Wrangling with the Timeline
The new Timeline in Project 2010 has become an very popular way to present Project information quickly and attractively. Problem is, you can get a little carried away putting all your tasks on the Timeline, and then have trouble selecting only a few tasks to copy into another program, like PowerPoint or Word.
Here is what you can do to copy selected tasks on the Timeline for copying and pasting.
1 Make sure the Timeline is displayed. On the View tab, click the Timeline checkbox.
2 Add the tasks you want to the Timeline. A quick way to do this is with the Existing Tasks command. But first, make sure you’ve clicked in the Timeline to make this command available.
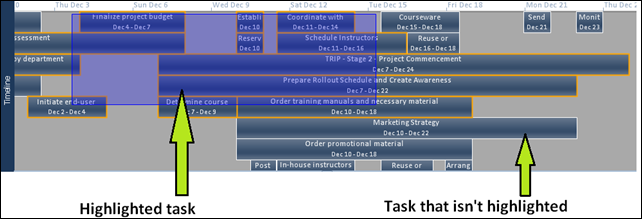
3 Now, here’s the fun part. Click and drag the mouse over the tasks you want to copy. If you do this correctly, a blue highlight band will cover the tasks, highlighting all the tasks that get in its way.
4 Once the tasks are highlighted, you can click individual ones to un-highlight them.
Tip You can also highlight the cells you want to copy by clicking a single tasks, and then holding down the Ctrl key on the keyboard while clicking the other tasks. Try it.
5 Now the only thing left to do is click Copy on the Task tab (or hit Ctrl + C on the keyboard) and paste into your favorite presentation program.


