Project 2010: Copy and Paste
In this post I’ll cover improvements to an everyday command in Project: copying and pasting data.
Though paste likes to keep a low profile, in fact it’s the fourth most commonly used feature in Project. And while Project and Project Server offer many advanced reporting features, a very common form of “reporting” is pasting data into an email, Word document, Excel spreadsheet, or PowerPoint presentation. And countless surveys and guidelines show that communication is a critical component of good project management.
In Project 2010, we’ve gone “back to basics” in an effort to bring you the output you want with minimum effort on your part. We’ve improved the copy/paste experience when going from Project into the Office apps, and also going from the Office apps into Project.
To illustrate some of the improvements, let’s imagine you get this email from your manager:
As in this example, our customers tell us that many of their projects start outside of Microsoft Project.
To start fleshing this out in Project, you could do the following:
- Highlight the bulleted text in the email
- Copy (press CTRL+C or chose Copy from the right-click context menu)
- Switch to Project 2010
- Paste (press CTRL+V or chose Paste from the Task tab in the ribbon or from the right-click context menu)
In Project, you’ll then get:
So without any further manual steps, you now have:
- The list of tasks as in the email
- Task hierarchy preserved based on the bulleted list
- Font and formatting (like bold and the red color) preserved. When you paste in Project, you’ll also see a smart tag which lets you match destination formatting, in case you prefer not to carry over this formatting.
And now you’re ready to start fleshing out your project, perhaps breaking down the work and collecting estimates. After some more work, your project might look like this:
Say you want to reply to your manager, or send a summary to team members. To do this, you can simply highlight the relevant columns. In this case I’ll drag to select a range of cells, leaving off the “TBD” tasks and also the “Resource Names” column since that is already shown in the group headings:
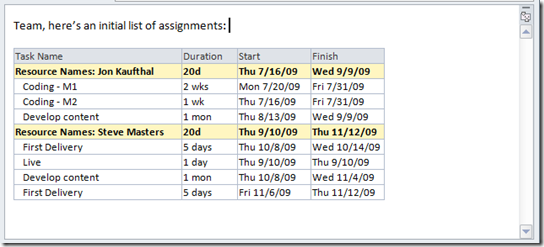
From Project, you can now choose Copy (via the Ribbon, context menu, or CTRL+C), and then switch to another application and then paste. If you paste into a new email, you’ll get the table shown here:
So with just a few clicks, you have an email with your table including the grouping, indenting, and formatting you specified. The column headings are automatically carried over. And since this is a standard table, you can use all of the power of Office’s table tools to further modify formatting.
Note that the above focused on working with tabular data, but keep in mind:
- Project’s Timeline view also has its own special paste experience
- You can copy a picture by using the Copy Picture command in the ribbon:
We hope these changes save you time and make it easier to share information with your team—in the tools they prefer.


