
Getting Started with Azure Data Lake
Application Development Manager, Jason Venema, takes a plunge into Azure Data Lake, Microsoft’s hyperscale repository for big data analytic workloads in the cloud. Data Lake makes it easy to store data of any size, shape, and speed, and do all types of processing and analytics across platforms and languages.
I’m not a data guy. Truth be told, I’d take writing C# or Javascript over SQL any day of the week. When the Azure Data Lake service was announced at Build 2015, it didn’t have much of an impact on me. Recently, though, I had the opportunity to spend some hands-on time with Azure Data Lake and discovered that you don’t have to be a data expert to get started analyzing large datasets.
What’s a Data Lake?
For most non-data experts (like me) it’s probably not obvious what a data lake is. At a high level, it’s reasonable to think of a data lake as akin to a data warehouse, but without any formal definition of requirements or schema. Data of any kind can be stored in the data lake regardless of structure, volume or velocity of ingestion. For a more in-depth definition, you can check out Top Five Differences between Data Lakes and Data Warehouses, which is a great article written by a colleague of mine.
In Azure, the Data Lake service is actually composed of two pieces: Azure Data Lake Store (ADLS) and Azure Data Lake Analytics (ADLA). No, the Data Lake Store is not a store where you can buy data lakes. The word store in this case is used in the sense of storage. In essence, ADLS is a storage service that is optimized for big data analytics workloads. You can store massive amounts of data in the lake as-is without having to worry about transforming it all to a pre-defined schema.
After the data is in ADLS, you use ADLA to run analytics queries against it. One of the most compelling features of ADLA is that you don’t need to spin up (and pay for) a cluster of servers in order to run queries against your data. Instead, there is a bank of servers already provisioned that you can simply take advantage of to execute your query. You only pay for the time it takes for your query to complete.
I decided to try out the service by uploading a single large data file into ADLS and running a few simple queries against it.
Getting Started: Creating the Data Lake
Creating a data lake is straightforward through the Azure portal. I first created the data lake store by opening the Marketplace and searching for it.

The only information you need to provide is the name of the store, the resource group, location (ADLS is currently supported in the Central US and East US 2 regions) and the encryption settings. I chose not to encrypt my data, but in a production setting you would want to encrypt.

Next, I created the Data Lake Analytics service. The process is similar, with the exception that you are also required to select an ADLS store to associate it to. I chose the store that I had just created.

Now that I had my data lake, it was time to load some data into it.
Putting Data into the Lake
There are a few different options for getting data into ADLS. If the data is already in an HDFS (Hadoop Distributed File System) store, you can use tools like Sqoop or DistCp. If you want to move data on a schedule, another option is Azure Data Factory. For data that’s in Azure blob storage, you can use a CLI tool called AdlCopy.
In my case, I had downloaded a single 1.4GB CSV file containing Chicago crime data from 2001 to the present from data.gov for my data set. Now, I realize this is not “big data” by anyone’s standards, and ADLS is capable of handling petabyte-sized files (in fact, there’s no upper limit on the amount of data you can store there), but for my purposes it would suffice. Since the file was on my laptop, it was simplest just to upload it to the store using the Azure portal.
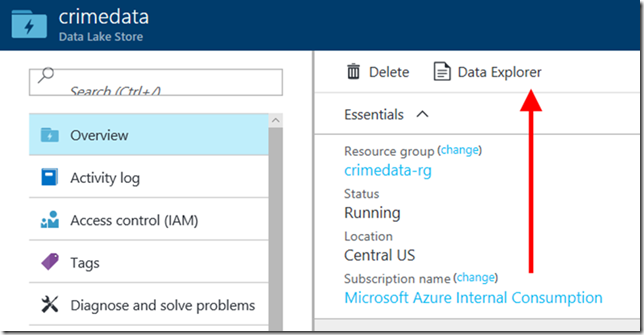
From the ADLS management blade, click on the Data Explorer button.
The Data Explorer blade lets you quickly see what’s in the store. You can create folders and modify access lists just like in a regular file system. There is also a convenient Upload button that you can use to upload new data. I used it to upload my CSV file to the store.
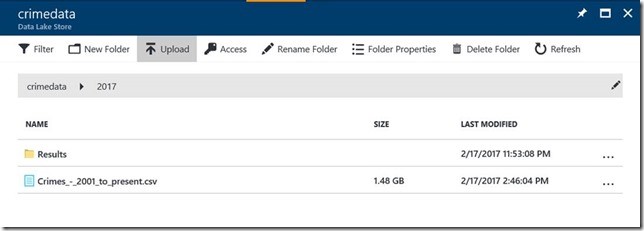
Once complete, I could see my file in the Azure portal in a folder that I created and named “2017”.

Querying the Data using U-SQL
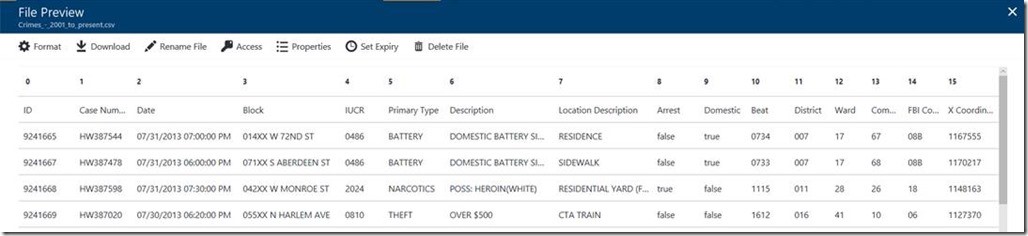
The crime data file that I used contained 22 columns of data. I could easily figure out the schema of the data by using the File Preview feature of the ADLS service. Simply clicking on a file in the store opens the preview window.
I decided that I wanted to write queries to answer 4 questions about this data:
- How many rows are there in the dataset?
- What are the most/least frequent locations that crimes occur?
- What are the most/least frequent types of crime that occur?
- How has the crime rate changed from 2001 to the present?
The Azure Data Lake team has created a language called U-SQL that makes it easy to write queries against your data. The U-SQL language is similar to the familiar SQL syntax, but allows you to intermix C# statements to make extracting, transforming and writing the data more flexible.
Everything I needed to do in my queries was possible using the built-in extractors but if my data had been in a more exotic format, I could have written my own extractor in C#. Incidentally, a quick tip is that U-SQL keywords need to be all caps, whereas C# uses normal casing rules.
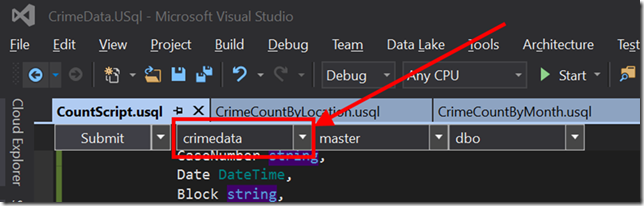
Before I could create any U-SQL scripts, I first needed to install the Data Lake Tools for Visual Studio. Once installed, I opened Visual Studio and from the File -> New Project menu, I chose U-SQL Project.

The result was a solution containing a single project and an empty U-SQL file. I used the documentation site to get an idea for what the structure of a basic U-SQL script looks like. I pasted the code into Visual Studio and made a few modifications.
First, I updated the list of columns to extract using the schema I discovered from previewing my file earlier. Then I updated the source location in the EXTRACT statement to point to my crime data file in ADLS, and the destination location in the OUTPUT statement to point to a folder in the same ADLS store where I wanted the query results file to be written. Finally, I updated the SELECT statement to simply count the number of rows in the file. This would provide then answer to the first question that I posed above.
@crimes =
EXTRACT Id int,
CaseNumber string,
Date DateTime,
Block string,
Iucr string,
PrimaryType string,
Description string,
LocationDescription string,
Arrest bool,
Domestic bool,
Beat int?,
District int?,
Ward int?,
CommunityArea int?,
FBICode string,
XCoordinate int?,
YCoordinate int?,
Year int?,
UpdatedOn DateTime,
Latitude float?,
Longitude float?,
Location string
FROM “adl://crimedata.azuredatalakestore.net/2017/Crimes_-_2001_to_present.csv”
USING Extractors.Csv(skipFirstNRows:1);
@res =
SELECT COUNT(*) AS Count
FROM @crimes;
OUTPUT @res
TO “adl://crimedata.azuredatalakestore.net/2017/Results/Count.csv”
USING Outputters.Csv();
I used the built-in CSV extractor, and passed the skipFirstNRows parameter to skip the header row that was present in my dataset. I then built the solution to make sure my syntax was correct. This opened a new tab in Visual Studio that displayed the amount of time it took to compile the query.

Running the Query
With my query written and compiled, I was now ready to execute it against my data. For testing against a scaled-down version of your data, it’s possible to run a U-SQL query locally and avoid the cost associated with running it in Azure. It’s simple to go back and forth using the dropdown at the top of the query authoring window. I chose to go straight to running it in the cloud.
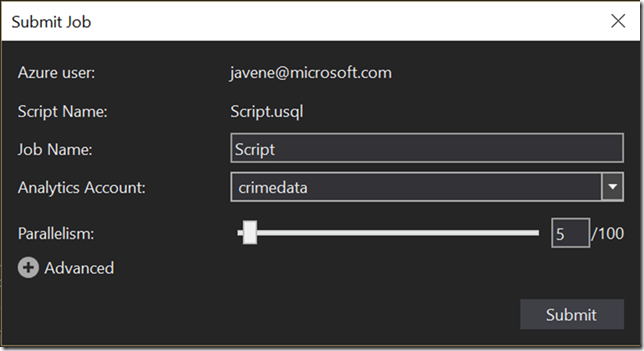
To run the query, I simply clicked the Submit button next to the dropdown. You can also click the down arrow next to the button to open the Advanced options screen, which allows you to select the amount of parallelism (i.e. the number of servers) you want to use when executing your query. There is a cost vs. speed trade-off here, and the value you choose depends on a number of factors including how parallelizable your data set is. I went with the default of 5, although this turned out to be overkill for my dataset.
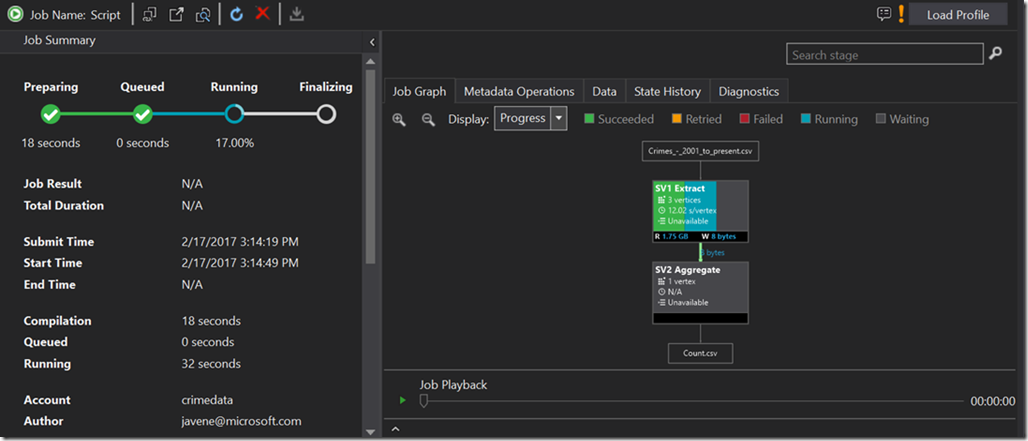
After you submit the job, ADLA takes care of running it on a pool of servers that are available to you through the service. This is a nice feature, because there’s no need for you to spin up and run a set of servers yourself. Once you submit the job, it’s placed in a queue until the necessary compute resources become available (usually only a few seconds).

The first time I did this, I got an error message because my data had some empty columns that I hadn’t declared as nullable types in the EXTRACT statement. The error message made it very clear what I had done wrong.

See that Download button in the top-right corner? This is a great feature that allows you to download the entire runtime of your query on the failed vertex (a.k.a. server) for debugging locally. In my case, the error message was enough for me to figure out what the problem was without doing that, but for debugging complex problems it can be a real life-saver.
After I made all of my numeric types nullable in my U-SQL query, I submitted the job again and this time it completed successfully.

Analyzing the Results
The simplest way to analyze the results of my query was to use the ADLS File Preview feature in the Azure portal. Remember, the results of my query are simply being written as a new file in the store. From the portal, I could see that my output file existed (success!) and that the total number of rows in the file was 6,270,269.

Emboldened by this small success, I went on to create similar U-SQL queries to answer the other 3 questions. For the most part, this was a simple matter of updating the SELECT and OUTPUT statements. For example, here’s the relevant portion of the query that retrieves crime incident counts by type:
@res =
SELECT PrimaryType, COUNT(*) AS PrimaryTypeCount
FROM @crimes
GROUP BY PrimaryType;
OUTPUT @res
TO “adl://crimedata.azuredatalakestore.net/2017/TopCrimeTypes.csv”
ORDER BY PrimaryTypeCount DESC
USING Outputters.Csv();
The U-SQL job execution visualization lets you see basic statistics about your query’s performance. In my case, I could see that the vast majority of time was spent in the extract phase which was spread across 2 vertices and took less than a minute to complete. This visualization also made it clear that 5 vertices was overkill for my data.

Visualizing with Power BI
For small result sets, it’s easy enough to look at the results of your queries by opening the CSV output files in ADLS. I decided to take it a step further by importing those files into Power BI and creating a report. I won’t go into detail on how to do that in this post, but the process is well documented. The result was the dashboard below.

Sweet success. Maybe I’m more of a data guy than I thought?
Conclusion
The Azure Data Lake service made it easy for me (a self-professed non-data-guy) to quickly perform analysis on large amounts of data without having to worry about managing (and paying for) my own cluster of machines. I stored a large data file as-is in Data Lake Store, and created a few simple U-SQL queries to extract and process that data across a pool of available compute resources. I then viewed the results of my queries by examining the output files and by quickly connecting the Data Lake Store to Power BI so I could create a great looking report.
Premier Support for Developers provides strategic technology guidance, critical support coverage, and a range of essential services to help teams optimize development lifecycles and improve software quality. Contact your Application Development Manager (ADM) or email us to learn more about what we can do for you.
 Light
Light Dark
Dark
0 comments