
Amazon Alexa Skills Development with Azure Active Directory and ASP.NET Core 1.0 Web API
In this post, Premier ADM, Rob Reilly, walks us through building Alexa Skills using Azure AD and ASP.NET Core Web API.
Background
 Amazon Alexa is a technology developed by Amazon that takes voice commands, interprets them, and then takes action by sending requests on to API’s to perform a multitude of tasks only limited by your imagination. Amazon offer various devices that can be used to take the requests from the user and act on the request. Examples of this are the TAP and the Echo and are essentially smart speakers. The bundling of this functionality into offering is known as creating an Alexa Skill and some examples of things you can do with this technology are stream music, call for an Uber, get news and weather and control home automation devices. Custom Alexa Skills can be developed by third parties. The Components of an Alexa Skill from the Amazon Alexa documentation are:
- A set of intents that represent actions that users can do with your skill. These intents represent the core functionality for your skill.
- A set of sample utterances that specify the words and phrases users can say to invoke those intents. You map these utterances to your intents. This mapping forms the interaction model for the skill.
- An invocation name that identifies the skill. The user includes this name when initiating a conversation with your skill.
- A cloud-based service that accepts these intents as structured requests and then acts upon them. This service must be accessible over the Internet. You provide an endpoint for your service when configuring the skill.
- A configuration that brings all of the above together so that Alexa can route requests to the service for your skill. You create this configuration in the Alexa developer portal.
There are multiple options by which Custom Alexa Skills can be created and in this post I will focus on using the Alexa portal for the Skills configuration and using ASP.NET Core 1.0 Web Api for the Cloud-based Service portion. There are also occasions when you will want to authenticate the Alexa device calling your Alexa Cloud Service. Alexa Skills can use what is known as account linking to allow your Alexa Device to connect to the API using a credential managed in an external identity provider such as an on-prem ADFS or Azure Active Directory. Basically the Account linking binds your Amazon account used for Alexa to these external Identity providers through a process where you authenticate to these Identity providers and grant the Alexa application permission to use your account in those systems for authentication and authorization to the Skills API’s you develop. This is done through a OAUTH 2 process. In this posting I am focusing on the use of Azure Active Directory as the Identity provider and use the OAUTH 2 Grant Type known as Authorization Code Grant. Authorization Code grant as its base is an authentication\authorization process where the user authenticates to the Identity provider and granted an Authorization Code. This code is then presented back to the same Identity Provider server or perhaps another where the Authorization Code is checked and a then an Access Token, used to access other systems and a refresh token used to refresh the Access token when it expires is presented back to the calling application. The Alexa Application the end user ties to their Alexa Devices does this access code grant and stores the access and refresh tokens for use from an Alexa Skill when the Alexa is asked to use a particular skill. This post is neither an in-depth discussion on OAUTH 2, Alexa Skills Development or ASP.NET Core. The main purpose of this post is to show how I was able to get Alexa, Azure Active Directory and an ASP.NET Core Web API to work together using the built-in Authentication and Authorization middleware and standard techniques for locking down web api. For more detailied information on these topics you should refer to their Associated documentation.
The Problems
Despite all of this following along with the OAUTH 2 standard there always seems to be instances where one vendors interpret standards differently. Interpretations can be perfectly within the standard but not actually work together. In addition to some implementation mismatches there were other issues getting Azure Active Directory to accept the Authorization Code Grant request from the Alexa account linking infrastructure. Once these issues were addressed and the account linking had been completed successfully making calls from Alexa to the .NET Core Web API backend that was secured did not work. Upon further reading of the Alexa Documents the JWT access token from an Alexa is not placed in the HTTP Authorization header as ASP.NET Core expects it is actually part of the Request Envelop made from Alexa. This means you can either use frameworks like the AlexaSkillsKit.NET or you can create some custom middleware for ASP.NET Core that pulls the access token out of the HTTP Request Body and adds the Authorization Header with the Bearer token you obtained from the body. I chose the latter approach. My reason for going this route is that it allows me to benefit from the building Authorization support in ASP.NET Core, specifically the use of the [Authorize] attribute and also leverage the fact that the access token validation functionality is coming from a built in ASP.NET core library so odd are it will be more up to date and likely more robust then the AlexaSkillsKit.net. However, figuring out how to pull this access token from the request body and add it as Authorization header got a little tricky as well. I found out after some hair pulling that unless you take certain steps when you interrogate the Request body it won’t be passed on along in the pipeline. So initially I got the Authorization to work but lost my payload to the method being called in the web api controller. I’ll being showing how this was addressed in the step by step tutorial that follows.
What’s needed before we begin
In order to complete this tutorial, you are going to need the following:
- Access to an Azure Subscription
- Azure Active Directory Domain
- Application set-up for Alexa front end
- Application set-up for Web Api
- Azure App Service to host the Alexa Skill Web ApI
- Azure Active Directory Domain
- Amazon Account
- Alexa Development Portal
- Alexa Application to manage your skills.
- Visual Studio 2015 Community Edition with updates for ASP.NET Core development
- Alexa Device for Testing
- You can test in the Alexa Developers portal but it might help to test a real world device.
- An alternative way to test is to use the online Alexa Simulator https://echosim.io/welcome?next=%2F
Step by Step Tutorial
Step 1 – Creating an Azure AD Directory (only if you don’t currently have one)
1. Login to Azure classic portal and you Azure Subscription (https://manage.windowsazure.com) a. Despite adding considerable support to the new Azure portal for the management of Azure AD it appears directory creation is still only available in the classic portal 2. At the bottom of the portal select NEW>APP SERVICES>ACTIVE DIRECTORY>DIRECTORY>CUSTOM CREAT

3. At the dialog Add Directory select Create new directory and provide the requested information and click the Circle with check in it.

4. Go to the ACTIVE DIRECTORY ITEM in the management portal.
5. Make sure the newly created directory displays in the list of directories.


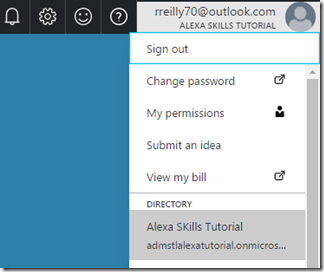
6. At this point you could add users and permission but for testing this tutorial out you can use your admin account (one you logged in the Azure subscription with) to complete all additional Azure Active Directory configuration and Alexa account linking. 7. Login to the new Azure portal(https://portal.azure.com) Since the new Azure Portal is where we should be learning how to do stuff I will do all the next steps from the new portal 8. Select the new domain from the Azure Portal This is selected under your account in the upper right hand corner
9. Select the Azure Active Directory Item in the portal to get to the management blade for this directory
10. At this point we can leave the portal open to this spot and move onto creating the web api and using this directory. We come back to here shortly.

Step 2 – Creating a ASP.NET Core 1.0 Web API with authentication
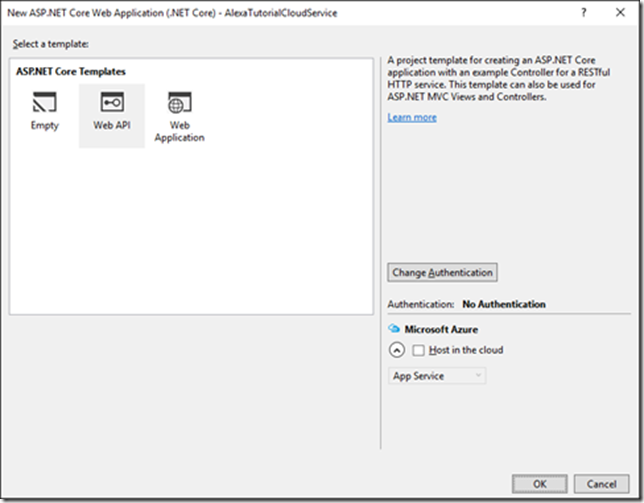
1. Open Visual Studio 2015 a. Make sure you have installed all the updates for .NET Core 1.0 and ASP.NET Core 1.0 (See Links sections for getting the tools and api’s) b. Installing the Azure SDKs and tools makes things easier to manage Azure components through Visual Studio Server Explorer 2. File>New>Project 3. Select ASP.NET Core Web Application (.Net Core)

4. Once you fill in the New Project information click OK button. 5. At the New ASP.NET Core Web Application dialog select Web API template
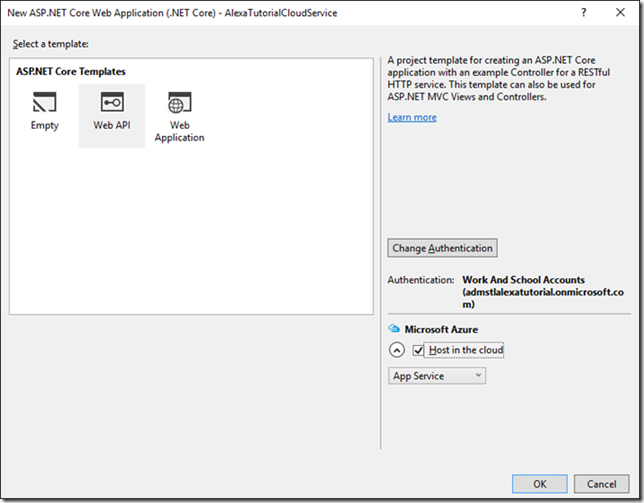
6. Click the Change Authentication Button 7. At the Change Authentication dialog select Work and School Accounts a. Select the directory domain you used when we created the AD Directory b. Check the Read directory data i. This allows the application to read from the Azure AD Graph API. We won’t need for the simple is authenticated and authorized scenario of this tutorial but it could be used later c. Expand the more options and update your App ID URI to https://tutorial.{domain} i. This value can be any valid uri and is needed later as part of the Alexa configuration. (Copy this value off for later referral)
8. Click ok 9. You may be prompted to authenticate to your azure portal as the admin account. 10. We’ll be hosting this Alexa Cloud Service in Azure so select the Host in the cloud check box.
11. Click Ok 12. Add the Create App Service dialog you can use the defaults or customize to your liking
13. Click Create

At this point Visual Studio has created a web api application from the template and configured it to use our custom directory form managing user authentication credentials. It has also provisioned the application registration in the Azure Active Directory Directory. Let’s look at the application setup the Visual Studio deployed out into our Azure AD Directory.
To see the application registration is located in the following way:
- Open Azure Portal
- Select the Directory you are using
- Click on the Azure AD item button on the lower left of the Azure Portal

- Click on App registrations
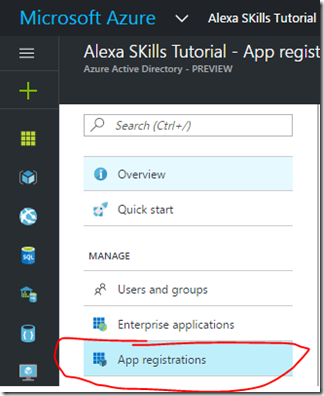
- You will see our just created Web API application
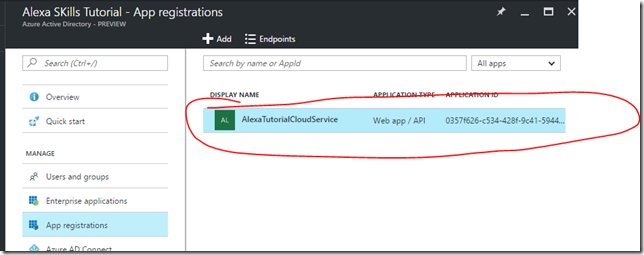
- Click on the application registration to get to its configuration settings


We don’t need to do any additional set-up at this point this is just for reference. You would come to this location if you needed to look up the information like the Application ID or the App ID URI. The App ID Uri can be located by looking at the manifest at the identifiedUris.

Now let’s go back to our web api and see how this information is configured in the application. The Azure AD information is configured into the application during the startup. The properties for the set-up are kept in one file (appsettings.json) and bootstrapped into the application in another file (Startup.cs). Let’s look at the appsettings.json.
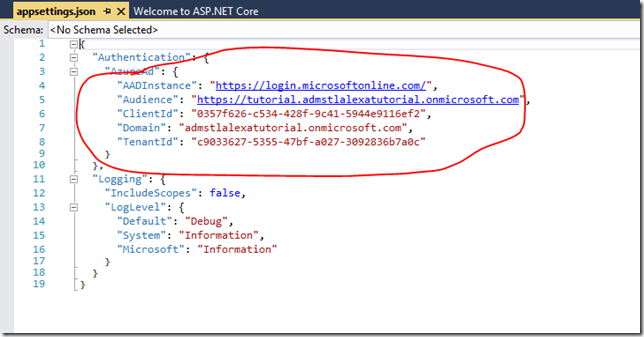
These values should look familiar they are what is configured in your application registration in Azure AD. The nice thing for us is that when we create the web Api project all this was created for us. Now lets see how these properties are bootstrapped in to the web api by looking at the Startup.cs.

In the Configure method of the Startup class the application is told to utilize the JwtBearerAuthentication Middleware. The call to the middleware is passed the JwtBearerOptions which pulls in the configured values from the Appsettings.json. The big thing to note about this is that the app. JwtBearerAuthentication() middleware is places before the app.UseMvc(). This is important because the precedence in the processing pipeline occurs in the order in which the middleware is configured here. Since we need to authenticate before we can pass on the credentials to the Mvc middleware the authentication MUST be defined above the Mvc Middleware. This will become important because we will be creating a custom middleware that that takes the Alexa access token from the HTTP Post body and maps it into the authorization header. This custom middleware must be placed above the JwtBearerAuthentication middleware so that the header is available for processing by the JwtBearerAuthentication.
Step 3 – Adding Alexa Skills functionality to the Web Api
Now we need to add the ability for our web api to be able to process Alexa Requests and Respond with actions for Alexa to take. In order to do this I have created a Alexa Object model that is a blend of some of my interpretation of the Alexa API interfaces and some code and approach found in the AlexaSkills.NET Project previously mentioned. This code along with the full sample tutorial will be available on GitHub for you to reference. Since the goal hear was mostly to work through the details of Alexa, Azure AAD and web api integration the Alexa Object model I provide is not 100% complete and needs further work to make it rock solid. The main goal is to make a simple “Hello World” type Alexa skill so we can test the component integrations without getting ties up in a complex Alexa Skills project. Lets add a controller to process our simple Alexa Skill Request.
- Add a new Web Api controller and call it HelloController

- Let’s keep things simple and strip out everything but the one Post method so our controller should look like:

- Now let’s reference the Alexa Object model classes provided and use them in the controller.


- Now we can update our Post method to process a very simple Alexa Skill that basically Says hello {FirstName} where {{FirstName} is one of the parameters that is passed to us from Alexa when the user asks our custom skill to act. More on this later when we get into the Alexa Skill Configuration portion. Note we are also securing this method with the [Authorize] attribute. This basically for our purposes means you either are authenticated or not by an Identity Provider we trust. You can of course check for additional claims to further see if the user can call this method or not but once again keeping it simple for our main goal.


Now we have and endpoint that can process Alexa Skills but there is one issue. The JwtBearerAuthentication() middleware looks for the access token in the HTTP Authorization header. Alexa does not send the Authorization header but sends the token as part of the HTTP Post Body. So if we want to use the [Authorize] attribute to lock down our api we need to do some processing of the request prior to it getting sent to the JwtBearerAuthentication() middleware. To accomplish this we will create our own middleware.
- Under the Web Api project add a new item.
- Select Middleware Class and name it AlexaJWTMiddleware
- The code needs to be update to the following
using System;
using System.Collections.Generic;
using System.Linq;
using System.Threading.Tasks;
using Microsoft.AspNetCore.Builder;
using Microsoft.AspNetCore.Http;
using System.IO;
using System.Text;
using Alexa.Skills.Api;
using Newtonsoft.Json.Linq;
namespace AlexaSkillSample
{
    // You may need to install the Microsoft.AspNetCore.Http.Abstractions package into your project
    public class AlexaJWTMiddleware
    {
        private readonly RequestDelegate _next;
        public AlexaJWTMiddleware(RequestDelegate next)
        {
            _next = next;
        }
        public async Task Invoke(HttpContext context)
        {
            if (!context.Request.Headers.Keys.Contains("Authorization"))
            {
                // Keep the original stream in a separate
                // variable to restore it later if necessary.
                var stream = context.Request.Body;
                // Optimization: don't buffer the request if
                // there was no stream or if it is rewindable.
                if (stream == Stream.Null || stream.CanSeek)
                {
                    await _next(context);
                    return;
                }
                try
                {
                    using (var buffer = new MemoryStream())
                    {
                        // Copy the request stream to the memory stream.
                        await stream.CopyToAsync(buffer);
                        byte[] bodyBuffer = new byte[buffer.Length];
                        buffer.Position = 0L;
                        buffer.Read(bodyBuffer, 0, bodyBuffer.Length);
                        string body = Encoding.UTF8.GetString(bodyBuffer);
                        RequestEnvelope AlexaRequest = RequestEnvelope.FromJObject(JObject.Parse(body));
                        if (AlexaRequest?.session?.user?.accessToken != null)
                        {
                            context.Request.HttpContext.Request.Headers["Authorization"] = "Bearer " + AlexaRequest.session.user.accessToken;
                        }
                        // Rewind the memory stream.
                        buffer.Position = 0L;
                        // Replace the request stream by the memory stream.
                        context.Request.Body = buffer;
                        // Invoke the rest of the pipeline.
                        await _next(context);
                    }
                }
                finally
                {
                    // Restore the original stream.
                    context.Request.Body = stream;
                }
            }
            await _next(context);
            return;
        }
    }
    // Extension method used to add the middleware to the HTTP request pipeline.
    public static class AlexaJWTMiddlewareExtensions
    {
        public static IApplicationBuilder UseAlexaJWTMiddleware(this IApplicationBuilder builder)
        {
            return builder.UseMiddleware<AlexaJWTMiddleware>();
        }
    }
}

You can review this code for yourself and if you want to better understand the ASP.NET Core middleware coding model please reference the documentation. The main thing to understand here is that we are plucking the access token out of the HTTP post body and adding it to the Authorization header as a bearer token. As you can see doing this is a little bit trickier than it sounds. The minute you read the Requests body payload off the buffer you have essentially cleared out the buffer and can’t rewind it. So this approach essentially makes a copy of the stream prior to processing the data off the buffer into a memorystream and getting at the content we need. A MemoryStream buffer can be rewound. Once we are done we rewind the memorystream buffer and place it back on the request body stream and send the context back on its way in the pipleing. Now we can use this middleware to do this processing for us by adding the following to the Startup classes configure method.
public void Configure(IApplicationBuilder app, IHostingEnvironment env, ILoggerFactory loggerFactory)
{
    loggerFactory.AddConsole(Configuration.GetSection("Logging"));
    loggerFactory.AddDebug();
    app.UseAlexaJWTMiddleware();
    app.UseJwtBearerAuthentication(new JwtBearerOptions
    {
        Authority = Configuration["Authentication:AzureAd:AADInstance"] + Configuration["Authentication:AzureAd:TenantId"],
        Audience = Configuration["Authentication:AzureAd:Audience"]
    });
    app.UseMvc();
}
Notice we placed this above the app.UseJwtBearerAuthentication(). This is very important as I mentioned before. Our middleware needs to process this accesstoken from the body into the header before the actual Authentication happens so the authentication middleware has an Authorization header to process. There might be a more elegant way to do this you could probably write a full on authentication middleware for Alexa but this allowed me to make a relatively simple middleware and still be able to leverage the rest of the built-in stuff. So at this point our Web Api is good to go so we can move on to working on getting an Application registry set-up in Azure Active Directory for he Alexa frontend piece.
Step 4 – Creating an Application Registry in Azure AD for the Alexa Front End
Now we have to configure an application registry for Alexa and grant it permissions to create access tokens that can access our web api.
- Go back into the Azure Portal where we left off and select App registrations

- Click the Add one the App Registrations Blade
- On the Create Blade

-
- Name: Alexa Tutorial Skill Frontend
- Application Type: Native
- Sign-on URL: https://pitangui.amazon.com/api/skill/link/{lookuplater}
This will create the application registration for our Alexa to account link to. Notice we selected Native for the Application Type. I’m not really sure why this is required but without setting this as a Native type Alexa Account Linking will not successfully occur. Also notice the {lookuplater} in the sign-on url. We’ll need to come back in later and update this after we create the Alexa Front end. The Alexa Configuration will provide the full URL for us after it creates the new skill. Also at that time we will get the key from this application registry but no need now till after we get into the Alexa Configuration. The only step left we need to do while still here is to grant permissions to the AlexaTutotorialCloudService to our Alexa Tutorial Skill Frontend application registration.
- Click on the Alexa Tutorial Skill Frontend registerd app and go into the Required permissions blade.

- Click the Add
- In the Add API Access blade
- Click on the Select an API
- In the Select and API you’ll need to do a search for AlexaTutorialCloudService

- Select the AlexaTutorialCloudService and click on the Select button.
- In the Enable Access blade check the Access AlexaTutorialCloudService

- Click on the select button.
- Click Done in the Add API access blade


That’s it for now. We’ll come back to this location later to update out sign-on URL and get our Client Secret(AKA Key) after we have created our new Alexa Skill in the Alexa Developer Portal.
Step 5 – Creating an Alexa Skill Frontend
Now we will be going to the Amazon Developer portal to create the Alexa Skill Configuration for the portion of this Alexa Skill that runs on the Amazon Cloud. I won’t go into the details of what each step means just plug in what I provide. You can read the documentation to better understand the full set-up.
- Login to https://developer.amazon.com with your developer account.
- Click on the Alexa Section
- Click on the Alexa Skills Kit>Get Started
- Click on the Add a New Skill button in the upper right hand corner
- In the Skills Information Section· Skill Type: Custom Interaction Model· Language: English· Name: Alexa ASP.NET Core Web API Tutorial· Invocation Name: Tutorial· Global Fields > Audio Player: No
- Click save then click Next
- In the interaction Model Section
- Intent Schema:

{
“intents”:
[
{
“intent”: “Tutorial”,
“slots”:
[
{
“name”: “FirstName”,
“type”: “AMAZON.DE_FIRST_NAME”
}
]
},
{
“intent”: “AMAZON.HelpIntent”
},
{
“intent”: “AMAZON.StopIntent”
}
]
}
-
- Sample Utterances: Tutorial Can you greet {FirstName}
8. Click Save then click next
9. In the Configuration Section

- Endpoint
- Service EndPoint Type: HTTPS
- Geographical region: North America
- North America: https://{App Service Hostname}/api/Hello
- This is the URL Endpoint of our Web API as deployed to the Azure App Service
- Account Linking: Yes
- Authorization URL: https://login.windows.net/{Azure AD Tenant}/oauth2/authorize?resource={App ID URI}
- You can get first part of this url by going to the Azure Portal and clicking on the Endpoints for the Azure AD Directory

- The resource parameter needs to be added because Azure AD seems to required it. This is the value mentioned when we created the web api. If you need to look it up it will be the Audience value in the appsettings.json
- You can get first part of this url by going to the Azure Portal and clicking on the Endpoints for the Azure AD Directory
- Client Id: {your native app registration Application id}
- From the Azure AD application registration from the Azure Portal
- From the Azure AD application registration from the Azure Portal
- Domain List: Leave default
- Scope: leave default
- Authorization Grant Type: Auth Code Grant
- Access Token URI: https://login.windows.net/{Azure AD Tenant}/oauth2/token
- Get this from the Azure AD App Registration endpoints
- Get this from the Azure AD App Registration endpoints
- Client Secret: This is the key associated with your Azure AD application registration for the Alexa front end
- We’ll generate this now.
- Select the Alexa Tutorial Skill Frontend
- Select the Keys setting

- Fill in the Description and select a key duration

- Click Save
- You won’t see the key until you click save.
- You get 1 Chance to save it off and that is now so copy the value and paste it into your Alexa Configuration client ID.
- We’ll generate this now.
- Client Authentication Scheme: HTTP Basic (Recommended).
- Private Policy File URL: {Path to you policy file}
- In order to account link Alexa requires you to provide a policy file.
- For a real app we would create a real policy file but for this tutorial Just add a Policy.html file under wwwroot to the web api and app.UseStaticFiles() right above app.useMvc() in the startup.cs. This will make it accessible via the cloud service as:
https://{App Service Hostname}/Policy.html


- Access Token URI: https://login.windows.net/{Azure AD Tenant}/oauth2/token
- Authorization URL: https://login.windows.net/{Azure AD Tenant}/oauth2/authorize?resource={App ID URI}


10. Click Save
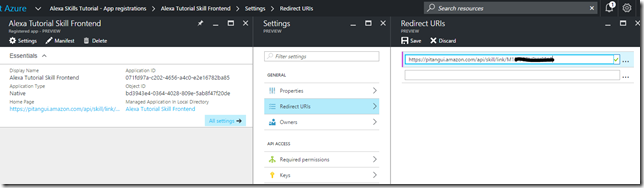
11. We now also need to update the redirect URI for our Alexa Tutorial Skill Front end Application registration in Azure Active Directory
- You can get the proper Redirect URI from the Alexa Configuration page
- Copy this URL and update the Azure AD application registration Redirect UIR for our Alexa frontend
12. Go back to the Alexa Configuration page and click next
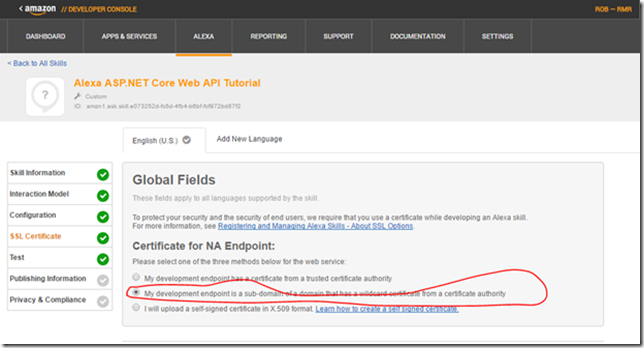
13. In the SSL Certificate Section select: My development endpoint is a sub-domain of a domain that has a wildcard certificate from a certificate authority.
14. Click Save and then click next
That’s the bare bones we need to configure the Alexa front end so we can account link and then test. If you actually build a real Alexa Skill that you will publish there are additional steps that need to occur.

Step 6 – Account Linking
Now we are ready to try to link our Alexa Skill Amazon account to our Azure AD Admin Account. Normally, you would use a user account in both systems but once again trying to keep it simple.
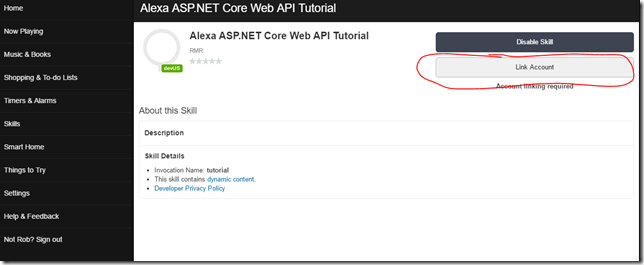
- Login to https://alexa.amazon.com
- Navigate to Skills>Your Skills
- You should see our newly created skill. Click on it.
- Click on the Link Account button
- You will be redirected to login to Azure Active Directory and then asked to accept the access being requested. Once you get through that the result if all goes well should be:
Now once we deploy our Web Api application we are ready to test.

Step 7 – Publish Web Api to Azure app service
At this point we need to publish our web api up to the clouds so we have something to test against.
- In visual Studio right click on the AlexaTutorialCloudService project
- In the context menu select Publish
- This should be all set-up and ready to go but if not fill in the proper values in the Publish dialog
- Press the publish button.
Once this completes you should be ready to test your Alexa Integration.
Step 8 – Testing the Alexa Integration
We have multiple options by which to test the Alexa Integration. We can use and actual device, the Amazon Developers Portal Test client or there is an Alexa Skill Testing Emulator. I go over the last two since they don’t require you to purchase anything.
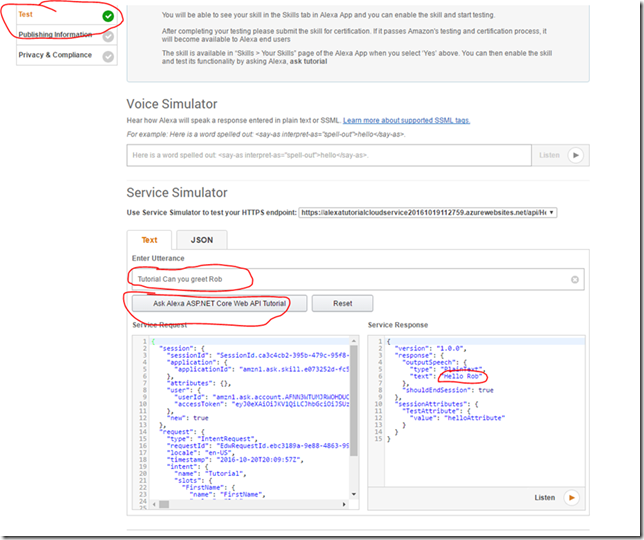
Amazon Developer Portal
- In the Amazon Developer portal where we configured the Alexa application
- Make sure you are under the Skill you are wanting to test
- Click on the test section
- In the Enter Utterance Section enter the following: Tutorial Can you greet {your name}
- {your name} = your name or any name
- This is derived in the iteration model section for the skill.
- Click the Ask Alexa ASP.NET Core Web API Tutorial button.
- If all goes well you should see something that looks like:
- If all goes well you should see something that looks like:
- If you click on the Listen Button you will hear the Alexa voice say “Hello {yourname}”
Alexa Skill Testing Tool (Emulator)
The Alexa emulator is a simulated version of using an Alexa device that is surfaced in a web page. You need to have a microphone and speaker to use this tool.
- Open browser and go to following URL: https://echosim.io/welcome?next=%2F
- Click on the Login with Amazon button.
- Use your Amazon Developer account
- Once logged in your ready to test

- Use the mouse to press the Microphone button and at the prompt say the following: Ask Tutorial can you greet {your name}
- If all goes well you should hear the lady say “Hello {your name}”

Wrap Up
Hopefully, you will have success working through this tutorial. My main hope is that this information will save you all the discovery and digging that I had to do to figure out how to make this all play nice and work together. This post just scratches the surface of building a full on Alexa Skill that you would want to publish to Amazon. Hopefully having this information will allow you to focus on those aspects if you are either going to, or are in the process, of creating an Alexa Skill and need to do account linking to secure the system.
Helpful Tools
The following are some very helpful tools you should look to get and use for troubleshooting web apis and OAUTH security in general.
- Postman plugin for Chrome – https://www.getpostman.com/
- F12 browser tool
- If you need to look at the HTTP Request Response stream pressing F12 from Explorer, Edge, Chrome will open integrated developer tools.
- JWT.IO – https://jwt.io/
- This is a browser based tool where you can take your JWT token from the request and decode it an verify the signature
Sample Code
The companion source code for the web api portion of this tutorial can be located on GitHub at the following location.
https://github.com/rreilly70/AlexaTutorialCloudService
Links
- Visual Studio and .NET Core API’s
- Azure SDKs and Tools
Premier Support for Developers provides strategic technology guidance, critical support coverage, and a range of essential services to help teams optimize development lifecycles and improve software quality. Contact your Application Development Manager (ADM) or email us to learn more about what we can do for you.
 Light
Light Dark
Dark
0 comments