
Creating a Secure Environment using PowerShell Desired State Configuration
Introduction:
Traditionally, IT environments have secured their business critical information against external threats by adding additional layers of security to the org’s network (e.g. firewalls, DMZs, etc.). However many of today’s attacks are coming from inside the network so a new “assume breach” approach must be adopted.
In this blog, we show how to create a secure environment to run a particular application or service inside of an assume-breached network. This substantially reduces the attack surface of the application or service by configuring a highly customized, application specific environment, by limiting user access and by having “Just Enough” administrative control with full auditing.
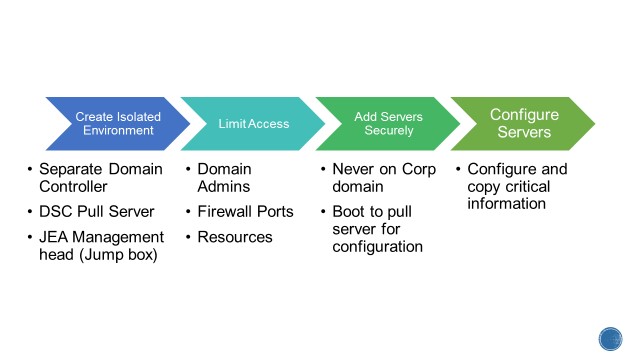
Below is a sample environment called Safeharbor. Safeharbor is an isolated environment for critical information that limits access to the resources. This is accomplished by:
• Policies to clearly define User access and actions on the resources • Separate isolated domain constraining access to the resources • Limited & relevant access to users • Auditing access to protected data, changes to user permissions and setting up alerts on access.
We will walk you through an implementation of the Safeharbor environment using PowerShell Desired State Configuration (DSC) and PowerShell Constrained Endpoints.
The key elements of creating a secure environment are:
- PowerShell Remoting
- Constrained PowerShell Endpoints
- Desired State Configuration (DSC)
- DSC Pull Server
- Securing credentials in DSC
- DSC Resource Kit
- Just Enough Administration (JEA)
- Networking, DHCP, DNS, Windows Active Directory, SMB Share concepts
Lab Configuration:
This blog is focused on creating a lab environment to explore the creation and operation of Secure Environments using PowerShell DSC. We first use DSC to create a “Corporate” domain for the lab. In the real world, you’ll skip this step and use your existing domain. We then assume that this environment has been breached. Of course you would route out and address the breach and secure the environment to avoid further breaches. But in an “assume-breach” approach, you recognize that you need to invest and put your most valuable assets, in this case, the corporate data stored on file servers, into a Secure Environment.
The first step for this lab is to setup a “Corporate” domain with a Domain Controller, Domain Administrator, Domain Users and a user to perform admin tasks in the domain (Person Authorized to perform Administrative tasks – PAPA).
Corporate Environment:

Below is the configuration to provision the lab’s Corporate domain controller using DSC.
Highlights of the configuration: • Setup and Promote the machine to be a DC using the xADDomain resource • Credentials are securely handled using certificates and Secure string in DSC • DNS zone transfer is configured to allow replication of DNS databases across other DNS Servers (This will be explained later when the secure domain is stood-up) • Domain users are added using the xADUser resource • Config uses a component to synchronize the execution of operations between the DSC managed nodes. The Synchronization component is primarily used for the configuration agent on the local machine to capture the state of the remote DSC supported machine and to sequence the execution of its configuration resources locally
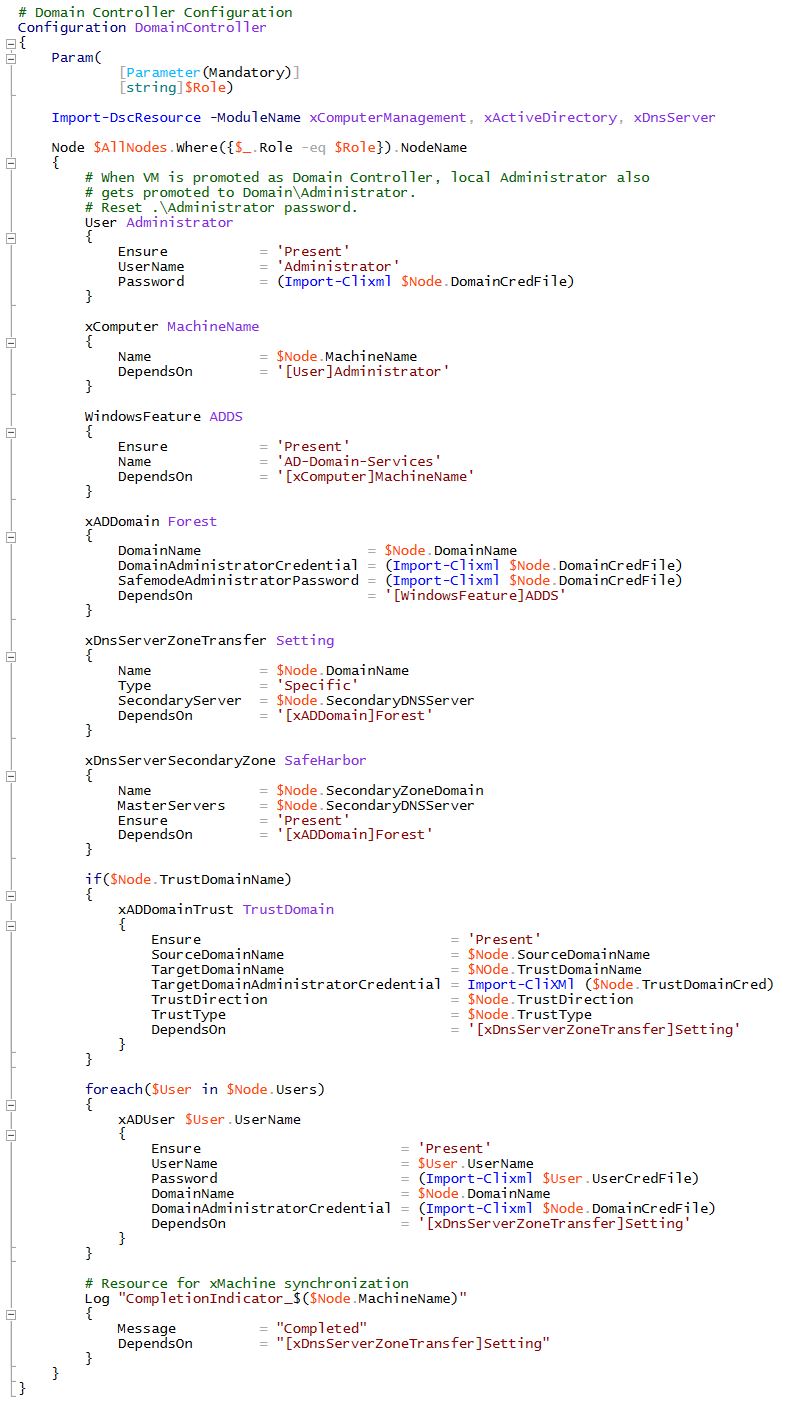
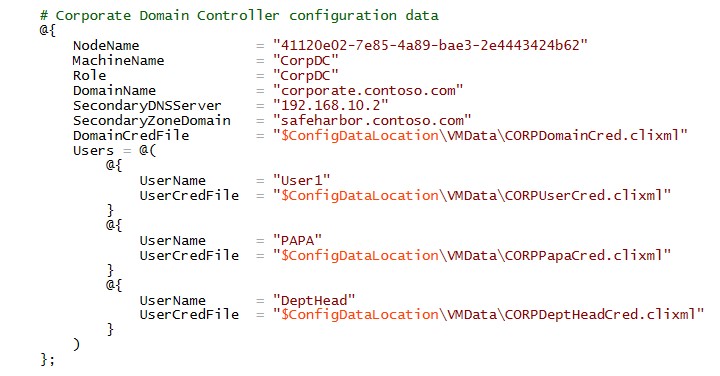
The configuration data for Corporate DC contains User configuration such as credentials, in a secure file.
A Client machine “CorpClient” is provisioned in the Corporate domain and the user to perform administrative tasks is added to the Administrator group.

This lab takes an “assume-breach” attitude so we are going to assume that the Corporate domain we just created is compromised and that IT Dept needs to create a secure environment for the critical data on the File Servers. A new Safeharbor domain is quickly stood-up, with a domain controller, Management head server constraining access to critical resources and a DSC Pull Server containing the configuration for the workload specific nodes such as File Servers. File Servers are then provisioned using boot-to-pull server mechanism.
By locking down the access to the resources using the isolated Safeharbor domain, we can mitigate threats originating internally from the domain.

Safeharbor Environment:
The plan to secure and lockdown access to the workload servers is following. We will explain each step of the process and go over the associated Configuration.
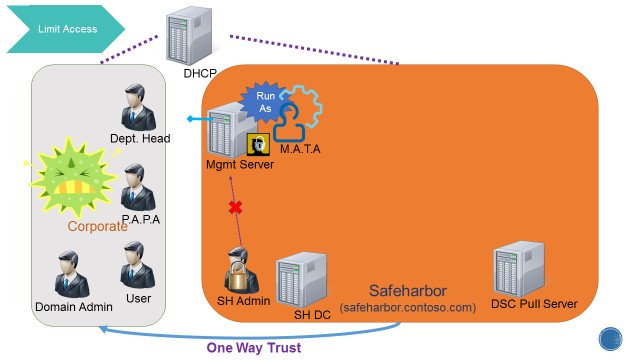
There are three users across domains that are of interest. 1) Corporate\PAPA – User in the corporate domain authorized to perform admin tasks. This is the only user from the Corporate domain allowed access to the JEA box. 2) Corporate\User – A general domain user of Corporate for whom we grant specific fileshare access (explained later) 3) Safeharbor\MATA – Non-admin domain user in Safeharbor – management account for trusted action” – RunAs on endpoint. This user has no other access in either domain.
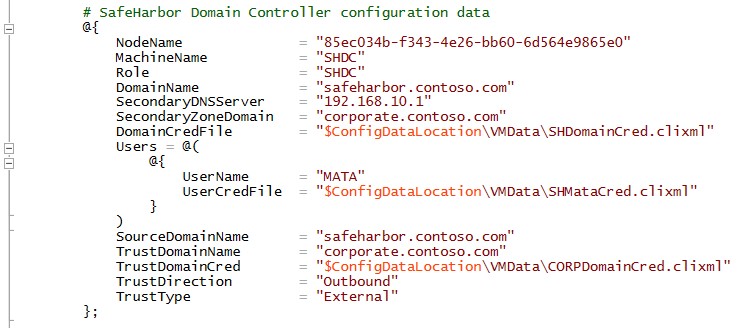
Safeharbor Domain Controller and Pull Server:
The first step is to bring up the Safeharbor domain controller.
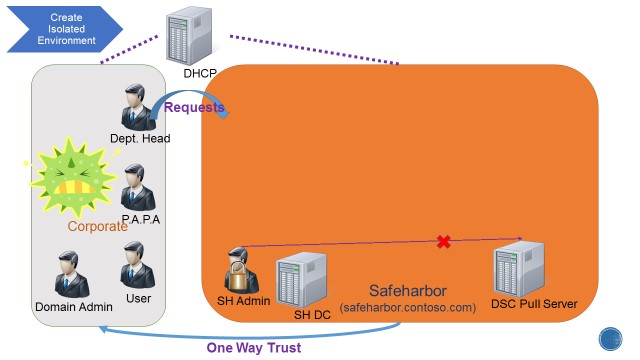
The same configuration which was used to setup the Corporate DC (see previous section) is used here. However the manifest data is different. Apart from using secure way of managing credentials, the key take away here is that we create a new domain user MATA (Management Account for Trusted Action). This is a non-admin user which is restricted to be used only on the workload File Servers to perform specific actions. There is also a one-way trust established to the Corporate domain to enable authenticating users from the Corporate domain.
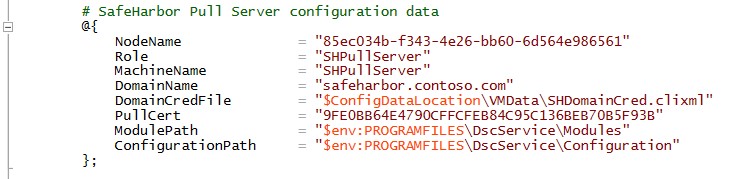
Next, a DSC Pull Server is provisioned with all local admin accounts disabled and the Pull Server is joined to the Safeharbor domain using the xComputer resource. This is a HTTPS based Pull Server containing configuration for the workload File Servers. The workload servers, upon boot, will pull their state from this server for configuration.
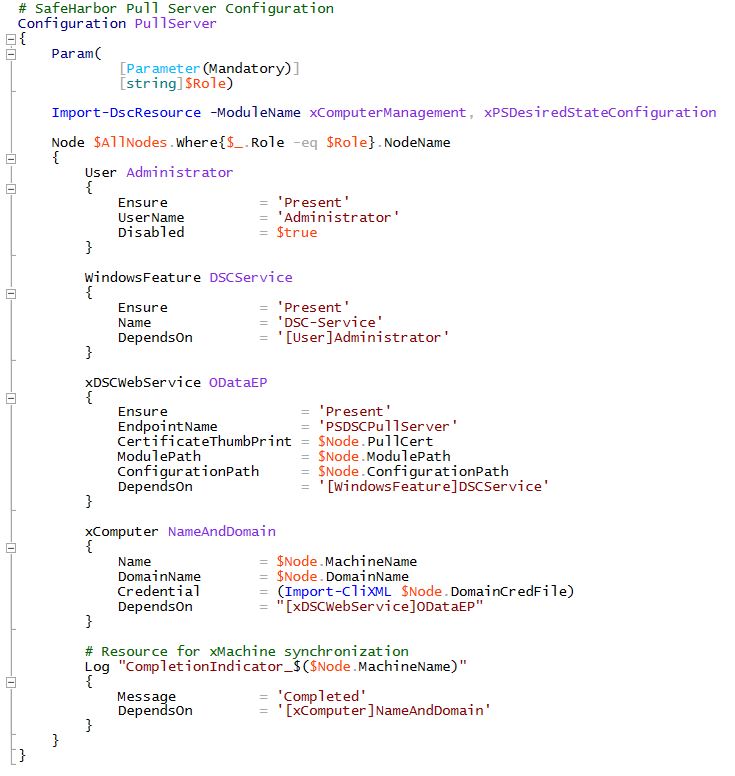
The Pull Server configuration data contains the Certificate information for SSL binding and the path for the config and modules for the workload servers.
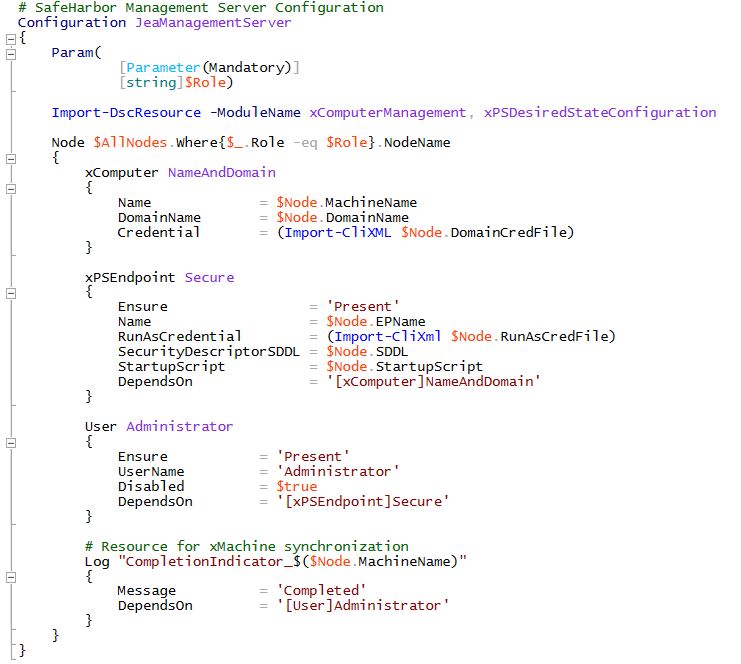
JEA Management Server:
A JEA (Just Enough Admin) enabled Management Server is setup with a constrained PowerShell endpoint. This endpoint allows access to only user from Corporate domain that can perform admin actions (PAPA). This is done to restrict the access to the workload file servers.For security reasons the Administrator’s Role is disabled in the Safeharbor domain. Safeharbor domain user MATA is configured as the RunAs user on the constrained endpoint.
Here is the configuration for the Management Server. xPSEndpoint resource is used to setup the constrained PowerShell endpoint. All local admins are disabled to restrict access to the machine.
The configuration data is as follows. The SDDL config for the endpoint grants access to Corporate\PAPA only. Also, all credentials are handled securely.
$ADUserSid is the SID of the user in Corporate Domain that is designated to perform Admin tasks (Corporate\PAPA). User -> Sid lookup is performed and the SDDL updated prior to configuring the constrained endpoint.

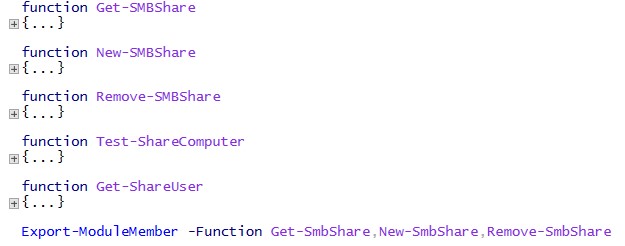
A startup script on the endpoint exposes only a relevant set of functionality to the incoming user. In this case, Corporate\PAPA is allowed access to the proxy equivalent of smbshare cmdlets to Create/Retrieve/Remove shares on the workload file servers.
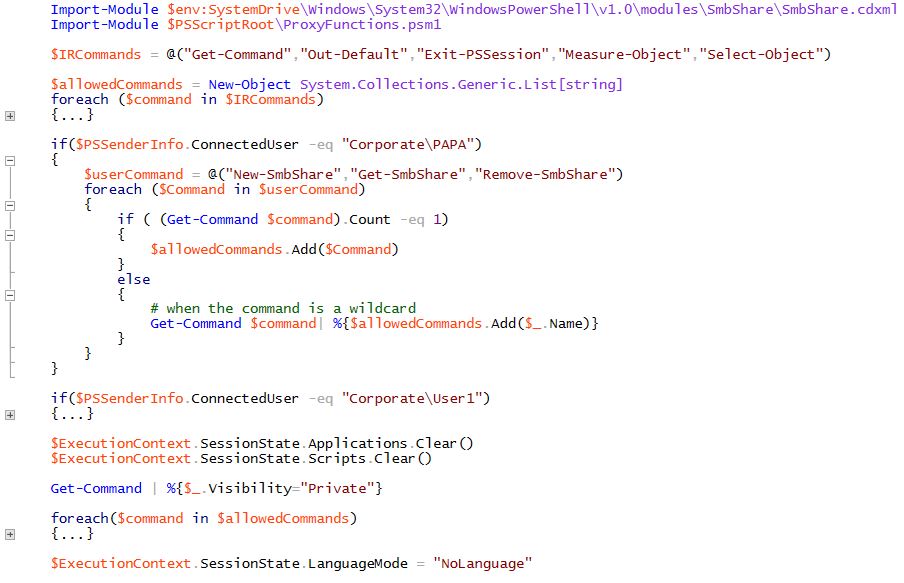
Proxyfunction for smbshare cmdlets to restrict the functionality:
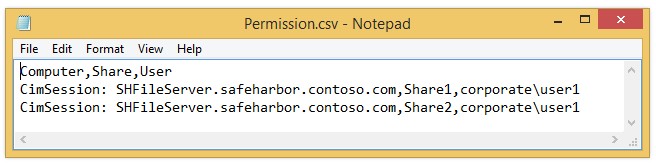
The proxy cmdlets use a Permission.csv file to map users-resources-access permissions. In this sample, Corporate\User1 will be allowed to access the named shares on the file server. This is configured during creating a new smbshare on the fileserver, when Corporate\PAPA connects to the constrained endpoint.
Workload Servers: In the final step the workload file servers are added securely. DSC Metaconfiguration on these servers is configured such that they pull their configuration from the DSC Pull Server. Also, the file servers are locked down by removing built-in firewall rules and allowing only specific traffic.
All local admins are disabled and the Safeharbor domain account MATA (Management Account for Trusted Action) is granted admin rights on the machine to perform creating/removal of smbshares.
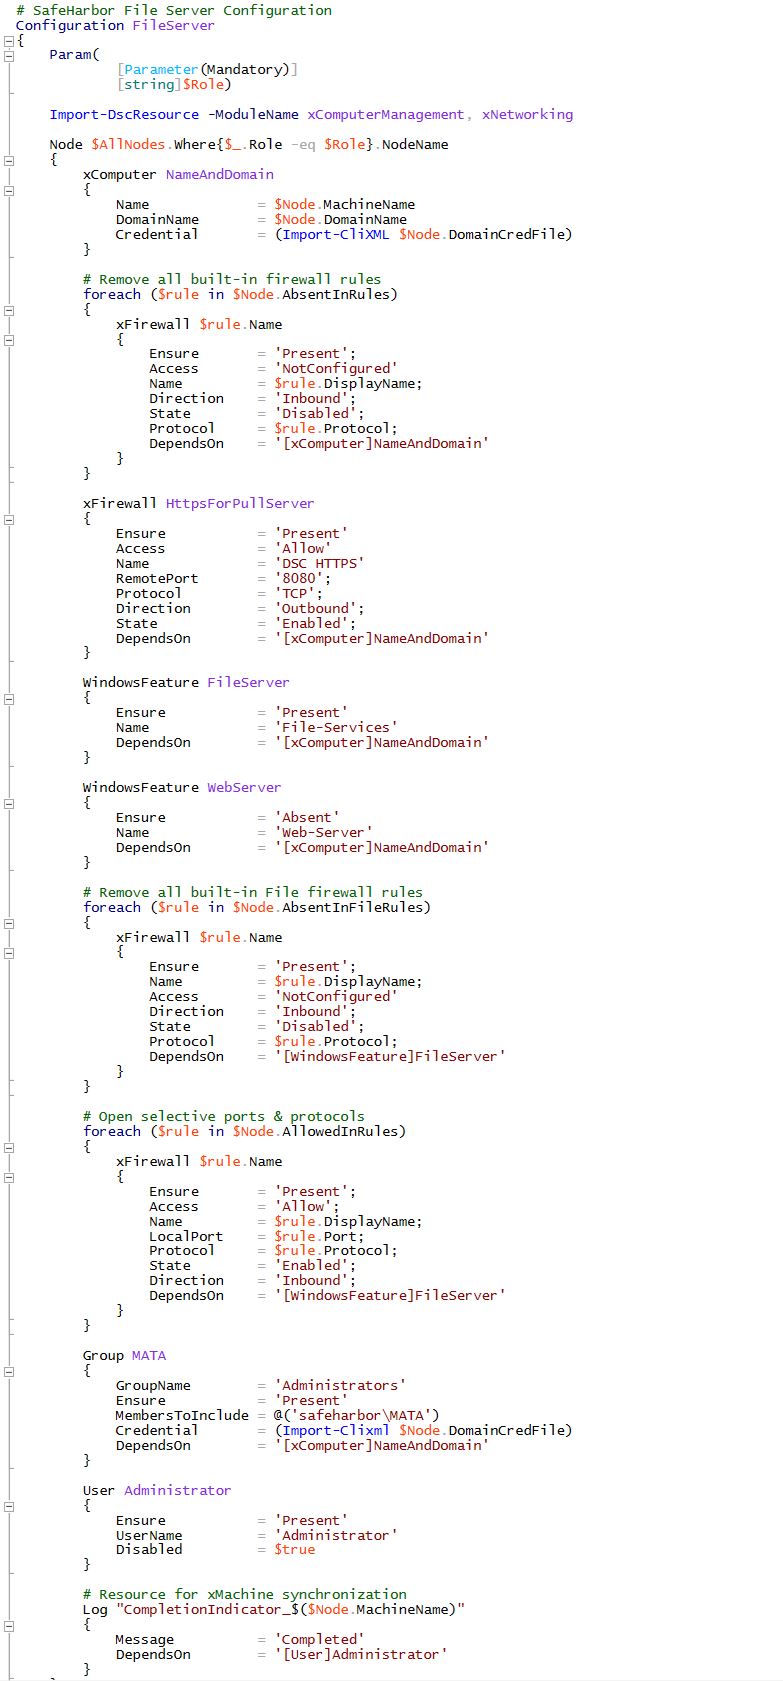
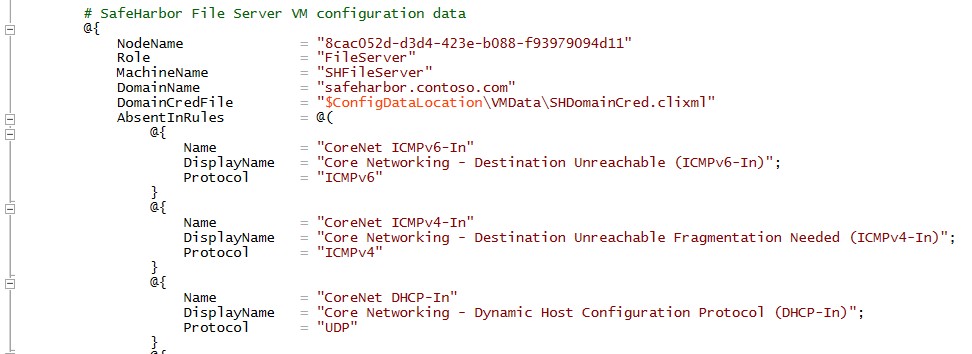
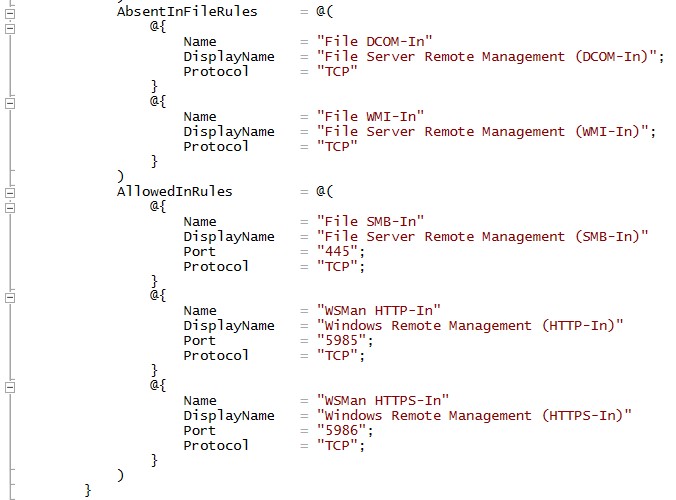
Here is a snippet of the configuration data used on the fileserver. Only smb and powershell remoting traffic is allowed and all other ports and rules are locked down. This ensures that the workload servers are secured completely.
…
…
Here is the final topology. The new Safeharbor domain protects and secures the corporate data and allows access to users on shares configured as per policy.
Final Topology:

Safeharbor demo can be deployed on a Hyper-V capable machine using the Assert-SafeharborScenario.ps1 script.

Validation: Once the Safeharbor environment is setup, we can validate the configuration by: • Creating a new smbshare on the File Server • Accessing the Share
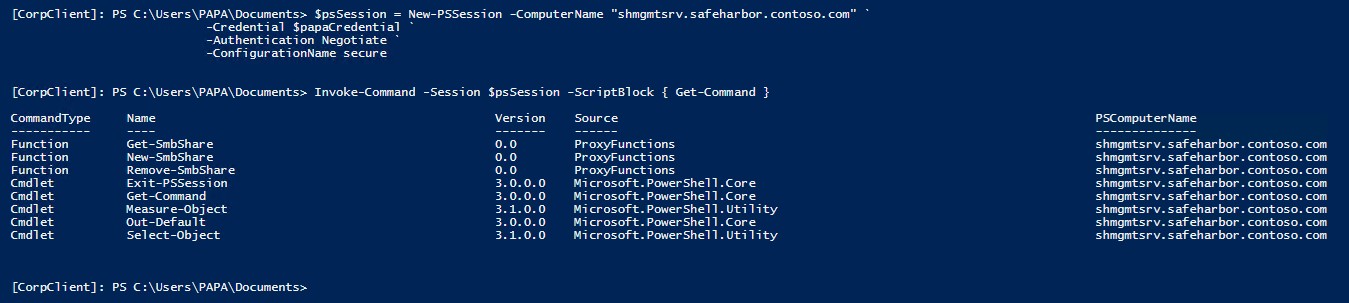
Create new share on the File Server: • Create a new session to JEA Jump Box at the contrained PSSession endpoint • Validate that only Corporate\PAPA can connect to this endpoint • Enumerate the available commands to Corporate\PAPA • Create a New-SMBShare on the File Server
Note that the smbshare names and permissions are limited by the configuration supplied in Permission.csv (previous section)


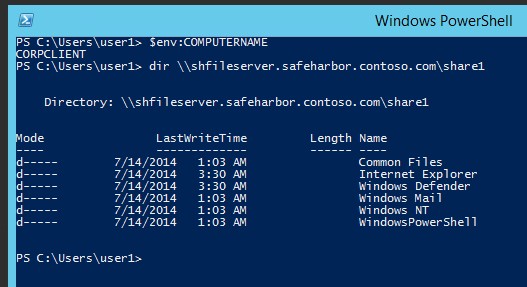
Accessing files on the File Server as Corporate\User1: • Only the Share authorized in the Permission.CSV file is accessible to this user • User can only “Read” share contents
Further, any user (other than PAPA) in Corporate domain cannot create new SMB shares:

Updates/Enhancements: The concept of JEA and constraining access to resources using Safeharbor in this sample can be further improved in your environment by:
• Remove domain from the isolated Safeharbor environment • Remove trust between the two domains • Limit all access to the Safeharbor environment through the Jump Box • Audits, alerts for changes to the environment, resources and user permissions
Download Safeharbor Environment sample code and powerpoint from the technet gallery
Raghu Shantha [MSFT] PowerShell Desired State Configuration Team
 Light
Light Dark
Dark
0 comments