
Configuring a SQL High Availability Group with DSC
Let’s use DSC to configure something complicated! In past blogs, we’ve shown you how to use Windows PowerShell Desired State Configuration (DSC) to configure relatively simple systems. However, the technologies you deal with on a day to day basis can sometimes become complicated. Don’t worry, DSC can still help simplify configuration. Let’s use SQL AlwaysOn Availability Group (AG) as a example. SQL AG is a new SQL feature that enables replication on top of Windows Server Failover Clustering. While the feature is cool, configuring the environment is quite complex. It involves many steps across multiple machines. Some steps in one machine might depend on progress or status of others.
In this blog post, we will demonstrate using DSC to configure a SQL AG. When using the provided example, one PowerShell command will deploy a SQL AG on Virtual Machines (VMs).
Environment
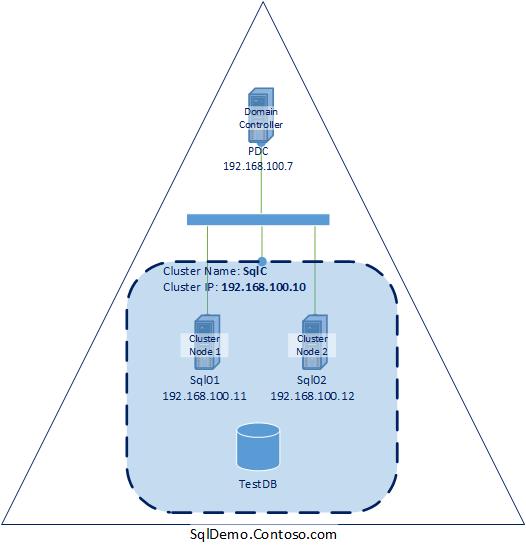
Using the DSC configuration scripts described in this blog you can fully deploy and configure the following environment:
Configuration Overview
To deploy the environment described above in a virtual environment using DSC a configuration is generated for each guest server described above and the VM host machine. All of these configurations are coordinated by a single PowerShell script (Deploy-Demo.ps1). A description of what each of the configuration scripts does is below. A zip (Dsc-SqlDemo.zip) containing all of the configuration files is attached to this blog (see the bottom of the blog) and should be downloaded before you read on so that you can follow along while looking at the associated scripts.
Configuring the Host and VMs
First, Deploy-Demo.ps1 runs Dsc-SqlDemo\ConfigSqlDemo.ps1. This configures the host machine by doing the following:
1. Ensure that a VM Switch for an internal network is present (in the demo, subnet of 192.168.100.*)
2. Ensure that a local user called vmuser is present, so that VMs can access data in host
3. Ensure that a net share (c:\SqlDemo\Sql12Sp1) is present.
4. Ensure that three VMs are created in the correct state by:
o Ensuring that a DSC Configuration, DSC Resources, and other files are copied to the VHD image.
o Ensuring that the VMs are started from the VHDs.
Once the host machine is configured, we have three VMs running. Each of these VMs has a configuration that has been bootstrapped into it. Because of the way we bootstrap the VMs, they will configure themselves after startup, using the .mof we have injected into them.
Stay tuned for a blog post about the bootstrapping procedure.
Configuring the Primary Domain Controller – pdc
The .mof file injected into the Primary Domain Controller (pdc) VM was generated from the configuration in Dsc-SqlDemo\Scenarios\nodes.ps1 from the node statement è Node $AllNodes.Where{$_.Role -eq “PrimaryDomainController” }.NodeName
1. Ensure the VM has a static IPAddress
2. Ensure necessary WindowsFeatures are present
3. Ensure that a Domain Forest is created
4. Sets up a network share folder that will be used in the SQL replication process
Setting up the first SQL Server- Sql01
The .mof file injected into the first SQL Server (Sql01) VM was generated from the configuration in Dsc-SqlDemo\Scenarios\nodes.ps1 from the node statement è Node $AllNodes.Where{$_.Role -eq “PrimarySqlClusterNode” }.NodeName
1. Ensures that the machines IPAddress is correctly set
2. Ensures that necessary WindowsFeatures are present
3. WaitFor Primary Domain Controller to have created the AD Domain
4. Ensure that the machine is joined to the Domain
5. Ensure that .Net 3.5 and SQL Server 2012 SP1 are installed
6. Ensures that Firewalls are configured such that Sqlbrowser.exe and SqlServr.exe are accessible in the private network.
7. Ensure that a Windows Cluster is created and that Sql01 is added to the cluster
8. Ensure that the SQL Server for High Availability (HA) service is enabled
9. Ensure that there is an Endpoint for the HA
10. Ensure that the SQL HA group for databases is created (in the demo, TestDB)
Setting up the second SQL Server – Sql02
The .mof file injected into the second SQL Server (Sql02) VM was generated from the configuration in Dsc-SqlDemo\Scenarios\nodes.ps1 from the node statement è Node $AllNodes.Where{$_.Role -eq “ReplicaSqlClusterNode” }.NodeName
1. Ensures that the machines IPAddress is correctly set
2. Ensures that necessary WindowsFeatures are present
3. WaitFor Primary Domain Controller to have created the AD Domain
4. Ensure that the machine is joined to the Domain
5. Ensure that .Net 3.5 and SQL Server 2012 SP1 are installed
6. Ensures that Firewalls are configured such that Sqlbrowser.exe and SqlServr.exe are accessible in the private network.
7. WaitFor the first SQL node to have created the windows cluster
8. Ensure that Sql02 is added to the cluster
9. Ensure that the SQL Server for High Availability (HA) service is enabled
10. Ensure that there is an Endpoint for the HA
11. WaitFor the first SQL node to have created the HA group
12. Ensure that sql02 is joined to the HA group.
Deploy the environment
Now that you have an understanding of the environment and what the DSC scripts do, let’s go ahead and deploy the environment using the scripts. Note there is quite a bit of preparation to complete before the scripts can be executed so please be patient.
Requirements
Hardware
To simulate a SQL AG, we need a decent machine that is capable of running Windows Server 2012 R2 and Hyper-V (64-bit) with at least 16GB of RAM and around 100GB of free disk space. Because this is a demo, we also recommend that you not store important items on the machine, in case it is cleaned up.
Software
The following software are needed to perform the steps in the demo.
1. An evaluation version of Windows Server 2012 R2 Datacenter (both ISO and VHD). A download can be found here. Note: We need both the VHD and the ISO because SQL Server requires .Net 3.5, which is not available in the VHD. Fortunately, in the expanded ISO image, there is a folder named Sources\sxs, that includes all .Net 3.5 files.
2. An evaluation version of SQL Server 2012 SP1 (ISO). A download can be found here.
3. The following DSC resources:
a. User (Ships in Windows Server 2012)
b. Windows Feature (Ships in Windows Server 2012)
c. xComputerManagement (Download here)
d. xNetworking (Download here)
e. xHyper-V (Download here)
f. xActiveDirectory (Download here)
g. xFailOverCluster (Download here)
h. xSqlps (Download here)
i. xSmbShare (Download here)
Certificate
Setting up domain controllers or SQL servers requires a few credentials. To keep these credentials secure, DSC encrypts them before placing them into the plain text of the .mof files. For details on this process, check out this blog. To secure credentials, DSC uses a certificate’s public key to encrypt the credentials and the private key to decrypt the credentials on the target machine that is being configured. To ensure that this demo works correctly, we need to ensure that the host and the target machines have the appropriate certificates.
To do this, we first create a self-signed certificate on the host machine, then copy it with private key to the target machines. We then install the certificate to the target’s local machine certificate store. Since private key should be kept secret, it is important to clean them up as soon as possible (instructions can be found below). Again, with this, please ensure you do NOT run the demo in production or on machines that require security by default.
1. Steps to setup certificate on the host machine:
· Get MakeCert.exe if you don’t have. (It is shipped with Windows SDK, a download can be found here).
· Create a certificate with CN=DSCDemo. To do this, open a PowerShell console with Administrator elevation, cd to place that can see MakeCert.exe, and run the following command (notice, for security reasons, I make the cert expire as soon as possible, please adjust the highlighted date as needed).
makecert -r -pe -n “CN=DSCDemo” -sky exchange -ss my -sr localMachine –e 02/15/2014
The command line above will create a self-signed certificate on localhost certificate store (cert:\localMachine\My, with Subject = “CN=DSCDemo”). Remember the subject, we will need it very soon. In my example, the UI in the certificate store looks like the following in (Certificates(Local Computer)\Personal\Certificates)

· Create a folder to hold the keys for the demo. In my example, I created C:\keys
· Public key. Export the public key of the certificate. You can do this manually, or do it with the following PS script. In my example, I saved the public key as: C:\keys\Dscdemo.cer”
$certSubject = “CN=DSCDemo”
$keysFolder = Join-Path $env:SystemDrive -ChildPath “Keys”
$cert = dir Cert:\LocalMachine\My | ? { $_.Subject -eq $certSubject }
if (! (Test-Path $keysFolder ))
{
md $keysFolder | Out-Null
}
$certPath = Export-Certificate -Cert $cert -FilePath (Join-Path $keysFolder -ChildPath “Dscdemo.cer”)
· Private key and protection-Password. For security reason, export the private key certificate as the following:
o In Personal\Certificates, find the certificate Issued to “DSCDemo” as shown above. Right click and select the “Export…” option.
o Take the option of “export private key”
o UI will ask you for apassword for the protection. Enter and remember your password, youneed it very soon. For this demo, we used P@ssword
o Export the certificate to the appropriate folder. In my example, it is C:\keys\Dscdemo.pfx
· Certificate Thumbprint. Run the following PS script to get certificate’s thumbprint, we need it very soon.
dir Cert:\LocalMachine\My | ? { $_.Subject -eq “CN=DSCDemo” }
In my example, it is E513EEFCB763E6954C52BA66A1A81231BF3F551E
2. Update the deployment scripts:
With above steps, we need update deployment scripts to point to the correct certificate values.
· Public key location: in my example, it is C:\keys\Dscdemo.cert
· Thrumbprint: in my example, it is E513EEFCB763E6954C52BA66A1A81231BF3F551E
· Private key location: in my example, it is C:\keys\Dscdemo.pfx
· Private key protection password: in my example, it is P@ssword
Update the following places in the deployment scripts:
2.1 ConfigSqlDemoData.psd1
At line 56, modify the file to point to your private key location.
SourcePath = “C:\Keys\Dscdemo.pfx”;
At line 145-146, modify the file to point to your certificate file and Thumbprint:
@{
NodeName= “*”
CertificateFile = “C:\keys\Dscdemo.cer”
Thumbprint = “E513EEFCB763E6954C52BA66A1A81231BF3F551E”
2.2 deployment\installcert.ps1
-Password $(ConvertTo-SecureString -String “P@ssword”
This corresponds private key protection password. Change it to the value you just entered.
3. Install the certificate to the VMs. Now that we’ve done steps 1 and 2, the deployment script will do the following automatically:
1. Encrypt credentials for the environment that is going to set up.
2. Copy the private key and the script (installcert.ps1) that holds the private key protection password to each VM’s VHD file (into the VHD’s c:\deployment folder). Once the VM is started, it will install the certificate with the private key.
4. Clean up the certificate. After you are done with the demo, please remove certificate and keys as soon as possible with the following steps:
1. Delete the certificate files. In my case, I delete all files under C:\keys
2. Remove the self-signed certificate we just created. In my case, I used the UI to go to Certificates(Local Computer)\Personal\Certificates, and deleted certificate issued to DSCDemo
3. Remove the password in the deployment\installcert.ps1 file.
4. Delete the xml files under deployment (pdc.xml, sql01.xml, sql02.xml) because they have passwords for VMs bootstrap.
5. In each VM, delete the files under C:\deployment
6. Shred the recycle bin of the host machine.
Prepare the host
Before we can run the demo, we need to make sure that we have all of the necessary files in the appropriate places.
Copying Files
1. Confirm that the host machine is running Windows Server 2012 R2. If that is not the case, you can expand the ISO downloaded above to DVD, and install Windows Server 2012 R2 from there. The host is also required to have Hyper-V. Please see the Hyper-V Start Guide in the reference section for more details on Hyper-V. It is recommend to upgrade the OS with latest patches by running Windows Update.
2. Create a folder named SqlDemo. In my case, I created the folder here: C:\SqlDemo
3. Copy the Windows Server 2012 R2 VHD file to C:\SqlDemo. For me, this looks like: “c:\SqlDemo\9600.16415.amd64fre.winblue_refresh.130928-2229_server_serverdatacentereval_en-us.vhd”
4. Copy the Windows Server ISO to C:\SqlDemo. To make things simple, you can rename the file to a short name. In my case, this looks like: C:\SqlDemo\WS12R2.ISO
5. Similarly, copy the SQL ISO to C:\SqlDemo. Again, rename the file to a short name like this: C:\SqlDemo\SqlSP1.iso
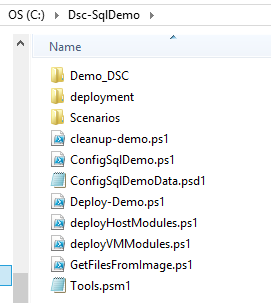
6. Unzip Dsc-SqlDemo.zip. In my case, it is like C:\Dsc-SqlDemo, the entire folder like the following:
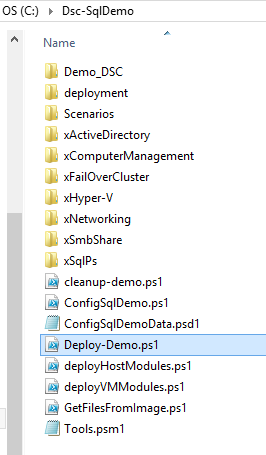
7. download xActiveDirectory, xComputerManagement, xFailOverCluster, xHyper-V, xNetworking, xSmbShare, xSqlPs modules if not. Copy them to root of unzipped folder. It looks like the following in the end:
Extracting Content
Now that we’ve copied the ISOs into the necessary locations, we need to extract some of their content. Specifically, we need to get the sxs files (which include .Net 3.5), and the SQL content. While there are many ways to do this, the simplist way in this situation is to run the “GetFilesFromImage.ps1” script in DSC-SqlDemo folder.
1. Open a Windows PowerShell console (with Administrator privileges), and cd to the Dsc-SqlDemo folder.
2. Run the following script to get sxs files including .Net 3.5
.\GetFilesFromImage.ps1 -ImagePath c:\SqlDemo\WS12R2.ISO -SrcPath “sources\sxs” -DstPath c:\SqlDemo\Srv12R2\sxs

Figure 1: Note: -SrcPath has no driver letter because we don’t know which driver letter the ISO image will mount to until runtime.
3. Similarly, get the entire Sql ISO content by running the following script:
.\GetFilesFromImage.ps1 -ImagePath c:\SqlDemo\Sql12SP1.ISO -SrcPath “*” –DstPath c:\SqlDemo\Sql12SP1

Remember folder c:\SqlDemo\Srv12R2\sxs and c:\SqlDemo\Sql12SP1, we need them later on.
Checking the Configuration Data File
It’s important to ensure the configuration data file (c:\dsc-SqlDemo\ConfigSqlDemoData.psd1) has the correct information. If you used the same paths as above for SqlDemo, and are okay with using the default credentials, the demo should work without any change. However, if SqlDemo and underneath files is in different path, driver, or name, their locations need to be updated in the data file.
Checking Credentials
By default, “P@ssword” is the password for every credential. You can change to your own if you would like, but please remember them. And don’t forget to do clean up after the demo.
Also, notice, those three VMs are created in private network of the host. In another word, they are only visible to each other and the host. To make vm access software’s on the host, we create a local user: vmuser, which could read access to SqlDemo folder (in my case: c:\SqlDemo).
Checking Paths
Confirm that the following paths in the ConfigSqlDemoData.psd1 file are correct:
# Windows Server 2012 R2 vhd
VhdSrcPath = “c:\SqlDemo\9600.16415.amd64fre.winblue_refresh.130928-2229_server_serverdatacentereval_en-us.vhd”
# .Net 3.5 source files
@{ Source = “C:\SqlDemo\Svr12R2\sxs”; Destination = “sxs” }
# Sql software folder on Host
SqlSrcHostPath = “C:\SqlDemo\Sql12SP1”
Running the demo
Once everything is ready, running the demo is as simple as this:

The script will ask you to enter password for private domain administrator, sql administrator, user to access host file share, and user on the host for the file share access. The last two should have the same password. In my example, I entered “P@ssword” four times for the sake of simply.
After about 30-60 minutes, the SQL AG will be set up across three VMs running on the host machine:
1. SqlDemo-pdc – the primary domain controller, which ensures the private domain for two SQL cluster nodes.
2. SqlDemo-Sql01 – the primary node in SQL AlwaysOn Availability Group
3. SqlDemo-Sql02 – the secondary node in SQL AlwaysOn Availability Group

Verification (How do you know it worked)
It’s worth noting that when the configuration returns success on the host machine, that only indicates that the VMs have been created, NOT that SQL AG deployment on VMs is completed. The deployment takes about 30-60 minutes, so be patient with the installation script.
To check for complete status:
· Monitor the size of the vhds being created on the host machine under Vm\. pdc vhd should be about 2.4 GB, sql vhds should be about 8GB.
To debug a failure:
· Check the ETW events on each VM under Applications and Services Logs\Microsoft\Windows\Desired State Configuration/Operational
To confirm success:
1. Login to one of SQLs nodes
2. Start “Microsoft SQL Server Management Studio”
3. Connect to one of SQL instances (like sql01, or 192.168.100.11 in IP)
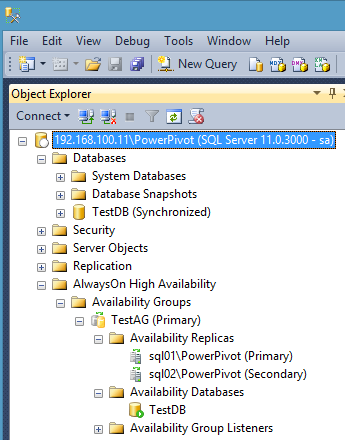
4. Under “AlwaysOn High Availability”, you should see something like the following snapshot:
5. Expand the Databases folder
6. Open TestDB
7. Populate some data
8. Check that it is replicated on the second node shortly thereafter.
Key Takeaways
This example is far more complex than most others that have been shown or created. As such, it demonstrates many characteristics of configurations that may be lost in the simpler scenarios. Here are a few things we think are worth noting.
- Each configuration uses a Configuration Data File to separate the structural configuration data from the environmental configuration. This allows the example to easily scale up.
- The “WaitFor” pattern is used many times to coordinate across machines. This pattern is used in scenarios where a machine needs to wait for another machines to do something. For example, Sql02 needed to wait for the Primary Domain Controller to create the domain before ensuring that it was joined to the domain.
- The configurations that ran in pdc, sql01, and sql02 were bootstrapped into the VHDs as .mof files. This technique improves scalability and performance when configuring VMs at startup. Stay tuned for a blog post on this later.
That’s it! Let us know what you think in the comments.
Enjoy the fun!
Chen Shang, Mark Gray, John Slack, Narine Mossikyan
Windows DSC Team
 Light
Light Dark
Dark
0 comments