
Push and Pull Configuration Modes
// bw + bsl && x + aw – ah / 2 – cw >= bsl ) { c.style.left = x + aw – ah / 2 – cw; } else { c.style.left = x + ah / 2; } if (y + ch + ah / 2 > bh + bst && y + ah / 2 – ch >= bst ) { c.style.top = y + ah / 2 – ch; } else { c.style.top = y + ah / 2; } c.style.visibility = “visible”; } } } function msoCommentHide(com_id) { if(msoBrowserCheck()) { c = document.all(com_id); if (null != c && null == c.length) { c.style.visibility = “hidden”; c.style.left = -1000; c.style.top = -1000; } } } function msoBrowserCheck() { ms = navigator.appVersion.indexOf(“MSIE”); vers = navigator.appVersion.substring(ms + 5, ms + 6); ie4 = (ms > 0) && (parseInt(vers) >= 4); return ie4; } if (msoBrowserCheck()) { document.styleSheets.dynCom.addRule(“.msocomanchor”,”background: infobackground”); document.styleSheets.dynCom.addRule(“.msocomoff”,”display: none”); document.styleSheets.dynCom.addRule(“.msocomtxt”,”visibility: hidden”); document.styleSheets.dynCom.addRule(“.msocomtxt”,”position: absolute”); document.styleSheets.dynCom.addRule(“.msocomtxt”,”top: -1000″); document.styleSheets.dynCom.addRule(“.msocomtxt”,”left: -1000″); document.styleSheets.dynCom.addRule(“.msocomtxt”,”width: 33%”); document.styleSheets.dynCom.addRule(“.msocomtxt”,”background: infobackground”); document.styleSheets.dynCom.addRule(“.msocomtxt”,”color: infotext”); document.styleSheets.dynCom.addRule(“.msocomtxt”,”border-top: 1pt solid threedlightshadow”); document.styleSheets.dynCom.addRule(“.msocomtxt”,”border-right: 2pt solid threedshadow”); document.styleSheets.dynCom.addRule(“.msocomtxt”,”border-bottom: 2pt solid threedshadow”); document.styleSheets.dynCom.addRule(“.msocomtxt”,”border-left: 1pt solid threedlightshadow”); document.styleSheets.dynCom.addRule(“.msocomtxt”,”padding: 3pt 3pt 3pt 3pt”); document.styleSheets.dynCom.addRule(“.msocomtxt”,”z-index: 100″); } // ]]>
Windows PowerShell Desired State Configuration: Push and Pull Configuration Modes
What are push and pull modes?
The Windows PowerShell Desired State Configuration (DSC) system has two configuration modes, which are referred to as push and pull modes. Each mode allows the user to apply a desired state over a target node.
Push mode vs. pull mode
How push mode works
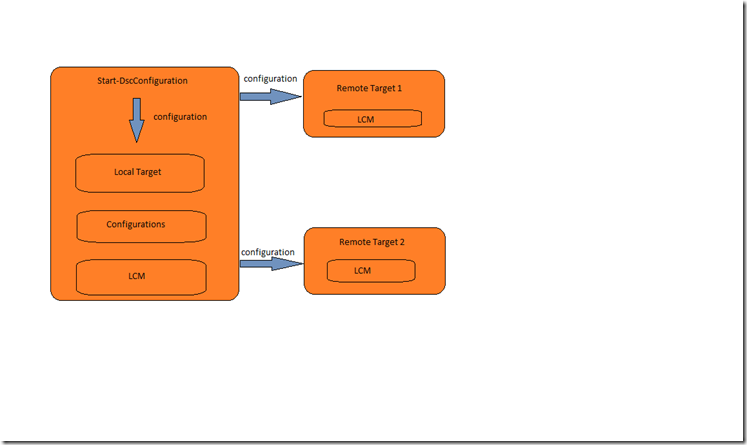
As illustrated in the preceding diagram, the push model is unidirectional and immediate. . The configuration is pushed to its intended targets, and they are configured.
How to push a configuration
In push mode, the user initiates configuration processing via the Start-DscConfiguration cmdlet. This command immediately applies the configuration to the target, which can be specified by the –ComputerName parameter of the Start-DscConfiguration DSC cmdlet. By default, this cmdlet uses the files in the -Path folder to find the target node details.
How pull mode works

In the preceding diagram, we have 4 machines that participate in the request, delivery and application of the configuration. Each one of the pull client machines is configured to get its desired state configuration from the pull server. Likewise, the pull server has been set up to host the DSC service, and has been provisioned with the configurations and resources that are required by the pull clients.
Each one of the pull clients has a scheduled task that performs a periodic compliance check on the configuration of the node. When the event is triggered the first time, it causes the Local Configuration Manager (LCM) on the pull client to validate the configuration. If the pull client is configured as desired, nothing happens. Otherwise, the LCM makes a request to the pull server to get a given configuration. If that configuration exists on the pull server, and it passes initial validation checks, the configuration is transmitted to the pull client, where it is then executed by the LCM.
How to pull a configuration
Pulling a configuration requires that a series of steps be taken on the pull server and target nodes. We will look at this series of steps in detail in the section titled The pull mode configuration steps in this post.
……….
NOTE ADDED 2/6/2018 – The latest information regarding DSC Pull Service can be found in the DSC documentation using the link: https://docs.microsoft.com/en-us/powershell/dsc/pullserver
……….
Push and pull configuration deployment steps
Push sequence
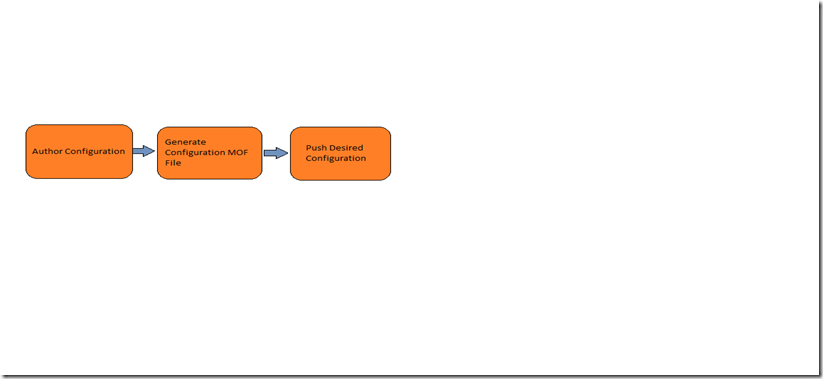
Authoring a configuration
First thing to do when configuring nodes through DSC is to define a configuration. Consider the following example, and then we’ll examine each part of the configuration.
InstallDscService.ps1
configuration InstallDSCService
{
node localhost
{
WindowsFeature DSCService
{
Name = “DSC-Service”
Ensure = “Present”
}
}
}
InstallDSCService -output “.”
In this simple example, we have the following main elements:
a) The configuration keyword, followed by a user-supplied name.
b) The Node keyword, followed by the name of the node to be configured. In this case, it is the localhost. Note that the Node keyword is not case-sensitive.
c) Within the scope of the node definition, we list the resources we will use to configure the node. In this case, we are using the WindowsFeature built-in resource provider to install the DSC Service feature on the local machine.
d) Finally, we have a statement making an invocation of the configuration, designating the location of the .mof output as the current directory.
Generate configuration MOF file
Now that we have our .ps1 file with the configuration defined above, we need to generate the MOF file that we will use to initiate the configuration. To generate the MOF file, all that is needed is to execute the .ps1 file containing the configuration. This generates a MOF file named with the same name as the node within the configuration, with the .mof file name extension. In this case, we’ll end up with localhost.mof.
PS D:\> .\InstallDscService.ps1
Directory: D:\InstallDscService
Mode LastWriteTime Length Name
—- ————- —— —-
-a— 8/28/2013 4:17 PM 1260 localhost.mof
Push the desired configuration to target nodes
Once we have the configuration mof file generated, we are ready to start the configuration using the Start-DscConfiguration command. In the following example, we provide a few extra parameters, explained below.
PS D:\InstallDscService> Start-DscConfiguration -Wait -Verbose -ComputerName localhost –Path .
VERBOSE: Perform operation ‘Invoke CimMethod‘ with the following parameters, ”methodName‘ = SendConfigurationApply,’className‘ = MSFT_DSCLocalConfigurationManager,’namespaceName‘ = root/Microsoft/Windows/DesiredStateConfiguration‘.
VERBOSE: An LCM method call arrived from computer LOUISC-VMHOSTD with user sid S-1-5-21-2800768176-829124343-4290817346-1106.
VERBOSE: [LOUISC-VMHOSTD]: LCM: [ Start Set ]
VERBOSE: [LOUISC-VMHOSTD]: LCM: [ Start Resource ] [[WindowsFeature]DSCService]
VERBOSE: [LOUISC-VMHOSTD]: LCM: [ Start Test ] [[WindowsFeature]DSCService]
VERBOSE: [LOUISC-VMHOSTD]: [[WindowsFeature]DSCService] The operation ‘Get-WindowsFeature’ started: DSC-Service
VERBOSE: [LOUISC-VMHOSTD]: [[WindowsFeature]DSCService] The operation ‘Get-WindowsFeature’ succeeded: DSC-Service
VERBOSE: [LOUISC-VMHOSTD]: LCM: [ End Test ] [[WindowsFeature]DSCService] in 1.6720 seconds.
VERBOSE: [LOUISC-VMHOSTD]: LCM: [ Skip Set ] [[WindowsFeature]DSCService]
VERBOSE: [LOUISC-VMHOSTD]: LCM: [ End Resource ] [[WindowsFeature]DSCService]
VERBOSE: [LOUISC-VMHOSTD]: LCM: [ End Set ]
VERBOSE: [LOUISC-VMHOSTD]: LCM: [ End Set ] in 2.3120 seconds.
VERBOSE: Operation ‘Invoke CimMethod‘ complete.
VERBOSE: Time taken for configuration job to complete is 2.365 seconds
· –Wait: This parameter ensures that the invocation of configuration is interactive and synchronous with user commands. Otherwise, a job object is returned that continues the operation in the background.
· –Verbose: This parameter ensures that any status or progress messages that are written by the resource implementation are displayed in the console. This is particularly helpful during development and debugging.
· –ComputerName: If this parameter is omitted, the Local Configuration Manager (LCM) will try to use all the files in the configuration folder. Because we specified localhost as the name of the MOF file, the configuration is applied to the local computer.
· –Path: Points to the path where the MOF file resides. In this case, it is in the current directory.
The pull mode configuration steps

Set up configuration
The following sections describe how to set up the configuration.
Author configuration for a target node
Authoring a configuration to work in pull mode is almost identical to the process of authoring a configuration for push. There are some special considerations, however, which we’ll cover in this section of the post.
First, let’s look at a simple configuration that we can use for pull mode.
SimpleConfigurationForPullSample.ps1
|
Configuration SimpleConfigurationForPullSample |
|
{ |
|
Node 1C707B86-EF8E-4C29-B7C1-34DA2190AE24 |
|
{ |
|
|
|
Computer ManagedNode |
|
{ |
|
Ensure = “Present” |
|
Name = “DomainClient1” |
|
DomainName = “TestDomain” |
|
} |
|
} |
|
} |
|
|
|
SimpleConfigurationForPullSample-output “.” |
There is not much difference in the way that configurations are constructed for pull scenarios. The main difference to note in this simple example is the node name, which is a GUID. This is because we provide a configuration ID that matches this GUID when we are performing the pull from the pull server.
Designate configuration to target machine
To define the configuration above, we must have a GUID value that we can use in the node definition. To generate a new GUID, refer to Create GUID (guidgen.exe) or Guid.NewGuid Method.
Using unique identifiers for configurations ensures that the mapping between the pull server and its pull clients is unambiguous, and each receives its own configuration.
Generate configuration MOF
Once the configuration script is complete, the next step is to run the script to generate a new <yournewguid>.mof. Once you run the script is, there is a new folder with the name of the configuration containing the MOF file. It is always good practice to ensure that the contents of the new MOF file match the contents of the configuration before moving forward.
Generate MOF file checksum
A checksum file is required before deploying the configuration to the pull server. This allows the LCM to validate the configuration before applying it. To generate a new checksum for the configuration, we need to run the New-DSCCheckSum command as follows.
PS D:\Samples> New-DSCCheckSum –ConfigurationPath .\SimpleConfigurationForPullSample –OutPath .\SimpleConfigurationForPullSample -Verbose -Force
VERBOSE: Create checksum file ‘D:\Samples\SimpleConfigurationForPullSample\1C707B86-EF8E-4C29-B7C1-34DA2190AE24.mof.checksum’
When the .ps1 script was generated, it was generated under the folder SimpleConfigurationForPullSample, which is created and named after the configuration. The new MOF file is placed in that directory, so in the call to New-DSCCheckSum, we must provide the configuration path. It is recommended to use the output path to have the new checksum file stored in the same place as the MOF file. Later, during the preparation of the pull server, we must copy both of these files to a specific location on the pull server.
Set up the pull server
For configuring a machine as a pull server from which the pull clients will get their respective configurations, please refer to “DSC Resource for configuring pull server environment” blog .
Deploy MOF and checksum files to the pull server
In order to provision the pull server with configuration files, we need to:
- Run script that generates node configuration Mofs
- Use New-DSCChecksum cmdlet to generate checksum files
- Copy all mofs and associated checksum files to pull server
The MOF files containing the configurations of the nodes must be stored on the pull server in the following location $env:SystemDrive\Program Files\WindowsPowershell\DscService\Configuration.
Configure the target node for pull mode
Each node (pull client) must be able to contact the pull server. This is accomplished via the use of a meta-configuration file that runs on the node. Here is an example of a meta-configuration script that we will use to change LCM setting of the node to be in pull mode as well as configure pull server URL that the node will be downloading its configurations from.
|
Configuration SimpleMetaConfigurationForPull
{ LocalConfigurationManager
{ ConfigurationID = “1C707B86-EF8E-4C29-B7C1-34DA2190AE24”;
RefreshMode = “PULL”;
DownloadManagerName = “WebDownloadManager”;
RebootNodeIfNeeded = $true;
RefreshFrequencyMins = 30;
ConfigurationModeFrequencyMins = 60;
ConfigurationMode = “ApplyAndAutoCorrect”;
DownloadManagerCustomData = @{ServerUrl = “http://PullServer:8080/PSDSCPullServer/PSDSCPullServer.svc”; AllowUnsecureConnection = “TRUE”}
} }
SimpleMetaConfigurationForPull -Output “.” |
|
|
Once the script runs, a meta-configuration mof file will be created in SimpleMetaConfigurationForPull folder.
For providing LCM with contact information about the pull server, we will use DownloadManagerCustomData key/value pair property of the meta-configuration. As seen above, there are two distinct key/value pairs that are used to configure the node.
- ServerUrl. This value must point to the URL of the DSC pull service on the pull server machine.
- AllowUnsecureConnection. Note that we are using HTTP port 8080 to access the service, and in this simple example, we are using an unsecured connection, so we set the value to “True”.
We must set the ConfigurationID property of LCM. This is the value of the new GUID that was used to create the configuration file that the node will be downloading (in this example it is the GUID of SimpleConfigurationForPullSample.ps1). To change LCM default from push to be in pull, we must change the RefreshMode property of LCM to be “PULL”.
Set up DSC on target node
Setting LCM on pull clients
In the “Configure target node for pull mode” section of this post, we saw how a configuration can be modeled to set the configuration of the Local Configuration Manager. To configure the LCM, we need to run the Set-DscLocalConfigurationManager command on each of the pull clients. The example meta-configuration file addresses one client, because it has a unique configuration identifier which differentiates it from other configurations intended for other clients.
To run Set-DscLocalConfigurationManager, we provide the following parameters.
– ComputerName: In this case, the value of the ComputerName parameter is localhost, because we are configuring the local node.
– Path: The path to the location where the localhost.meta.mof file resides. If the -Verbose switch is used on invocation, we can see the following output on a successful execution of Set-DscLocalConfigurationManager.

Once all the pull clients are configured, each node can download its configuration from the pull server. From this point on, the DSC consistency engine ensures that the desired state is retained over time until it is explicitly changed by the user. Each node’s configuration will be updated with the configuration defined in its mof file that was deployed with the checksum file on the pull server.
Conclusion
In this blog post, we have seen how we can use DSC to configure machines locally and remotely, and have looked at the two modes of deployment, push and pull. In this series of blogs, we plan to cover custom resources, security, and other important aspects of the DSC platform.
Louis Castaneda[MSFT]
Narine Mossikyan
PowerShell Team
[Updated 5/29/14]
 Light
Light Dark
Dark
0 comments