
New-Workflow –MakeItEasy: Authoring Workflows using PowerShell Extended Syntax
Some time back, in his blog post, Jeffrey Snover introduced one of the new Windows PowerShell 3.0 feature – Windows PowerShell Workflow. In that post, you saw a glimpse of how to author workflows using PowerShell syntax. This post dives into more details of authoring workflows using PowerShell syntax and various extensions to it.
Why we chose to extend the PowerShell Language for Workflow Authoring
As Jeffrey mentioned in that blog post, Windows Workflow Foundation traditionally has been a developer-focused feature that requires Visual Studio and a lot of code to create a solution. To review the solution, another person has to understand XAML or they have to install Workflow Designer. Authoring workflows by using Windows PowerShell is much easier and overcomes the development hurdles. Additionally, you get the benefit of sharing the workflows by simply pasting them into an email or publishing them online.
Another reason, as pointed out in another blog post, is our promise to the PowerShell community about learning once and reusing that knowledge over and over again:
“ … We respect your investment in learning Windows PowerShell by reusing concepts over and over to make sure learning Windows PowerShell was the best thing you ever did. …”
While designing the workflow authoring experience, we kept this promise in mind. We also thought of ways to work with existing tools and, hence, came up with two approaches to workflow authoring:
- Script-based Workflow Authoring: Leverage and extend the PowerShell language for workflows so IT Pros can reuse their existing PowerShell scripting skills.
- XAML-based Workflow Authoring: Plug into the Visual Studio Workflow Designer experience so developers can easily get the management activities in their existing environment and continue leveraging their XAML and Visual Studio knowledge.
This post will dive into details of the former approach for workflow authoring: PowerShell script-based workflows. In a later blog post, we will look into the XAML-based authoring experience.
Although there are multiple ways to showcase the new script-based workflow experience, we will explain it by using a real-world example: Creating virtual machines on a Hyper-V capable host machine and joining those virtual machines to a domain. This example is a good workflow sample because it has all the necessary workflow characteristics – long running task across multiple machines that require robustness due to machine reboots.
The benefit of this approach is that by the end of this blog, you will have a real-world workflow sample that can easily be used in your environment. ![]()
Workflow Extensions to the PowerShell Language
In next couple of sections, we will look at various extensions to the PowerShell language that expose and enable Windows Workflow Foundation concepts.
Workflow Keyword
The most important of extensions to the PowerShell language is the workflow keyword. To create a workflow, use the workflow keyword, followed by a name for the workflow and, then, followed by the body of the workflow, such as:
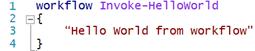
As you can see, if you know how to write a PowerShell function, you are 80% on the way to being able to write a workflow.
Note: The behavior of a workflow is different than a function and it has a few more rules that we will delve into in another blog post soon.
After knowing how easy it is to create a workflow, let’s build our workflow for creating virtual machines (VM). We will name it Install-VM – using a verb-noun name just like those of any other PowerShell command. We will add parameters to our workflow that will specify virtual hard disk (VHD) location for VMs, default prefix for VM name and the number of VM to create.
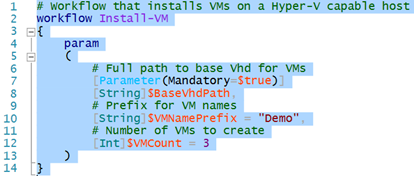
Note: As you might notice, in Windows PowerShell Workflow, you can specify default values for the parameters, just like you do in functions.
In the example above, notice that Windows PowerShell ISE recognizes the workflow and its content and colorizes them appropriately, just like it does for any other PowerShell command.
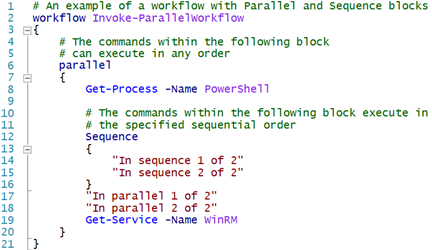
Parallel Execution
The underlying Windows Workflow Foundation runtime supports running activities or commands in parallel. We expose this capability in Windows PowerShell Workflow through the parallel keyword, as well as foreach-parallel, an enhancement to the ForEach statement. With parallel execution, you can significantly reduce the operation time across a set of machines.
Additionally, to execute a collection of activities or commands in order (not in parallel) within a parallel block, use the sequence block, such as:
Now let’s go back to our previous Install-VM workflow. We’ll use a foreach –parallel block to add logic for creating VMs in parallel.
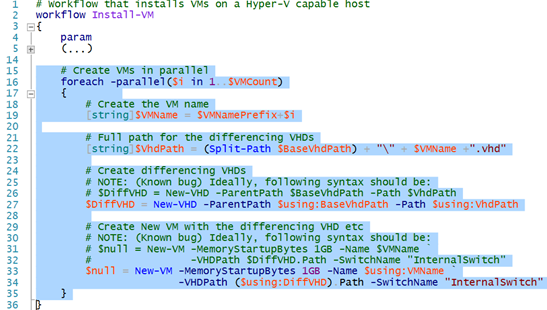
Note: In order to call New-VM and New-VHD commands, you need to install Hyper-V module.
Checkpoint Workflow Execution
Windows Workflow Foundation allows a workflow to persist or checkpoint all aspects of its state by using an explicit call to the Persist activity. The same feature is exposed through the Checkpoint-Workflow command in Windows PowerShell Workflow.. With the use of Checkpoint-Workflow, Window PowerShell Workflow checkpoints the workflow state and saves the workflow data to the persistence store. In case of unintended interruptions (machine reboot, process crash, network disruption, etc.), the workflow execution resumes from the last persistence point. Alternatively, to achieve similar results, you can add -PSPersist $true at the end of an activity or command.
Now let’s add a Checkpoint-Workflow call to our previous Install-VM workflow to save the workflow state.
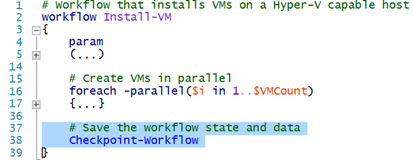
Note: Just look at the param and foreach –parallel block above and you will notice another cool ISE feature: collapsible regions.
InlineScript: Running Isolated Blocks of Windows PowerShell Script
By default, each command in a workflow is executed with no PowerShell state sharing. Variables created by one command are not visible to the next command. But, by using the inlineScript keyword it is possible to execute a collection of PowerShell commands as a single execution unit
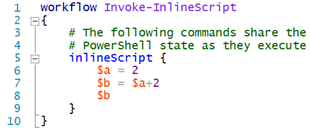
Note: As mentioned in section 5 of PowerShell Workflow architecture, for reliability reasons, by default, inlineScript runs in a separate process
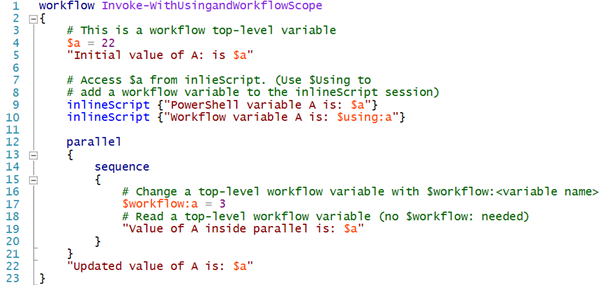
Accessing Workflow Variables from Different Execution Scopes
Just like PowerShell remoting in PowerShell 3.0, Windows PowerShell Workflow supports the $Using:<variable name> scope modifier. This new scope modifier can access workflow variables into the context of an inlineScript.
Unlike PowerShell, Windows Workflow Foundation does not support dynamic scoping of variables. This means that a variable that is defined in the parent scope cannot be redefined in a child scope. In Windows PowerShell Workflow, to change a workflow-scoped variable from any inner scope, use the $workflow:<variable name> scope modifier.
Now, we will use our new foreach -parallel, inlineScript and $using concepts, to update our previous Install-VM workflow by adding logic for starting the VMs and getting their IP addresses in parallel.
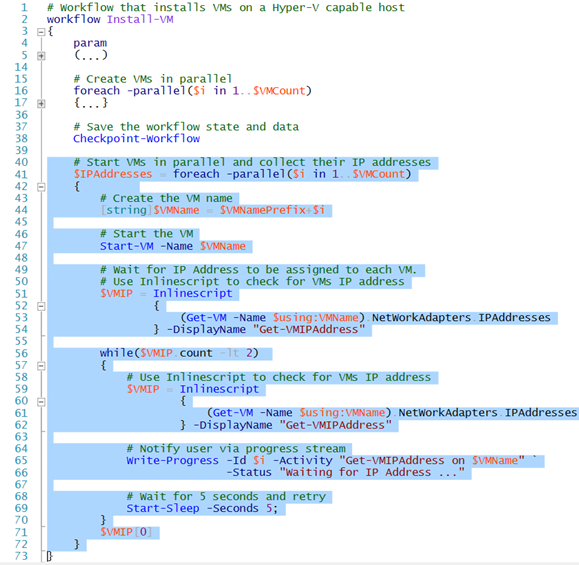
Note: All the commands in workflow have a –DisplayName common parameter to provide a custom or friendly name for the command. In the previous example, we used it on inlineScript.
Suspending a Workflow from within the workflow
Windows PowerShell Workflow has a Suspend-Workflow command that suspends the workflow during its execution. This command gives the workflow author complete control over the workflow suspension behavior independent of the workflow user. For example, a workflow can detect a problem that requires manual intervention, notify the operator of this condition, and then suspend operations until the operator corrects the situation and resumes the workflow.
Let us update our previous Install-VM workflow to send an email to a senior admin and suspend itself. Once the senior admin gets the email, he/she can resume the workflow manually.

Additionally, you can integrate the workflow execution with the Management Odata IIS Extension feature of Windows Server 2012 to manage workflows from any Windows or non-Windows device that can understand HTTP requests. The PowerShell team demonstrated this feature at TechEd North America and TechEd Europe 2012. You can see a recording of this session here (look at the 1:03:17 mark).
Workflow Calling Workflow
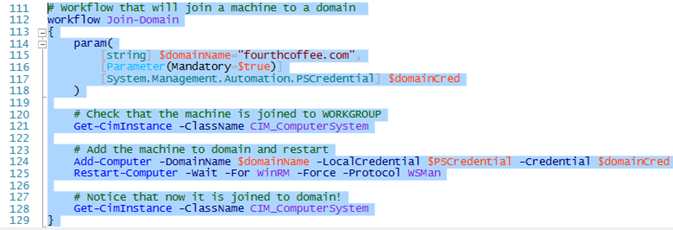
This feature of Windows PowerShell Workflow enables you to re-use workflows to create higher-level workflows, while leveraging your existing workflow investment, workflows from other users, and workflows from the PowerShell Community. To use this feature, the child workflow (e.g. Join-Domain) must be defined and imported into the PowerShell session in which the parent workflow is defined..
Let’s define a Join-Domain workflow that joins a machine to a domain. To complete the scenario, we will call Join-Domain from our Install-VM workflow.
Updated Install-VM workflow looks like as follows (and script is attached at the end of the blog post):
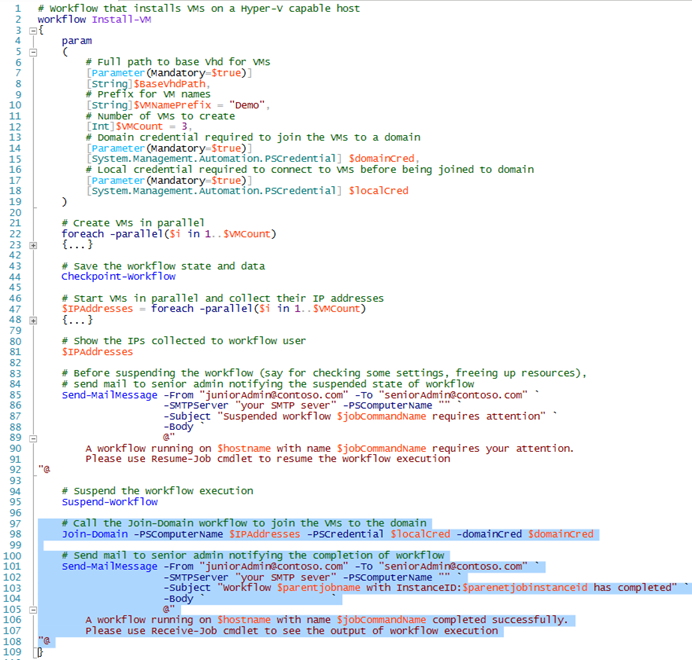
NOTE: Notice that the param block of Install-VM has two additional parameters: $domainCred and $localCred. The Join-Domain workflow needs these values.
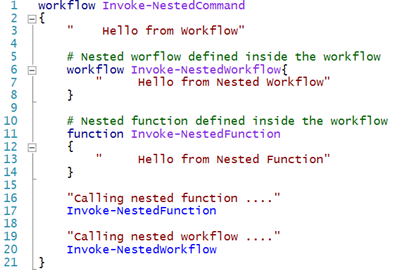
Additionally, you can define nested functions or nested workflows inside the workflows as well, such as:
Finding and Running Your Workflow
As explained by Mir Rosenberg in an earlier blog post, Windows PowerShell Workflows behave just like other Windows PowerShell commands. You can discover them by using Get-Command:
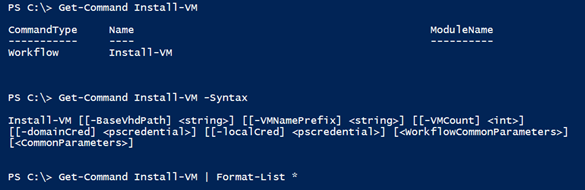
You can run them interactively or use the AsJob common parameter of workflows to run any workflow as a background job.
![]()
![]()
Join-In
Now that you know how easy it is to author workflows using PowerShell syntax, please try your hand at creating couple of workflows for long-running multi-machine scenarios and tell us about your experience (and feature requests J ). As always, you can send feedback directly to us by using the Windows PowerShell Connect site.
While we create our next set of blog posts about Windows PowerShell Workflow, enjoy some additional resources about Windows PowerShell 3.0 and Windows PowerShell Workflow:
- PowerShell v3: Workflow is the Flagship Feature (by Don Jones – PowerShell MVP)
- PowerShell Workflow, Defined (by Hal Rottenberg – PowerShell MVP)
- PowerShell Workflow module
- PowerShell Workflow SDK documentation
- Authoring a Workflow using PowerShell Activities
Hemant Mahawar [MSFT] Senior Program Manager Windows PowerShell
 Light
Light Dark
Dark
0 comments