Enable Kerberos on Cloudera with Azure AD Domain Service
In this previous blog series we documented how to integrate Active Directory deployed in virtual machines on Azure with Cloudera. In that scenario, we need to deploy and maintain the domain controller VMs ourselves. In this article, we will use Azure Active Directory Domain Service (AADDS) to integrate Kerberos and single-sign-on with Cloudera. AADDS is a managed service that lets you join Azure VMs to a domain without the need to deploy your own domain controllers.
Here are the main tasks to complete:
- Enable Azure AD Domain Service. By the end of this step, we will have a classic VNet managed by AADDS. We will have a Windows VM joined to the domain with Active Directory tools to view and manage the domain services.
- Connect the Azure classic VNet used with AADDS with an Azure Resource Manager (ARM) VNet in which the VMs will be deployed. By the end of this step, we will have an ARM VNet connected to the classic VNet via VPN and managed by AADDS. AADDS currently only works with Azure classic VNet. Hopefully ARM VNet support will come in the near future, in which case this step will become unnecessary. [Update 8/2017: Azure now supports VNet peering between classic and ARM VNet as long as the two VNets are in the same region. This step can now be greatly simplified with VNet peering if the VNets are in the same region.]
- Deploy and configure the VMs. By the end of this step, we will have Linux VMs joined to the domain, with Kerberos enabled. We will be able to ssh into the Linux VMs with users defined in AADDS.
- Enable Kerberos on Cloudera.
Step 1: Enable Azure AD Domain Service
- Follow this AADDS documentation to enable Domain Service. Although we will connect the classic VNet used with AADDS with the ARM VNet for the VMs later in Step 2, here are a few things to plan head because they can't be changed after AADDS is enabled -
a. Make sure the classic VNet to be used with AADDS is deployed in a region where your VMs will be deployed to.
b. Make sure the address space of the classic VNet to be used with AADDS don't overlap with the address space for the ARM VNet. For example, use 10.1.0.0/16 for the classic VNet, and 10.2.0.0/16 for the ARM VNet.
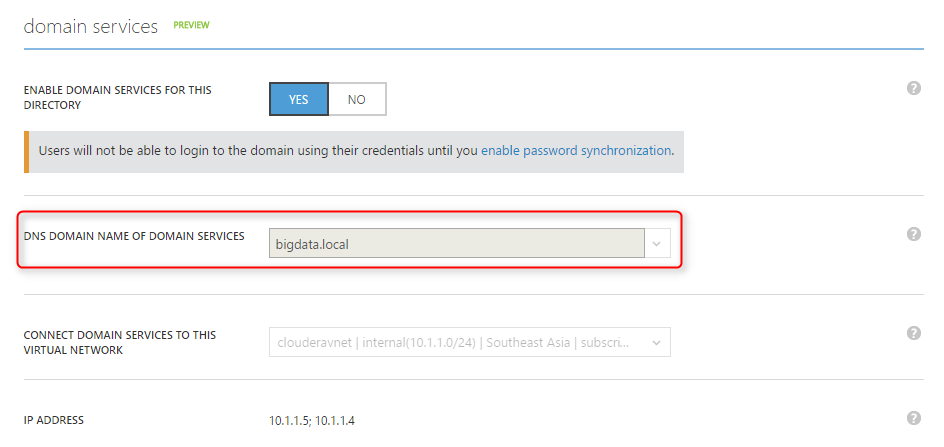
c. When you enable AADDS, you can choose the dns name for your domain. It doesn't have to be the default "onmicrosoft.com" dns name, you can use, for example, "bigdata.local".
2. Once AADDS is enabled, deploy a Windows VM to the subnet of the classic VNet managed by AADDS.
a. Add AD and DNS tools using "Add roles and features" wizard.

b. Join the VM to the AADDS domain, for example "bigdata.local", using a user that belongs to the "AAD DC Administrators" group created in the previous step. After rebooting the VM, log in as a domain admin, we can now use the AD and DNS tools to manage the domain.
Step 2: Connect the "classic" VNet used with AADDS with an Azure Resource Manager (ARM) VNet in which the VMs will be deployed
[Update 8/2017: Azure now supportsVNet peering between classic and ARM VNetas long as the two VNets are in the same region. This stepcan now be greatly simplified with VNet peering if the VNets are in the same region.]
- Create an ARM VNet in which we will deploy the VMs, make sure it's in the same region as the classic VNet and that its address space doesn't overlap with that of the classic VNet.
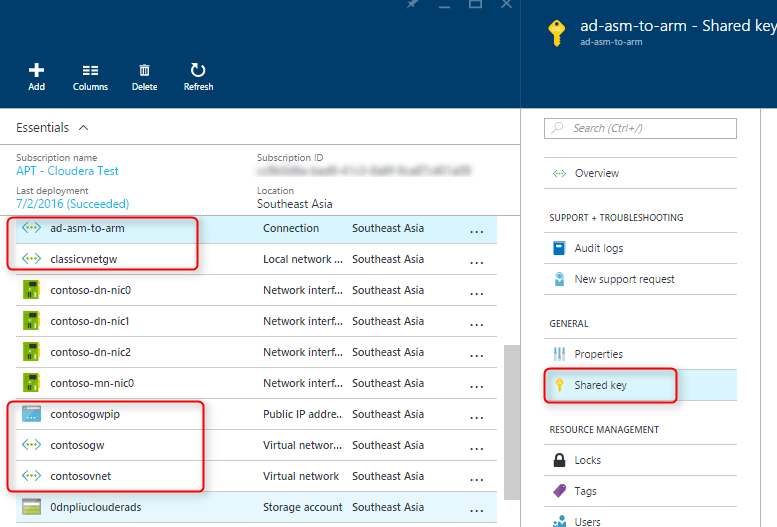
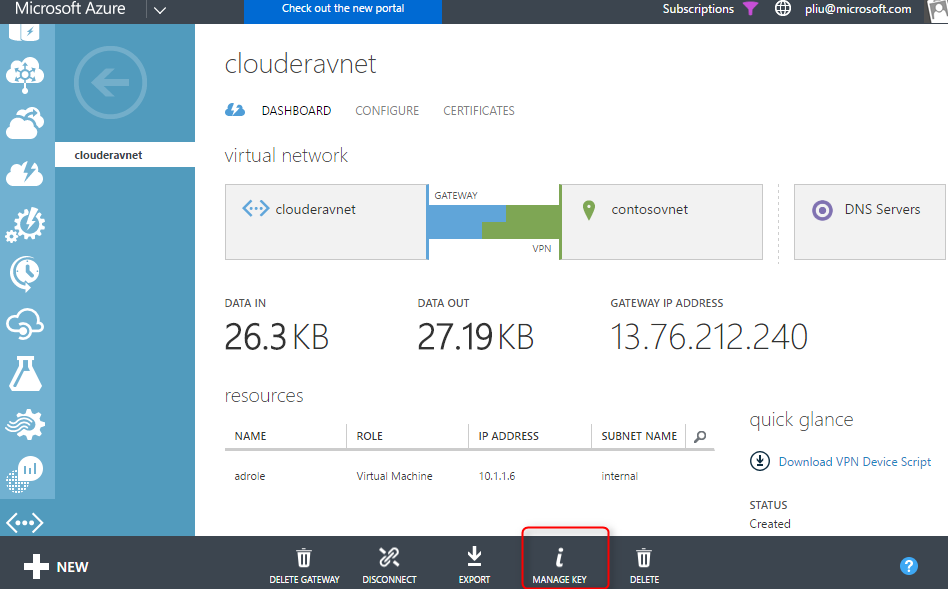
- Follow these steps to create a gateway in the classic VNet and ARM VNet respectively, then connect the two VNets. Note that you don't have to use the scripts in the documentation, you can create both gateways and the connection from the Azure portal. The "shared key" used to make the connection between the two gateways can be accessed from the portal of the classic VNet:
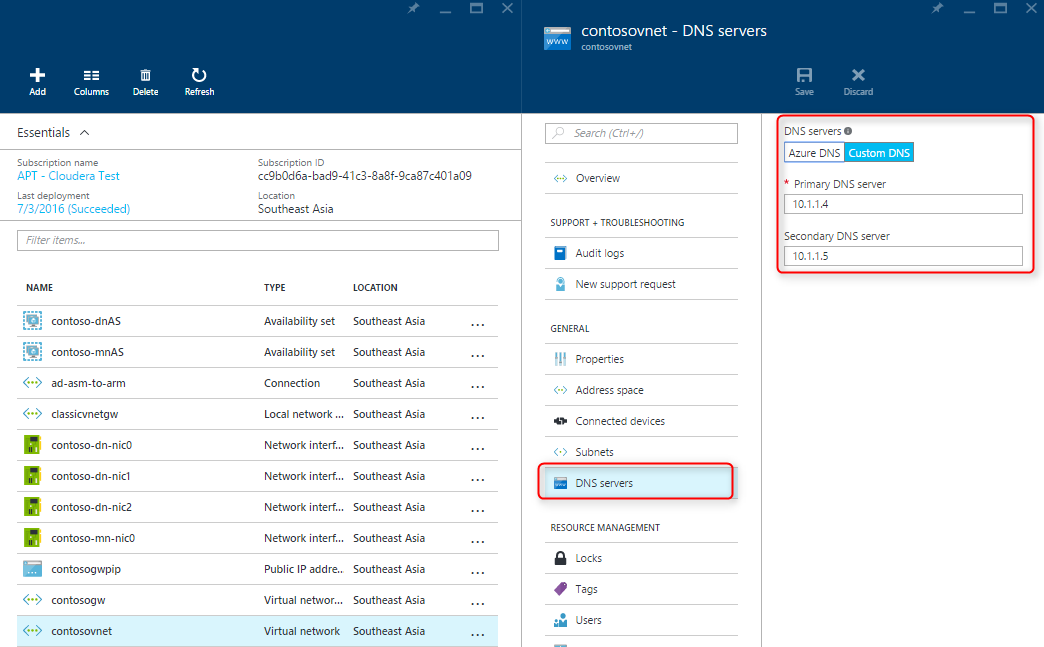
3. The classic VNet should already be configured to use AADDS for DNS in Step 1. Now configure DNS for the ARM VNet to use AADDS as well:
4. Plan for the IP addresses you will assign to the VMs. If you deploy the VMs using this Cloudera ARM template in Step 3 and the address prefix for the VM subnet is, for example, 10.7.0, then the Cloudera master nodes start with 10.7.0.10, and the data nodes start with 10.7.0.20. Add a Reverse Lookup Zone for the domain controllers and another for the VMs. Make sure to update the PTR records for the domain controllers so that they show up in their reverse lookup zone.
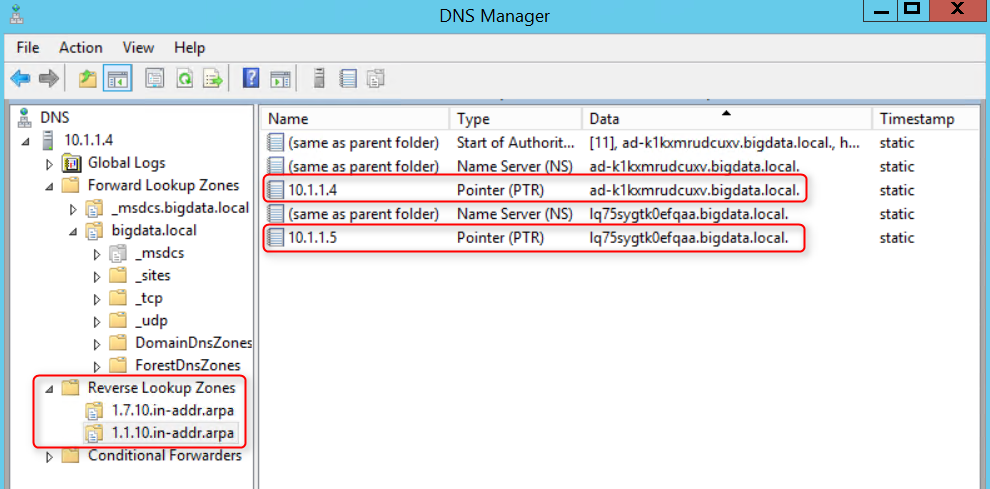
5. Add the DNS records for the VMs
Step 3: Deploy and configure the VMs
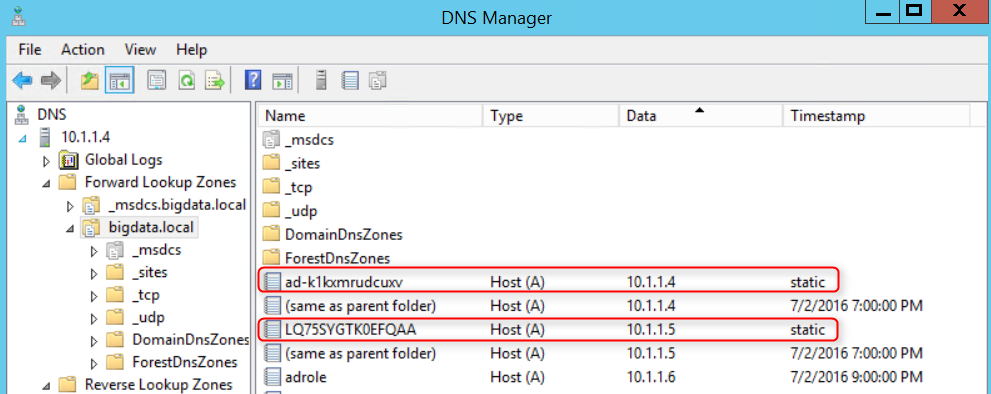
- For Kerberos to work, we need the FQDN of the domain controllers. The host name generated by AADDS can be found in the DNS tool:
2. In this example, we will use an ARM template originally created for a Cloudera cluster to deploy Cent OS VMs, however, Cloudera specific code is only used in Step 4. You can deploy Cloudera in another way, or you can customize the template to deploy any Linux VMs. In any case, note the following configurations that made the integration between the VMs and AADDS possible:
a. ntp, sssd, samba, and kerberos are installed and configured on each VM (see initialize-node.sh and the configuration templates in the config folder)
b. AADDS domain controller names and IPs are passed to the ARM template in the following parameters so they can be automatically set in the configuration files, for example, the following values match the screenshots above. It's also important to set useLdapIDMapping to True when we use sssd rather than NIS (NIS is not supported on AADDS):
  "adDomainName": {"value": "bigdata.local"},
 "PDC": {"value": "ad-k1kxmrudcuxv"},
 "BDC": {"value": "LQ75SYGTK0EFQAA"},
 "PDCIP": {"value": "10.1.1.4"},
 "BDCIP": {"value": "10.1.1.5"},
 "useLdapIDMapping": {"Value": "True"}
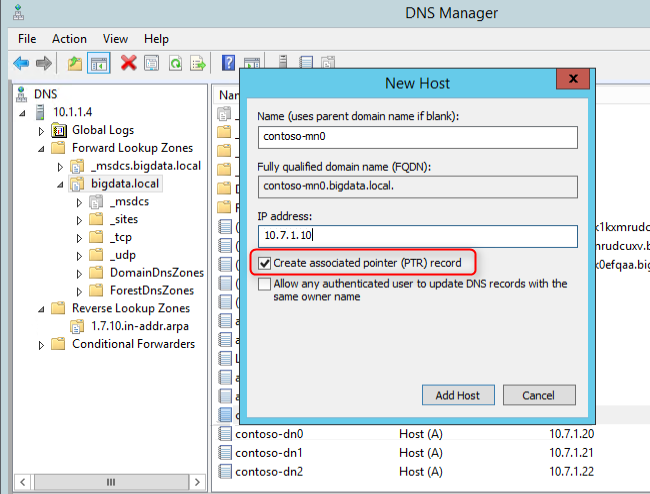
Deploy azuredeploy.json. Once done, from the Windows VM on the classic VNet, we should be able to ping the linux VMs using their FQDN, for example contoso-mn0.bigdata.local, and vice versa. We should also be able to ping Linux VMs from each other using their FQDN. To verify reverse DNS works, run "host <linux vm ip>" on a Linux VM, and it should return the FQDN for that IP.
3. Join the Linux VMs to the domain by ssh into each VM and run the following commands with root privilege:
 #join the domain with a domain admin credential
#this should be a user in the "AAD DC Administrators" group created in Step 1
 > net ads join -Uadadmin@BIGDATA.LOCAL
 > authconfig --enablesssd --enablemkhomedir --enablesssdauth --update
 > service sssd start
 > kinit adadmin@BIGDATA.LOCAL
#if you see an output from the following command, then everything is set up correctly
 > getent passwd adadmin@BIGDATA.LOCAL
Now we should be able to ssh into each VM using a user defined in AADDS. Up till this point, other than we leveraged the ARM template originally created for Cloudera to deploy the VMs, there's nothing specific we did for Cloudera. In fact, Cloudera bits are not yet installed on the VMs.
Step 4: Enable Kerberos on Cloudera.
- Install Cloudera on the VMs by deploying azuredeploy_postad.json. The following parameters must match what was specified when deploying azuredeploy.json in the previous step. (This is not necessary if you deployed Cloudera using a different method than our sample ARM template.)
adminUserName
adminPassword
dnsNamePrefix
adDomainName
nodeAddressPrefix
numberOfDataNodes
region
tshirtSize
2. Verify Cloudera is installed correctly by RDP into a VM (could be the Windows VM created in the AADDS classic VNet), open a browser, and access https://<dnsNamePrefix>-mn0.<adDomainName>:7180. Use the Cloudera Manager admin credential specified when deploying the template in the previous step.
3. Follow this documentation to enable secure LDAP on AADDS. This is required by Cloudera Manager when issuing LDAPS requests to import KDC account manager credentials.
4. If you haven't already, create an Organization Unit in AADDS. This is required because users in AADDS are created in Azure AD and synced to AADDS, only users under an Organization Unit can be created inside AADDS.
5. Follow this Cloudera documentation to enable Kerberos using the wizard in Cloudera Manager
a. Make sure to install JCE Policy file
b. We already installed OpenLdap client library on all VMs using our template.

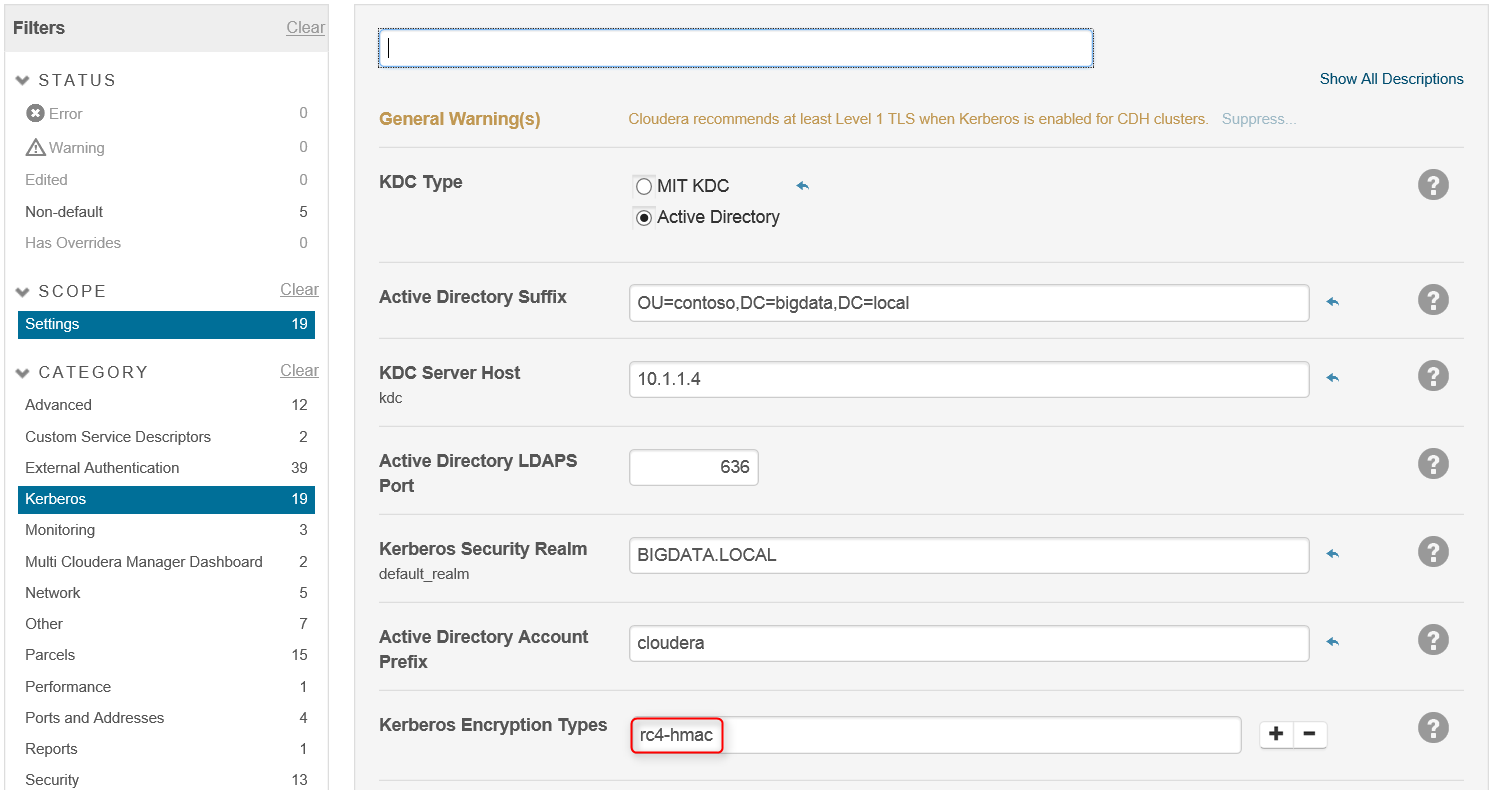
c. Specify domain info, note that here we specify encryption type rc4-hmac (aes256 doesn't seem to work with AADDS, however, JCE policy file is still needed for hadoop commands to work):
6. Verify Kerberos is set up correctly by running "hdfs dfs -ls /" as the built-in hdfs user on a Cloudera VM, it should render a security error. Create a hdfs@<domain name> in the Organization Unit created earlier, ssh in as this domain user and run the command again, it should succeed.
(Many thanks to my colleague Bruce Nelson who enabled Kerberos on Cloudera with AADDS first and made me aware of this solution.)