Integrating Cloudera cluster with Active Directory (Part 1/3)
[Update 8/2017: With Cloudera Director support on Azure, you can now automate this whole process of enabling Kerberos on a Cloudera cluster. See this Github repo for instructions and scripts.]
In this blog post, we will show you step by step how to secure a Cloudera cluster by enabling DNS, Single-Sign-On (SSO) and Kerberos with Active Directory. While we will deploy Active Directory and Cloudera VMs in Azure, because Azure makes deployment much easier, it doesn't have to be Azure to integrate AD with Cloudera. Many of the steps should apply to AD and Cloudera in general. Here's what this system topology looks like.

The following steps are described in details.
- Deploy Active Directory with HA in Azure
- Deploy Linux VMs for the Cloudera cluster
- Enable Active Directory DNS on the Linux VMs
- Sync Linux VMs with Active Directory time service
- Join the Linux VMs to Active Directory and enable Single-Sign-On
- Install Cloudera
- Enable Kerberos on Cloudera
- Enable Single-Sign-On for Cloudera web consoles
Part 1 of this blog will cover the first 4 steps, Part 2 will explain how to join Linux VMs to AD and enable Single-Sign-On, and Part 3 will cover the remaining Cloudera specific steps.
Step 1: Deploy Active Directory with HA in Azure
By the end of this step, we will have an AD forest with a primary domain controller (PDC) and a backup domain controller (BDC). We can create this AD forest by simply deploying this template on Azure Quick Start Templates repo on GitHub. Among the parameters to the template, the following two impact the rest of the components in this system:
- Virtual Network (VNet): the AD VMs and the Cloudera VMs must be in the same virtual network (which also implies the same region). The AD VMs and the Cloudera VMs can be in different subnets of this VNet.
- Domain name: this is the domain that will be used by all the VMs in this system. In this example, we specify mydomain.com as our domain name.
Step 2: Deploy the Linux VMs for Cloudera cluster
By the end of this step, we will have 4 identical Cent OS VMs in Azure, with necessary SSO and Kerberos packages installed and /etc/krb5.conf, /etc/samba/smb.conf, /etc/sssd/sssd.conf, and /etc/ntp.conf configured.
- If we want a different subnet for Cloudera than AD, we can go to the Azure portal and create a subnet for Cloudera. Make sure to use the name and IP address of the VNet created in Step 1 and the subnet created here as the network parameters for the template below.
- Normally we can deploy a Cloudera cluster in Azure using this template. However, it uses public DNS and hosts files for domain resolution. To integrate with AD instead, we need to refactor this template by splitting it into two parts: the deployment of the VMs, and the installation of Cloudera. The refactored template can be found here. Deploy azuredeploy.json in this step. The following parameters must match what we have created in #1.
-
- adDomainName, for example, bigdata.com
- PDC, the host name of the PDC, for example, adpdc
- BDC, the host name of the BDC, for example, adbdc
- PDCIP, the static private IP of the PDC, for example, 10.0.0.4
- BDCIP, the static private IP of the BDC, for example, 10.0.0.5
- region, the same region as the AD forest
- virtualNetworkName, the same virtual network as the AD
- vnetResourceGroup, the resource group where the virtual network is located, not necessarily same as the resource group the Cloudera VMs will live in
- subnetName, the subnet for Cloudera VM, must be created in #1 if not already exists
- subnetPrefix, the IP CIDR for the Cloudera subnet
- nodeAddressPrefix, the first 3 octets of the subnetPrefix
We can deploy either a production or an evaluation type of cluster with any number of data nodes, for simplicity, here we will deploy an evaluation cluster with 1 master node and 3 data nodes. If we specify cloudera in the dnsNamePrefix, and bigdata.com in adDomainName, the 4 VMs will have these FQDNs:
-
- cloudera-mn0.bigdata.com
- cloudera-dn0.bigdata.com
- cloudera-dn1.bigdata.com
- cloudera-dn2.bigdata.com
However, the VMs are not addressable with these domain names until we integrate the VMs with Active Directory DNS. All the VMs have static IP addresses within the VNet. The deployment also populates the following files in each VM with the specified AD info:
-
- /etc/resolv.conf
- /etc/ntp.conf
- /etc/krb5.conf
- /etc/samba/smb.conf
- /etc/sssd/sssd.conf
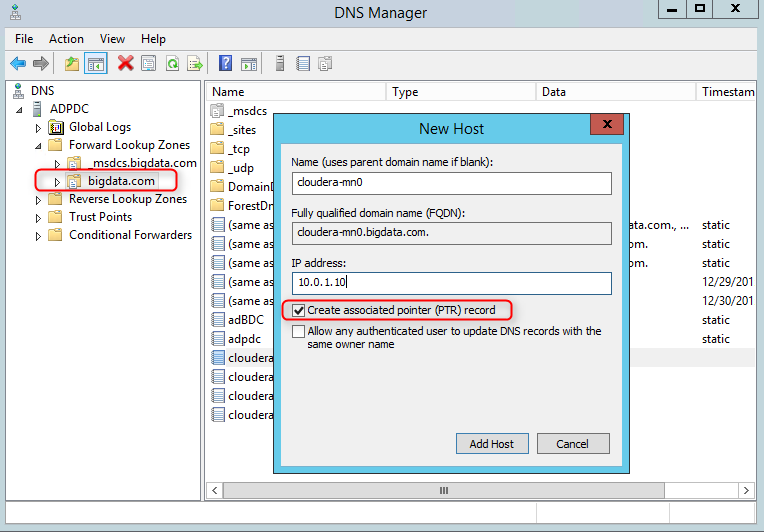
Step 3: Enable Active Directory DNS on Linux VMs
By the end of this step, we should be able to ping the Linux VMs with their FQDN from within the VNet. Note that registering a domain name on the Internet is out of the scope of this blog, so here we will use the AD domain, for example, bigdata.com within the VNet.
1. RDP into the PDC, and open the DNS Manager. Note that if DNS Manager is not installed, install it by "Add Roles and Features" -> Features -> Role Administration Tools -> DNS Server Tools
2. Add a new reverse lookup zone if there's none that corresponds to the subnet address range where the Linux VMs are located

3. Add the Linux VMs to the forward lookup zone with their static IPs, check "create/update associated PTR record"
4. On the Linux VMs, verify VMs are reachable by their DNS names:
 hostname -i //should display the static IP of the VM
host <VM static IP> //should perform DNS reverse lookup and display FQDN of the VM
ping <VM name.mydomain.com> //should successfully reach any of the 4 Cloudera VMs within the VNet
Step 4: Sync Linux VMs with Active Directory time service
By default, the AD domain controllers deployed in this example are already running time service for its clients to sync. The Linux VMs also have their /etc/ntp.conf configured to sync with AD. If your AD doesn't have time service running, you can use the steps below to configure it.
1. On the PDC, configure the Windows Time service by running this command, time.windows.com is a valid time server, or you can use another time server of your choice, restart the time service
 w32tm /config /manualpeerlist:"time.windows.com" /syncfromflags:manual /reliable:yes /update
net restart w32time
2. On the BDC, restart the time service by running the following command:
w32tm /config /syncfromflags:domhier /update
3. On the Linux VMs, verify time syncing with the following command, the "system peer" in the output should point to the PDC:
ntpdc -c sysinfo
Now we have an AD forest with a PDC and a BDC. We have Linux VMs addressable by AD DNS and syncing to the AD time service. In Part 2 of this blog, we will join the Linux VMs to AD and enable ssh with AD users.