It’s not about what we have, it’s about what we share… Part Two.
In part one I gave an overview of what was possible and started down the journey of the verious bits of setup that had to be done, eith erby you, or setup that has already been done by the WIndows Live team. In this article I show how the OAuthWRAP protocol works with Messenger Connect.
Windows Live ID wants to share some secrets
Windows Live ID is the Authorization Server. It implicitly trusts the Live IDs in its database because it created and issued them. But when it gets down to your site, it needs to have some assurances that the site that comes to it purporting to be your site is in fact your site. To this end it will create and share a couple of secrets with you. In OAuth WRAP terms, your site is known as the client application, hence the secrets are termed the client ID and the client secret. It's important that you keep these secrets, well, secret.
To obtain these secrets you must go through a registration process with Windows Live ID (the Authorization Server). You'll be asked for the site's domain name and the URL of a callback handler (covered later). The secrets will be stored against the domain and URL. Whenever your site communicates with Windows Live ID, all the parameters must match up; the URL, the domain, the client ID and the client secret. Security and authorization error messages invariably end up with one or more of these parameters not matching up correctly.
While the product is in Beta, you can't register a domain unless you have also applied to join the Beta and been accepted on to the program. You are informed by email of your successful registration. This process can take a few days, so make sure you allow for it in your schedule. You'll be asked questions about the number of users that hit your site and the scenarios you want to try. As a general rule, if you fill in all the fields accurately, the scenario you want to deploy is supported and the site is a genuine site, you will be accepted on to the Beta program. You'll need a Live ID to register.
To register, go to https://dev.live.com and click the "Join the Beta" button.
Once you are registered, you can add additional URLs and manage their secrets. You can also upload logos that will be used in authentication challenges and so on. This is done at https://manage.dev.live.com.
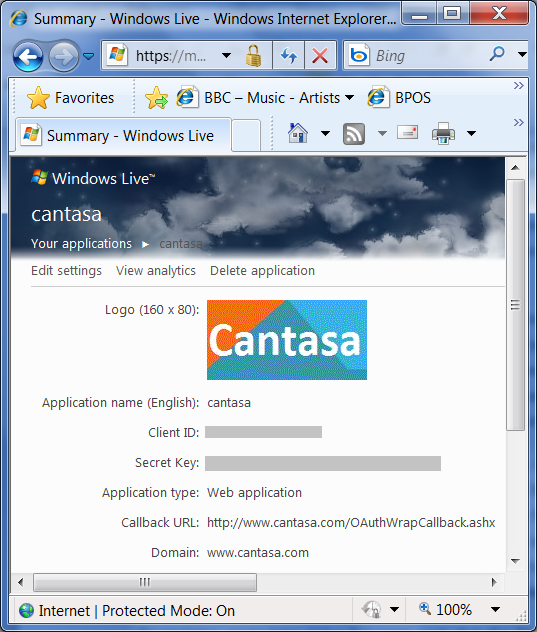
Figure 2: Client application management at https://manage.dev.live.com
Protocol Exchanges
Once all this basic setup (certificates, client ID, secret, callback URL, domain name) has been completed, you can create/modify the pages in your site with the aid of the Windows Live SDK.
In this section, you'll see how the browser, Windows Live ID, the Windows Live API Service, your site and so on all communicate with each other. In later sections we'll talk about how most of this is wrapped up in the OAuthWRAPCallback assembly plus some javascript libraries. It's useful to understand how the elements communicate with each other before understanding what the libraries and Windows Live tags do. Even though this means you'll have to live with a degree of ambiguity until you understand more - but stick with it, it is better this way.
First, a protocol diagram:
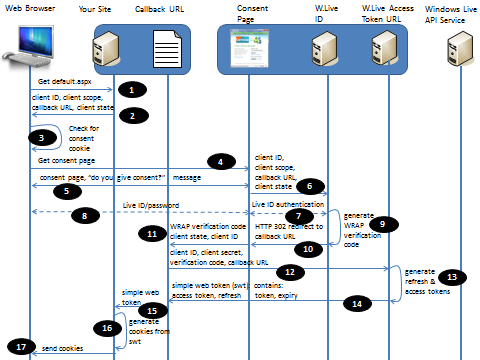
Figure 3: OAuthWRAP protocol exchanges in Messenger Connect
Each element is numbered 1 - 17. At the end of this, the browser will have cookies that represent security tokens. Your web site will take these cookies, convert them to tokens and use them to access, for example, Windows Live profile information, or contact information.
- 1. The web browser connects to your site.
- 2. The web browser loads a page that contains a "Connect" button. Embedded in to this button is the client ID you obtained when you registered your application, the callbackURL you registered, a thing called the client scope (basically a permission type that will be covered later) and optionally, client state information.
- 3. Clicking the button causes the browser to see if it has already gone through a consent process by checking for a consent cookie. In this case we assume no consent cookie is present.
- 4. This causes the browser to go to a special page on Windows Live called the "Windows Live Consent page".
- 5. The consent page prompts the user for credentials, but also, importantly asks the user "are you happy to be providing this site, with the following information". The consent page looks like this:
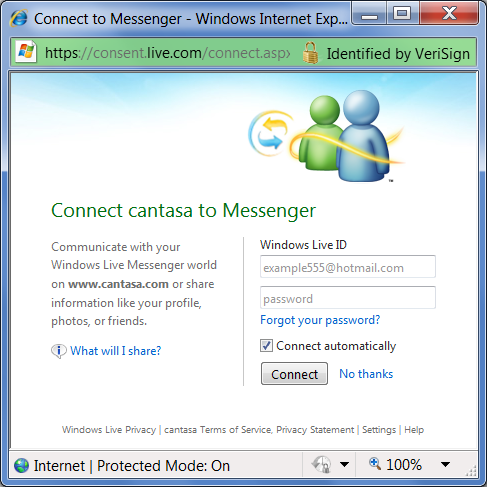
Figure 4: Windows Live Consent Page
...clicking the "what will I share" link, shows something similar to the following:

Figure 5: What you will share
- 6. At the same time, the consent page gathers up the client ID, scope, callbackURL and state, and makes a call to the Windows Live ID Authentication URL.
- 7. Windows Live ID is what is asking for the Live ID and password.
- 8. Because the user typed the credentials in to the consent page and they were accurate...
- 9. ...Windows Live ID validates the password against the Windows Live ID and sees a genuine user. It now generates a short lived verification code and records this fact against the specified Windows Live ID in the back-end database.
- 10. Windows Live ID generates an HTTP 302 redirect to the callbackURL (which it obtained in step 6)
- 11. The verification ID, client ID and client state are passed to the callbackURL.
- 12. It's the callbackURL that has access to the client secret (the one that was generated by https://manage.dev.live.com when you registered your site. Remember the screenshot in figure 2?). The code for the callbackURL is provided in an assembly as part of the Live SDK. The assembly checks in web.config to retrieve the secret which must match exactly the secret stored at manage.dev.live.com. Although it might appear to be a security risk to store sensitive information like this in a file on a web server, by default IIS request filtering protects this file. Of course though, if someone manages to find an exploit - there is your client secret for all to see. I'll talk about a solution to this problem later.
- 13. The client secret is checked to make sure it matches the one stored against the specified client ID. The short-lived verification code is checked to see if it has expired yet. This is a simple protection against replay attacks. 2 tokens are now generated: the refresh token, which is long lived - 8 hours - and the access token, which has a short life. The names of the tokens are something of a give-away. You use the refresh token to get new access tokens when they expire. There is no need to re-trace every step, including authentication, to renew an access token. Simply supplying a refresh token returns a fresh access token. Say if the access token has a life of 10 minutes, it means if a Windows Live user makes a more restrictive edit to their profile, it will only be a maximum of 10 minutes before requests are no longer honoured. Of course, if the client application already has a copy of the data, then there is nothing Messenger Connect, the OAuthWRAP protocol or indeed the original owner of the data can do about that. Once past initial disclosure, it is not possible to destroy data that is now in somebody else's hands. These tokens are stored in Simple Web Token format. Recall the description in the Part One post which shows how the tokens are additionally protected by encryption and signing, and remember this requires the creator and consumer of the tokens to go through a certificate exchange which involves the exchange of public keys.
- 14. The access and refresh tokens are returned to the callbackURL along with expiry information.
- 15. The callbackURL forwards the tokens to your web site.
- 16. Your website uses a process to copy the token contents in to a collection of cookies.
- 17. The cookies are returned to the browser. Although you might expect the site to keep copies of the tokens and maintain state between the browser and the tokens, in this case, the tokens are effectively stored in cookies on the client. They are session cookies, not long-lived cookies, so when the browser is closed, the cookies are destroyed. This means to get them back again, the process has to be re-traced in its entirety. The reason for doing this is because the code that runs on your site is a very clever javascript library. Storing cookies in the browser like this makes it possible to perform apparently complex state operations entirely in client-side code.
In Part 3, we'll have a look at how the tokens are passed to the Windows Live API Service and the data retrieved. Then in subsequent parts we'll look at some code and show how the various pages and services link together. I'll cross reference the code that runs with the protocol diagram so you should be able to work out what's going on.
Stay tuned.
Planky