Copying Captured VM Image in Azure IaaS
An image is a bootable virtual hard disk (.vhd) that has been cleaned up so that it acts as a template for creating new Virtual Machines in Azure IaaS. One usually picks an image from the Windows Azure Image gallery to provision VM’s. However, a very useful scenario is where one wants to customize a VM and then export it as an image so that further VM’s could be provisioned from that same image and therefore have identical customization. In order for a Windows VM to be exported as an image, it needs to be “sysprep’d” and likewise for a Linux VM one has to do “waagent –deprovision”. The full set of steps are already well documented and can be found here for Windows and here for Linux.
However, there are a few quirks to the way the capture process works and these are not very well documented. For example, when you capture an image from the Azure portal (as described in the documentation cited above), the user interface gives no option to specify where the image (i.e. the captured VHD file) will be located – which storage account? Which container? In fact, it automatically stores the new image file in the same storage account where the original VM used to be, and the blob container is automatically chosen to be “vhds”. Further, while we do get an option to provide a name for the image – this is the name with which the image will appear in the gallery – there is no option given for naming the vhd file, which gets assigned an auto-generated unique but nonsensical name.
There is an additional issue with the image captured as discussed above. It turns out that any new VM provisioned from that image will always have its vhd stored in the same storage account as that which contains the image; i.e. one cannot provision a VM in a different storage account. This is quite significant and if one needs to put the new VM in a different storage account, then the only way of doing so is to first create an image in this other storage account by copying the previously created image from the previous storage account.
The copying of image from one storage account to another is largely a matter of copying the underlying blob, but it is not sufficient. The newly copied VHD, which is actually just a blob, needs to be published as an image, otherwise attempts to provision VM from the copied blob/vhd would give errors. This point unfortunately is also not documented very well anywhere till you stumble upon it through trial-and-error. The purpose of this blog post is to show the steps through a Powershell script for copying and publishing a new image in a storage account different from that where the image was originally created. Further, once a decision has been made to copy the image to a different storage account, then it actually works to our advantage in removing some of the restrictions faced during the initial capture of the image; i.e. better naming and ability to specify the container where it will be stored etc. During the copy process, using Powershell, one is able to specify the container where the blob will be copied as well as one gets an opportunity to name the VHD file according to the naming conventions of one’s group. Finally, we are able to publish that image with a suitable name. The script below provides a walkthrough of the steps described above and also shows how to test the newly created image by provisioning a VM out of it.
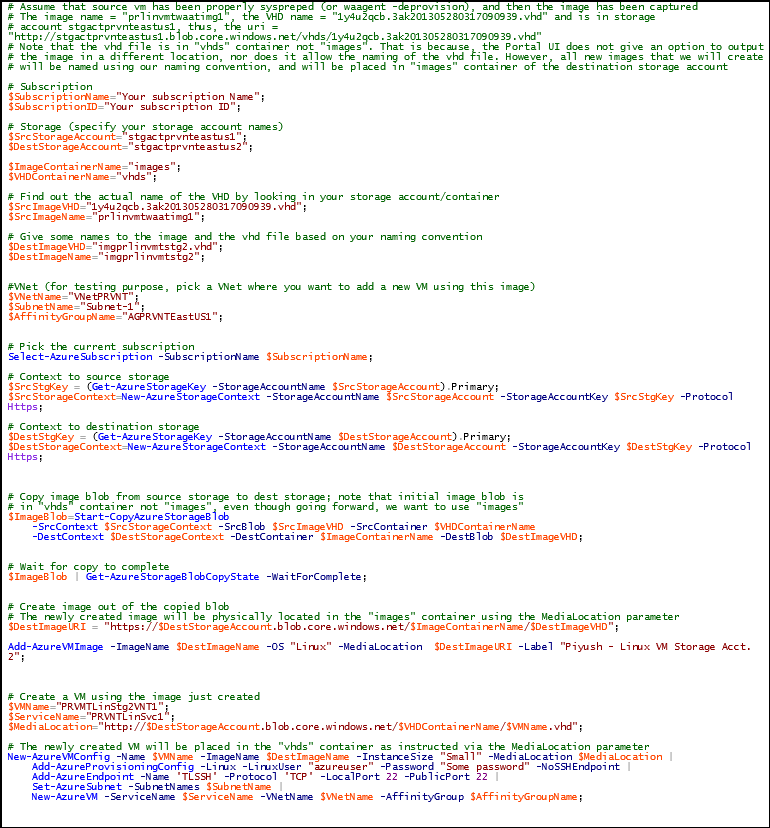
The Powershell script is attached for ease of use; see attachment.