MPI Project Template for Visual Studio 2008/2010
This new Visual Studio Gallery template sets up a project that can be used as the starting point for developing an MPI application. After template installation, an “MPI Project” entry appears in the Visual Studio “New Project” dialog. If the Microsoft HPC Pack 2008 SDK is installed, this template automatically fills the following project properties: Additional Include Directories, Additional Library Directories, Additional Dependencies and Debugger to launch.
Want to experiment with MPI application development? Don’t have an HPC Cluster handy? No worries… just configure your workstation for MPI development and leverage MPI’s shared-memory computing model. Follow these steps (click on any image to view it enlarged):
1. Using your shiny new Windows Server 2008 R2 workstation (of course)… Or any other x64 Windows OS (you can also build/run 32-bit MPI apps on Windows client, but that’s not covered herein).
2. Install Visual Studio 2010 RC.
3. Install the Microsoft HPC Pack 2008 (client utilities only).
 |
4. Install the HPC Pack 2008 Service Pack.
5. Install the HPC Pack SP1 SDK.
6. Install the MPI Project Template for Visual Studio.
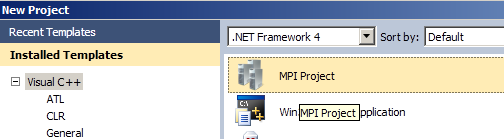
7. Open Visual Studio, create new project, and select the MPI Project Template.
 |
9. Accept project defaults and build the project. Note that the x86 project succeeds. Switch project settings to x64 and rebuild. Note that the x64 project fails to link correctly. The problem is that the x64 linker setting “General – Additional Library Directories” incorrectly references the x86 msmpi.lib path. For both debug and release x64 project configurations, this path should be “C:\HPCPack2008SDK\Lib\amd64\” instead of “C:\HPCPack2008SDK\Lib\i386\”. Simple enough. I’m told that a fix is underway.
 |
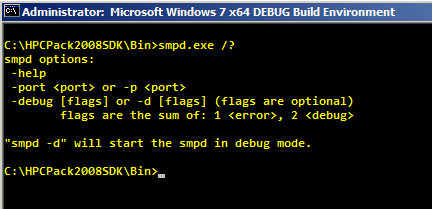
10. Now all we need to do is start the MPI service (smpd.exe) and launch our new application. As we’re not using the HPC Server scheduler to launch our MPI processes, we’ll need to run the smpd service in debug mode (smpd.exe –d). This functionality is, in fact, built into Visual Studio. Just press F5 to debug your MPI application. Or, manually start the smpd service and launch your application via the command line as follows.
 |
11. Finally, let’s launch our new MPI application using the mpiexec command (mpiexec.exe –n 4 MyMpiApp.exe).
 |
12. MPI is considered to be a rather low-level parallel computing paradigm and perhaps not well-known within the Windows developer community. But, in the Technical Computing product market there are many solver library implementations based upon MPI. It’s also a rather mature technology and a great way to learn many distributed computing concepts.
Find additional resources at https://code.msdn.microsoft.com/hpc. Daniel Moth has also recently written about the MPI Project Template, the Cluster Debugger and other resources on his blog.