Creating an Item Template Extension (Part 1)
I’ve put together a WPF AboutBox item template and released it on the Visual Studio Gallery. It’s published there so that you can download, install, and use it through the Extension Manager and New Item dialog in Visual Studio 2010 Beta 1. Now, I’m going to go through the process, so that you can see how it’s done, and hopefully entice some of you out there to create your own templates to share with the world.
Step 1 – Creating an Item Template
First thing first, you need to have some code that you want to create into a template… perhaps some code that you use all the time (for me this was an AboutBox for WPF applications). Once you’ve written and test the code (yes, testing it is important, remember everyone is going to put this code into their application J), you are ready to export it as a template.
There’s a well hidden feature in Visual Studio under the File menu, called “Export Template…” This launches a wizard to help you create a template from your current solution.
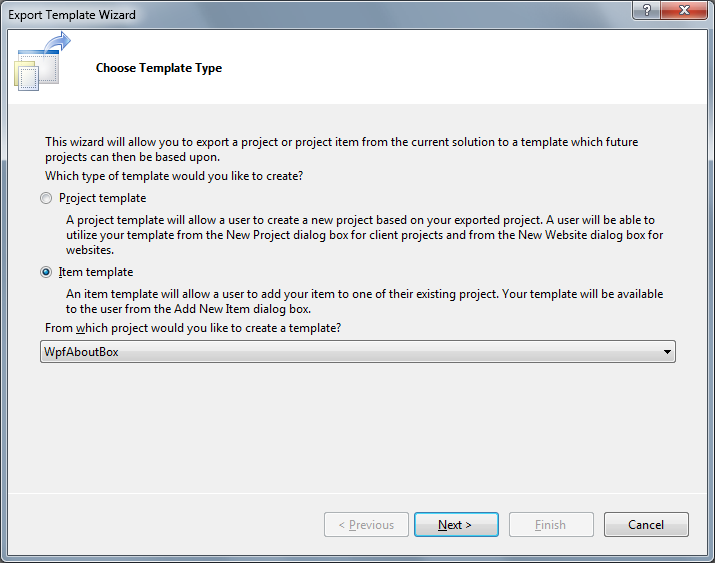
This page lets you pick from an Item or Project template, and the project to use in your template. Item templates are a single file and any of their dependent files. They get shown in the “Add New Item” dialog. And, you can create multiple instances of them in one project. Project templates wrap up a whole project with all of the contents of the project you select. They get shown in the “New Project” dialog. And, you can add multiple projects into a solution. Note: In Beta 1, we only support putting a single project into the template (through the Export Template Wizard or by hand-editing the .vstemplate file, and upload it to the VS Gallery).
After selecting Item Template and the project (WpfAboutBox), click the Next button.

Select the file that you wish to export. The wizard wraps up the file and its dependents. So, this example, you select the AboutBox.xaml file, and it also includes the code-behind file, AboutBox.xaml.cs. You can only select one file to export for an item template.
Click Next to proceed.
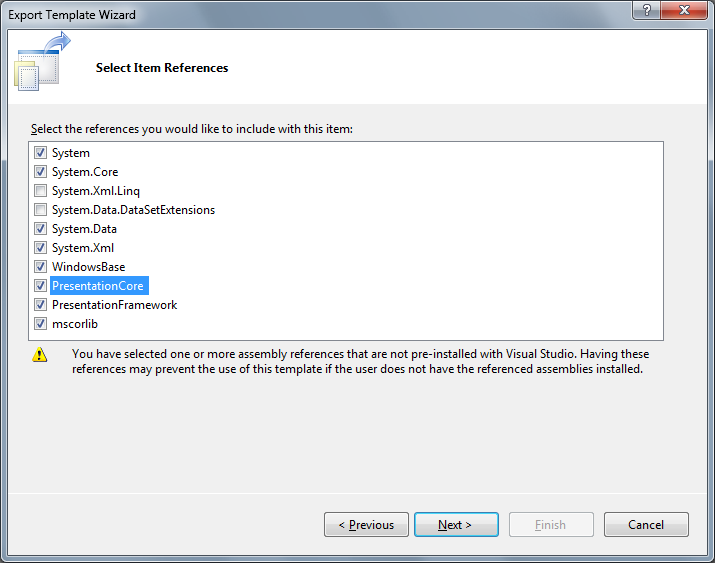
Now the wizard asks for the references your template will need. The items you select here will become references in the project where you use the template. Be sure to only select the references that are needed only for the file that you are exporting… or you will create unnecessary references in the target project.
Once you have selected all of the references you need, click Next.
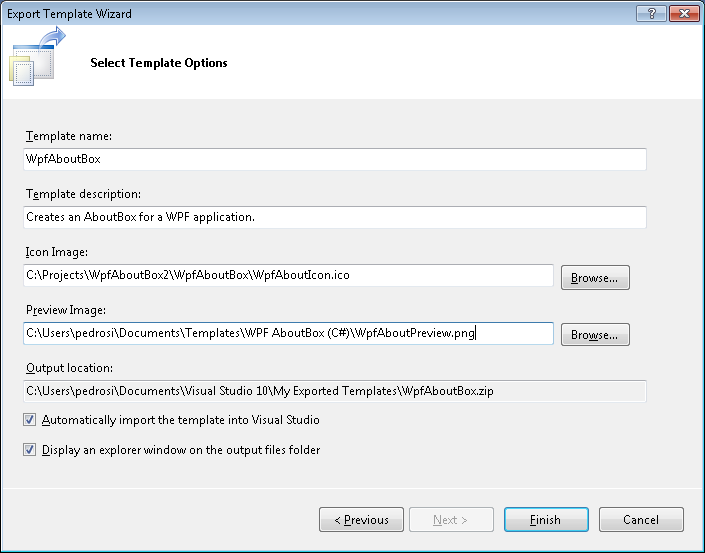
Fill in the metadata about your template. You have the opportunity to name the template and provide a short description that will be shown in the New Item/Project dialog. As well as an icon and a preview image for the template… while these are optional, I recommend providing them otherwise you get defaults in the New Item/Project dialog, and that won’t look like a finished extension.
Once you’ve filled in all of the data, click the Finish button.
There you are! You now have an item template in your “My Documents” folder under “Visual Studio 10\My Exported Templates”. You can even run the Add New Item dialog in Visual Studio and this template will show up for C# code.
Note: Item templates are a little more complicated than project templates. For a project template, wizard steps 2 & 3 above are skipped, and you go straight to the metadata collection page.
More Info: If you’d like more detailed information about how to create item and project templates, please read: Creating Project and Item Templates.
Step 2 – A Little Template Cleanup
Ideally, we’d be done with our item template. But, there were a couple of little complications that required editing the template file by hand. Luckily the template is just a zip file, so you can look into its contents, and edit the MyTemplate.vstemplate file. This file is an XML file that describes the makeup of your template. If you edit the file in VS, you get intellisense from its schema. So, I made three small but important changes to the file:
<TemplateData>
<DefaultName>WpfAboutBox.xaml</DefaultName>
<Name>WPF AboutBox</Name>
<Description>Creates an AboutBox for a WPF application</Description>
<ProjectType>CSharp</ProjectType>
<SortOrder>10</SortOrder>
<Icon>__TemplateIcon.ico</Icon>
<TemplateGroupID>WPF</TemplateGroupID>
</TemplateData>
a) Changed the Name of the template to include a space… This is the display name in the New Item dialog and looks better with a space. Unfortunately, the name you input for you template is used both for the DefaultName and the Name in the .vstemplate file, so you can’t use different ones for each without editing the file by hand.
b) Added the <TemplateGroupID>WPF</TemplateGroupID> line to the TemplateData section. This isn’t obvious why, but there’s an issue in the filtering of templates in the New Item dialog when it’s looking online. If the template group is not defined, then you template might not show up correctly, especially for areas that filter, like WPF… trust me, you should do this. I spent quite a few hours tracking down what was going on here.
c) Added the AboutLogo.png file as payload to be unfolded with the template. First, I added that image file to the .zip file contents. Then, put in the following XML segment with the other ProjectItem defintions:
<ProjectItem SubType="Image" TargetFileName="AboutLogo.png" ReplaceParameters="false">AboutLogo.png</ProjectItem>
This ensures that the image file will be copied into the target project, and that it will not be renamed, and no token replacement will be attempted for this file (it’s an image file, no need for token replacement).
More Info: If you’d like to read more about the format of the .vstemplate file, read this topic.
There you have it… an item template that is now ready to be shared with the world. In my next post, I’ll go through the steps of packaging this template up as an extension that can be uploaded to the VS Gallery and installed through the Extension Manager.