Drag & Drop in Silverlight for Windows Phone
Probably the idea of drag and drop are at the heart of educational, children learning and quiz sort of apps. Since I’m often contacted on how to achieve drag and drop using Silverlight for Windows Phone, I thought to write a basic blog post covering this aspect.
The first thing you need to understand is that you need to write custom code to handle your particular scenario. Please note that implementation provided below serves only a starting note and that it makes use of Microsoft.XNA.Framework DLL to make collision detection and location tracking easier (using built in Rectangle and Vector2 classes in XNA).
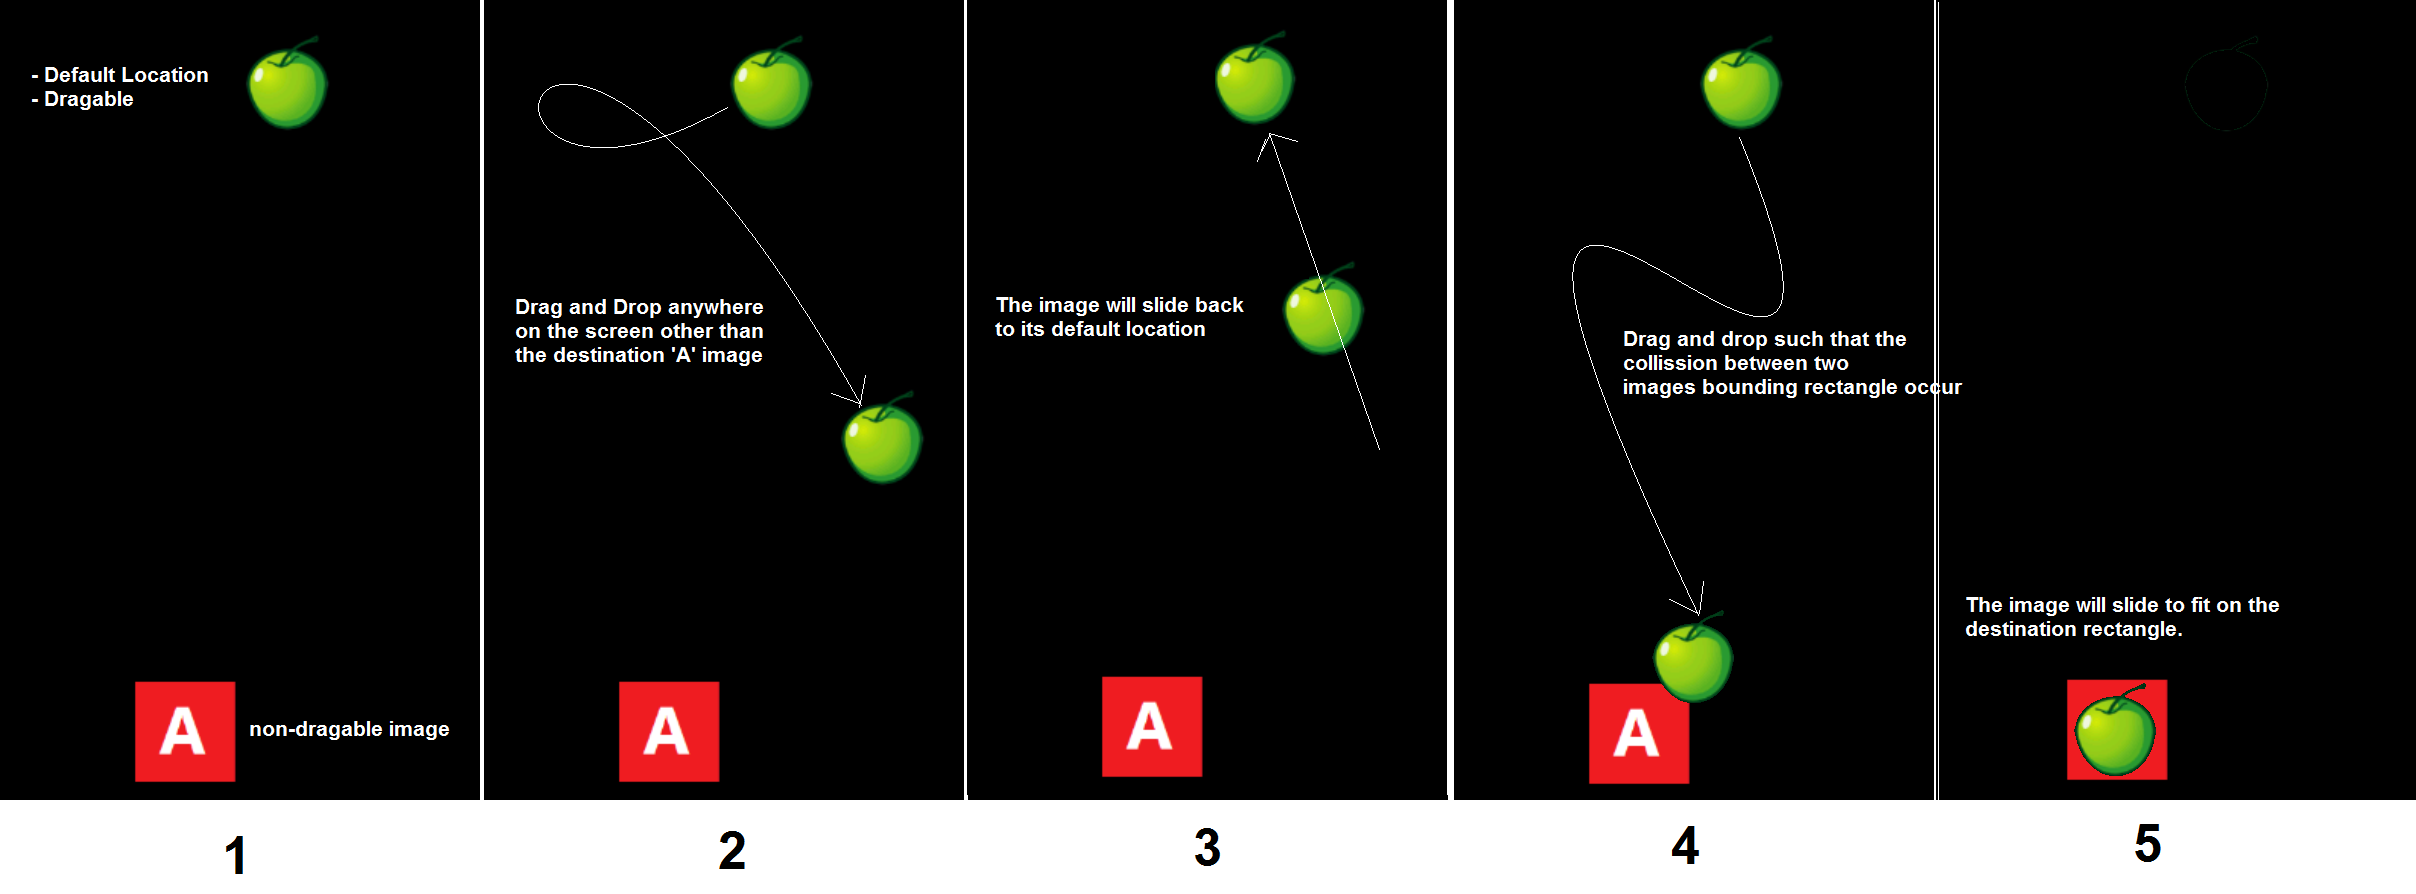
The requirement for the drag and drop application can be understood from the figure below. The image on top ‘Apple’ is drag-able whereas the image ‘A’ is not. If you drag the ‘Apple’ and leave anywhere on the entire canvas such that no collision between bounding rectangles of ‘A’ and ‘Apple’ is occurring, image ‘Apple’ will slide back to its default location. However if a collision is identified, ‘Apple’ will slide to cover over ‘A’.
So let’s first go ahead and add both images on the app canvas. We’re going to do that from code behind to gain benefit from SetTop and SetLeft proper of Canvas class however by placing a Canvas in XAML.
  <Grid x:Name=”LayoutRoot”>
 <Canvas x:Name=”MainCanvas” HorizontalAlignment=”Stretch” VerticalAlignment=”Stretch”>

 </Canvas>
 </Grid>
To make the image drag-able
To make the ‘Apple’ image drag-able we make use of the event, ManipulationDeltag within which we set the new bounds for the ‘Apple’ and ensure that it doesn’t go beyond the bounds of the Windows Phone app canvas. In each tick first identify the distance of ‘Apple’ from Left and Top, add manipulation delta X and Y factor in that and assign it back to the ‘Apple’ element. During first line of the event we acquire the event just being dragged as FramewrokElement. This ensures that a single handler can be utilized for as many images as you want to scroll (current implementation makes use of only one image though).
  void AddDragableItemOnCanvas()
 {
 Image appleImage = new Image();
 appleImage.Source = new BitmapImage(new Uri("/images/Apple.png", UriKind.Relative));

 Canvas.SetTop(appleImage, 0);
 Canvas.SetLeft(appleImage, 240);

 MainCanvas.Children.Add(appleImage);

 //subscribe to events
 appleImage.ManipulationDelta += new EventHandler<ManipulationDeltaEventArgs>(OnManipulationDelta);

 appleImage.ManipulationCompleted += new EventHandler<ManipulationCompletedEventArgs>(OnManipulationCompleted);
 }

 void AddPlaceholderOnCanvas()
 {
 Image anImage = new Image();
 anImage.Source = new BitmapImage(new Uri("/images/A.png", UriKind.Relative));

 Canvas.SetTop(anImage, 650);
 Canvas.SetLeft(anImage, 135);

 MainCanvas.Children.Add(anImage);
 }
Note: To make the dragging experience smooth, tweak the class level variable ‘ratio’. The lower the value, the smoother the dragging experience will be.
const float RATIO = 0.15f;
Slide to Default Location or Destination in case of a Collision
To do that we have hooked another event ManipulationCompleted of ‘Apple’ image. This is fired when user stops dragging. Just as above we identify the control being dragged, and identify the location (X and Y) where it is dragged to and start a timer that was set in the constructor.
  void OnManipulationDelta(object sender, ManipulationDeltaEventArgs args)
 {
 FrameworkElement Elem = sender as FrameworkElement;

 double Left = Canvas.GetLeft(Elem);
 double Top = Canvas.GetTop(Elem);

 Left += args.DeltaManipulation.Translation.X;
 Top += args.DeltaManipulation.Translation.Y;

 //check for bounds
 if (Left < 0)
 {
 Left = 0;
 }
 else if (Left > (LayoutRoot.ActualWidth - Elem.ActualWidth))
 {
 Left = LayoutRoot.ActualWidth - Elem.ActualWidth;
 }

 if (Top < 0)
 {
 Top = 0;
 }
 else if (Top > (LayoutRoot.ActualHeight - Elem.ActualHeight))
 {
 Top = LayoutRoot.ActualHeight - Elem.ActualHeight;
 }

 Canvas.SetLeft(Elem, Left);
 Canvas.SetTop(Elem, Top);
 }
Note: To make the sliding back experience smooth or in other words control the speed of sliding when you stop dragging, tweak class level constant SPEED_FACTOR. The greater the value, the greater the speed.
const double SPEED_FACTOR = 60;
Note: The slide animation jerks are subject to Timer Tick interval. The greater the interval, the slower the sliding animation will appear.
timer.Interval = TimeSpan.FromMilliseconds(35);
Decide whether Collision Occurred or Not?
The decision of collision is taken in each timer tick between ‘Apple’ and ‘A’ bounding rectangle using Intersects method. Depending upon the collision, the new Left and Top values of the ‘Apple’ image are set on each time.
  void OnTimerTick(object sender, EventArgs e)
 {
 if (ElemToMove != null)
 {
 double Left, Top;
 Left = Canvas.GetLeft(ElemToMove);
 Top = Canvas.GetTop(ElemToMove);

 Vector2 currentPosition = new Vector2((float)Left, (float)Top);

 Microsoft.Xna.Framework.Rectangle movingRectangle = new Microsoft.Xna.Framework.Rectangle();

 movingRectangle.X = (int)Left;
 movingRectangle.Y = (int)Top;
 movingRectangle.Width = 100;
 movingRectangle.Height = 100;

 Vector2 Target = new Vector2(240, 0);

 if(movingRectangle.Intersects(rectangleA))
 {
 Target.X = rectangleA.X;
 Target.Y = rectangleA.Y;
 }

 Vector2 Delta = (Target - currentPosition) * RATIO;
 if (Delta.Length() < 0.05f)
 {
 currentPosition = Target;
 timer.Stop();
 }
 else
 {
 currentPosition += Delta;
 }

 Canvas.SetLeft(ElemToMove, currentPosition.X);

 Canvas.SetTop(ElemToMove, currentPosition.Y);

 }
 }
You can make the code more efficient by setting a Boolean variable since if the collision is recorded once, the check to whether Intersection occurs will continue to yield true for subsequent timer ticks as well.
  if(movingRectangle.Intersects(rectangleA))
 {
 Target.X = rectangleA.X;
 Target.Y = rectangleA.Y;
 }
Stopping the Timer
On each tick a Vector Delta is identified as the distance between ‘Apple’ and destination location (either ‘A’ or Default Location). Once the delta is less than 0.05, the timer is stopped to ensure smooth execution.
  Vector2 Delta = (Target - currentPosition) * RATIO;

 if (Delta.Length() < 0.05f)
 {
 currentPosition = Target;
 timer.Stop();
 }
 else
 {
 currentPosition += Delta;
 }
Download
The code for this article can be downloaded from here
Limitations
The code will require changes if multiple images are to be scrolled as a single timer won’t handle multiple sliding experiences. The code may also be subject to improvements in efficiency.