The busy data scientist's walk-through to managing Azure Data Lake Store in R
Earlier this year (2017), my Microsoft colleague Ramkumar Chandrasekaran published a blog post about performing Azure Data Lake Store (ADLS) file system operations using the R language. After working through that for a recent project, I decided to write a detailed, step-by-step walk-through of getting this running, including the required Azure configuration steps.
Who is this for?
The audience is data scientists comfortable with R and R tools, who need to manage folders and data files in their organization's Azure Data Lake Store but without being Azure experts, requiring tools or languages they're unfamiliar with, or needing administrative access to their organization's Azure environment.
To that end, while several of the steps below can be completed in multiple ways, I have chosen tools or technologies for simplicity (e.g. showing the Azure portal instead of automation scripts). The Resource Links listed at the end of this post include details on alternate ways to complete various steps, as well as code and other resources.
In particular, the walk-through uses Server Principal Name (SPN) authentication, not a user account. This enables authentication and privileges to be customized for least privilege, and to be robust against organizational changes such as a particular user leaving the organization and their credential being disabled.
Why do this?
As organizations move to the cloud and undergo change, it's important to maintain productivity. Azure Data Lake is a fantastic platform for big data storage and analysis, but busy data professionals may not yet have the requisite tools or skills to work with new cloud technologies natively. Microsoft's cloud platform enables flexible and hybrid approaches to benefit from new technology while continuing to use existing tools and skillsets, allowing for transition and training at the right pace for people and organizations.
This post was motivated by scenarios where organizations are storing production data in Azure Data Lake, but delivery timelines and operational/resource levels required simple, immediate access to the folders and files there for data analysts and scientists. There are certainly more robust usage scenarios for working with big data in Azure Data Lake; this post is intended to show how to quickly work with the Azure Data Lake file system without requiring clusters or extensive data movement orchestrations.
To be clear: this is not a replacement for the analytical power of Azure Data Lake Analytics (ADLA) and U-SQL, or the Hadoop/Spark stack or other big data technologies.
What will we accomplish here?
By the end of this post, we will have completed Azure configuration steps and have a set of operational R scripts that can perform folder and file operations (upload, download, delete, list, rename) in an ADLS account. A data scientist will be able to work in their preferred R environment (such as R Studio or Visual Studio with R Tools for Visual Studio) and execute various R scripts against ADLS.
Pre-Requisites
To complete this walk-through, you will need an Azure subscription. Please ensure you, or someone working with you, can log into Azure before continuing. If you are not in the Owner role for this subscription, you will need to work with someone in that role to complete some Azure steps below.
| To check what role you are in on your Azure subscription, in the Azure portal, click on the left nav menu, then "Subscriptions".Then click the subscription you will use. | 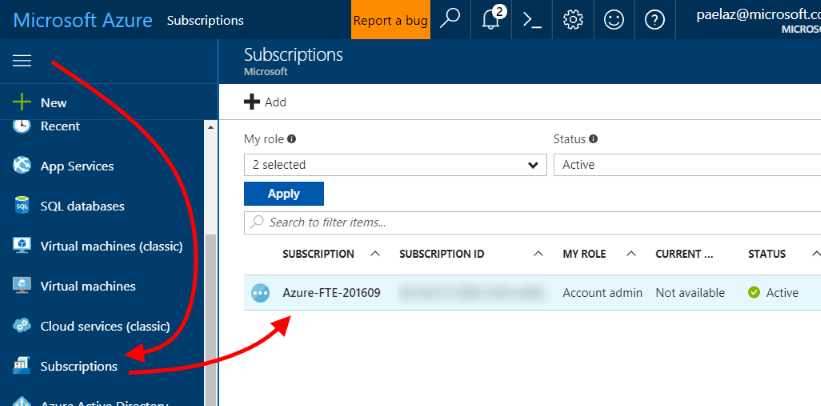 |
| When displaying your subscription, click "Access control (IAM)" on the left menu, then consult the blade to see what role you are in.As you can see here, I am grouping by Role and my account is shown in the "OWNER" group as well as showing "Owner" in the "ROLE" column. | 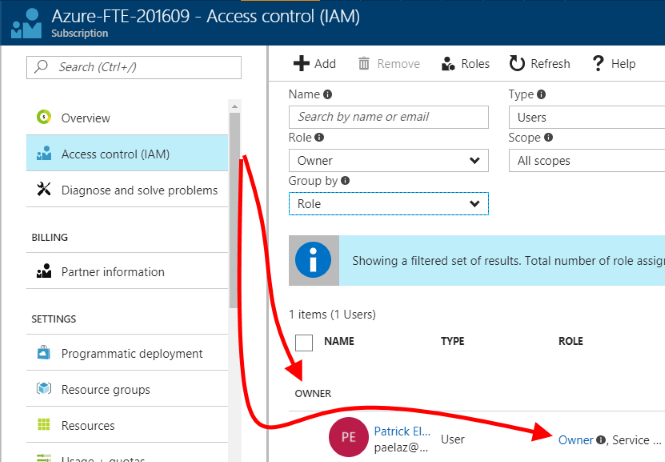 |
Key Information
As you proceed through the following steps, you will need to collect and keep four items of information. Please note them as you encounter them:
- The ADLS account name you create (I use "radls" below)
- The Azure Active Directory ID
- The Application ID for the Azure AD application registration you will create
- A key for the Azure AD application registration you will create
As we encounter these items of information below, I will remind you to note them.
Overview
What will we accomplish in this walk-through?
- We'll create an Azure Data Lake Store (ADLS) account in the Azure portal. *
- We'll create an application and a Server Principal Name (SPN) in Azure Active Directory (Azure AD), also in the Azure portal. *
- We'll grant the application appropriate permissions to our ADLS account. *
- We'll apply initial file system permissions in the ADLS account. *
- We'll install R pre-requisites.
- We'll write R code to obtain an OAuth2 token, which we need to authenticate (as the SPN) when making calls to the WebHDFS REST API exposed by ADLS.
- We'll write R code to run various file system operations against ADLS.
* These one-time steps require permissions on the Azure subscription. See below for details.
1 - Create an Azure Data Lake Store account
To complete this step, you will need to be in the Owner role for the Azure subscription you are working in.
| 1. After logging into the Azure portal, click "+ New", then "Data + Analytics", then "Data Lake Store / Create". |  |
| 2. Provide the info needed to provision the ADLS account. (Note the ADLS account name you enter for later use, per "Items to Keep" above.)I set Encryption Settings to "Not enabled" for simplicity. Please set this to an appropriate value for your environment and data type. See Resource Link #2 for details.For testing, I recommend you create a new Resource Group and use it only for Azure resources related to this walk-through. When you are done, it's easy to de-provision the resources created for this walk-through by deleting just the Resource Group created here, which also deletes all resources deployed within it.) | 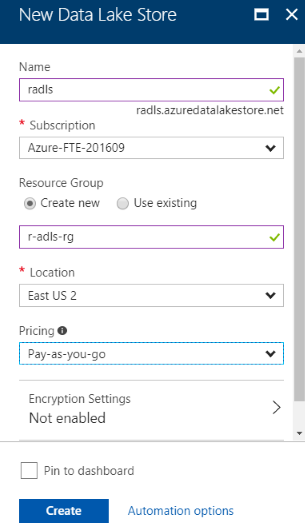 |
| 3. Click "Create" and wait for the ADLS account to be created. Then, click into the resource group you specified in the preceding step to see the newly-created ADLS account.A new ADLS account's Firewall is not enabled by default. If you require Firewall protection, enable it from the ADLS account's "Firewall" blade, and set appropriate firewall rules so that users can later access the ADLS file system. | 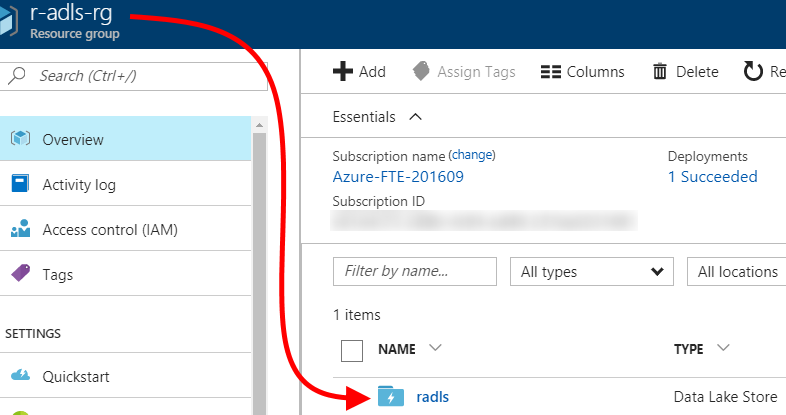 |
2 - Create a Server Principal
To complete this step, you will need to be in the Owner role for the Azure subscription you are working in. If you are not in the Owner role, you may still be able to complete this step: follow the steps at /azure/azure-resource-manager/resource-group-create-service-principal-portal#required-permissions to determine if you have the needed privileges.
| 1. In the Azure portal, open the main left nav, click "Azure Active Directory", then click "New application registration". | 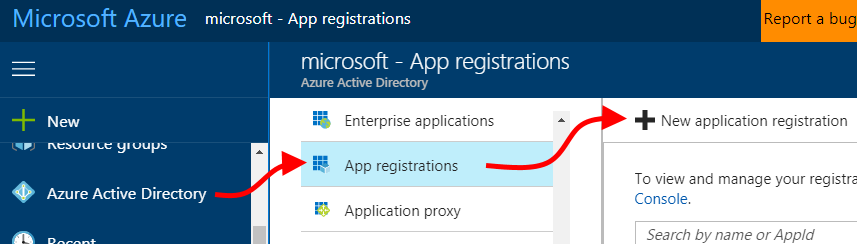 |
| 2. Enter the info for the application registration, then click "Create".For "Application type", choose "Web app / API".For "Sign-on URL", you can enter a non-existent value. This will not be used in our scenario. | 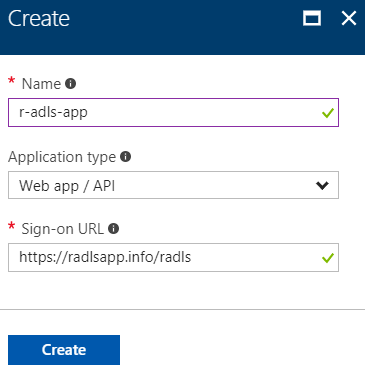 |
| 3. After the application registration is created, find it in the list of applications and click on it. | 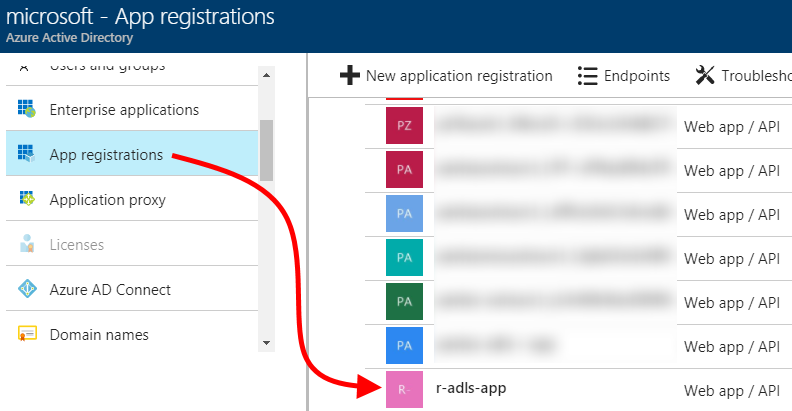 |
| 4. On the application's information blade, copy and store the value shown under "Application ID" for later use (per "Key Information" above).Then, click on "All settings" to open the application's Settings blade (this may already be displayed). | 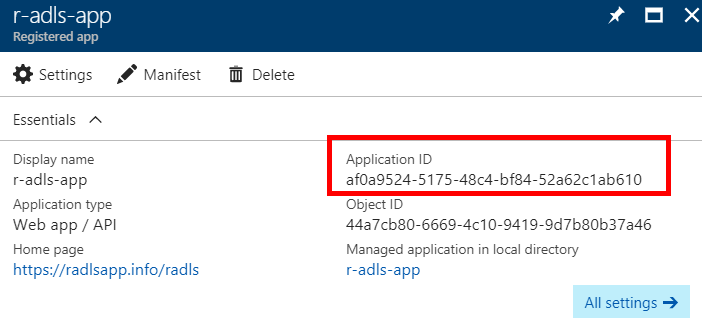 |
| 5. On the Settings blade, click "Keys". Create a new key by entering a key description and expiration.After entering these values, click "Save" to display the generated key. | 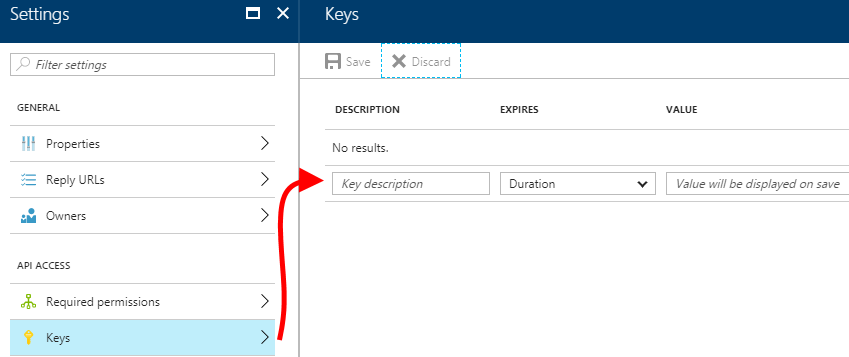 |
| 6. After the key is created, the key value can be copied only once.Copy and note it for later use (per "Key Information" above) - do this immediately, as you will not be able to re-display this key. | 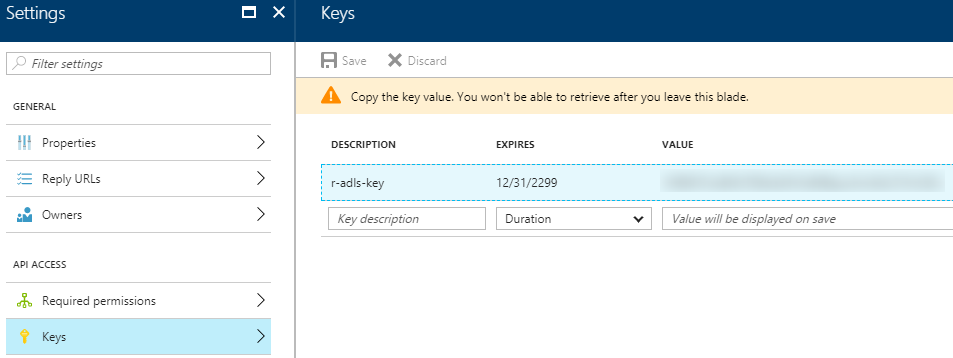 |
| 7. Next, we also need the Azure Active Directory ID for later use (per "Key Information" above).Close the App registrations blade. Return to the Azure portal left nav, click "Azure Active Directory" again, then click "Properties" and note the value displayed for "Directory ID". | 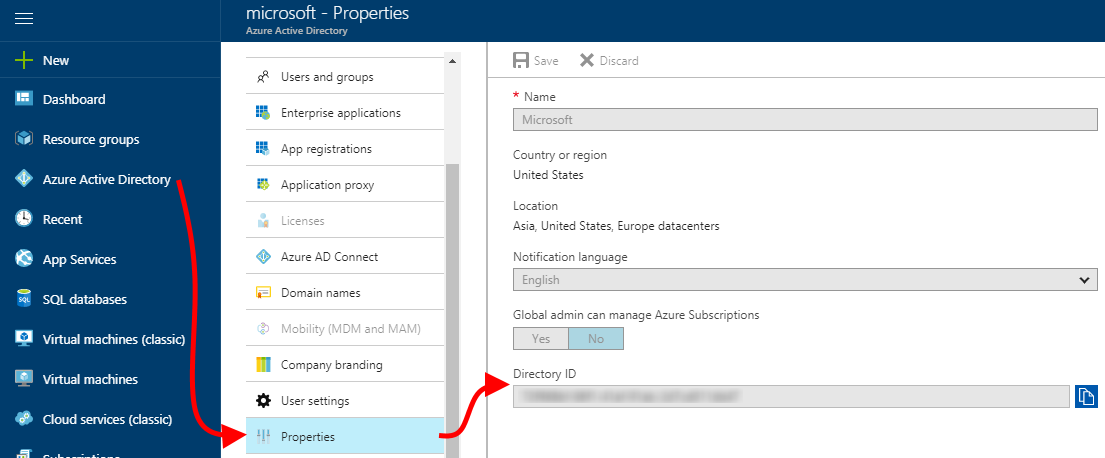 |
3 - Grant ADLS Permissions
To complete this step, you will need to be in the Owner role for the Azure subscription you are working in, or at least for the resource group you created above (the subscription owner can add you to the Owner role for the resource group).
| 1. In the Azure portal, navigate to the resource group you created. Click on the ADLS account you created, then click on "Access control (IAM)", then click "+ Add".We will grant the SPN permissions to just the ADLS account, rather than the containing resource group, to minimize its permission scope.Instead, you could grant the SPN permissions to the entire resource group; these permissions would then be inherited by all resources in the resource group. This would be useful for other scenarios with the SPN you created. However, I'll restrict the permission scope here and work only with the ADLS account itself. | 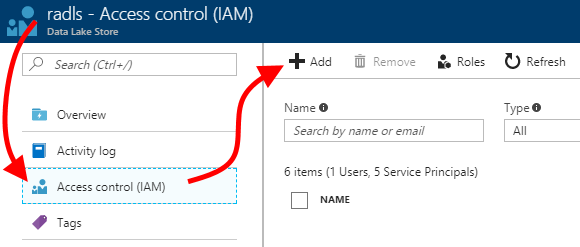 |
| 2. Enter information for the permission we are creating.For "Role", specify "Reader". Then, select the name of the Azure AD application you created above; I used "r-adls-app" and have selected that here. Last, click "Save".The "Reader" role enables the SPN to see the ADLS resource, but not make any changes to it. Less restrictive roles (such as "Contributor" or "Owner") are not needed for this walk-through.The permission we are granting here applies to the Azure resource itself, not to the data within it (i.e. the files and folders we will work with; we will grant permissions for those in a later step). By assigning "Reader", we are preventing the SPN from being able to make changes to the Azure resource itself. | 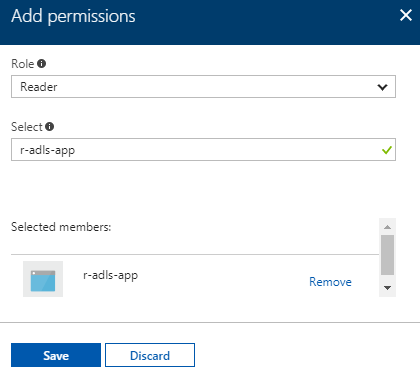 |
| 3. Verify that the permission was created correctly. After the previous step completes, verify that the permission was created correctly in the ADLS account's Access control (IAM) blade.Note that I am filtering to Reader roles only, for a more compact display. You may need to click "Refresh" and/or filter to quickly find the appropriate permission. | 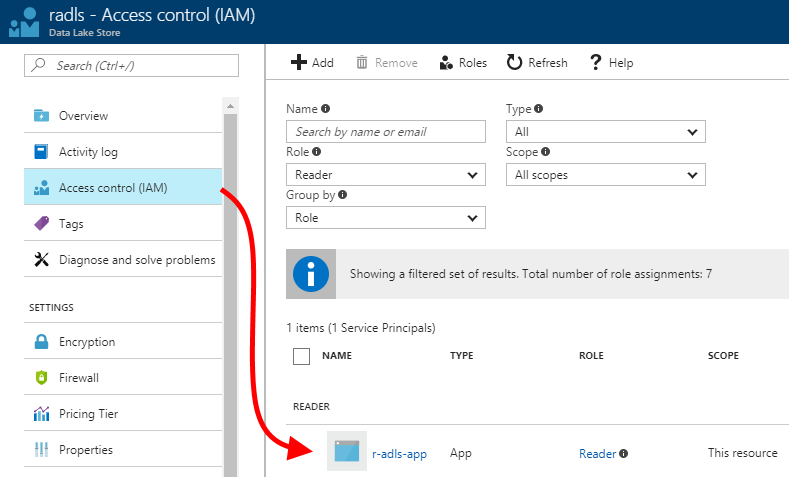 |
Intermission - verify you now have all Key Information
Before continuing, please consult the "Key Information" list above, and verify that you have copied and set aside all the required pieces of information for later use. Please treat this as sensitive information (especially the application key).
4 - ADLS File System Permissions
To complete this step, you will need to be in the Owner role for the Azure subscription you are working in, or for the resource group you created above, or at least for the ADLS account itself (the subscription owner can add you to the Owner role for the resource group or the ADLS account).
| 1. Navigate to the ADLS account and select its "Data Explorer" blade. As you will see, in a new ADLS account, no folders or files exist yet.I created a "/Data/Analysis/" folder structure for this walk-through. Consider a folder structure that makes sense for your scenario, and create it by clicking "New Folder". Navigate through the folder hierarchy you create by using the middle blade.Next, we will create file system access permissions to permit our SPN to perform all operations only within the "Analysis" folder - not in its containing "Data" folder.This is to show a scenario where a data scientist may not have full access to the root of the ADLS account, and will be constrained to work within a subfolder. | 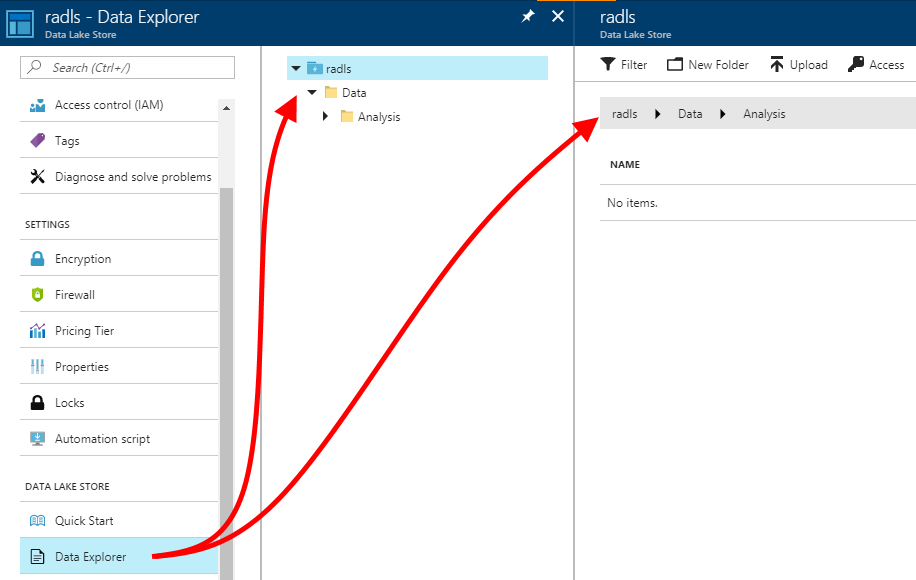 |
| 2. In order for our SPN to access the "Analysis" folder, we have to grant the SPN "RX" (Read and Execute - not Write) permissions at each parent level in the containing folder hierarchy first, so that the SPN can traverse the hierarchy to reach our work folder.In my scenario, I have to apply appropriate permissions both at the ADLS root, as well as on the "Data" folder. Perform steps 2-4 here on both the root and on "/Data": select the folder, then click "Access". After verifying that the blade subtitle shows that I am at the correct folder (root or "Data (Folder)", shown), I click "+ Add" to open the "Assign Permissions" blade, where I will specify the user or group, and the permissions to grant.See Resource link 5 for details on ADLS file system access control permissions, and why RX permissions on the containing hierarchy are necessary. | 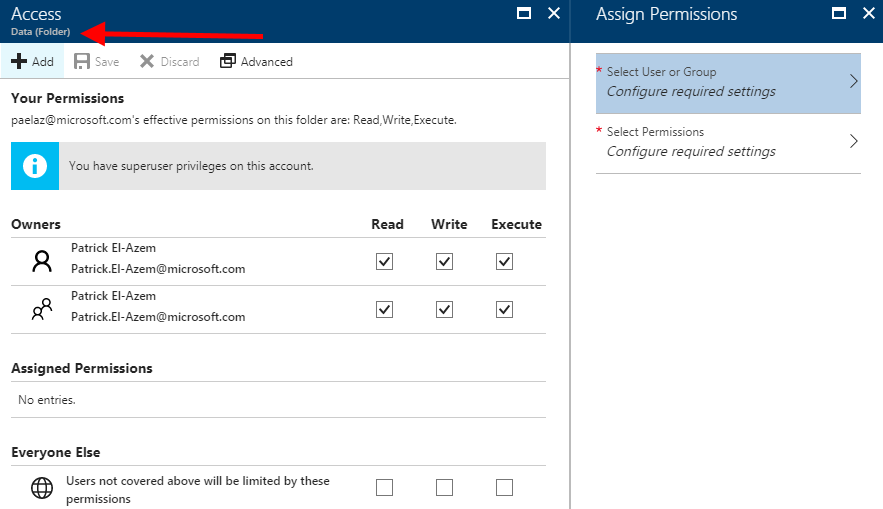 |
| 3. In the "Assign Permissions" blade, click on "Select User or Group", then enter the name of the Azure AD application, i.e. the SPN.In this walk-through, this is "r-adls-app", as we have seen above. Once it is selected, click "Select" to return to the "Assign Permissions" blade. | 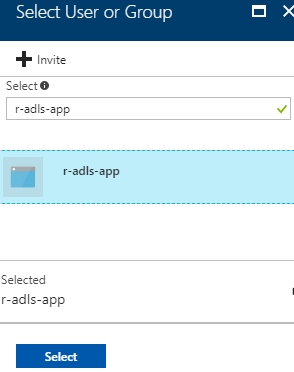 |
| 4. In the "Assign Permissions" blade, click on "Select Permissions".Check "Read" and "Execute" Permissions.Set "Add to:" to "This folder".Set "Add as:" to "An access permission entry".Then click "Ok" to save this setting, then "Ok" in the "Assign Permissions" blade to finish saving the new permission.Remember - this is the enclosing hierarchy. These permissions are the minimal ones required to grant our data scientist full permissions in the contained subfolder. This is why we are not granting Write here, or setting this as a default permission entry.Remember to perform steps 2-4 both for the root as well as the "/Data" folder! | 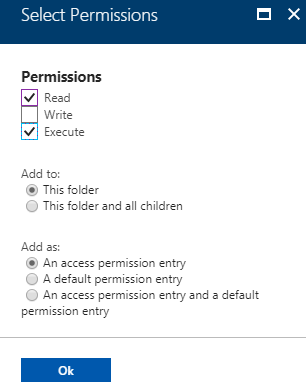 |
| 5. Similar to the previous steps, in the "Data Explorer" blade, navigate to the enclosed folder where the data scientist will work. In my scenario, that is the "Analysis" folder (full path: "/Data/Analysis/").As done in the previous steps, click "Access" and "+ Add" to add a file system permission entry for this folder. Select the same user (the SPN) and continue to "Select Permissions".Check all Permissions.Set "Add to:" to "This folder and all children".Set "Add as:" to "An access permission entry and a default permission entry".Then click "Ok" to save this setting.Then click "Ok" in the "Assign Permissions" blade to finish saving the new permission.This time, we are setting permissions to allow the data scientist - who will authenticate using the SPN - full control in this folder and all folders and files contained within it - but not above it. | 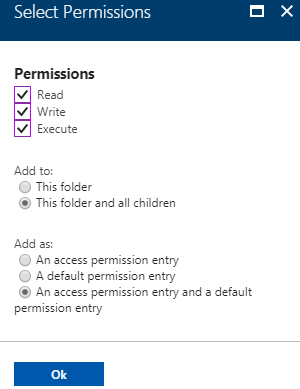 |
| 6. Back in the "Data Explorer" blade, ensure you have again selected the enclosed folder where the data scientist will work, then click "Refresh", then "Access".Verify that the permissions set in the previous step were correctly set and saved.If the permissions were set and saved correctly, this completes our work in the Azure portal for this walk-through. | 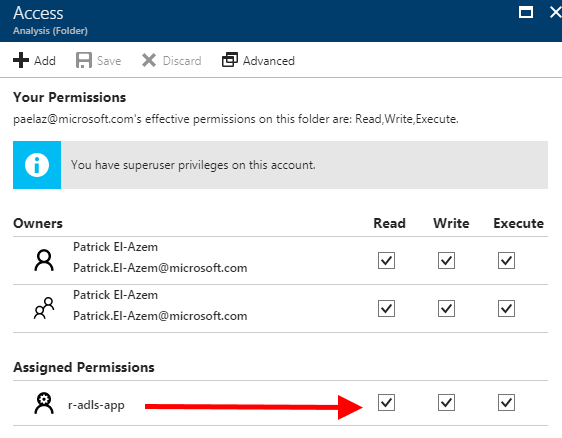 |
Working in R
For the remainder of this walk-through, I will work in R Studio, with Microsoft R Client. However, please feel free to try this with your preferred R tool or IDE.
Our R code will perform file system operations in our ADLS account by interacting with the WebHDFS API exposed by ADLS. We'll use the HTTR package to make the REST API calls. (Note that I'm using R since this was a specific requirement on the project I mentioned at the top; but any language that can interact with a REST API could be used for this part.) See the Resource Links below for more information on these topics.
I have created a set of R scripts for the work described below. These scripts are available in my public github repo (see Resource Links). Please refer to this repo as I mention R files and scripts below. I recommend you clone the repo, or download the files, so you can work in the code while continuing below.
5 - R Pre-Requisites
We need one R package to complete this walk-through: HTTR (see Resource Links) and its dependencies.
This is very simple to install:
install.packages("httr", dependencies = TRUE)
I have packaged this in the file 1-PreReqs.R in my github repo. Run this once in your R environment.
6 - REST API Authentication
| In order to authenticate to the WebHDFS API using the SPN we created above, we need to obtain an OAuth2 token to send with each API request.Please edit security_info.R. |
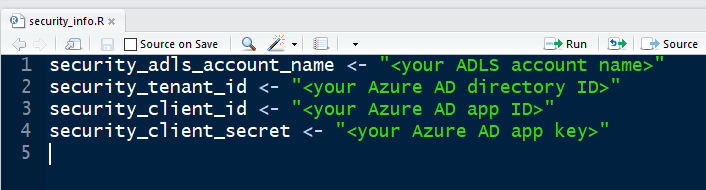 |
You will need to fill in the information (from "Key Information", above) as follows:
|
The security_info.R file we just edited is used as a source file by security.R, which does the actual work of getting an OAuth2 token. This script exposes a security_get_token() function, which is called by the other R scripts we discuss below. This encapsulates all the token work for easy re-use across the various file system scripts.No edits are needed to security.R. Feel free to review it to see how it is getting the token and returning it from the security_get_token() function before continuing. |
 |
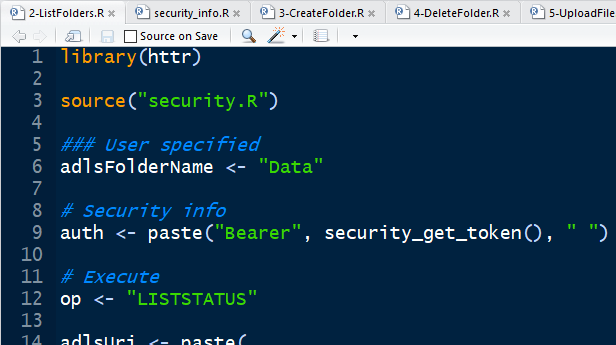
The R scripts provided in my repo for this walk-through follow a consistent structure. Each has these sections, delineated by comments:### User specified # Security info # ExecuteIn these files, you only need to perform edits in the section marked by ### User specified, for example to substitute in your own folder and file names. In each file, in the # Security info section, there is a call to the security_get_token() function in security.R, used to assemble the authentication header sent to the WebHDFS API in the # Execute section. The # Security info and # Execute sections are functional as is, and do not need editing for this walk-through. |
 |
| Now that we have prepared our security_info.R file with the info we created earlier in this walk-through, and reviewed our security.R file, we are ready to start working with the ADLS file system from our R environment! |
7 - ADLS file system operations
| We'll start by listing folders in our ADLS file system. Recall that, above, I created a "/Data/Analysis/" hierarchy. If all the previous steps worked correctly, I should now be able to list folders in my ADLS file system.To do this, I'll run 2-ListFolders.R. Note that on line 6 (see last screenshot in the previous section), I'm setting the folder name whose contents I want to list. Since I'm listing the contents of "/Data", I should see the "Analysis" folder in the results. |
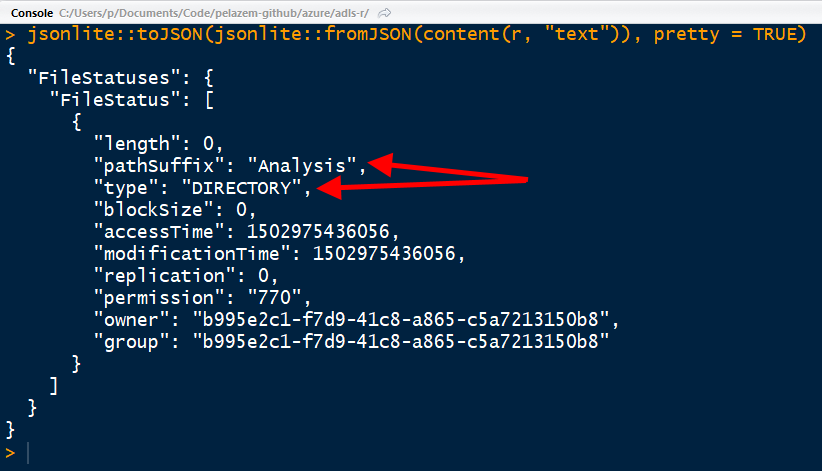 |
| The output shows our "Analysis" directory, so we have successfully queried the ADLS file system! |
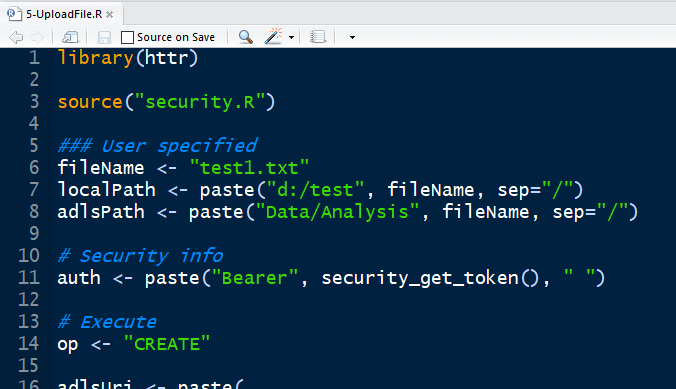
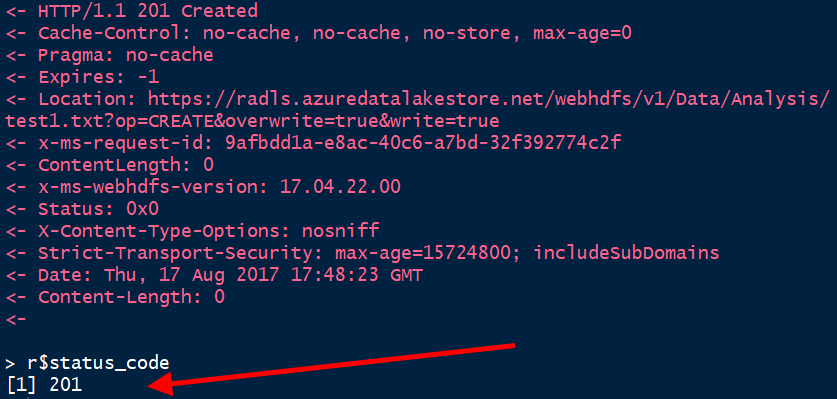
| Now let's upload a file into our "Analysis" folder.In 5-UploadFile.R, I've specified a file on my local system (d:/test/test1.txt), and a destination path for it in ADLS (/Data/Analysis/test1.txt). Edit these values as needed.If the upload succeeds, this script should output an HTTP 201 status code at the end, and the file should show up in the ADLS account's Data Explorer display in the Azure portal. |
 |
 |
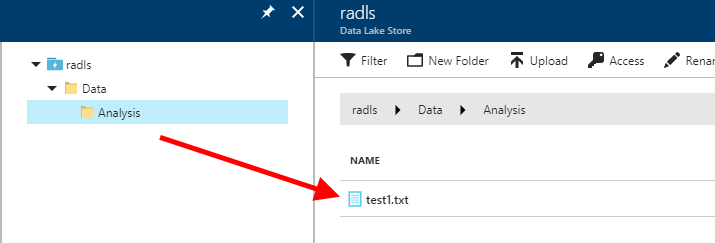 |
| The R Studio console output shows an HTTP 201 status code, meaning success - the ADLS Data Explorer in the Azure portal shows the file uploaded successfully!We have now used both our Read and Write permissions to read from, and write to, our ADLS file system. |
| Please explore the remaining R scripts in the github repo and test them. In particular, 8-ReadFile.R allows files to be downloaded to the local system, so that data scientists can work on source data files in their local environment and with their local tools, as needed. |
Conclusion
In this walk-through, we started with only an Azure subscription. We created an ADLS account and an Azure AD application registration, and configured security for R scripts to run against the ADLS file system by interacting with the WebHDFS REST API.
I hope this walk-through is useful to you. Please contact me with questions or comments - and pull requests are always welcome!
Resource Links
For more information on pertinent topics in the walk-through, please refer to these sources:
- Ramkumar's post: https://blogs.msdn.microsoft.com/microsoftrservertigerteam/2017/03/14/using-r-to-perform-filesystem-operations-on-azure-data-lake-store/
- Getting started with Azure Data Lake Store: /azure/data-lake-store/data-lake-store-get-started-portal
- Create an Azure AD app and Service Principal: /azure/azure-resource-manager/resource-group-create-service-principal-portal
- Service-to-service authentication, ADLS with Azure AD: /azure/data-lake-store/data-lake-store-authenticate-using-active-directory
- ADLS access controls: /azure/data-lake-store/data-lake-store-access-control#common-scenarios-related-to-permissions
- ADLS REST API: /azure/data-lake-store/data-lake-store-get-started-rest-api
- Hadoop WebHDFS REST API reference: https://hadoop.apache.org/docs/stable/hadoop-project-dist/hadoop-hdfs/WebHDFS.html
- CRAN HTTR reference: https://cran.r-project.org/web/packages/httr/
- My github repo containing the R scripts used in this post: https://github.com/pelazem/azure/tree/master/adls-r
- The Azure portal: https://portal.azure.com