Getting Started with Node.js and Mango
It's been a while since I've found time to blog - but it's not like I've left you in cold hands. Rohan has been doing a great job posting on the Silverlight for Windows Phone Performance blog (check it out if you haven't yet).
On a completely non-performance related topic (we'll get to those in the next couple of blog posts), I've been meaning to play around with Node.js for a while, and when a colleague posed a question about using it with Mango, I thought it might be a great excuse to polish off the Beta 2 tools (get them while they're hot!) and do some Socketing!
First things first - grab 7zip (if you don't have it already), and Node.js binaries for Windows (or build it yourself). Extract these to a convenient location and you should be good to go.
We're going to use the Hello World sample ripped straight from the Node.js homepage, with one extra debugging addition (highlighted in yellow) and a practical change (highlighted in green - see "gotcha!" below):
 var http = require('http');
http.createServer(function (req, res) {
  res.writeHead(200, {'Content-Type': 'text/plain'});
  res.end('Hello World\n');
 console.log('Sent message'); }).listen(1337, "192.168.2.125");
console.log('Server running at https://192.168.2.125:1337/');
Gotcha Warning!
A common mistake at this point is to stick with the sample's use of 127.0.0.1 (locahost). This will work great from your browser, but not from the emulator or your device (regardless of whether it is connected to WiFi or tethered via Zune). This is because the emulator and the device join the network as *new* devices which means they get a newly assigned IP address and they act just as though they were a machine on the network. This leads to 127.0.0.1 pointing back to themselves, which is not allowed, leaving you with a "NetworkDown" network error. Instead, make sure to set your IP to your local LAN address (usually starts with 192.168.X.X or 10.X.X.X). You can find your exact IP address from cmd by typing "ipconfig" and looking for the address that corresponds to your local network.
Testing the Server
Now, save your modified script somewhere somewhere convenient (I saved it to c:\nodejs\bin\servers\helloworld.js) and then launch the server with a simple:
C:\nodejs\bin>node servers/helloworld.js
Server running at https://192.168.2.125:1337/
Note the use of UNIX style paths... If you see any errors at this point it's most likely path related. Fix your path so it is relative to your binary and you should be good to go. Need to verify that everything is working? Fire up your browser and enter https://localhost:1337 and you should see "Hello World!".
Note: When launching the server you may get the Windows warning dialog about a program accessing the network, feel free to set the settings to whatever you are comfortable with, just note that Node.js will need at least local network access so that you can talk to it from the emulator / a device over WiFi.
Let's get me some Windows Phone!
We're up and running, so time to get our hands dirty with some C# code. Open Visual Studio and start a new C# Windows Phone application targetting "Windows Phone 7l.1" (which is the code target name for Mango). The project that we create is going to do something extremely simple - it's going to open the socket, send a request for data (it's really a dummy request since this server isn't really waiting for a real request) and then displays the response, verbatim, on the screen.
Once you have the project created add a button (btnStart), which will kick the whole process off, and a textblock (txtServerResponse) to contain the server response. We're not going to use binding to simplify the sample, but you can certainly do that instead. Add a Click handler to the button by double clicking on it and add the following code to MainPage.xaml.cs. The code is heavily documented so should answer any further questions you might have. I've also stuck a zipped version of the project (including the mini-server) which you can use to experiment with.
private Socket _socket;

private void btnStart_Click(object sender, RoutedEventArgs e)
{
    // the message to send to the server
    byte[] message = UTF8Encoding.UTF8.GetBytes("GET / HTTP/1.1\nHost: localhost\n\n");

    // the address we'll be connecting to
    IPAddress address  = new IPAddress(new byte[] {192, 168, 2, 125});

    // an endpoint translates into the complete destination - address + port
    // you can also use a DnsEndpoint to look up an IP address from a hostname
    IPEndPoint endpoint = new IPEndPoint(address, 1337);

    // all socket operations are asynchronous on the phone so you must set up
    // a SocketAsyncEventArgs object to let the socket know how to act
    SocketAsyncEventArgs args = new SocketAsyncEventArgs() { RemoteEndPoint = endpoint };

    // don't allow multiple clicks before the request finishes
    btnStart.IsEnabled = false;

    // create our socket, note that it isn't connected yet
    _socket = new Socket(AddressFamily.InterNetwork, SocketType.Stream, ProtocolType.Tcp);

    // set up the call back to be called when we finish connecting to the socket
    args.Completed += new EventHandler<SocketAsyncEventArgs>(OnSocketConnected);

    // neat trick - setting the buffer of a socket before it connects will cause the socket to send
    // that data as soon as it connects
    args.SetBuffer(message, 0, message.Length);


    // boom! we're off
    _socket.ConnectAsync(args);
}

void OnSocketConnected(object sender, SocketAsyncEventArgs e)
{
    if (e.SocketError != SocketError.Success)
    {
        // don't forget that we're now on a background thread so anything that interacts with
        // the UI thread (MessageBoxes, updating UI etc) has to be dispatched back
        Dispatcher.BeginInvoke(() =>
        {
            MessageBox.Show("(Connect) Socket error! " + e.SocketError.ToString());
        });
        return;
    }

    // we're done with the connect + send, time to receive

    // create a buffer for the respone
    byte[] buffer = new byte[1024];

    // create the Socket event args for this receive
    SocketAsyncEventArgs args = new SocketAsyncEventArgs();

    // set a buffer for the receive - the size will be the maximum amount read
    args.SetBuffer(buffer, 0, 1024);

    // we have to come back somewhere after the receive completed
    args.Completed += new EventHandler<SocketAsyncEventArgs>(OnSocketReceive);

    // kick off the actual receive
    _socket.ReceiveAsync(args);
}

void OnSocketReceive(object sender, SocketAsyncEventArgs e)
{
    if (e.SocketError != SocketError.Success)
    {
        Dispatcher.BeginInvoke(() =>
        {
            MessageBox.Show("(Receive) Socket error! " + e.SocketError.ToString());
        });

        return;
    }

    // the response comes back as a byte array, so convert it to a string
    // Note: usually you would read from the buffer and then call _socket.ReceiveAsync(e)
    // again until e.BytesTransferred == 0 (signals end of the receive), for this example
    // we're going to keep it simple
    string response = UTF8Encoding.UTF8.GetString(e.Buffer, 0, e.BytesTransferred - 1);

    // we have our response now update the UI thread
    Dispatcher.BeginInvoke(() =>
    {
        txtServerResponse.Text = response;
        btnStart.IsEnabled     = true;
    });
}
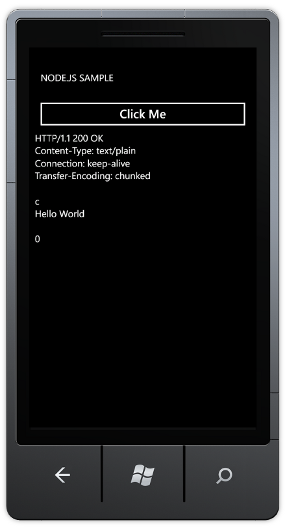
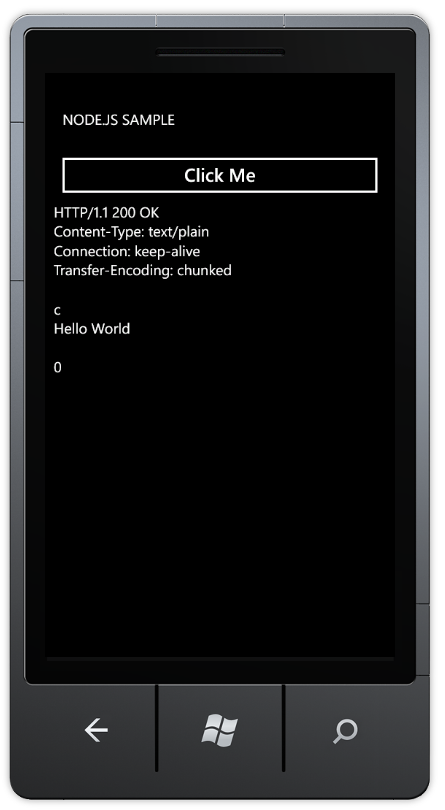
What does it look like?
Questions?
Feel free to leave comments below - Good Luck!