Customizing In-Box Netmon Parsers. How to edit and deploy updated Netmon Parsers.
This article will explain how to edit and deploy an “in-box”
Netmon parser. By “in-box”, I refer to a
parser that was installed with the Netmon package or was downloaded and
installed via https://nmparsers.codeplex.com.
The need to alter an in-box parser should be rare and done
only with a full understanding of the consequences. Parsers go through regular maintenance where
improvements and corrections are made.
It is advisable to keep your parser collection up-to-date to realize
these benefits. Having a customized
parser muddies this model.
Netmon marks all In-Box parsers as Read Only to protect them
from editing. It’s not immediately
obvious, but by protecting the in-box parsers Netmon is protecting any
customizations you make. Without this
protection, it is likely that your changes will get overwritten and lost if the
entire parser package is updated. This
requires you to make a copy of the parser you want to customize and edit the
copy. The consequence is that if the
parser you’re replacing is updated, you won’t realize any improvements because
Netmon will be pulling from your edited copy.
Be aware of this condition and use this technique sparingly.
If you are editing a parser to make a fix, you should report
problems to the Netmon parser team via the Network Monitor forum at https://social.technet.microsoft.com/Forums/en-US/netmon/threads.
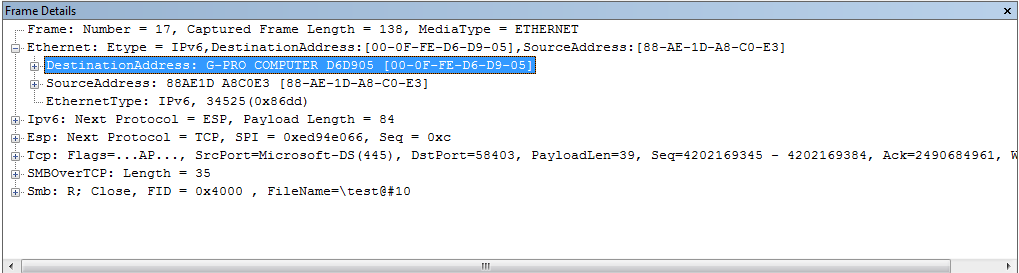
In this example, I will make a simple, textual change to the
Ethernet parser. To the output "DestinationAddress:
<computername> [<MAC address>]”, I’ll add “XXX”, as in “"DestinationAddress:
XXX <computername> [<MAC address>]”. This change has no value except to illustrate
the process to edit and deploy the change and to visually prove that the change
was picked up.
Before we begin, we need to identify the parser that is
responsible for a specific line of output.
This is easy to do with Netmon’s Go To Data Field Definition feature.
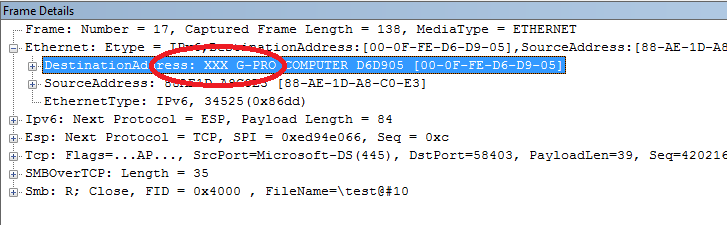
Take the following frame:
If you right-click on any field, in our case
“DestinationAddress”, and select “Go To Data Field” from the drop down menu,
Netmon will open a new window with the Netmon parser source code that emitted
that line. In this case, it identified
the file C:\ProgramData\Microsoft\Network Monitor 3\NPL\NetworkMonitor
Parsers\Base\Ethernet.npl (the parsers are in Netmon Parser Language, .NPL
files).
The feature further identified the source line that created
the output:
“MacAddress DestinationAddress = FormatString("%s
[%02X-%02X-%02X-%02X-%02X-%02X]", MacTable(this), this[5], this[4],
this[3], this[2], this[1], this[0])”

This is what I want to edit.
First, copy the parser file to somewhere safe. I would suggest C:\Users\<user>\Documents\Network
Monitor 3\Parsers. Thus, I copied
C:\ProgramData\Microsoft\Network Monitor
3\NPL\NetworkMonitor Parsers\Base\Ethernet.npl
To
C:\Users\<user>\Documents\Network Monitor 3\Parsers\Ethernet.npl.
I edited my private copy of Ethernet.npl by adding “XXX” to
the text output and saved the file:
““MacAddress DestinationAddress = FormatString("XXX %s
[%02X-%02X-%02X-%02X-%02X-%02X]", MacTable(this), this[5], this[4],
this[3], this[2], this[1], this[0])”
The next task is to cause Netmon to use your customized
Ethernet.npl. This requires you to have
a custom (User) parser profile. From
Netmon’s main window, select Parser Profiles and then Parser Profile Options.
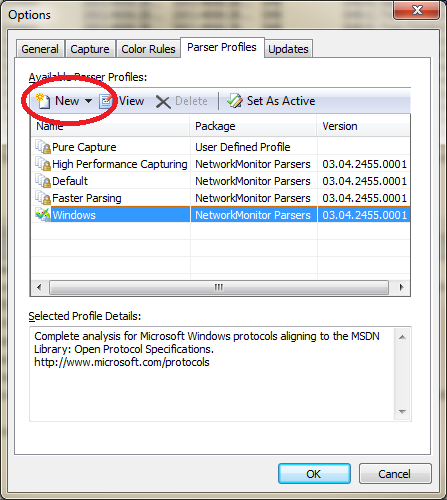
Select (single-click) the Windows profile and then press
New. From New, you can select either a
Blank Profile or Create from Selected.
Select Create from Selected.
Since you already selected the Windows profile, this will make a new
profile based on the existing Windows profile.
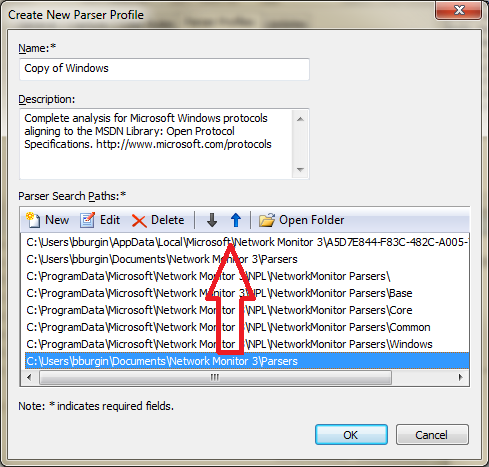
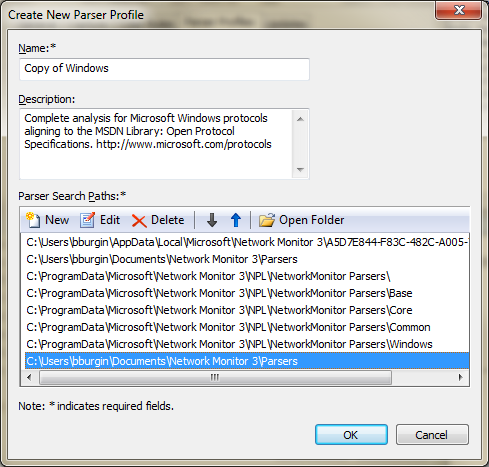
Next, add a Parser Search Path that includes where your copy
of Ethernet.npl lives. Notice that the
path was added to the bottom of the Parser Search Path:
To ensure that your copy of Ethernet.npl takes precedent
over its original, you must move C:\Users\<user>\Documents\Network
Monitor 3\Parsers to the top by selecting it and pressing the UP arrow until it
occupies the top slot.
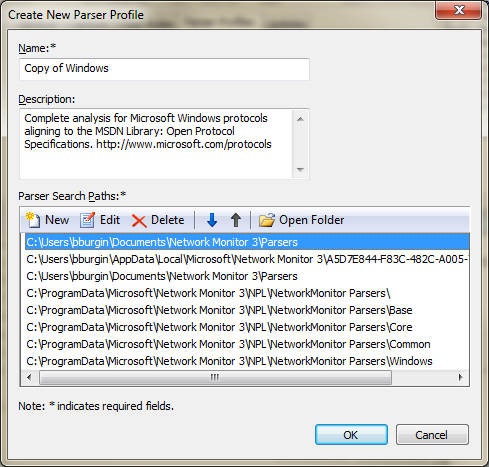
Then, save this profile by pressing OK.
Lastly, configure Netmon to use your customized
profile. Back on Netmon’s main window,
select Parser Profiles and then User Defined Profiles and lastly Copy of
Windows (or, whatever name you gave the new profile). Netmon will then reload the parsers and
re-parse your trace and you’ll realize your modification: