Set up and use Docker Swarm on Azure
As Docker dominates as the hot containerization topic, the focus is starting to shift from just containers to container orchestration. SWARM is the first step towards this.
There are several ways to set up a SWARM cluster of Docker hosts on Azure. The documentation out there is out-of-date or incomplete or simply does not work. I wanted to share one way that seemed easy to me.
Here is a diagrammatic representation of the SWARM cluster we will create on Azure [ 1 Swarm Manager (Ubuntu), 2 Swarm Nodes (Ubuntu) in a VNET, being controlled from a Docker Client of any sort (I use my Windows laptop) ]:
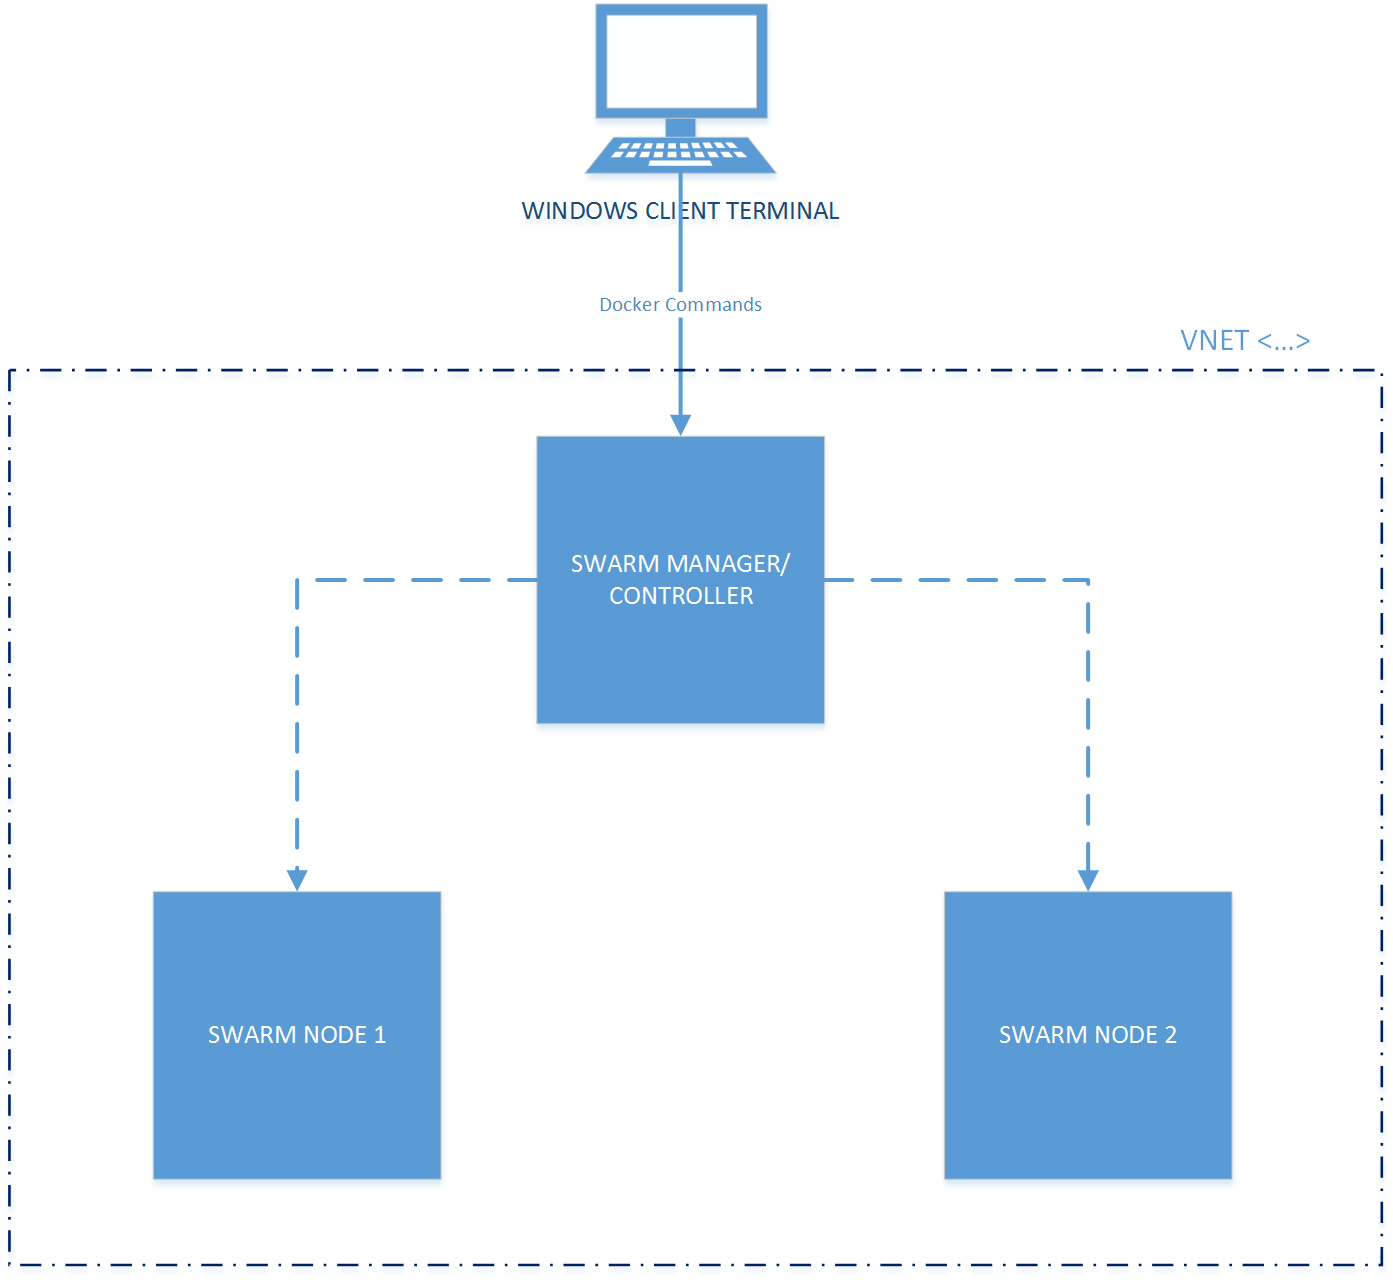
(In addition, I used another Linux VM to issue Azure CLI commands to actually create the set-up. Instead, you could use the same machine for the Docker client and CLI client)
Steps involved:
1. Create the SWARM Master using Azure CLI, then configure it:
a. Pre-requisite: Install Azure CLI. Steps for an Azure Ubuntu VM are given below:
i. sudo apt-get update
ii. sudo apt-get install nodejs-legacy
iii. sudo apt-get install npm
iv. sudo npm install -g azure-cli
v. (Log yourself in) azure login
b. Change mode to ARM:
i. azure config mode arm
c. Create a separate resource group which will contain all the resources for this set-up
i. azure group create -n "cliSouthCentralSwarmRG" -l "South Central US"
d. Create the SWARM master VM with its own NIC, Public IP Address and a new storage account, also creating the VNET and subnet in the process
i. azure vm docker create --resource-group cliSouthCentralSwarmRG --name cli-swarm-master --location southcentralus --os-type linux --nic-name clitestnic --public-ip-name clitestpip --vnet-name cliswarmvnet --vnet-subnet-name cliswarmsubnet --storage-account-name clidockerswarmstorage --image-urn canonical: UbuntuServer :14.04.3- LTS:latest --admin-username Azure123 --admin-password 'Azure!23'
ii. (When prompted for VNET address prefix, use something that works for you like 10.10.0/16, for subnet address prefix, you can use 10.10.1.0/24 in that case. When prompted for Public IP domain name, use something unique, e.g., “clidockerswarm” – I have already taken that one for South Central US though)
iii. Check the portal for the FQDN of the Public IP you just created, use that and port 22 to SSH into the box (you can use Putty)
e. Disable TLS on the Swarm Master – for demo purposes, we will disable TLS, as using TLS for Swarm cluster is slightly more work than enabling it for just one server, and we can dedicate some time later on if we are working on a real production or dev/QA workload, adding TLS back
i. Once logged into the Swarm Master host on SSH, enter a sudo shell (“sudo su”) as the following operations will need root access
ii. Edit /etc/default/docker (use vi or some other editor) and remove the parameters tlsverify, tlscacert, tlscert and tlskey. The shortened line should look like this: DOCKER_OPTS="-H=unix:// -H=0.0.0.0:2376"
iii. service docker restart
iv. (To verify that your changes have taken effect) ps aux | grep docker
f. Connect to the SWARM master host from your docker client. If you are not sure how to set up a docker client on your windows laptop, follow the first 2 sub-steps in “Step 2: Set up your Docker client on your Windows desktop/ laptop and connect to the server” of my blog here . There is no need to follow the sub-steps beyond the first two as we will not be using TLS. On your WINDOWS laptop command prompt/ Cygwin terminal running on WINDOWS laptop:
i. Make sure that you have no user or user/environment variables DOCKER_HOST or DOCKER_TLS_VERIFY or DOCKER_CERT_PATH. If you have set them previously to connect to another docker server, you can do the following: (a) if you are running Cygwin, temporarily disable these for the current session by running: unset DOCKER_HOST; unset DOCKER_TLS_VERIFY; unset DOCKER_CERT_PATH (b) If you are running on command prompt, these will turn the variables off permanently: setx DOCKER_HOST “”; setx DOCKER_TLS_VERIFY “”; setx DOCKER_CERT_PATH “”
ii. docker -H tcp://{domain name of your docker VM swarm master's Public IP Address}:2376 {some docker command}
Example: docker -H tcp://clidockerswarm.southcentralus.cloudapp.azure.com:2376 ps -a
2. Create the two SWARM nodes using Azure CLI and configure them:
a. Azure CLI command to create the 2 VM-s – basically the same command as for creating the swarm master, but with new values for (a) --name (b) --nic-name (c) --public-ip-name, but with existing values of vnet-name, vnet-subnet-name and storage-account-name. Which means that we are, with each command, creating a new VM with a new NIC and a new Public IP Address but we are adding it to the same vnet/subnet and using the same storage account. When prompted, use some unique name for Public IP domain name for each node (like “clidockerswarmnodeone”, “clidockerswarmnodetwo”):
i. azure vm docker create --resource-group cliSouthCentralSwarmRG --name cli-node-1 --location southcentralus --os-type linux --nic-name clitestnicnodeone --public-ip-name clitestpipnodeone --vnet-name cliswarmvnet --vnet-subnet-name cliswarmsubnet --storage-account-name clidockerswarmstorage --image-urn canonical:UbuntuServer:14.04.3-LTS:latest --admin-username Azure123 --admin-password 'Azure!23'
ii. azure vm docker create --resource-group cliSouthCentralSwarmRG --name cli-node-2 --location southcentralus --os-type linux --nic-name clitestnicnodetwo --public-ip-name clitestpipnodetwo --vnet-name cliswarmvnet --vnet-subnet-name cliswarmsubnet --storage-account-name clidockerswarmstorage --image-urn canonical:UbuntuServer:14.04.3-LTS:latest --admin-username Azure123 --admin-password 'Azure!23'
b. Like you did with the SWARM Master host, disable TLS on each and connect to each node from your docker client repeating the steps 1(e) and 1(f) for each of the nodes, with ONE IMPORTANT DIFFERENCE. When you edit /etc/default/docker on the nodes, ALSO CHANGE THE PORT NUMBER TO 2375 (instead of 2376). The DOCKER_OPTS line should look like this for the nodes: DOCKER_OPTS="-H=unix:// -H=0.0.0.0:2375" .
3. Create the swarm cluster and join the nodes to the cluster (all commands from now on should be executed on the docker client, using the -H parameter to point it to the correct docker server, be it the swarm master or one of the swarm nodes). NOTE: We are installing swarm using docker, which means swarm will run as a container:
a. Pointing client towards swarm master (commands show the FQDN as created in the above examples, replace with your own FQDN):
i. docker -H tcp://clidockerswarm.southcentralus.cloudapp.azure.com:2376 pull swarm
ii. docker -H tcp://clidockerswarm.southcentralus.cloudapp.azure.com:2376 run --rm swarm create
iii. Save the cluster id reported back by the last command, we will need it later on
b. Pointing client towards swarm node one (commands show the FQDN as created in the above examples, replace with your own FQDN):
i. docker -H tcp://clidockerswarmnodeone.southcentralus.cloudapp.azure.com:2375 pull swarm
ii. In the following command, use the public ip address of node one for the value of addr parameter (get it from the portal) and use the cluster id saved in 3(a)(iii) above after token://
iii. docker -H tcp://clidockerswarmnodeone.southcentralus.cloudapp.azure.com:2375 run -d swarm join --addr=40.84.184.174:2375 token://cb12d74b9b5c45deb054f92cf6578efe
iv. (to verify) docker -H tcp://clidockerswarmnodeone.southcentralus.cloudapp.azure.com:2375 ps -a
c. Pointing client towards swarm node two (commands show the FQDN as created in the above examples, replace with your own FQDN):
i. docker -H tcp://clidockerswarmnodetwo.southcentralus.cloudapp.azure.com:2375 pull swarm
ii. In the following command, use the public ip address of node two for the value of addr parameter (get it from the portal) and use the cluster id saved in 3(a)(iii) above after token://
iii. docker -H tcp://clidockerswarmnodetwo`.southcentralus.cloudapp.azure.com:2375 run -d swarm join --addr=40.84.190.103:2375 token://cb12d74b9b5c45deb054f92cf6578efe
iv. (to verify) docker -H tcp://clidockerswarmnodetwo.southcentralus.cloudapp.azure.com:2375 ps -a
d. Pointing client towards swarm master (commands show the FQDN as created in the above examples, replace with your own FQDN):
i. In the following command, use the cluster id saved in 3(a)(iii) above after token:// and be careful with the port numbers, note that we are connecting the docker client to port 2376 where the docker daemon is running, but we are asking to start the swarm manager daemon to start up and listen on port 2375, and pass docker commands to port 2375 on the nodes:
ii. docker -H tcp://clidockerswarm.southcentralus.cloudapp.azure.com:2376 run -d -p 2375:2375 swarm manage token://cb12d74b9b5c45deb054f92cf6578efe
iii. Once the manager is up and running, our cluster is ready, and we should be able to list the nodes. There are 2 ways to list the nodes
iv. (First way to list the nodes): docker -H tcp://clidockerswarm.southcentralus.cloudapp.azure.com:2375 info
v. (Second way to list the nodes): docker -H tcp://clidockerswarm.southcentralus.cloudapp.azure.com:2376 run --rm swarm list token://cb12d74b9b5c45deb054f92cf6578efe
e. It may happen that when you try to list the nodes, you do not see two of them, you only see one. That would be a bug whereby you joined one of the nodes too soon. Just join it back again (run 3b or 3c again depending on which node needs re-joining) and verify using the listing methods
4. Put SWARM to work – well what use of setting a SWARM cluster up unless you also use it for something. I will cover the basics of how you could use the cluster:
a. From this point on, issue ALL docker commands (from your docker client) against the SWARM master port 2375 (where the SWARM manager daemon is running):
i. First, verify that no containers are running on any node: docker -H tcp://clidockerswarm.southcentralus.cloudapp.azure.com:2375 ps
ii. Then, run mysql on your cluster and see SWARM master pick one of the nodes automatically: docker -H tcp://clidockerswarm.southcentralus.cloudapp.azure.com:2375 run -d -P --name db mysql
iii. Then, check which node it chose with the ps command again, it should show which node it chose in the ‘names’ column. Also, note the container id
iv. Then, stop the container: docker -H tcp://clidockerswarm.southcentralus.cloudapp.azure.com:2375 stop <container id of mysql container>
b. That was an example of SWARM selecting the node for you. However, SWARM provides several ways by which you can specify your preference of nodes. See the filters topic here
c. Once you combine the filters with strategies, you can start putting together the rules of how to design an end-to-end solution/application (e.g., an n-tier backend) with containers. I will write back, in another session, on the application design and architecture aspects of using docker, swarm, etc.
Thanks