Set up a MySQL IaaS NDB cluster with 4 nodes on Azure Linux
Introduction
In an earlier blog post, I wrote about setting up a MySQL single server instance on Azure Linux (Ubuntu) Virtual Machine. We also did some performance bench-marking around READ-s with lots of joins.
However, most enterprises would be interested in exploring a full-fledged MySQL cluster as opposed to just a single server. MySQL cluster uses the NDB engine to manage the different nodes, and data is saved in the data nodes in such a way that it is extremely fault-resilient, scalable and high performing.
In this blog post, I will explore how to set up a 4 node MySQL IAAS cluster on Azure.
Note: ClearDB now provides PAAS MySQL Clusters on Azure as well. In fact, their offering seems very robust and technically a lot more attractive than setting your own IAAS instance because of the recently announced option of Premium Dedicated Clusters. I said "technically" because I have not had the chance to compare the cost model of going with them versus hosting your own IAAS cluster on Azure. In this blog post, we will focus on the IAAS option.
Architecture
These steps are listed on mysql website in a generic fashion - https://dev.mysql.com/doc/mysql-cluster-excerpt/5.1/en/mysql-cluster-installation.html
However, these steps need some modifications on Azure Virtual Machines running Ubuntu LTS 14.04. We will try to capture the differences here.
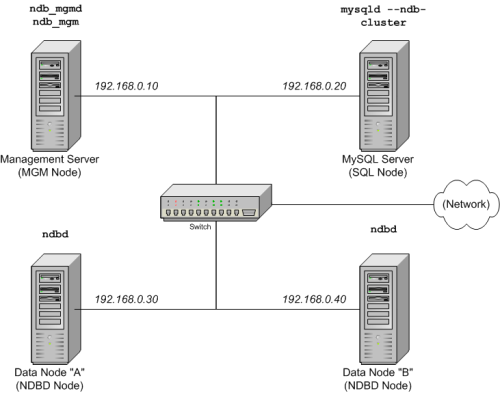
Here is the conceptual architecture diagram of what we are trying to achieve. We will, as is obvious from this diagram, we will spin up 4 Virtual Machines - 2 for the data nodes, 1 for SQL Node, and 1 for the NDB Management node. You can set up a 5th node as a client if you want to run performance tests, and we will also briefly cover that. However, to hold against a large performance test run on the cluster, the cluster nodes need to be beefy, as MySQL has a tendency to consume large amounts of memory unless tuned well - especially queries with JOINS needs AQL. Discussing such optimizations in not within the scope of this blog post.
Set up the cluster on Azure
Set up the 1st data node ("mysqlclusterdatanodeA") from Azure portal with its own resource group, vNet, storage account and availability Set. Recommended minimum size SKU is D1 Standard
Set up the 2nd data node ("mysqlclusterdatanodeB") - join it to the same resource group, vNET, storage account and availability Set as the data node A. Recommended minimum size SKU is D1 Standard
Set up the SQL Node ("mysqlclustersqlnode") - join it to the same resource group, vNET and storage account as the data nodes. No need for Availability Set. Recommended minimum size SKU is A1
Set up the Management Node ("mysqlclustermgmtnode") - join it to the same resource group, vNET and storage account as the data nodes. No need for Availability Set. Recommended minimum size SKU is A0
From the MySQL cluster download area (https://dev.mysql.com/downloads/cluster/) - download the file mysql-cluster-gpl-7.4.8-linux-glibc2.5-x86_64.tar.gz. Copy it to each of the 4 VM-s created above
[At this stage, we have moved on to the section 4.1.1 here: https://dev.mysql.com/doc/mysql-cluster-excerpt/5.1/en/mysql-cluster-install-linux-binary.html. However, instead of saving the downloaded and copied tar.gz file in /var/tmp, we can proceed with it being present in the home directory of the primary used being used to log into the Azure VM-s]
Follow all the steps in section 4.1.1. You will need to deviate in the following steps:
Step 3 - "cd mysql" should read "/usr/local/mysql"
Step 3 - The step "scripts/mysql_install_db --user=mysql" will fail as it cannot find libaio.so, it turns out that the 64 bit version of the library is not installed on the Azure VM by default, "sudo apt-get install libaio1" fixes it
Step 5 - Instead of /etc/rc.d/init.d use /etc/init.d
Step 5 - instead of the chkconfig command use: sudo update-rc.d mysql.server defaults
Do not restart the SQL node now, just move on to the data node A
Follow steps for data node A, data node B from the same section. DO NOT RESTART ANY OF THESE, move on to the next node
Follow steps for management node from the same section. Do not restart. Move on
[At this stage, we have moved on to the section 4.3 here: https://dev.mysql.com/doc/mysql-cluster-excerpt/5.1/en/mysql-cluster-install-configuration.html\]
Log into the SQL Node and do the following:
sudo vi /etc/my.cnf (or use your favorite editor)
Paste this:
[mysqld] # Options for mysqld process: ndbcluster # run NDB storage engine [mysql_cluster] # Options for MySQL Cluster processes: ndb-connectstring=10.2.0.7 # location of management server-
[Remember to use the correct Private IP address for the management server in the last line. Get that from Azure Portal. Make sure that you DO NOT use the VM's Public IP Address here. Use the private one] -
 sudo reboot (so that the mysql process can start as we put it in /etc/init.d)
This is also a test whether we did that right!
While that is rebooting, repeat the same steps (12 a, b) on the two data nodes (but no need to reboot
them, as data nodes are not expected to run any daemon that needs restarting or starting)Log into the management Node and do the following:
sudo mkdir /var/lib/mysql-cluster
cd /var/lib/mysql-cluster
sudo vi config.ini
Paste this:
[ndbd default] # Options affecting ndbd processes on all data nodes: NoOfReplicas=2 # Number of replicas DataMemory=1024M # How much memory to allocate for data storage IndexMemory=160M # How much memory to allocate for index storage # For DataMemory and IndexMemory, we have used the # default values. Since the "world" database takes up # only about 500KB, this should be more than enough for # this example Cluster setup. [tcp default] # TCP/IP options: portnumber=2202 # This the default; however, you can use any # port that is free for all the hosts in the cluster # Note: It is recommended that you do not specify the port # number at all and simply allow the default value to be used # instead [ndb_mgmd] # Management process options: hostname=10.2.0.7 # Hostname or IP address of MGM node datadir=/var/lib/mysql-cluster # Directory for MGM node log files [ndbd] # Options for data node "A": # (one [ndbd] section per data node) hostname=10.2.0.4 # Hostname or IP address datadir=/usr/local/mysql/data # Directory for this data node's data files [ndbd] # Options for data node "B": hostname=10.2.0.5 # Hostname or IP address datadir=/usr/local/mysql/data # Directory for this data node's data files [mysqld] # SQL node options: hostname=10.2.0.6 # Hostname or IP address # (additional mysqld connections can be # specified for this node for various # purposes such as running ndb_restore)-
 NOTE:
(i) NoOfReplicas = how many data nodes we have

(ii) DataMemory, IndexMemory - Key point to note here apart from the explanations available
in the documentation is that these memory limits will be imposed on the DATA NODES.
Not on the management node. In our case, the management node is small (A0) and has
only 0.75 GB of memory. Obviously it cannot handle 1024M as DataMemory - it does
not even have that much. The reason we have used 1024M here is that: if you try to install
the standard publicly available employees database, which is around 160 MB in size,
you will still be good

(iii) For IndexMemory, the thumb rule is to allocate between 1/6 and 1/8 of the DataMemory,
but if there are too many UNIQUE in the table definitions, it will need more to store all the
unique hash indexes

(iv) portnumber - internal communication port for all the hosts in the cluster,
we will have to open this port up from the portal

(v) hostname - in the 4 sections "ndb_mgmd", "ndbd", "ndbd" and "mysqld" - make sure
that you use the CORRECT PRIVATE IP ADDRESS of the management node,
data node A, data node B and SQL node respectively

(v) Remember that the way we have set up the data nodes, there is no directory
called "/usr/local/mysql/data" on them, but the "datadir" entry for these 2 servers are
pointing to this value. Which means we have to log into our data hosts, create this
directory and set its permissions correctly
So we have a few follow-up tasks from the above config.ini. Let us execute these one by one:
-
Go to the portal and browse to the NSG for each of the 4 nodes one by one (each host will have one Network Security Group created for itself. Select that NSG, add 1 inbound security rule - Source ANY, Destination Port 2202 (overwrite 80 with 2202), Protocol ANY and 1 outbound security rule - Source Any, Destination Any (overwrite 80 with *), Protocol Any. Repeat for each of the 4 NSG-s -
Log onto the data nodes are run these commands on each:sudo mkdir /usr/local/mysql sudo mkdir /usr/local/mysql/data sudo chmod a+w /usr/local/mysql sudo chmod a+w /usr/local/mysql/data/
-
Now is a good time to log into your SQL Node and make sure that it rebooted. Once in, run
"sudo netstat -tap | grep mysql" and make sure that mysqld is running
[At this stage, we have moved on to the section 4.4 here: https://dev.mysql.com/doc/mysql-cluster-excerpt/5.1/en/mysql-cluster-install-first-start.html\]
Initial Startup of cluster:
On management node: Step 1 under section 4.4 will fail unless you run this first: "sudo mkdir /usr/local/mysql" and then run ndb_mgmd with sudo: "ndb_mgmd -f /var/lib/mysql-cluster/config.ini". Verify with "ps aux | grep ndb"
On Data nodes: sudo ndbd. Verify with "ps aux | grep ndbd"
On SQL Node: mysqld should be running already as we set it to run at startup and we rebooted the node. If you have not done that, do it now
On management node: (VERIFY THAT CLUSTER IS RUNNING): "ndb_mgm" (no need to use sudo) - use verb SHOW and then EXIT
[At this stage, we have moved on to the section 4.5 here: https://dev.mysql.com/doc/mysql-cluster-excerpt/5.1/en/mysql-cluster-install-example-data.html\]
By now, you can safely exit from any terminal(s) on the data and management nodes. All interaction with the cluster can happen through the SQL node, as if you are talking to a MySQL server located on the SQL Node. Remember, however, that the underlying engine must be specified as "NDBCLUSTER" instead of InnoDB or MyISAM for every table residing on every database in the cluster for it to be replicated across the cluster. Therefore, when creating any table on the cluster, we must specify ENGINE=NDBCLUSTER option. This goes for any mode of creation - even if we are importing databases from dumps. If we have not done so, we must ALTER TABLE each table and set ENGINE=NDBCLUSTER later on
On SQL Node:
cd /usr/local/mysql
sudo bin/mysql_secure_installation (As root password is not set yet, just press ENTER when prompted for current root password. Then, set the root password properly)
NOTE: It is worth taking into account that Cluster nodes do not make use of the MySQL privilege system when accessing one another. Setting or changing MySQL user accounts (including the root account) affects only applications that access the SQL node, not interaction between nodes
log into mysql client prompt using root user (assuming you are still inside /usr/local/mysql): bin/mysql -uroot -p<root password set above>
Add /usr/local/mysql/bin to PATH so that you can just log into the SQL Node VM and start typing "mysql..." without bothering to change directories.
For an Azure Linux (Ubuntu) VM, this can be achieved most easily by executing this:
cd ~; ln -s /usr/local/mysql/bin/ ./bin What this will do is create a symbolic link called "bin" in your home directory that links to /usr/local/mysql/bin/ . Azure Ubuntu VM-s already come with a ~/.profile file that adds your home directory's bin subdirectory to PATH while logging in. Log out and log back in and you should have access to mysql at your command prompt from anywhere.-
 The cluster is ready. Treat it like a single server where the network address
of the SQL node is the equivalent of the "server" in the single-server world.
You can now point another VM (a client box) to this SQL node and connect,
and the steps would be the same as if you were connecting to a single server,
which are covered in my previous blog post<br>
Conclusion
This blog post only handles the setting up of the cluster. I am actually going ahead and running some basic performance tests on this cluster - I will update best practice guidelines for Azure shortly.
Thanks!