MySQL performance benchmark on Azure Linux: OS disk (ext4) vs RAID 0 array (xfs)
Introduction
In an earlier blog post, I wrote about how we can configure an Azure Linux (Ubuntu) VM with a RAID 0 array of data disks and mount XFS on the array. The goal of doing this was gaining disk I/O, hence performance.
In order to substantiate this claim, I am following up with some performance tests run with the popular Open Source RDBMS database - MySQL. This blog shows how to set up the test using Azure Linux (Ubuntu) VM-s from scratch, and also discusses the results.
Install Mysql
Before we dive into the details of the performance test and its results, let us quickly review what we need to do to install and run MySQL database on an Azure Linux (Ubuntu) VM. Here are the steps:
Provision an Azure Linux (Ubuntu 14.04 LTS) VM through the portal, Azure CLI, Powershell or REST API-s - or one of the several other ways now available to do so (like this open source go sdk).
NOTE A: Please remember that we are going to benchmark SQL Server performance on this machine - hence the VM instance type should be carefully chosen. We recommend at least D-series for this purpose. If you plan to add data disks to this VM later on in order to create a RAID array, please pay close attention to the maximum number of data disks allowed as it varies per VM instance type. In order to complete this tutorial as-is, you should choose A2 or higher if you are going with A series, D2 or higher if you are going with D series. That is because we stripe together 4 data disks, and A1/D1 does not allow four data disks.
NOTE B: Please use the "Resource Manager" deployment method (as opposed to the "Classic" method). "Resource Manager" is the newer method and provides expanded manageability of your VM. Also, please create a new Resource Group (name it something meaningful like "mysqltest") and also create a new Virtual Network for this VM (also name it something meaningful). This is important because we will later create a load testing client machine and add it to the same Resource Group and Virtual Network. Adding the client machine to the same network as the server machine results in the load traffic not needing to cross any switches, thus avoiding variance.
Log into the VM using Putty (or any other SSH client)
sudo apt-get update
sudo apt-get upgrade
sudo apt-get install mysql-server
sudo mysql_secure_installation (set root password, make other changes to make your installation as necessary - you can leave anonymous access on for convenience during testing)
mysql -u root -p (test whether you can use the root password that you set in the above step)
sudo netstat -tap | grep mysql (test if you can detect the mysqld daemon running)
sudo service mysql restart (test if mysql has registered as a service)
mysqlslap -uroot -p{Root password} (test whether the load testing client tool has been installed properly)
vi /etc/mysql/my.cnf (or use any other editor - review this configuration file carefully, we are going to make changes to this file down the line to change the way mysql behaves)
[ These steps are consolidated as a shell script here (check out "install-mysql-on-azure-ubuntu-vm-needs-sudo.sh"): https://github.com/kbxkb/mysql-on-azure ]
Install a large database to run the test against
Now that we have installed MySQL Server and got it running on our Azure Linux (Ubuntu) VM, we should download and install a decently large database with lot of records in it so that we can run a good performance test on it. This can be done with any database of your choice, but here is how I downloaded and installed the employees db from mysql official site - it has 4 million records in all, and is around 160 MB in size:
- mkdir employees_sample_db; cd employees_sample_db/
- wget "https://launchpad.net/test-db/employees-db-1/1.0.6/+download/employees_db-full-1.0.6.tar.bz2" (NOTE: Please make sure that you are using the latest and correct URL, launchpad may have a more current version)
- tar -xjf employees_db-full-1.0.6.tar.bz2
- cd employees_db/
- mysql -uroot -p{Root password} -t < employees.sql
- Follow the steps here to install, validate and get the database up and running (note that the last few steps above are also included in this guide, so adjust your starting point accordingly)
- Log into the mysql> prompt (mysql -uroot -p{root password}) and run show databases; to verify that the employees database is now installed on your server
[ These steps are consolidated as a shell script here (check out "install-employees-db-pass-mysql-root-pwd-as-parameter.sh"): https://github.com/kbxkb/mysql-on-azure ]
Set up user to run the test with
Now that we have installed the employees database - let us create a special user for running our performance tests. We will create a powerful user with all permissions on all objects. You can tailor this step as per your need (or entirely skip it), but this is what I did (I granted permission on both localhost as well as '%' because we will eventually run the performance test from a different client VM) - run these commands at the mysql prompt as root ("mysql -uroot -p{Root password}") - substitute the "perftest" and "Azure123" with your own user name and password if you wish:
 CREATE USER 'perftest'@'localhost' IDENTIFIED BY 'Azure123';
GRANT ALL PRIVILEGES ON *.* TO 'perftest'@'localhost' WITH GRANT OPTION;
CREATE USER 'perftest'@'%' IDENTIFIED BY 'Azure123';
GRANT ALL PRIVILEGES ON *.* TO 'perftest'@'%' WITH GRANT OPTION;
FLUSH PRIVILEGES;
SELECT * from information_schema.user_privileges where grantee like "'perftest'%";
Set up a client Virtual Machine on Azure
Now that we have set up the perftest user, we should set up second VM - it will be out load test client machine (because it is never a good idea to run a performance benchmark on a server from the same machine as the server itself). Before we do that, let us reconfigure our MySQL server to accept connections from external hosts:
- Edit /etc/mysql/my.cnf and comment out the line "bind-address = 127.0.0.1"
- sudo service mysql restart (for the my.cnf changes to take effect)
It is time to spin up the client machine:
Set up an Azure Linux (Ubuntu 14.04 LTS) VM through the portal, Azure CLI, Powershell or REST API-s - or one of the several other ways now available to do so (like this open source go sdk).
NOTE A: The machine type does not need to be as powerful as the server's, but it is really up to you - executing a lot of parallel threads on the client is easier to scale if you have multiple cores.
NOTE B: Please set this machine up in the same Virtual Network as the server's. It is recommended that you also use the same Resource Group so that you can manage/ remove all the resources belonging to the same resource group together. See the notes for the server VM creation step for more information
Log into the VM using Putty (or any other SSH client)
sudo apt-get install mysql-client
Use the portal to retrieve the Private IP Address of your server VM (the one that you created earlier). In the following step, use that IP address with the -h parameter, and whatever user name and password you created for the performance test user above. Remember, use the private IP address (not the public IP address) so that the load test traffic stays internal to the VNET
mysql -h 10.1.0.4 -uperftest -pAzure123
The client machine should now connect to the server successfully above
Turn off query caching
Before we kick off a good READ test that will bring out the performance difference between the Azure VM's OS disk and a striped array of data disks, we should turn off query caching. That way, all our queries will hit the disk instead of some of them being served from memory. The comparison benchmark will have less variance. That is easy to do. Edit /etc/mysql/my.cnf and set query_cache_size to 0. Restart the mysql server after making the change (sudo service mysql restart).
Know your database design to model good queries
At this stage, it is a good idea to inspect the layout of the employees database that we imported. This will help us construct good queries for using in the load test. As such, mysqlslap does not need you to provide queries to run a good test. It creates its own queries and it uses them on test tables that it creates before that. We will actually use both these features - we will have it run its own queries as well provide our own.
While testing mysql using the employees database, we should look to make it work hard. For example:
select salaries.emp_no, salaries.to_date, dept_emp.dept_no FROM salaries INNER JOIN dept_emp ON salaries.emp_no = dept_emp.emp_no WHERE salaries.to_date BETWEEN '1990-01-01' AND "1991-12-31" ORDER BY salaries.emp_no, salaries.to_date;
The above query looks up the salaries table using a non-indexed field (to_date). That causes mysql to read a lot more data from the disk - exactly what we want. It also performs a JOIN, which makes it work even harder. This query returns around 233K records, give it a spin from the mysql prompt!
However, the results being published in this blog post did not use the above query. I used the following query (courtesy this blog post) because it is rich with joins, and returns almost half a million records:
SELECT e.first_name, e.last_name, d.dept_name, t.title, t.from_date, t.to_date FROM employees e INNER JOIN dept_emp de ON e.emp_no=de.emp_no INNER JOIN departments d ON de.dept_no=d.dept_no INNER JOIN titles t ON e.emp_no=t.emp_no ORDER BY e.first_name, e.last_name, d.dept_name, t.from_date;
Mysqlslap
(We should now inspect the load test tool that we will use: mysqlslap. It is a good idea to read up on the tool's features, parameters etc. so that you can make the best use of it.)
NOTE A: mysqlslap has several parameters and supports running load tests in many different ways. You should use it in several other ways as well to get a well-rounded picture. The "--debug-info" parameter results in the output containing interesting system information during the test like memory, CPU, etc. I found the "involuntary context switches" statistics to be one of the few interesting things that mysqlslap reports.
NOTE B: Use the correct value for --host (it should be the Private IP Address of your MySQL server VM that you can easily look up from the Azure portal). Use the correct user id and password as created above or otherwise.
NOTE C: Interpreting mysqlslap's output, quite interestingly, has been an non-intuitive journey for myself. For a given value of --concurrency parameter and a given value of --iterations parameter, its output may look like this:
 Average number of seconds to run all queries: 167.015 seconds
Minimum number of seconds to run all queries: 166.215 seconds
Maximum number of seconds to run all queries: 167.995 seconds
Naturally, if my concurrency was say 20, and iterations was say 5, I would want to know what exactly took 167 seconds? The phrase "all queries" initially threw me off - I was thinking "wait, do I again need to divide it by the number of queries to get the real mean I need?"
Turns out that I do not need to. If concurrency was 20, mysqlslap created 20 client threads, each running my given query once (provided I have not used the --number-of-queries parameter). That was one single test. It then repeated that single test 5 times if I have said --iterations=5. So it ran my query 20 * 5 = 100 times. 167.015 seconds is the average across all these 100 runs. It says "all queries" because my query could have easily been a set of queries instead of just one (it also accepts a .sql file with several queries in it). That is why it resorts to a generic phrase "all queries". I suspected this all along, but had to take an incredibly long journey to actually confirm this.
Here is the mysqlslap command that fires off the above query. Please note that the value of --concurrency parameter, as quoted below, is 'XX' because that is what I varied during different test runs.
mysqlslap -uperftest -pAzure123 --host=10.1.0.4 --create-schema=employees --query="SELECT e.first_name, e.last_name, d.dept_name, t.title, t.from_date, t.to_date FROM employees e INNER JOIN dept_emp de ON e.emp_no=de.emp_no INNER JOIN departments d ON de.dept_no=d.dept_no INNER JOIN titles t ON e.emp_no=t.emp_no ORDER BY e.first_name, e.last_name, d.dept_name, t.from_date;" --concurrency=XX --iterations=10 --verbose --debug-info
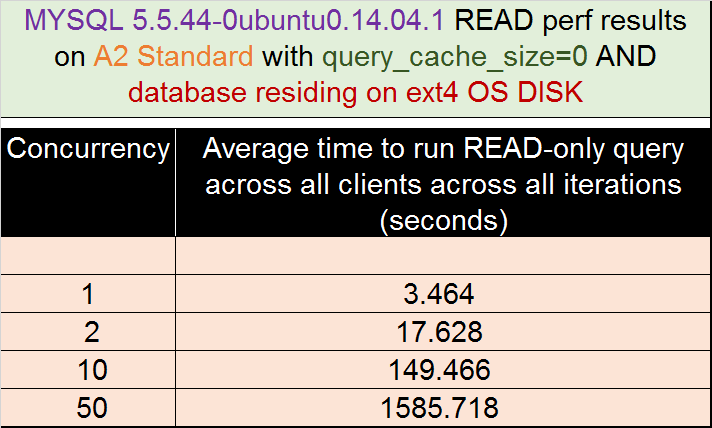
Results on OS disk
Here are the results with the employees database still residing on the OS disk:
Switch to RAID 0 array as data directory
Now that we have executed our READ test against the ext4 OS Disk, we can now, in order to compare, run it against an alternate partition - the RAID 0 array of 4 standard storage data disks mounted with XFS. In order to do so, you need to follow my earlier blog and add 4 data disks to the mysql server VM, stripe them in a RAID 0 array and mount it as an XFS partition - if you have not already done so.
NOTE: You can add data disks and follow all the steps to stripe, partition and mount them without disturbing the software installed on the OS disk
Once you have followed those steps, you should have a mount point "/RAID0" on your server VM:
 $ df -T
 Filesystem Type 1K-blocks Used Available Use% Mounted on
 /dev/sda1 ext4 30202916 4062200 24874684 15% /
 none tmpfs 4 0 4 0% /sys/fs/cgroup
 udev devtmpfs 1756712 12 1756700 1% /dev
 tmpfs tmpfs 352320 452 351868 1% /run
 none tmpfs 5120 0 5120 0% /run/lock
 none tmpfs 1761584 0 1761584 0% /run/shm
 none tmpfs 102400 0 102400 0% /run/user
 none tmpfs 64 0 64 0% /etc/network/interfaces.dynamic.d
 /dev/sdb1 ext4 139203560 60928 132048464 1% /mnt
  /dev/md127 xfs 1048047616 741848 1047305768 1% /RAID0
$
Now, we have to copy the entire MySQL database part to /RAID0 partition from / (i.e., to /dev/md127 from /dev/sda) and also point mySQL at the new location.
Follow these steps to do so:
sudo service mysql stop
sudo netstat -tap | grep mysql #check if stop worked
rm -rf /RAID0/mysql #because rsync will create the mysql folder
sudo rsync -avzh /var/lib/mysql /RAID0 #rsync parameters will make sure that all directory permissions and ownerships will be preserved
edit /etc/mysql/my.cnf and change (line following '-' is replaced by the line following '+' without the -/+ sign themselves being part of the lines):
-datadir = /var/lib/mysql
+datadir = /RAID0/mysqlsudo mv /var/lib/mysql /var/lib/mysql-old
edit /etc/apparmor.d/usr.sbin.mysqld and change (line following '-' is replaced by the line following '+' without the -/+ sign themselves being part of the lines):
- /var/lib/mysql/ r,
- /var/lib/mysql/** rwk,
+ /RAID0/mysql/ r,
+ /RAID0/mysql/** rwk,sudo /etc/init.d/apparmor reload
sudo service mysql start
sudo netstat -tap | grep mysql #check if start worked
[ These steps are consolidated as a shell script here (check out "switch-mysql-data-from-var-lib-to-new-dir-needs-sudo-needs-newdir-as-param.sh"): https://github.com/kbxkb/mysql-on-azure ]
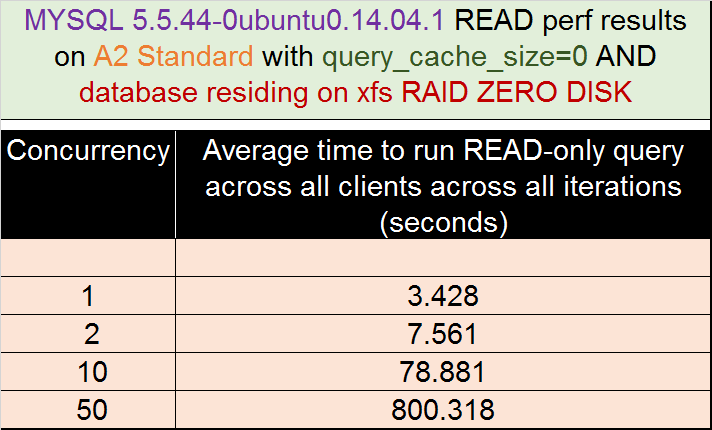
Results on RAID 0 array
Once the switch is complete, invoking mysql server on your server VM, results in it actually reading/ writing data from/to the /RAID0 disk array - and not the OS data disk.
Therefore, you can now repeat the same test as above - running mysqlslap from the client machine with the same command line and same query, which does not need to know anything about this change we made on the server side.
Here are the results:
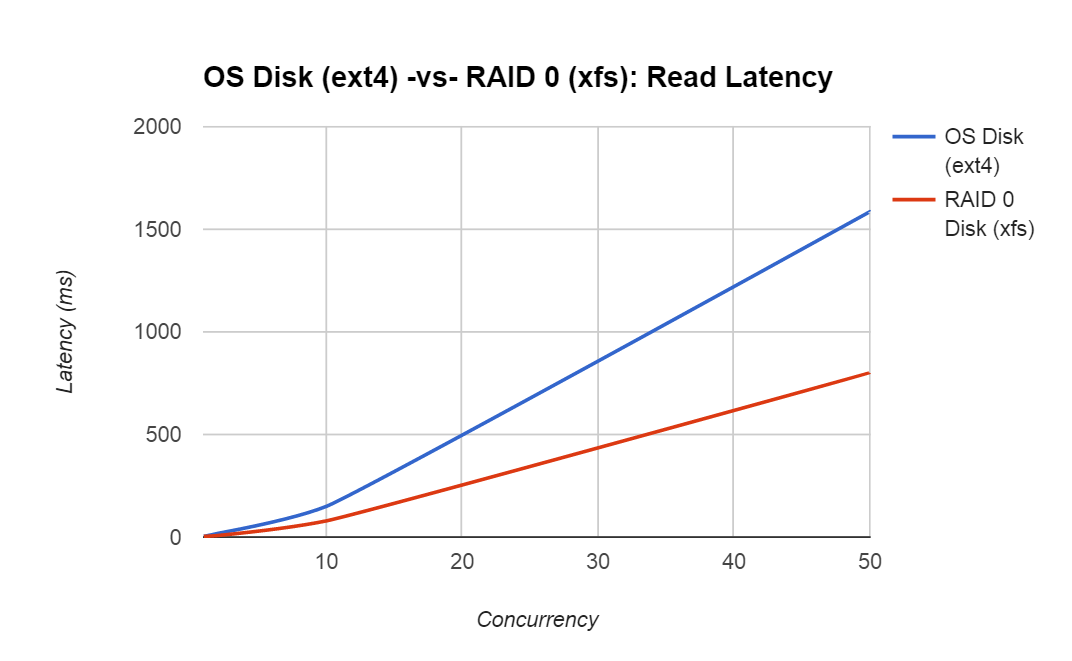
And here is a side by side comparison, the Y axis being latency and X axis being concurrency. You can see that as concurrency increases, the RAID 0 array of 4 standard disks performs twice as well as the OS disk (suffers from half as much latency)
WRITE tests
We can run similar tests for WRITE operations as well. Let us use mysqlslap's built-in capability of generating its own tables and queries. We can use the following command on the client machine to simulate a write load:
NOTE A: These two parameters are key here: --auto-generate-sql and --auto-generate-sql-load-type=write. You can change the concurrency parameter's value just we did with the READ query
NOTE B: Use the correct value for --host (it should be the Private IP Address of your MySQL server VM that you can easily look up from the Azure portal). Use the correct user id and password as created above or otherwise.
mysqlslap -uperftest -pAzure123 --host=10.1.0.4 --auto-generate-sql --auto-generate-sql-load-type=write --concurrency=100 --iterations=10 --verbose
NOTE C: Even if you do not use " --auto-generate-sql-load-type=write", mysqlslap, by default, executes a mixed test - which means it does some reads and some writes
NOTE D: Now that we switched the mysql server's data location to the /RAID0 partition during the READ test, how do I switch it back to the OS disk (/var/lib/mysql) to run the WRITE test against the OS disk? That is quite easy to do - just execute steps 1 & 2, then reverse execute steps 5, 6 & 7, followed by steps 8 & 9 in the above step-by-step guideline that explains how to move the data directory to /RAID0. You can switch back and forth as many times as you want - just remember one thing: there are 2 copies of the database in the two disks, and though they are identical to begin with, they will diverge if you start writing to them. If you have written to them and want to synchronize them, just use the rsync command (step 4) accordingly.
[Actual write tests left as exercise]
Other Considerations
MySQL performance tuning is a vast but well documented topic. All such tips and techniques intrinsic to MySQL itself also applies to MySQL running on Azure. Hence, I am not going into much details here, the goal of this blog was to marry MySQL and Azure and let them evolve. The performance tests executed on this blog purposefully made MySQL run slow - because I wanted to tax the server and extract information out of the disk. The queries executed had a lot of JOIN-s in them - and now MySQL has AQL - which can improve performance on JOIN-s by several times. None of these techniques were used here. These numbers, therefore, should not be interpreted as typical MySQL numbers on Azure.
Conclusion
MySQL demonstrated that it reads from a RAID 0 array of standard data disks twice as fast than it reads the OS disk. The OS disk on Azure Linux VM-s are optimized for fast boot times. They are not the best options for scaling read/write performance and disk throughout. This is part two of my earlier blog post where I discussed how to set up a RAID 0 array on an Azure Linux VM here: https://blogs.msdn.com/b/opensourcemsft/archive/2015/10/16/set-up-azure-ubuntu-vm-with-xfs-on-raid-zero.aspx
Note: I have followed up this blog post with another that shows you how to set up a MySQL Cluster on Azure, should help with a new perspective.
Thanks!