Windows Vista Security Series: Programming the Windows Vista Firewall
Dan Griffin
JWSecure, Inc.
May 2007
Summary: This whitepaper and accompanying sample demonstrates how to program the new Windows Firewall API including how to configure the Windows Firewall for correct operation with. (22 printed pages). Download XPS version.
Download the associated sample code, FirewallSample.exe.
Dependencies
You must have the Windows SDK for Windows Vista. If you do not install the SDK to the default location, which is listed below, you must update the Visual Studio Include and Library paths in the sample code accordingly. Download the Windows SDK for Windows Vista. The Windows Vista SDK installs to %ProgramFiles%\Microsoft SDKs\Windows\v6.0.
Introduction
I’m Dan Griffin of JW Secure, Inc, and this is the second in a series of articles that I’m writing about some of the new cool security features in Microsoft® Windows Vista. The first article demonstrated how to add a new symmetric cipher algorithm to “Crypto API: Next Generation” (CNG) and the Cryptographic Message Syntax (CMS) APIs. Future articles and sample code will address the topics including IPsec, IPv6, the smart card module minidriver interface, and fuzz testing (using malformed data input for testing).
The focus of this article is to demonstrate the recommended use of the new Windows Firewall API. Specifically, I show how to program Windows Firewall from the perspective of an independent software vendor (ISV) that wishes to configure its network-based application with a restrictive-as-possible firewall rule set. A complete set of code samples accompanies this article, including a demonstration socket-based client/server program and a firewall tool that shows how to programmatically add and remove firewall rules.
Firewall and Filtering Architecture
Before I get to the discussion of the sample code, there are two other items of business to address. First, I want to provide pointers to existing documentation and background information that every programmer should peruse prior to using the Windows Firewall API.
- About the Windows Firewall API:
https://msdn2.microsoft.com/en-us/library/aa364679.aspx. - Existing Windows Firewall sample code:
https://msdn2.microsoft.com/en-us/library/aa366415.aspx. - Introduction to the Windows Filtering Platform, which the Windows Firewall is based on:
https://msdn2.microsoft.com/en-us/library/aa366510.aspx.
I recommend reviewing the five or so (short) introductory Web pages that follow the article in the MSDN table of contents, including the architectural diagram that shows how the Windows Firewall, and a typical socket application, interacts with the filtering platform.
The second item of business to address before I get to the sample code is to briefly explain the difference between the Windows Filtering Platform and the Windows Firewall APIs.
My sample demonstrates the use of two closely related Windows Vista APIs – those for the Windows Filtering Platform and those for the Windows Firewall. The Windows Filtering Platform API is new in Windows Vista. While some of the Windows Firewall API functionality is available in Windows XP, it has been greatly enhanced in Windows Vista. And while some of the capabilities of the Windows Filtering Platform and Windows Firewall APIs overlap in Windows Vista, it’s important to understand the scenarios to which each applies.
I learned this lesson the hard way since my first attempt to programmatically add firewall rules for my sample TCP server was based on the Windows Filtering Platform API. This was partly because I first found a sample in the latest SDK that demonstrates adding Windows Filtering Platform-based rules for MSN Messenger. Since I had no reason to suspect that this wouldn’t be a good starting point for my own work, I used it as a baseline. Using the Windows Filtering Platform API instead of the Windows Firewall API was also initially attractive because I found the Windows Filtering Platform API to be more intuitive.
However, while testing my first Windows Filtering Platform-based solution, I found that even after adding my filters, I was still getting prompted by the Windows Firewall when the TCP socket-based test server program started listening on its port. Windows Vista displayed the screenshot below when I was testing my first Windows Filtering Platform-based solution.
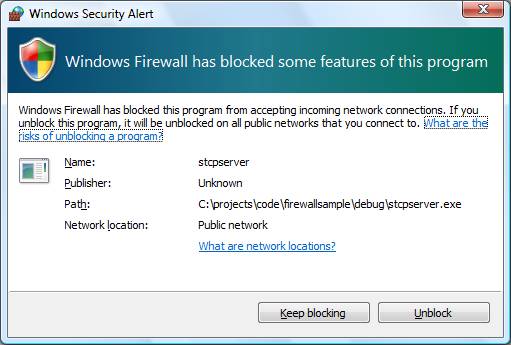
Figure 1 – Windows Security Alert
Furthermore, my Windows Filtering Platform rules seemed to be ignored. If I clicked the Keep blocking button, the client could never connect, regardless of my own filter. If I clicked the Unblock button, the server was able to receive all traffic, regardless of the client address, for example, even though my filter was more restrictive. In other words, despite the presence of my filter, I was still observing the default per-application behavior of the Windows Firewall.
This was contrary to my goals for this demo since I wanted to demonstrate the proper way to install very specific firewall rules and to avoid the above potentially confusing dialog box.
Subsequent conversation with the engineering team at Microsoft clarified that the Windows Filtering Platform API is not intended to be used in the way I was using it. In scenarios where the Windows Firewall is enabled, and a standard network based application needs to open one or more ports, the Windows Firewall API should be used. In contrast, the primary purpose of the Windows Filtering Platform API is to facilitate development of rule-based network infrastructure technologies, such as 3rd party firewalls. Indeed, the Windows Firewall is based on the Windows Filtering Platform API, as I’ll demonstrate below, and non-Microsoft firewalls are intended to be so as well.
We can infer from this situation that it’s Microsoft’s intent that the average network application should not interact with the Windows Filtering Platform API in any way. Rather, such applications should call into the higher-level Windows Firewall APIs during installation and un-installation. This is best practice since the Windows Firewall is enabled by default. However, application developers should also provide documentation detailing the expected firewall rules configuration for proper and secure operation. This is important since the Windows Firewall may have been replaced by a non-Microsoft solution (and, therefore, a different programmatic interface). Finally, this should serve as a gentle reminder that Windows should always have a software firewall enabled and correctly configured!
Sample Business Problem
Let’s consider a specific example in order to motivate the discussion of the Windows Firewall API. Suppose, at a large manufacturing enterprise, one business group maintains an internal software application that stores customer information, including some sensitive data like credit card and social security numbers. Suppose, further, that to create synergy across the organization, another business group must now have access to the same data.
As the in-house developer in charge of this line of business application, suppose I’ve been asked to confirm that it’s sufficiently robust for the new demands that will be placed on it, including the need for additional users and increased exposure of the sensitive data to the corporate network.
Considering the problem in a somewhat broader sense, depending on the internal network security policies of the organization, such an application may be hosted on a server that is itself protected by a 3rd party firewall solution. The following items may compound the problem:
-
- Administrative access to the server may be tightly controlled and audited.
- The application architecture may be three-tier, with the data hosted off-box.
- IPsec policies may be in place to protect network traffic, at least between the application and database servers.
These are all good things. However, additional defense-in-depth measures are recommended. To put it another way, as a software developer, I shouldn’t assume that security mechanisms beyond my direct control, such as a hardware-based firewall, are present or configured correctly. This is where a discussion of the Windows Firewall becomes interesting. In the context of this example, the objective is to configure the software firewall under the assumption that it’s the last defense standing between an army of bad guys and the sensitive customer data. Realistically, leveraging the security mechanisms offered by the underlying platform is especially important in light of the fact that many organizations lack the resources to deploy the additional security mechanisms mentioned above.
In summary, I know that two business groups will be accessing sensitive customer data from the corporate network via my application. Although the following discussion will focus only on configuring the software firewall, in reality, other aspects of the security design of the application need to be considered. For example, has the code recently undergone a thorough security review?
With these requirements in mind, let’s take a look at some sample code.
Sample Code: Introduction
In the example scenario I described above, I’m a developer who’s been asked to prepare an existing line of business application for broader use in a corporate network. In this article, my intent is to use this scenario to demonstrate the use of the new, improved version of the Windows Firewall API. It bears mentioning that this implies that the application is hosted on Windows Vista or a later version of Windows. Admittedly, this is more of a server scenario, and will be more relevant once the next version of Windows Server (codename Longhorn) is released. I’m not aware of any plans to port the new Windows Firewall API down-level.
A portion of the sample code accompanying this article is based on a pre-existing sample from the Windows Vista version of the Windows SDK (formerly known as the Platform SDK). The original sample code for the TCP server application can be found in the “Samples\NetDs\winsock\securesocket” subdirectory of the SDK installation. The original code included some logic pertaining to IPsec and IPv6, which I’ve intentionally disabled or removed in order to limit the scope of this particular discussion. Future articles in this series will include a complete analysis of introducing those technologies into the context of a similar sample.
More Windows Firewall related sample code also accompanies the latest Windows SDK. See the “Samples\Security\WindowsFirewall” subdirectory.
Firewall Rules
I mentioned in the beginning of this article that I was initially confused about the difference between the Windows Firewall API and the Windows Filtering Platform APIs. Once I understood how to access the firewall, I became quite impressed with its simplicity of use. A firewall rule includes configurable conditions for a variety of network traffic characteristics (ports, addresses, etc). A rule must specify an action – Allow or Block. Therefore, in order for an Allow rule to apply, each of its conditions must be met.
This is exactly the behavior that I want to apply in my sample code. Namely, the application is opening a socket on the server and waiting for clients to make requests. By default, the application is listening on a port that I expect to be blocked by the Windows Firewall. I want to cause the firewall to open that port, but to only allow network traffic through that meets certain conditions. I also want to make those conditions as restrictive as possible. Any traffic that doesn’t meet every filter condition should never be able to access my application. This is an important security concept – the default answer for inbound packets that wish to traverse the firewall, even when my application is listening on its port, is still “No”!
Ultimately, the appropriate set of filter conditions will vary for each application and deployment. Bearing in mind, again, that the rule or rules should be as restrictive as possible, I’ll attempt to create a representative set of conditions in this example. In this case, I don’t want to accept any traffic unless it meets all of the following conditions.
The protocol in use is TCP/IP. For example, we won’t accept UDP traffic.
The destination port is the specific one upon which my application is listening.
The client address is of an expected range.
- Given that I’m only testing this example with IPv4 addresses, this condition is easy to implement for small organizations, especially those using NAT. In those cases, the client address condition might stipulate 192.168.1.0 with the corresponding mask of 255.255.255.0.
- For organizations with multiple non-contiguous address ranges, managing the configuration of this rule is a little tougher, but certainly not impossible.
Finally, as an added bonus, I’d like to ensure that the above rule only applies to my specific application, and only when it’s running. That is, I don’t want another process on the host server to be able to receive my traffic, intentionally or otherwise.
Implementation of the Sample Firewall Rule
As I mentioned above, a Windows Firewall API rule exposes a variety of optional conditions. Programmatically, the conditions are exposed as properties of the INetFwRule interface. In fact, the available set of properties is sufficiently expressive that the desired behavior of the sample socket application can be achieved with a single rule. That’s exactly what I hoped for: conceptually, I want to open a port as well as enable a specific application to listen on it, but only to certain types of traffic. It’s easy to imagine how a rules engine requiring two separate rules to implement that behavior might in fact not be able to achieve it. For example, the resulting filters could be overly permissive due to a port being open but not bound to a specific application. I’ll show how to test for such situations in the next section.
In the meantime, here’s the code that creates the rule and enables it on the host. The function is WFAddRule, and it is part of my FwTool.exe utility. I’ll discuss this utility in more detail in the Testing section.
#import "netfw.tlb"
// Add settings for the demo server application to the Windows Firewall
DWORD
WINAPI
WFAddRule(
__in LPWSTR wszServerAppName,
__in LPWSTR wszServerAppFullPath,
__in LPWSTR wszFirewallGrouping,
__in NET_FW_IP_PROTOCOL fwIpProtocol,
__in LPWSTR wszRemoteAddresses,
__in LPWSTR wszLocalPort)
{
HRESULT hr = S_OK;
long lCurrentProfileTypes = 0;
WCHAR rgwszDescription [256];
try
{
// Retrieve the active policy
NetFwPublicTypeLib::INetFwRulePtr sipFwRule;
NetFwPublicTypeLib::INetFwPolicy2Ptr sipFwPolicy2AsAdmin;
CHECK_COM2(_CoCreateInstanceAsAdmin(
GetDesktopWindow(),
__uuidof(NetFwPolicy2),
IID_PPV_ARGS(&sipFwPolicy2AsAdmin)));
lCurrentProfileTypes = sipFwPolicy2AsAdmin->CurrentProfileTypes;
// Create a new rule
CHECK_COM2(sipFwRule.CreateInstance("HNetCfg.FwRule"));
// Build and set the rule description string
CHECK_COM2(StringCbPrintf(
rgwszDescription,
sizeof(rgwszDescription),
L"Allow network traffic for %s",
wszServerAppName));
sipFwRule->Description = rgwszDescription;
// Set the remaining rule properties
sipFwRule->Name = wszServerAppName;
sipFwRule->ApplicationName = wszServerAppFullPath;
sipFwRule->Protocol = fwIpProtocol;
sipFwRule->LocalPorts = wszLocalPort;
sipFwRule->RemoteAddresses = wszRemoteAddresses;
sipFwRule->Grouping = wszFirewallGrouping;
sipFwRule->Profiles = lCurrentProfileTypes;
sipFwRule->Action = NetFwPublicTypeLib::NET_FW_ACTION_ALLOW;
sipFwRule->Enabled = VARIANT_TRUE;
// Add the new rule to the active policy (effective immediately)
CHECK_COM2(sipFwPolicy2AsAdmin->Rules->Add(sipFwRule));
}
catch(_com_error& e)
{
hr = e.Error();
}
return (DWORD) hr;
}
There are a few things to note about the above sample code. First, for the sake of brevity, I’ve omitted the definition of two dependencies of this function. One is the error-checking macro CHECK_COM2, which simply prints a debug string and throws an exception if the wrapped COM call fails. The other is the helper routine _CoCreateInstanceAsAdmin, which is essentially the same as the routine documented in the SDK in the COM Elevation Moniker section (see https://msdn2.microsoft.com/en-us/ms679687.aspx).
The next thing to note about the code is that, although I’m using the Windows Firewall COM classes via C++, I’m avoiding some of the usual interoperability nastiness (e.g. explicitly converting LPWSTRs to BSTRs) by using the “netfw.tlb” interop library included with the SDK.
With those general comments in mind, I’ll run through the main purpose of the routine – adding the firewall rule for my demo server application. Here’s an explanation of each property in turn.
Property
Description
Description
A diagnostic field, visible programmatically and via the Firewall MMC snap-in (see below).
Name
Take another look at the Windows Security Alert dialog box screen shot in the previous section. Notice that the default firewall behavior is to use the program binary, without the extension (.exe), as its rule name. I’ll discuss this behavior in more detail below. In the meantime, the caller of my WFAddRule function is expected to provide that string (“stcpserver” in this case) as the first parameter.
ApplicationName
This property should be set to the full path of the server application binary. By using this property, I’m preventing a binary at any other location in the file system from listening on my port.
Protocol
See the NET_FW_IP_PROTOCOL enumerated type in the public icftypes.h header. Defined values correspond to TCP, UDP, and ANY. This example uses this property to restrict allowed traffic to TCP.
LocalPorts
Specifies the port upon which my application is allowed to listen. For handling more complex scenarios, a comma-delimited list of ports may be used instead (see https://msdn2.microsoft.com/en-us/library/aa365362.aspx).
RemoteAddresses
During testing, I’m typically using this property to specify a single address on my test LAN, in order to ensure that the test client is allowed or blocked as appropriate. For deployment, more sophisticated use of this property will be required – it can take a variety of interesting values – see https://msdn2.microsoft.com/en-us/library/aa365366.aspx.
Grouping
This property should be used to specify a common group name for all rules that apply to a given application or feature. This demonstration only requires a single rule, so the value of this property is diminished. However, its presence allows an administrator to enable, disable, and remove rules using group name rather than having to do this for each individually. The syntax of this property allows the value to be retrieved using a resource table, which facilitates localization. The sample code that accompanies this article demonstrates this “indirect string” configuration. A difficult-to-diagnose error (INetFwRules.Add returns 0x80004005) occurs if the indirect string is incorrectly configured; keep in mind that it must be loaded from system32.
Profiles
This property indicates the policy profile(s) in which the rule should apply. For the list of possible values, see the NET_FW_PROFILE_TYPE2 enumerated type in icftypes.h. Note the behavior of my test program which installs this rule – it specifies that the new rule should apply in whichever profiles are in effect at the time of installation. However, if the server needs to be able to run under a different profile (e.g. Domain vs. Public), then this logic will need to be modified accordingly.
Action
This property is simple to understand: a given rule either blocks traffic or allows it. This example does the latter.
Enabled
Another straightforward property: a rule can be present but disabled. However, I want my rule to be enabled immediately, so this property is set to “True”.
In summary, creating and applying the rule is not a complex task. Once the rule is in effect, though, it needs to be tested. This presents a more interesting challenge, and is the topic of the next section.
Testing
Installing the Firewall Rule and Running the Demo
As I mentioned in the discussion about the WFAddRule function, that code is part of the FwTool.exe command-line utility that accompanies this article. The utility has three modes of operation, as displayed in its console “usage” output:
>FwTool.exe
Usage:
FwTool.exe ADD -n <ServerAppName> -p <Port> -a <ClientAddressRange>
FwTool.exe DELETE -n <ServerAppName>
FwTool.exe SHOW -n <ServerAppName>
In other words, the first option allows the firewall rule (as discussed in the previous section) to be created based on the specified server application name, server port, and allowed client address range. The second option allows the rule to be deleted. The third option displays the resulting Windows Filtering Platform filters that are created by the firewall under the covers.
To configure the server-side of the test (mine is named “testmachine6”), copy stcpserver.exe and fwtool.exe to the system32 directory (although you can see in the sample filter output in the next section that I was running both programs from a directory called test at the root of the volume). Then, add a rule for stcpserver in the firewall by using FwTool. For example, the following command will allow only the client at a specific IP address to connect:
>FwTool.exe ADD -n stcpserver -p 27015 -a 192.168.1.192
Success
Run stcpserver.exe on the server-side host machine, as shown in the following command. Since its rule has already been added to the firewall, you shouldn’t see a Windows Security Alert dialog box.
>stcpserver.exe
Listening on socket bound to 0.0.0.0:27015 ...
Run stcpclient on the client-side host machine, as shown in the following command. The server DNS name must be specified on the command-line. Since this client is the one allowed by the installed firewall rule, it immediately connects, exchanges some data with the server, and disconnects.
>stcpclient.exe testmachine6
Secure connection established to the server
Sent 8 bytes of data to the server
Received 11 bytes of data from the server
Finished
Here’s the additional output displayed by the server in response to the client-connect and data-exchange. Then the server re-listens on its socket.
>stcpserver.exe
Listening on socket bound to 0.0.0.0:27015 ...
Connected to a client
Received 8 bytes of data from the client
Sent 11 bytes of data to the client
Listening on socket bound to 0.0.0.0:27015 ...
Displaying the Resulting Filters
>FwTool.exe SHOW -n stcpserver
Filter Name: stcpserver, Action: 0x1002, Effective Weight: 0xd92fd4
SubLayer: Windows Firewall, Weight: 2
Match Field: IP_LOCAL_PORT, Type: 0, Value: 27015
Match Field: APP_ID, Type: 0, Value:
0000 5c 00 64 00 65 00 76 00 69 00 63 00 65 00 5c 00 \.d.e.v.i.c.e.\.
0010 68 00 61 00 72 00 64 00 64 00 69 00 73 00 6b 00 h.a.r.d.d.i.s.k.
0020 76 00 6f 00 6c 00 75 00 6d 00 65 00 34 00 5c 00 v.o.l.u.m.e.4.\.
0030 74 00 65 00 73 00 74 00 5c 00 73 00 74 00 63 00 t.e.s.t.\.s.t.c.
0040 70 00 73 00 65 00 72 00 76 00 65 00 72 00 2e 00 p.s.e.r.v.e.r...
0050 65 00 78 00 65 00 00 00 e.x.e...
Filter Name: stcpserver, Action: 0x1002, Effective Weight: 0xd96f8c
SubLayer: Windows Firewall, Weight: 2
Match Field: IP_LOCAL_PORT, Type: 0, Value: 27015
Match Field: APP_ID, Type: 0, Value:
0000 5c 00 64 00 65 00 76 00 69 00 63 00 65 00 5c 00 \.d.e.v.i.c.e.\.
0010 68 00 61 00 72 00 64 00 64 00 69 00 73 00 6b 00 h.a.r.d.d.i.s.k.
0020 76 00 6f 00 6c 00 75 00 6d 00 65 00 34 00 5c 00 v.o.l.u.m.e.4.\.
0030 74 00 65 00 73 00 74 00 5c 00 73 00 74 00 63 00 t.e.s.t.\.s.t.c.
0040 70 00 73 00 65 00 72 00 76 00 65 00 72 00 2e 00 p.s.e.r.v.e.r...
0050 65 00 78 00 65 00 00 00 e.x.e...
Match Field: IP_REMOTE_ADDRESS, Type: 0, Value:
Addr = 192.168.1.192
Mask = 0.0.0.0
Match Field: IP_PROTOCOL, Type: 0, Value: 6
Success
The Windows Firewall MMC Snap-In
Windows Vista includes a built-in firewall management console, which I found (along with FwTool.exe) to be a useful way to check my work as I was developing and testing the rule code discussed in the previous section. To access the console, click Start, type “WF.msc” into the Start Search box, and then press Enter. I started by selecting Inbound Rules in the left pane. It’s educational to examine the rules that are present by default.
Once my custom rule was added by using FwTool, as described above, I selected Filter by Group in the Actions pane on the right. Sure enough, one of the listed options is the TCP Server demo group created by my code. Selecting that option, and then adjusting the widths of some of the display fields, allowed me to grab the following screenshot.
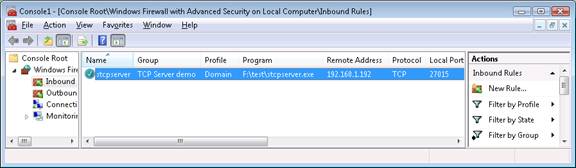
Figure 2 - Windows Vista Firewall Management Console
In the center pane of the above screenshot, all of the expected properties of the custom rule are present (including a number of fields that I’m not showing since the image would have been too wide). For example, the host machine is a member of a test (Active Directory) domain, and was on that network (that is, as opposed to a roaming laptop connected to public Wi-Fi) at the time that the rule was added. Therefore, the rule is applied in the Domain profile. Also, note that I configured a single test client to be allowed through the filter – namely, the client with IPv4 address 192.168.1.192.
Comparing the Custom Rule to the Default
During the course of developing my custom firewall rule for the stcspserver.exe test application, I continually used the FwTool.exe “show” option to sanity check my work. It’s also interesting to use that tool to compare the custom rule to the rule that’s created by default. Note that the default rule is created in the following situation:
1.
2.
3.
4. Unblock button (or the Keep blocking button, which results in a different set of default rules).
I recommend using the sample application to cause the default Unblock rules to be created and to use the Firewall MMC snap-in review them. Not surprisingly, when this happens, all network traffic on any port and from any client can now be received by the designated application. This is perhaps a reasonable default behavior (based on the assumption that the user recognizes the application in question as trustworthy), given the need to compromise between usability and security in a consumer operating system. However, it further reinforces why the application developer should implement a much tighter rule configuration for installation (and un-installation).
Testing Each Rule Property
Once I had the stcpserver.exe application rule configured, I wanted to test each property of it to ensure that I was demonstrating a truly locked-down configuration. With that said, I realized that some of the properties would be easier to test than others. Furthermore, I assumed that there would be some properties that I’d like to test on an as-needed basis, and that testing these would require modifying my socket-related code on the client as well as the server. However, I didn’t really want to expose this in the command-line options (for example, the ability to send and receive UDP traffic).
To avoid that extra work, I used an existing network testing tool called NetCat. The current Windows version can be downloaded from https://www.vulnwatch.org/netcat/nc111nt.zip.
Application Name
First, as a warm-up for the testing phase of preparing this demo, I wanted to ensure that, based on my new firewall rule, only the designated server application name is allowed to listen on the open port. I started by configuring the server rule as discussed above.
>FwTool.exe add -n stcpserver -p 27015 -a 192.168.1.192
Success
Next, I ran NetCat (nc.exe) on the same server, with the appropriate command-line options to listen on the same port (type “nc.exe –h” for command-line help).
>nc.exe -l -p 27015
As a result, I immediately see the Windows Security Alert dialog box.
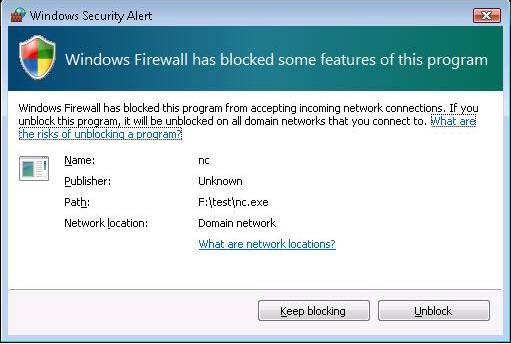
Figure 3 – Windows Security Alert
This is good – it indicates that, even though there are conditional “unblock” rules associated with the server application port, only binaries of the same name can open it. However, it’s important to mention that even a totally different application, if renamed to “stcpserver.exe,” can indeed open the port. I confirmed this by renaming “nc.exe” to “stcpserver.exe” and then re-running it with the same command-line options as above.
>del stcpserver.exe
>ren nc.exe stcpserver.exe
>stcpserver.exe -l -p 27015
Next, I ran the client application (shown below) from an allowed machine. In response, I saw “12345678” displayed by stcpserver/nc.exe on the server, indicating that the connection and data transmission was successful.
>stcpclient.exe testmachine6
Secure connection established to the server
Sent 8 bytes of data to the server
Therefore, it is indeed possible to bend the firewall rules a little more than you might like! Of course, if an attacker is actually able to run code in this manner on a server, there may be broader security problems to worry about. Still, I hope that Microsoft adds strong application identity to the firewall in a future release so that only a binary with a given cryptographic hash can match a given rule.
One final note about testing – I wanted to be sure to remove any firewall rules created by each test scenario, in order to ensure that downstream test results wouldn’t be affected. This can be accomplished via my FwTool.exe tool (shown below) or the Firewall MMC snap-in (see above). Also, after running this particular test case, don’t forget to rename nc.exe and stcpserver.exe, as appropriate!
>FwTool.exe delete -n nc
Success
>FwTool.exe delete -n stcpserver
Success
Protocol
In addition to verifying the behavior of the application identity filter I added, I wanted to confirm that the protocol filter was working as expected. In particular, only TCP traffic should be traversing the firewall based on my rule: no UDP traffic. This is easily confirmed using a variation of the test configuration discussed in the previous section.
First, I added a rule to allow NetCat the same network access that I granted the stcpserver demo application.
>FwTool.exe add -n nc -p 27015 -a 192.168.1.192
Success
During any testing effort, I recommend running a “positive” test case in conjunction with every “negative” test case. In other words, try the variation that should work, and then change a single variable to try the variation that shouldn’t work. This pattern is especially important when testing something as complex – and as critically important – as network security. To accomplish this in my current test scenario, I ran NetCat in TCP listen mode (its default) on the server as a positive test case.
>nc.exe -l -p 27015
Running NetCat in connect mode from the client confirms that the rule is allowing TCP traffic through:
>nc.exe testmachine6 27015
adsfasdfasdfasdf
How do I know that traffic is passing through the firewall? Easy – the “adsfasdfasdfasdf” string is echoed on the server (not shown). Finally, I re-ran the above two commands, but including the NetCat command-line option to send (and listen for) UDP packets instead of TCP. On the server:
>nc.exe -l -p 27015 –u
Then I ran the corresponding client-connect command:
>nc -u jwsecure-v6 27015
asdfasdfasdfasdf
I confirmed that the text I entered at the client was not echoed on the server. Finally, I cleaned up the created rules on the server to prepare for the next phase of testing.
>FwTool.exe delete -n nc
Success
>FwTool.exe delete -n stcpserver
Success
Client Address
Verifying the client address component of my demo rule is also straightforward. The optimal test scenario for the client address filter requires three machines: a server, an allowed client, and a denied client. However, there are also a variety of permutations that don’t require a second client.
The first step is to setup the server rule and confirm that the allowed client can successfully connect, as discussed at the beginning of the Testing section, above. Then, attempt to connect to the server from a different client (i.e. a different IP address).
>stcpclient.exe jwsecure-v6
WSAConnect returned error 10060
SecureTcpConnect returned error 10060
The error code above corresponds to “Connection timed out” (see https://msdn2.microsoft.com/en-us/library/ms740668.aspx). This confirms the negative test case as expected: a disallowed client address cannot connect to the server.
Conclusion
In general, the proper configuration and use of a software-based firewall is an important defense-in-depth measure. With the new Windows Firewall API, the Windows Vista release has made proper programmatic firewall configuration easier to accomplish. This is particularly true for conscientious ISVs who wish to make their customers’ lives easier by providing built-in firewall rule configuration with their network applications. The demo socket-based application discussed in this article is an example of this approach.
Acknowledgements
I am indebted to David Abzarian, Mahesh Mohan, Philippe Joubert, and Sarah Wahlert at Microsoft for their technical assistance in preparing this article.
About the Author
Dan Griffin is a software security consultant in Seattle, WA. He previously spent seven years at Microsoft on the Windows Security development team. Dan can be contacted at https://www.jwsecure.com.
this is draft content and is subject to change