Register your application in Azure AD
Hi, Sharad and Diane again. If you're here, that means you've set up your Azure AD tenant. (If not, follow the steps in this post.)
To use OneNote APIs with Office 365 notebooks (in Preview), you need to register an application in an Azure AD tenant that's associated with an Office 365 subscription. The registration process creates a service principal that you link to in your app code. After you register the application, you can specify the OneNote permissions it needs. See Adding, Updating, and Removing an Application for more information about the consent framework and managing Azure AD applications.
Register an application in Azure AD
Sign in to the Azure Management Portal. Use the Microsoft account or Office 365 credentials that you set up as both service administrator or co-administrator for Azure and global administrator for Office 365.
In the navigation pane, click Active Directory.
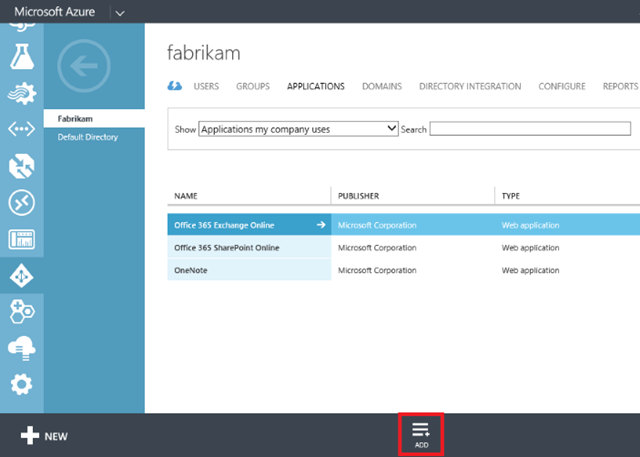
Click the directory where you want to register your application, and then click the Applications tab.

- In the drawer, click Add.
Click Add an application my organization is developing.
Enter a friendly name for the application (for example "OneNote app") and choose the application type:
-
Web application and/or web API. This is a web application such as an MVC or Web Forms solution.
Then, enter the sign-on URL and app ID URI. The sign-on URL is where users sign in and use your app. The app ID URI is a unique identifier for your app and must be in a verified custom domain.Native client application. This is an application that can be installed on a device.
Then, enter the redirect URI where Azure AD will redirect in response to an OAuth 2.0 authorization request. It doesn't need to be a physical endpoint, but it must be a valid URI (example: https://yourdomain/onenoteapp/ ). The redirect URL acts as a unique identifier for your app.
Azure AD uses this information to generate resources your app will need to authenticate with Azure. For web applications, Azure generates both a client ID and app secret. For native apps, Azure generates a client ID. Learn more about Azure application objects.
Specify OneNote permissions (and get the client ID and secret)
Now you're ready to specify the OneNote permissions that the application needs.
In the list of applications on the tenant, click your new application.
Click the Configure tab.

On the Configure tab, you'll find the client ID and other application properties that you might use in your app code. If you created a web application or web API, you can create a key (client secret).
Scroll down and click Add application.

- Click the OneNote application, and then click the check mark in the lower-right corner. (The OneNote application may not be immediately available in the tenant, but it should show up in a few minutes.)

- Add OneNote permissions to the application, and then click Save. Web applications and web APIs can add Application Permissions and Delegated Permissions. Native client applications can only add Delegated Permissions, as shown below:

The following permission scopes are available. The permissions you select will be displayed to your users in the consent dialog box. You should request only the permissions your app requires, and specify the lowest level of permissions possible.
| Name in Azure AD | Permissions | Corresponding consumer scope |
|---|---|---|
Create pages in OneNote notebooks |
Notes.Create. Can view the titles of your notebooks and sections; create new pages. |
office.onenote_create |
| Application-only OneNote notebook access | Notes.ReadWrite.CreatedByApp. Can view the titles of your notebooks and sections; create new pages; view and modify pages created by the app. Cannot view or modify pages created by other apps or in password protected sections. |
office.onenote_update_by_app |
| View OneNote notebooks | Notes.Read. Can view the contents of your notebooks and sections. Cannot create new pages; modify existing pages; access password protected sections. |
office.onenote |
| View and modify OneNote notebooks | Notes.ReadWrite. Can view the titles of your notebooks and sections; view and modify all your pages; create new pages. Cannot access password protected sections. |
office.onenote_update |
| View OneNote notebooks in your organization | Notes.Read.All. Applies to notebooks you have access to outside your OneDrive for Business. Can view the contents of notebooks and sections in all notebooks that the signed-in user has access to. Cannot create new pages; modify existing pages; access password protected sections. |
n/a |
| View and modify OneNote notebooks in your organization | Notes.ReadWrite.All. Applies to notebooks you have access to outside your OneDrive for Business. Can view the titles of notebooks and sections; view and modify all pages; create new pages in all notebooks that the signed-in user has access to. Cannot access password protected sections. |
n/a |
You've configured your application! You can now link to it in your app code using application properties such as the client ID. You can find and change properties from the management portal at any time. For example, you can configure a web application to be multi-tenant or add access to other web APIs to your application.
Next steps:
- Edit the app configuration file
- Get your app into the Office 365 app launcher
- Get started with Office 365 APIs in apps
- Get the Windows universal sample app and try it out. Follow the instructions in the readme to set it up.
Edit 11/9/2015: Removed the Coming Soon tags from the Notes.Read.All and Notes.ReadWrite.All scopes. Use these scopes to access SharePoint site-hosted notebooks.
Need help?
Contact us on twitter @onenotedev, or ask a question tagged onenote on Stack Overflow.
See also
Support for work and school notebooks on Office 365 (in Preview)