TFS 2012 Web Access Customizations, Part 3: Extension Packaging & Deployment
Our fourth (yay zero based numbering!) will explain the fundamentals of TFS Web Access Extension package and how to deploy it to the server. After reading this article, you should be able create an extension on your own. However, in the upcoming articles we will discuss sample implementation of a few extensions and look at ways to speed up the development process.
Extension contains JavaScript source files and a manifest file at least. It can also contain CSS, images or other resources. When deploying the final extension package (which is an ordinary ZIP file with the aforementioned content) it must contain two version of each JavaScript file. The .debug.js version with full source code and comments and .min.js minified file that is reduced in size and does not contain whitespace or comments. A way to automate JS file minification will be shown in a later article.
The manifest file, which is a plain old XML, contains metadata for the extension. This metadata (description, vendor and extension website) is displayed primarily in the Control Panel of the Team Foundation Server. It also contains a list of all modules within that particular extension.
 <WebAccess version="11.0">
 <plugin name="description" vendor="Microsoft" moreinfo="url" version="1.0.0" >
 <modules>
 <module namespace="Microsoft.Siemens.BugList“ kind="TFS.WorkItem.CustomControl"/>
 </modules>
 </plugin>
</WebAccess>
Before you can deploy your extension, you must modify the Work Item definition file. The definition file tells TFS what work item types are available and how should each item be presented. A work item type defines the rules, fields, states, and transitions for an item of work that will be tracked for a team project, such as a bug, requirement, or risk. This definition is shared by both Web Access and Visual Studio (and “other clients” to be more precise). However, there is a way to differentiate what gets displayed where. You can have some layout and controls specific to web access and some to Visual Studio. This actually comes in handy considering the fact that you have to provide 2 different implementations (one .NET, one JavaScript) in order to be able to cater to both.
To retrieve current work item definition file, you use following command:
witadmin exportwitd /n:Bug /f:c:\bug.xml /collection:https://tfsinstance:8080/tfs/collectionname /p:project
The XML file gets saved to a local disk where you can do any modifications deemed necessary.
You can either:
- Add proprietary fields to fields collection to store additional data for work each work item
 <FIELD name="SelectedBug"
 refname="TFS.WA.SelectedBug"
 type="Integer" />
- Add control and associate a field (system or custom) with a control
 <Control
 Name="TFS.WA.Control"
 FieldName="TFS.WA.SelectedBug"
 Type="TFS.WA.BugList"
 Label="Project Bugs:"
 LabelPosition="Left" />
Control’s optional attribute Name uniquely identifies a control. It is mandatory if more than one control on the form is associated with the same work item field.
FieldName references field in the TFS data store that holds the value for each work item.
Type is our registered extension.
For the full reference, see the MSDN article https://msdn.microsoft.com/en-us/library/ms243932.aspx.
To create different configuration for Web Access and other clients, you split up the layout definition into two groups in a following way:
 <FORM>
 <Layout Target="Web">
 <Group>
 …
 </Group>
 </Layout>
 <Layout Target="WinForms">
 <Group>
 …
 </Group>
 </Layout>
</FORM>
Only downside to that is you have to maintain definition for shared controls in both layouts. Also note that control’s name attribute has to be unique across the whole work item definition, not only one layout.
When our work item type definition is ready, we can deploy it back to TFS with the following command:
witadmin importwitd /f:"c:\bug.xml" /collection:https://tfsinstance:8080/tfs/collectioname /p:projectname
Next step is to deploy the packaged extension itself.
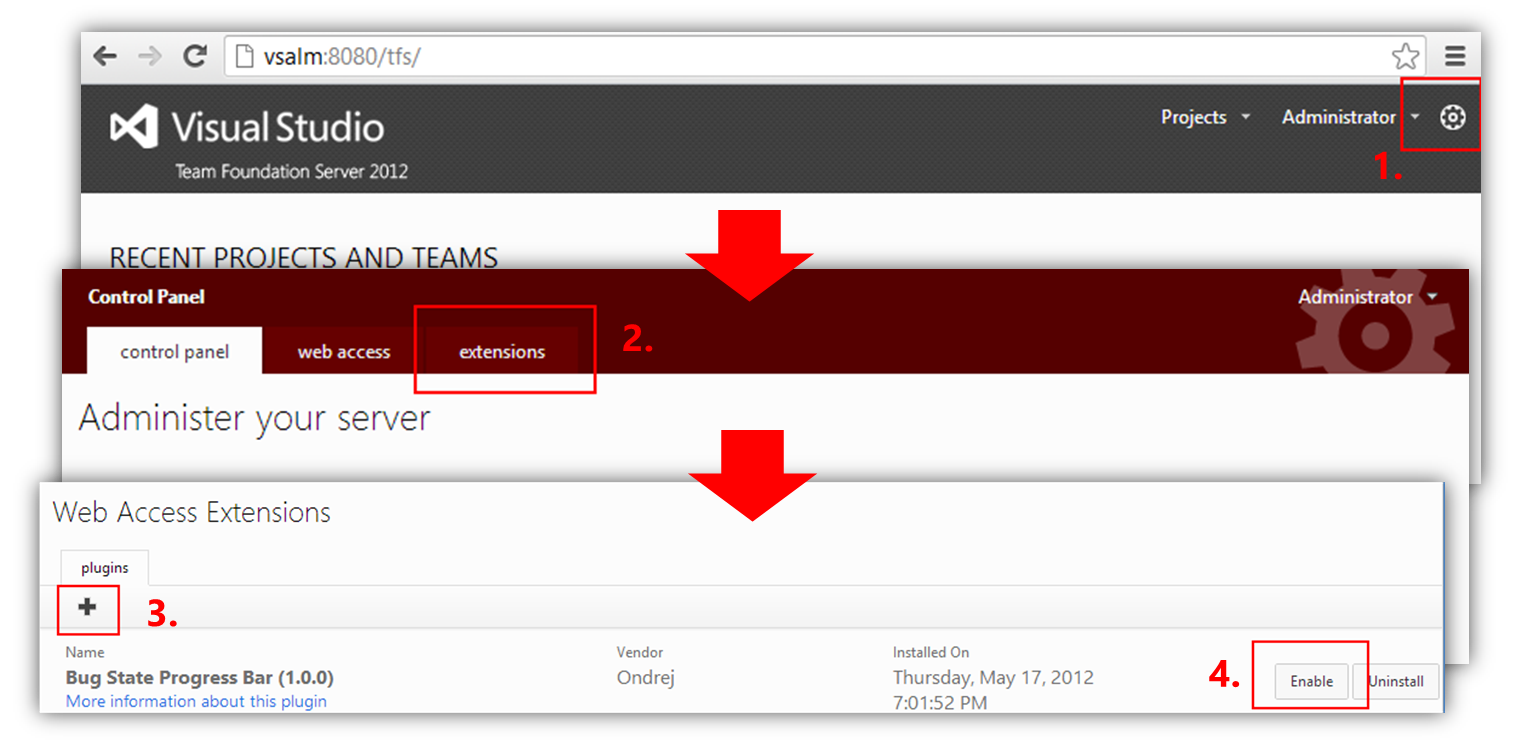
We can go to TFS control panel and click the Administration button.
On the Extensions tab, we see all currently deployed extensions, have a chance to enable/disable them or deploy new extensions.
Every time we deploy new version of the extension, it is enough to upload and enable it. It is not necessary to uninstall previous version.
In this post you learned how to modify the work item definition file, create extension package and deploy it to the TFS server. By now, you should be able to start developing Web Access extensions on your own. If you stick with me for couple more posts, you will also see some sample code and learn how to improve your development process.