Windows 8: Updates and Maintenance
My Top-8: Updates and Maintenance
Overview
This blog explores some of the changes in Windows® 8 related to PC maintenance, installing updates, and other related activities.
Maintenance Tasks
Windows 8 improves the state of performance improvement and maintenance activities with a variety of changes across the product. Some of these changes include the following:
- Improvements in the behavior of background services to reduce overhead and power consumption. One example is Windows Update, which no longer runs all the time.
- Scheduled Defrag updated to support Storage Spaces.
- Trim support across storage types.
- Startup app performance impact assessment in Task Manager.
- Automatic Maintenance – a feature that provides one place for scheduling maintenance activities for Windows and apps.
This last change is discussed in more detail on the next page.
Automatic Maintenance
One of the most important maintenance-related improvements in Windows 8 is Automatic Maintenance. This is a new system maintenance service that can be used by Windows components and apps to schedule maintenance activities on the PC in one scheduled window per day.
Automatic Maintenance is shown in Action Center in the Maintenance section.
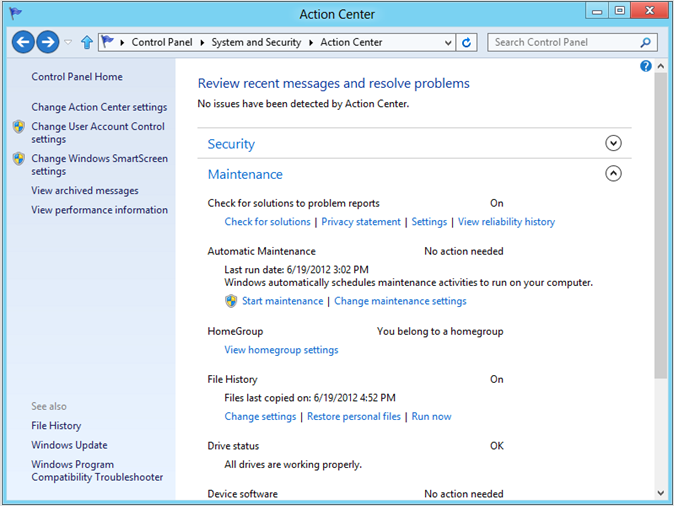
Figure 1: Automatic Maintenance in Action Center
You have two main actions available from this interface:
- Start maintenance: This provides you with the option of running all maintenance tasks on-demand.
- Change maintenance settings: This is useful if you want to change the maintenance window.
The Maintenance Settings interface is shown below.

Figure 2: Automatic Maintenance Settings
As indicated in the settings text above, Automatic Maintenance checks to see if the PC is in use, so that maintenance tasks don't impact your activities in Windows. This is a big part of the benefit of this feature – we can have one robust mechanism for determining when to perform maintenance tasks, rather than many separate mechanisms that may make decisions differently.
For more detail on what Automatic Maintenance provides, see the following page on MSDN:
Automatic Maintenance
https://msdn.microsoft.com/en-us/library/windows/desktop/hh848037%28v=vs.85%29.aspx
Windows Servicing
Windows Servicing is the infrastructure in Windows that manages system files, settings, features, and editions. There are two significant new features for Windows Servicing in Windows 8:
- Features on Demand
- Corruption Repair
These two features rely on a new Windows Servicing capability – Trusted Installer can now retrieve Windows system components from Windows Update directly. The next few pages introduce these new features.
Features on Demand
Windows 8 lets you install features using Windows Update as the install source.
Background
Windows Servicing maintains a full set of operating system components in the component store (in the \Windows\Winsxs directory). Even when you are not using a feature, it is still in this directory so that you do not need Windows media to install it. When you do install a feature, a virtual copy is created for use, so you only ever have one copy of a particular component. This helps make feature additions and update install/uninstall quick and reliable.
It also has a few limitations in previous Windows versions. Two big ones are:
- You can't remove stuff you don't need or want. So you are keeping components around that you may never use.
- If a component gets damaged, there's no method in Windows to get a good version to replace it. A reinstall will do it, and CheckSUR can do it in many cases. But not all.
Features on demand targets the first of these limitations.
Turn Windows Features On or Off
When you turn Windows features on or off, you're telling Windows Servicing to do some work in the component store folder. On Windows 8 we're breaking out of this folder. Now that Windows 8 can source component files from Windows Update, features can be downloaded based on your action in the Turn Windows features on or off interface.
And that means features can be completely removed from your hard drive as well.
You can see the state of features in your Windows 8 installation using the DISM command in an Administrator command prompt:
dism /online /get-features
You will find that most features are listed with a Disabled or Enabled state.
Example: .NET Framework 3.5
Many Windows 8 users won't ever run an app that requires Microsoft® .NET Framework 3.5. Windows 8 includes it as an optional feature. You can enable it if you need it.
If you find its entry in that DISM output, you will see that it is not even on your PC:
Feature Name : NetFx3
State : Disabled with Payload Removed
This is the state that represents a feature absent from the component store. Windows does have the feature definition information – the package identification. That's the kind of detail that is in \Windows\Servicing\Packages.
You can get detailed information about just one feature with this command:
dism /online /get-featureinfo /featurename:<feature>
So, in our example, the command would be:
dism /online /get-featureinfo /featurename:NetFx3
Installing a Feature
Do you want to install a feature that is absent from the PC? Just check the box in the Turn Windows features on or off interface. When you enable the feature, it will communicate with Windows Update, much like what happens during an update download.
Note: If you are on a Metered network connection, you will not be able to finish the installation. Features on Demand does not download over a metered network connection to avoid incurring charges.
When the download and installation is complete, you will find that the feature changed to an Enabled state, and it is in the component store where you would expect it.
You can do this at the command line using this syntax:
dism /online /enable-feature /featurename:<feature>
Removing a Feature
Removing a feature using that Control Panel interface only sets it to a Disabled state. There is not an option to remove a feature completely.
If you want to remove a component from your Windows 8 hard disk, you will need the DISM command again:
dism /online /disable-feature /featurename:<feature> /remove
The "/remove" switch is what tells Windows Servicing to remove the feature files from the drive.
Corruption Repair
That other limitation mentioned for Windows Servicing is what generates support issues related to Windows 7 and Windows Vista® component store corruption. The symptom is that some or all updates can't be installed, features cannot be added, or you cannot upgrade to a later version of Windows.
This corruption can happen due to progressive hard disk failures that may not expose other symptoms. The primary method used to repair this type of corruption is chkdsk.exe to scan the disk, and the CheckSUR update to find and repair damaged component files. This required a significant amount of time, to both download and run CheckSUR.
Windows 8 adds a significant new feature to address this support concern – automatic corruption repair.
Corruption Repair Details
When a servicing action – such as an update installation, update uninstall or feature addition – fails in Windows 8, an automatic corruption repair mechanism is initiated. This mechanism performs a scan for damaged components, and then retrieves replacement files from Windows Update to complete the repair.
Log events for this repair activity is saved.
Important: When corruption repair fixes a damaged file, there may still be damaged to Windows files that are in use. The sfc /scannow command is still relevant, and should be used if symptoms persist after corruption repair has completed.
Note: Corruption repair is disabled while connected to a metered network.
Manual Repair
There is typically no user intervention required to repair such corruption events. When a failure is encountered, the automatic repair mechanism performs the repair.
If you wish to manually scan a system for corruption, you can do so using options added to the DISM.exe utility. This can be useful if a machine is showing signs of a corruption-related failure, but does not seem to be repaired automatically. Using the DISM.exe commands, you can obtain an error code encountered during the repair, to diagnose the cause of the repair failure.
The command help for the new DISM options can be obtained using the command dism /online /cleanup-image /? . This help output is shown below.
Deployment Image Servicing and Management tool
Version: 6.2.8175.0
Image Version: 6.2.8175.0
/Cleanup-Image /RevertPendingActions
WARNING! You should use the /RevertPendingActions option only in a
system-recovery scenario to perform recovery operations on a Windows image that
did not boot.
Example:
DISM.exe /Image:C:\test\offline /Cleanup-Image /RevertPendingActions
/Cleanup-Image /spsuperseded [/hidesp]
Use /SPSuperseded to remove any backup files created during the installation of
a service pack. Use /HideSP to prevent the service pack from being listed in the
Installed Updates for the operating system.
WARNING! The service pack cannot be uninstalled after the /SPSuperseded
operation is completed.
Example:
DISM.exe /Image:C:\test\offline /Cleanup-Image /spsuperseded /hidesp
/Cleanup-Image {/CheckHealth | /ScanHealth | /RestoreHealth}
Use /CheckHealth to check whether the image has been flagged as corrupted by a
failed process and whether the corruption can be repaired.
Use /ScanHealth to scan the image for component store corruption.
Use /RestoreHealth to scan the image for component store corruption, and then
perform repair operations automatically.
Use /Source with /RestoreHealth to specify the location of known good versions
of files that can be used for the repair, such as a path to the root directory
of a mounted image.
Use /LimitAccess to prevent DISM from contacting WU/WSUS.
Example:
DISM.exe /Online /Cleanup-Image /ScanHealth
DISM.exe /Image:c:\offline /Cleanup-Image /RestoreHealth
/Source:c:\test\mount /LimitAccess
Note the presence of "/revertpendingactions" in the above help text. This was previously the only option under "/cleanup-image". It was made available to help recover from update installation failures on Windows 7. It still functions the same on Windows 8 – use it only from WinRE, and only if other troubleshooting fails.
Key corruption repair tasks include the following:
- Quick status check: If you want to check the status quickly, to see if the component store is in a problem state, run the command:
dism /online /cleanup-image /checkhealth
- Scan for problems: If you need to scan for not-yet-found corruption issues, use the command:
dism /online /cleanup-image /scanhealth
- Manual repair: You can perform the same actions as the automated repair feature, enabling you to trigger this repair on-demand using the command:
dism /online /cleanup-image /restorehealth.
- Local repair source: If you need to repair a PC, which does not have access to the Internet, you can specify a local source for repair files. If you are repairing original installation files that are damaged, you can point to installation media. If you are repairing damaged files installed as part of an update, you can download those update files and point to the download location.
dism /online /cleanup-image /restorehealth /source:c:\users\username\downloads
Important: When corruption repair fixes a damaged file, there may still be damage to Windows files that are in use. The sfc /scannow command is still relevant, and should be used if symptoms persist after corruption repair has completed.
Status for the execution of these commands, and the result of each is shown in the CMD window, making it easier to interpret the result compared with CheckSUR on Windows 7. A failure example is shown below:
C:\WINDOWS\system32>dism /online /cleanup-image /restorehealth
Deployment Image Servicing and Management tool
Version: 6.2.8175.0
Image Version: 6.2.8175.0
[==========================100.0%==========================]
The restore operation failed. Either the repair source was not found or the component store cannot be repaired.
Error: 0x800f081f
DISM failed. No operation was performed.
For more information, review the log file.
Note: This is a pre-release example, which was failing because the files were not available on Windows Update. This is not expected to be a real-world failure case. The example shows the error code, which can be used for troubleshooting. In this case, it indicates that files are missing – expected as they were not yet on Windows Update.
DISM Log
If you do need to examine the scan or repair activity in more detail, use the file C:\Windows\Logs\DISM\DISM.log. This is where DISM.exe logs events. Here is an example log entry showing the same failed repair attempt as above:
=================================
Checking System Update Readiness.
(p) CBS Catalog Corrupt Windows-Defender-AM-Default-Definitions-Package~31bf3856ad364e35~x86~~6.2.8175.0
(p) CSI Payload Corrupt x86_microsoft-windows-mediaplayer-shortcut_31bf3856ad364e35_6.2.8175.0_none_36610e67da6302e7\Windows Media Player.lnk
Repair failed: Missing replacement payload.
Summary:
Operation: Detect and Repair
Operation result: 0x0
Last Successful Step: Entire operation completes.
Total Detected Corruption: 2
CBS Manifest Corruption: 1
CBS Metadata Corruption: 0
CSI Manifest Corruption: 0
CSI Metadata Corruption: 0
CSI Payload Corruption: 1
Total Repaired Corruption: 0
CBS Manifest Repaired: 0
CSI Manifest Repaired: 0
CSI Payload Repaired: 0
CSI Store Metadata refreshed: True
Total Operation Time: 395 seconds.
The same summary details, though not the error codes, are also logged in the CBS.log as well, making it easier to see when this command was run.
Windows Update
Windows Update has been changed for Windows 8 with a few improvements:
- Windows Update interface in PC Settings to provide access to basic update actions.
- Change in Restart behavior and notifications.
- Metered network connection awareness.
- Firmware Update Support.
Using Windows Update
As with previous Windows versions, the default configuration for Windows Update in Windows 8 is to download and install updates automatically. This is set when users follow the short path through Windows Welcome at the end of Windows 8 setup, or if users go through the detailed steps and choose the recommended configuration.
In this configuration, the Windows Update interface will typically show You're set to automatically install updates as in the example below.
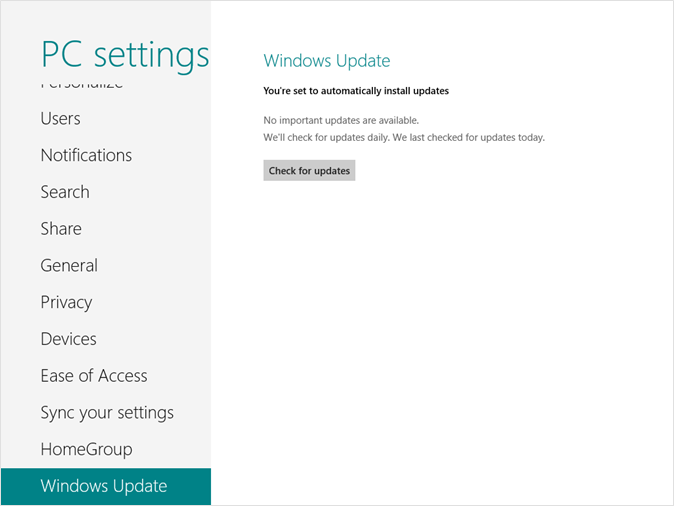
Figure 3: Windows Update in PC Settings
The Check for updates button starts a check against the Windows Update servers to see if new updates are available.
If a new update is available, but it has not yet been installed automatically, Windows Update displays the status as shown below. Clicking the link text shows more information.
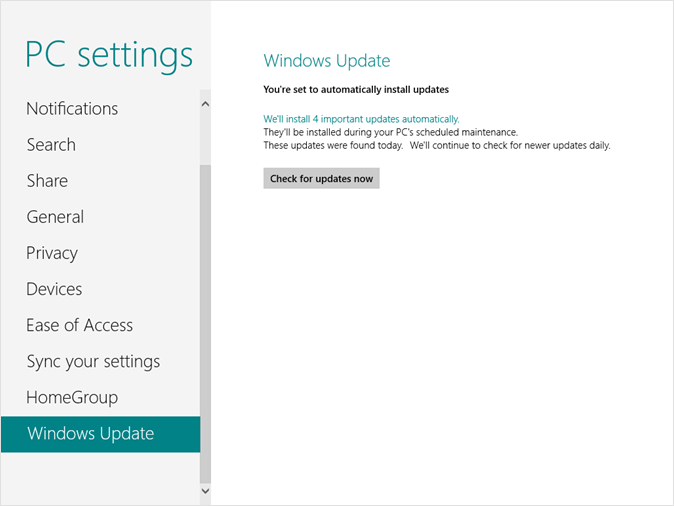
Figure 4: Windows Update in PC Settings – Updates Available
The additional information is shown below. This includes a list of updates, the update size, and a button to start installation immediately.
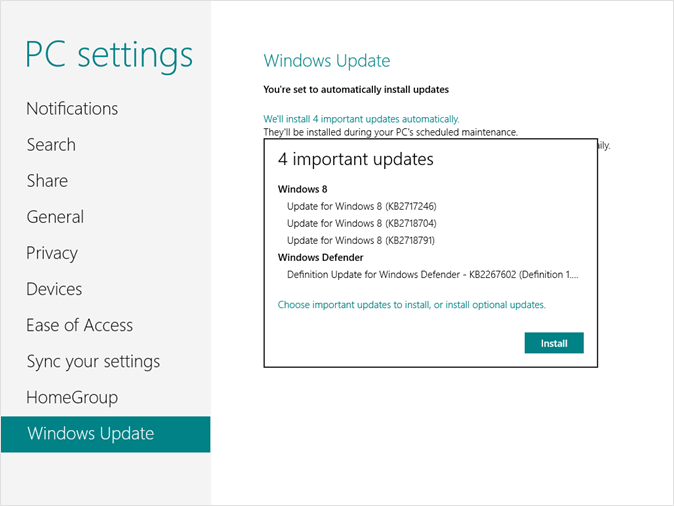
Figure 5: Windows Update in PC Settings – Important Updates
In the event that an update requires user interaction, a notification is shown, as in the example below. Updates with user interface interaction generally require installation through the full Windows Update interface on the desktop. An exception to this is an update with a EULA, which can be completed without leaving the new Windows UI.
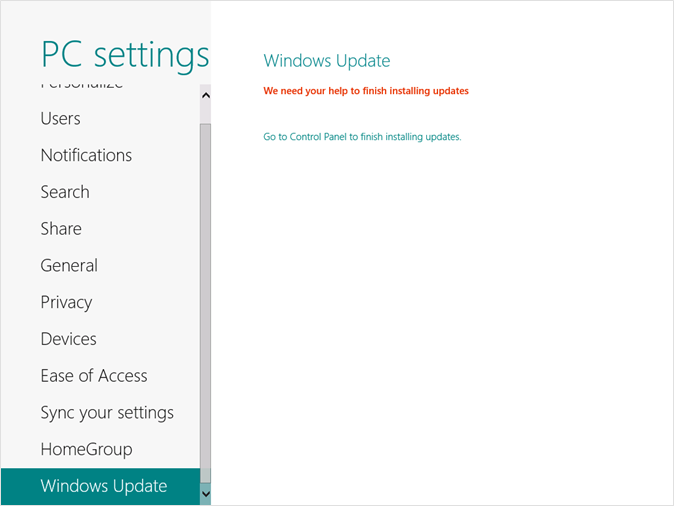
Figure 6: Windows Update in PC Settings – Need Help to Finish Installing Updates
The Windows update interface in Control Panel remains largely the same as with previous Windows versions. This is where the user can configure Windows Update settings, view a list of installed updates, hide available updates, and so on.
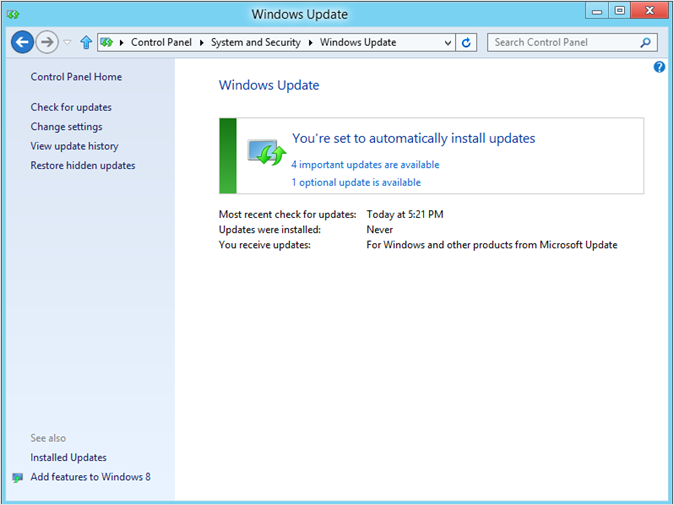
Figure 7: Windows Update Control Panel
In addition to the above, Installed Updates in Control Panel is where the user must go to uninstall updates. This matches the behavior of previous Windows releases.
One change in Control Panel is in the Change settings page. This has been updated to reflect the Automatic Maintenance behavior. Windows Update now uses that maintenance window to schedule updates.
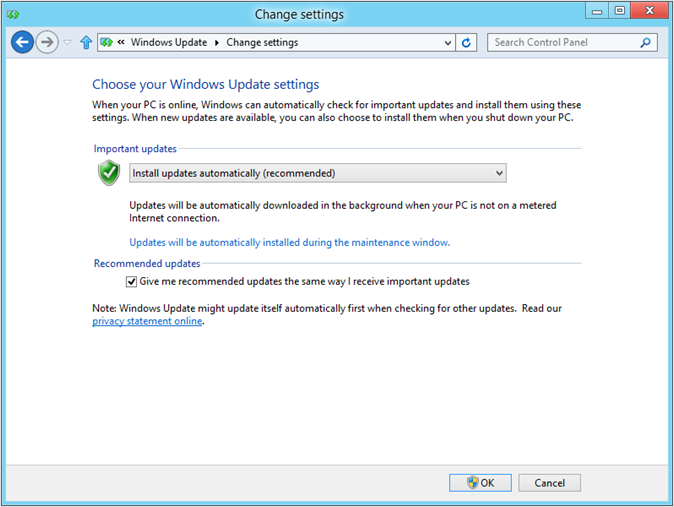
Figure 8: Windows Update Settings
New Restart Behavior
Another improvement in Windows Update relates to the way that restarts are handled when updates are installed. Windows 8 includes changes to incur fewer update-related restarts.
Windows 8 also introduces restarts differently to make them less intrusive, while also balancing the need to have important updates installed in a timely manner. When security updates requiring a restart are installed, but the restart is not completed, Windows is still at risk, and may be a risk to other PCs. So the change in Windows 8 gives you more time to decide when to do a restart. At the end of that time, a restart is done automatically.
When you need to restart to complete an update installation task, notification is provided through the login interface from the lock screen. An example is shown below.
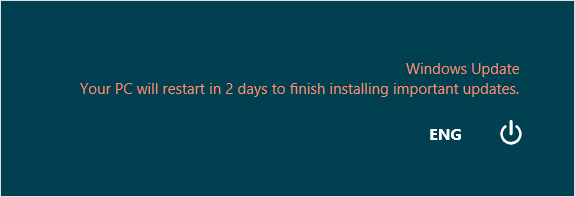
Figure 9: Restart Required
The message starts with 3 days remaining before a restart. When you click the Power button here or in the Settings charm, the options will be to Shut down or Update and restart. Both will have the effect of satisfying the need for a restart.
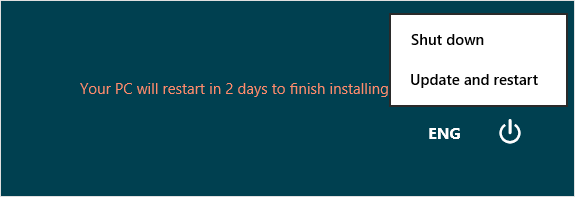
Figure 10: Restart Required – Power Options
While in this state, you can also see in the Windows Update interfaces that a restart is required.
Note: When the only user account has no password set, you would not see the login screen message above. In this configuration, you will see a system notification indicating the need to restart.
The only other restart notification you can expect to see is at the end of the 3-day window, when a 15-minute countdown is shown. To prevent data loss, if any of the following risky scenarios are detected, the restart notification is not shown:
- Open Desktop app with the PC locked.
- Background-registered Windows Store app running with the PC locked.
- Running with a game or movie full-screen.
- Running in Presentation Mode.
When any of the above conditions exist, the restart countdown is not started. As soon as none of the above conditions is true, you will see a restart notice with 15 minutes remaining. This is shown below.
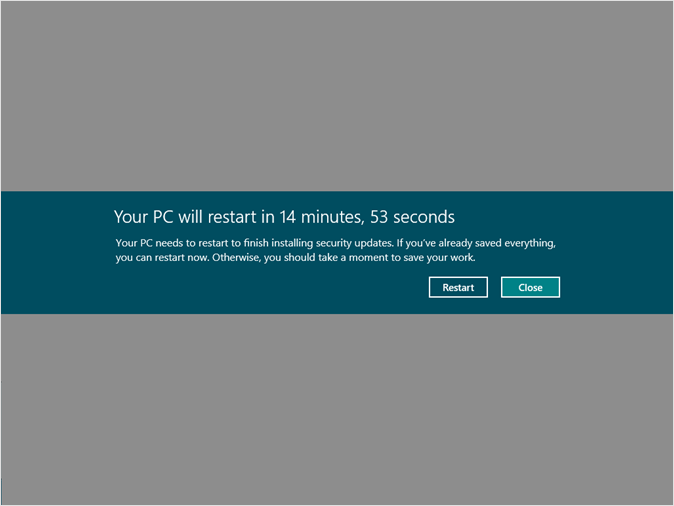
Figure 11: PC will restart in 15 minutes
You can close this notification to close programs and save data. Another notification is displayed at 5 minutes remaining. When these minutes elapse, the PC is restarted.
Updating on Metered Networks
Windows Update uses the metered network feature in Windows 8. Being on a metered connection results in the following changes from typical Windows Update behavior:
- No Download on Metered Networks
- Automatic download of updates is disabled on metered connections. There is an exception for a super-critical update, such as an update to fix a zero day exploit.
- Downloads in progress are paused when the PC connects to a restricted network.
- Resume when on Unrestricted Network
- When the PC connects to an unrestricted network, downloads are automatically started or resumed.
- Notification after 7 days
- If an update has failed to download for more than 7 days due to constant metered network connectivity, the user will be notified on the login screen.
- As with the restart notification, if you would never see the login screen a system notification is used.
The Windows Update interface in PC Settings shows the current state as metered to explain why updates will not be downloaded. An example of this message is shown below.
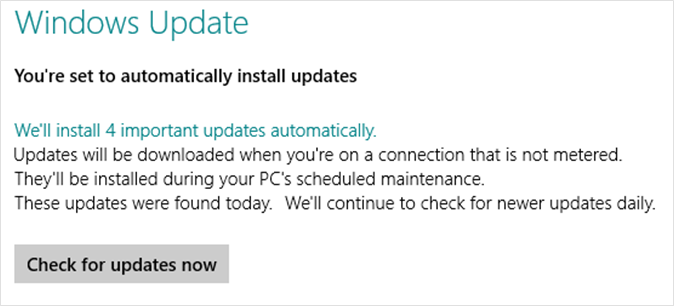
Figure 12: Windows Update on a Metered Connection
Windows Update in Control Panel gives you the option to override the default behavior.
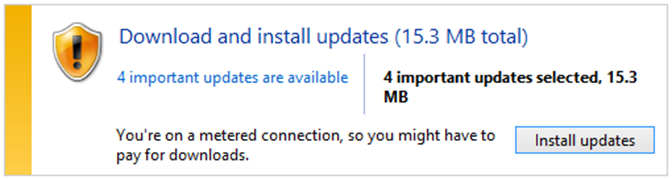
Figure 13: Windows Update on a Metered Connection
If you view the list of updates, there is a warning next to the Install button, but it does not prevent you from downloading updates.

Figure 14: Windows Update on a Metered Connection
Download Details
If you want to examine the details of the download tasks that are waiting for installation, you can use bitsadmin.exe or the Windows PowerShell™ get-bitstransfer cmdlet.
To use bitsadmin for this, run the command:
bitsadmin /list /allusers
To see specific information on a particular job, copy the GUID for the job from the previous command, and then run this command:
bitsadmin /info <GUID> /verbose
Firmware Update Support
Windows Update in Windows 8 now supports the distribution of firmware updates. This is focused on Windows RT configurations, where Windows Update is the only method for updating system software.
This capability enables manufacturers to distribute firmware only to specific PC configurations, rather than the more generic hardware targeting used for a typical driver installation. This is a new level of precision for targeting Windows updates.
When a firmware update is available for your PC, you will see a login screen notification, as well as a system notification like the example below.
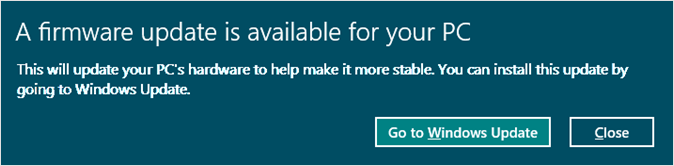
Figure 15: Windows Update firmware update
The Windows Update page in PC Settings is where you can go to install the update. It indicates that a restart is required.
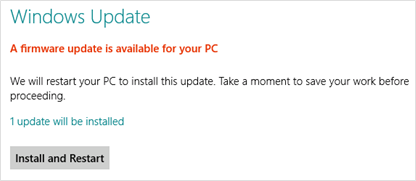
Figure 16: Firmware update available
The installation proceeds, as indicated by an on-screen message.

Figure 17: Installing firmware update
When the update installation reaches the restart, another system notification is shown. The restart at the end of the countdown is automatic.
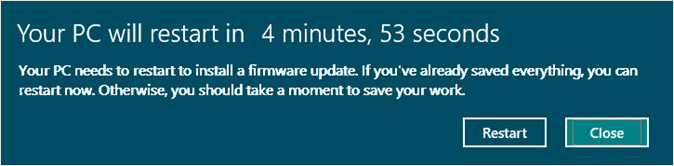
Figure 18: Firmware update restart
During the restart, you will see a manufacturer-specific screen showing the final stages of the update being initialized. After this is complete, Windows is started and the installation is complete.
Troubleshooting Windows Update
Support for Windows Update changes in Windows 8 primarily due to the user interface changes, new corruption recovery feature and the change in restart behavior.
Core troubleshooting is unchanged:
- Windows Update service names remain the same as on Windows 7.
- WindowsUpdate.log and CBS.log locations and formats remain the same as on Windows 7.
- Download is the same as on Windows 7.
Areas that you may need to approach differently are outlined below.
Understanding the Issue
Use the Windows Update Control Panel interface when assisting customers. You can access it easily using search from the Start screen or other methods, and it will provide much more information on the state of Windows Update on the PC.
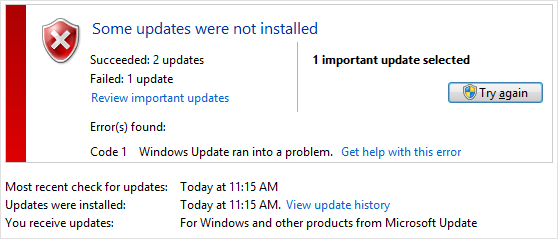
Figure 19: Windows Update error
As with previous Windows versions, you can use the Get help with this error link to get more information on the failure.
Using the Windows Update interface in PC Settings for troubleshooting is not recommended due to the relative lack of information provided. It is designed to simplify and reduce noise, which is contrary to your needs.
Windows Corruption Repair
If Windows Update encounters an error related to corrupted system files, you no longer need an external tool to make a repair. CheckSUR is not needed, and there is no CheckSUR log.
Instead, you can use the built-in DISM.exe command in an Administrator command prompt to check the health of the Windows component store:
dism /Online /Cleanup-Image /CheckHealth
If there has been an update installation failure caused by corruption, DISM should report problem that corruption. Repairs should generally happen automatically, but you can also trigger repair manually using this command:
dism /Online /Cleanup-Image /RestoreHealth
The results are reported in the CMD window, so it should be easier to determine whether further action is required. If you need to capture the results to a file, use the redirect operator to send the output to a file.
What's Next?
What if there is still a problem? The Refresh option in Windows 8 should provide a good method of returning the PC to a working state without the need to reactivate. See the Recovery and Troubleshooting section of the training for more information on Refresh.
Restarts and Automatic Update Installation
One of the support scenarios we expect to encounter with Windows Update in Windows 8 is related to this restart behavior. When assisting customers in this area, it can help to gauge their needs and concerns to help advise on what might be the best configuration for them.
- For most customers:
- Configuring Windows to update automatically gives the best experience. This is also the healthiest configuration for the Windows ecosystem in general, as fewer Windows PCs in need of updates means a reduced potential for malware and other attacks to spread.
- For some customers:
- Configuring Windows to update automatically may be inconvenient given this new restart behavior, but with education, the new behavior might be acceptable.
- For a small number customers:
- Configuring Windows so that it does not install updates automatically may be the most satisfactory solution. Our customers who are more directly involved and interested in maintaining their PC, timely updates will still happen. So we should help get Windows working the way that works best for them.
The main potential pitfall in this support scenario would be to recommend the last solution for someone who is unlikely to do the work to manage updating Windows. This could leave them vulnerable to future malware or other security issues.
For More Information
Performance & maintenance
Automatic Maintenance
https://msdn.microsoft.com/en-us/library/windows/desktop/hh848037(v=vs.85).aspx
Redesigning chkdsk and the new NTFS health model
https://blogs.msdn.com/b/b8/archive/2012/05/09/redesigning-chkdsk-and-the-new-ntfs-health-model.aspx
ONiehus, Microsoft