Windows 8: Storage
Storage in Windows 8
My Top-6: ISO/VHD Mounting and Storage Spaces
Overview
This module covers the new ISO and VHD mounting support in Windows 8, as well as Storage Spaces. Storage Spaces allows you to take a variety of disks of different sizes and connection types and combine them into a single resilient and easy to manage storage pool for your data.
ISO and VHD Mounting
Windows 8 adds native support for mounting ISOs and VHDs as virtual drives in File Explorer.
An ISO is an exact digital copy of a CD or DVD stored as a single file with an ISO extension. ISO files are useful for distributing software over the Internet in a format that can be burned to a CD or DVD by the end user. MSDN and TechNet subscribers typically download the software that is available as part of their subscription as ISO files.
- By either double-clicking ISO or selecting an ISO and then clicking Mount, the ISO will be mounted in File Explorer.
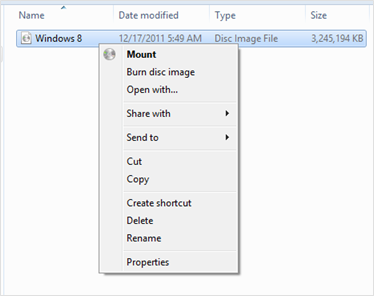
Figure 1: Mount ISO image
- When an ISO is mounted, it is exposed to the user as an additional DVD drive in File Explorer using the next available drive letter.
- To access or use the files in the ISO, open the virtual DVD drive in Explorer.
- When you are finished with the ISO, right-click the Virtual DVD drive and click Eject. At this point, the drive will disappear completely.
- You can identify the specific drive letter being used for a particular ISO by looking at the properties of the device Microsoft Virtual DVD-ROM, and then under the Volumes tab, click Populate. The drive letter will be displayed next to the volume label.
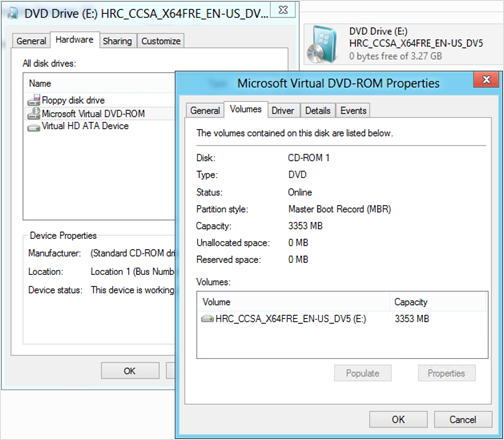
Figure 2: Microsoft Virtual DVD-ROM properties
Note: Windows 7 included native support for burning ISO files to CD or DVD.
A VHD is a Virtual Hard Drive file used by Microsoft virtualization products such as Windows Virtual PC and Hyper-V®. Windows 7 had the ability to boot physical computers from a VHD stored on a hard disk. Windows 7 System Image Backup also used VHDs as its storage container for disk backups. It could also mount VHD files directly, but this functionality was only exposed through tools like Disk Management and Diskpart.exe.
- Similar to ISO files, mounted VHDs are given the next available drive letter in File Explorer. However, they show up as additional hard drives instead of as DVD drives, and they are both readable and writable.
- File Explorer can only mount existing VHD files. You can use Disk Management to create VHD files for testing from the Action menu.
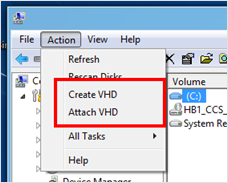
Figure 3: Create or attach VHDs
- The same Mount and Eject actions that we saw for ISO files apply to VHD files as well.
You can find more information about mounting ISO and VHD files on the Building Windows 8 blog at the link below:
Accessing data in ISO and VHD files
https://blogs.msdn.com/b/b8/archive/2011/08/30/accessing-data-in-iso-and-vhd-files.aspx
Try This: ISO and VHD Mounting
- Find the ISO that you are using to install Windows 8 on your PC and mount it.
- What drive letter did it receive?
- Eject the drive.
- What happened to the drive you just saw?
Storage Spaces
Storage Spaces is a new feature for Windows® 8 that allows a user to combine several disks into a single pool of storage that provides for easier management of multiple disks and resiliency against hardware failure on any of those disks. The disks that you use for Storage Spaces can be a mix of different-sized disks, and these can be connected to Microsoft® Windows using both internal and external connections, making it easy to turn the collection of drives you already have into a safe and easy-to-manage place to store things like your home videos or photos.
Storage Spaces allow the following:
- Organization of physical disks into storage pools, which can be easily expanded by simply adding disks. These disks can be connected either through USB, SATA (Serial ATA), eSATA, or SAS (Serial Attached SCSI). A storage pool can be composed of a variety of physical disks, which means you can create a single storage pool using disks with different sizes and disks connected to the computer in different ways.
- Usage of virtual disks (also known as spaces), which behave just like physical disks for all purposes. However, spaces also have powerful new capabilities associated with them such as thin provisioning (described below), as well as resiliency to failures of underlying physical media.
Pools and Spaces
The image below shows a sample Storage Pool. Here, we've taken a pair of 2TB USB disks and "pooled them" (logically speaking). From this storage pool, we are free to create one or more spaces.
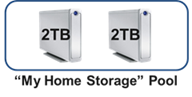
Figure 4: Sample storage pool
Once physical disks have been added to a pool, they are no longer directly usable by the rest of Windows—they have been virtualized, meaning that they are now dedicated to the pool in their entirety. Though we call this "virtualized," the storage and reliability provided is very real.
The storage capacity in a pool can be used by creating "spaces" within the pool. In the images below, we have carved out one 10TB space called Documents from the "My Home Storage " pool.
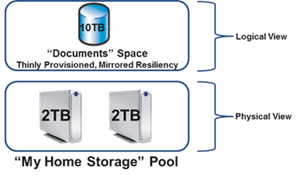
Figure 5: Spaces within a storage pool
This virtual disk is usable just like a regular physical disk—you can partition it, format it, and start copying data to it. You may notice that the space has a couple of interesting properties:
- Its logical capacity is listed as 10TB although the underlying physical disks in the pool only have 4TB of total raw capacity. This is enabled through a feature of Storage Spaces called thin provisioning, which is discussed below.
- Resiliency is built in by associating the mirrored attribute , which means that there are at least two copies of all data contained within the space on at least two different physical disks. Because the space is mirrored, it will continue to work even if one of the physical disks within the pool fails.
Thin Provisioning
The feature that allows us to create a 10TB mirrored space on 4TB of total raw capacity is called thin provisioning.
Important: Thin provisioning ensures that actual capacity is reserved for the space only when you decide to use it, for example, when you copy some files to the volume on the space.
Previously allocated physical capacity can be reclaimed whenever files are deleted. This reclaimed capacity is subsequently available for usage by either the same space, or by some other space that is carved out from the same pool. We achieve all of this through architected cooperation between the underlying file system (NTFS) and Storage Spaces.
With thin provisioning, you can augment physical capacity within the pool on an as-needed basis. As you copy more files and approach the limit of available physical capacity within the pool, Storage Spaces will display a notification telling you that you need to add more capacity, which you can do easily by purchasing additional disks and adding them to your existing pool.
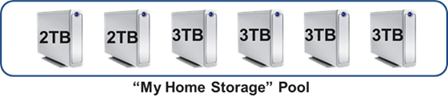
Figure 6: Larger storage pool
Expanding Your Storage Capacity
As you see in the illustration above, we expanded the overall capacity of the "My Home Storage" pool by purchasing and adding four 3TB disks.
Once we have added this physical capacity, we don't need to do anything more to consume it. We can keep copying files or other data to the space within the pool and this space will automatically grow to use all available capacity within the containing pool, up to its maximum logical size of 10TB. You can also increase the maximum logical size of a space if needed.
You also don't need to tell Storage Spaces which of your disks should be used for each of the spaces you have created. Behind the scenes, Storage Spaces optimally manages the capacity of each of the physical disks within the storage pool, for all the spaces carved out from the pool.
Storage Resiliency
Another core (but optional) capability associated with a space is resiliency to failure of the physical disks comprising the storage pool. For example, the space we discussed above is a mirrored space (in other words, it has the mirrored resiliency attribute associated with it). This mirrored setting ensures that we always store at least two (and optionally three) complete copies of data on different physical disks within the pool. This way, despite partial or complete disk failure, you are protected to a much greater degree against data loss.
The physical disks comprising the pool are typically not even visible to other components within Windows or to applications running on your computer. If a disk within the pool fails, that failure is completely shielded from other Windows components or applications. They continue to operate on the space, completely oblivious to the fact that Storage Spaces is working quietly in the background to maintain data availability.
If a disk fails, Storage Spaces automatically regenerates data copies for all affected spaces as long as sufficient alternate physical disks are available within the pool.
Resiliency through mirroring
Let's take a look at how your data is mirrored on different disks. The illustration below shows how a (two-copy) mirrored space is constructed from a two-disk pool:
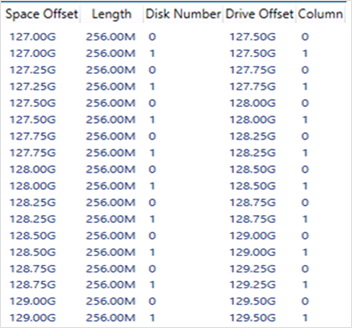
Figure 7: Mirrored space construction
In this case, Storage Spaces has allocated physical capacity for the mirrored space in what we call slabs, which are multiples of 256MB. Also, for this particular example, half of each slab is mirrored on 2 separate disks. Even if one of the two disks fails, Storage Spaces can continue to deliver your data because at least one copy exists on a non-failed physical disk.
When multiple disks are available, Storage Spaces spreads slabs across suitable disks as shown in the six-disk pool below:

Figure 8: Slab distribution
When a pool disk fails, Storage Spaces identifies the affected slabs for all spaces utilizing the failed disk, and reallocates them to any available hot-spare disk orto any other suitable disk within the pool.
Hot-sparesare reserved disks within the pool, only to be used as automatic replacements for failed disks. This self-healing is done automatically and transparently so as to minimize the need for manual intervention. We've also optimized for speed to prevent data loss from multiple hardware failures at the same time.
Resiliency Through Parity
There's another resiliency attribute, called parity, which directs Storage Spaces to store some redundancy information alongside user data contained within the space, thereby enabling automatic data reconstruction in the event of physical disk failure.
While conceptually similar to mirroring, parity-based resiliency utilizes capacity more efficiently than mirrored spaces, but with higher random I/O overhead. Parity spaces are well suited for storing data such as large home videos, which have large capacity requirements, large sequential write requests, and an infrequent-to-minimal need to update existing content.
Similar to mirrored spaces, slabs for parity spaces are strewn across available disks (with additional capacity utilized for parity information) as shown below for a parity space contained within a six-disk pool:
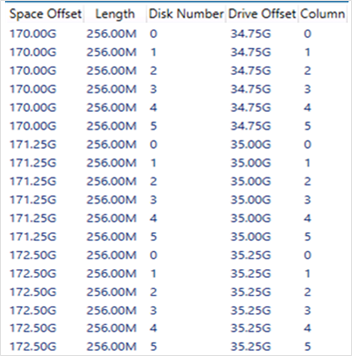
Figure 9: Parity distribution
When a disk fails, the parity space recovers automatically and transparently (as does the mirrored space). For parity spaces, Storage Spaces utilizes the parity information to reconstruct affected slabs for all affected spaces, and then automatically reallocates the slab to utilize any available hot-spare diskorany other suitable disk within the pool (just as it does for mirrored spaces).
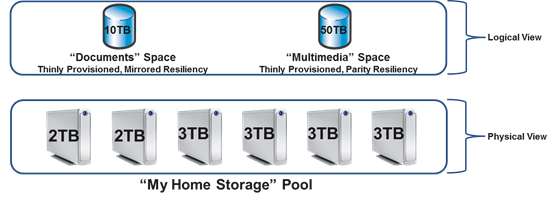
Figure 10: Two spaces in the same pool
The illustration above shows two spaces – one with mirrored resiliency and the other with parity resiliency – carved out from the same pool. Both spaces are thinly provisioned and part of the same pool of physical disks). Slabs for both spaces are intermingled, and spread over all available physical disks, although each space uses different mechanisms to recover from physical disk failure.
You can access spaces contained within a pool, as long as a simple majority of physical disks comprising the pool are healthy and connected to your computer, a concept called quorum. For example, you will need four of the six disks comprising the My Home Storage pool to be healthy and physically connected to the computer in order to access either the Documents or the Multimedia space.
Of course, as previously stated, the resiliency attribute associated with the space determines how many physical disks can fail while still maintaining access to your data – for example, if the Documents space is three-way mirrored and allowed to use all disks within the pool, you can continue accessing data despite the loss of any two disks.
We can explore the virtualization capabilities of Storage Spaces by looking at a common usage scenario. Imagine that you have just purchased a Windows 8 computer and wish to use this machine as a central repository for much of the digital content in your home or small business. This setup might involve creating two resilient spaces:
- One is a mirrored space for your important documents (these are typically modified more often).
- The other is a parity space, for your large multi-media content like home videos and family pictures, which you typically update less often.
By using the appropriate resiliency scheme, you can optimize for both capacity utilization as well as for best performance.
Logically, your storage configuration would look exactly like the illustration provided above, where two spaces with different resiliency attributes are carved out from a single pool. Here are the basic steps for setting this up:
- Connect your physical disks to your computer using either an internal or external connection (USB, SATA, and so on).
- Create your pool and the two spaces.
Create a Storage Space
To create our pool and a mirrored space, you can perform the following steps.
- Open the desktop Control Panel, click System and Security, and then Storage Spaces.
- Click Create a new pool and storage space.
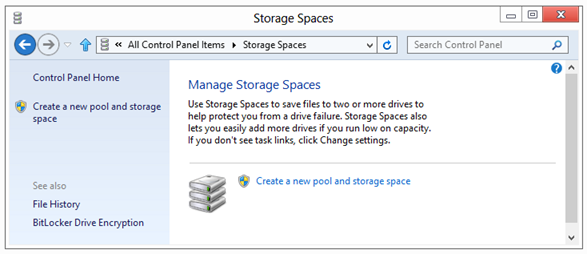
Figure 11: Storage Spaces dialog box
- Select the drives you want to add to the new pool.
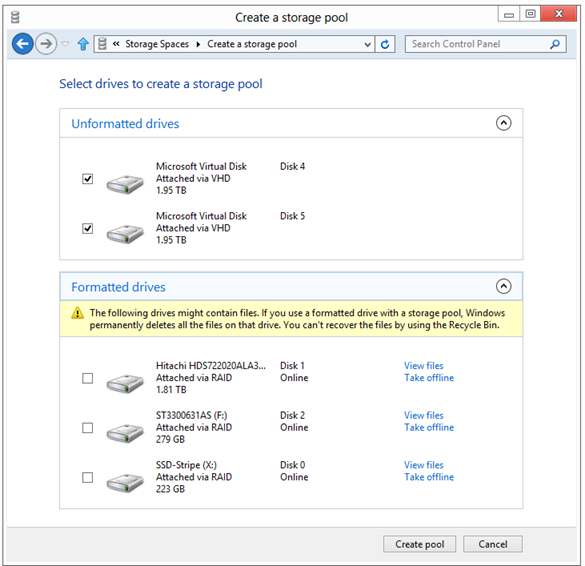
Figure 12: Select drives dialog box
- Select your resiliency type and other options.
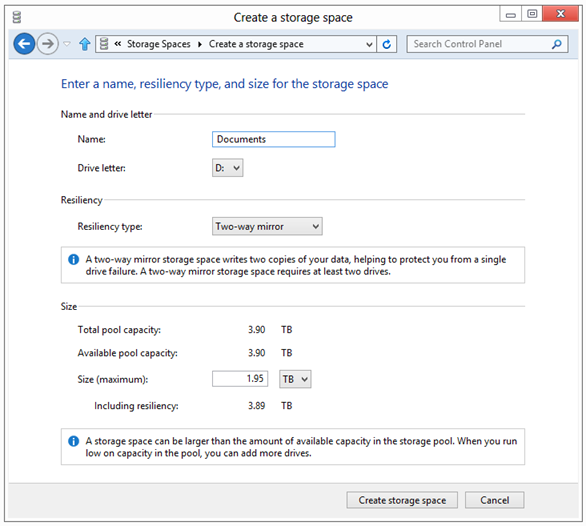
Figure 13: Options dialog box
Your table below describes the different options for resiliency.
Table 1: Resiliency options for Storage Spaces
Type |
Description |
Simple (No Resiliency) |
Available space will be the sum of all disk space in the storage pool. 2TB Disk + 2TB Disk = 4TB Available Disk Space. All available space is used, but data is not protected from a drive failure. Can be created with only a single disk. |
Two-Way Mirror |
Available space will be half of all disk space in the storage pool. 2TB Disk + 2TB Disk = 2TB Available Disk Space. Half of available space is used, but you can lose half of the drives in the pool without losing data. Requires a minimum of two disks in the storage pool. |
Three-Way Mirror |
Available space will be 1/3 of all disk space in the storage pool. 2TB Disk + 2TB Disk + 2TB Disk = 2TB Available Disk Space. 1/3 of available disk space is used, but you can lose 2/3 of the disks in the pool without losing data. Requires a minimum of 5 disks in the storage pool. |
Parity |
Available space will be the sum of all disks (if they are evenly sized) minus 1 disk. 2TB Disk + 2TB Disk + 2TB Disk + 2TB Disk + 2TB Disk = 8TB Available Disk Space. Requires a minimum of 3 disks in the storage pool. |
Note: You can assign a drive letter and format the volume as part of creating the space.
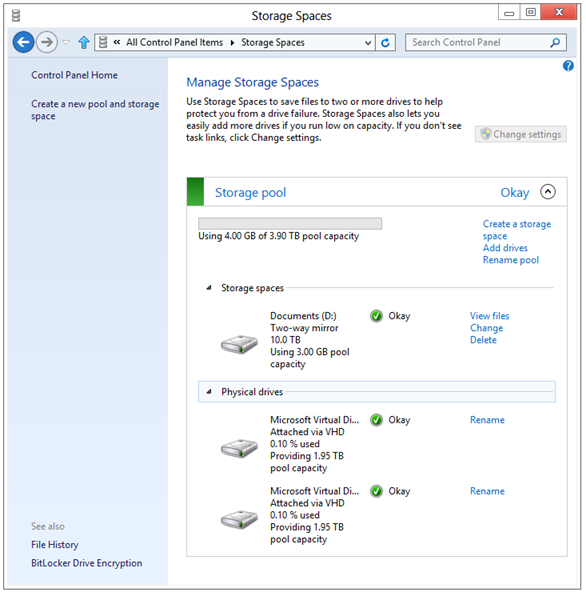
Figure 14: Manage Storage Spaces dialog box
Add Disks to an Existing Pool
To add disks to an existing pool, follow the steps below.
- Click the Add drives link within the Storage Pool you wish to expand.
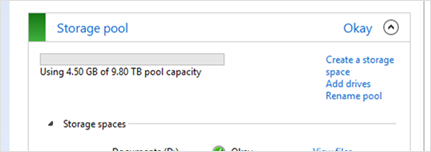
Figure 15: Storage pool dialog box
- Select the drives you want to add and click Add drives.

Figure 16: Drive selection
In the event you start running out of capacity, Action Center will display a notification indicating the Storage Spaces has an issue:
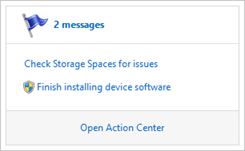
Figure 17: Space warning
Click the notification to see more information, including information about how to fix it.
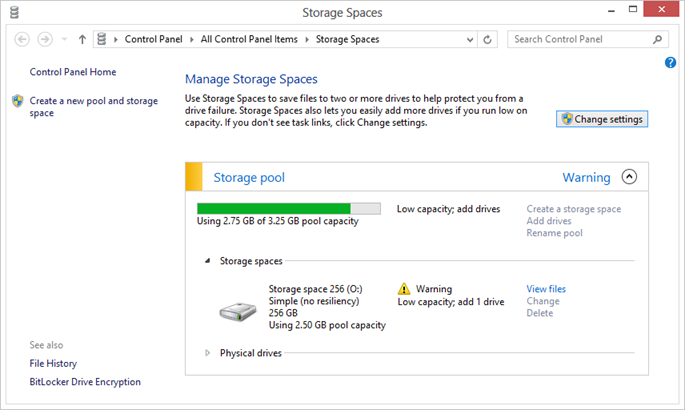
Figure 18: Manage Storage Spaces troubleshooting
That's all you need to do to start using Storage Spaces. After the spaces are created, you can utilize them just like any other disk.
Storage Spaces FAQ
Are Storage Spaces some kind of RAID? If it is, what RAID versions do you implement?
Storage Spaces virtualizes storage in order to be able to deliver a multitude of capabilities in a cost-effective and easy-to-use manner. Storage Spaces delivers resiliency to physical disk (and other similar) failures by maintaining multiple copies of data. To maximize performance, Storage Spaces always stripes data across multiple physical disks.
While the RAID concepts of mirroring and striping are used within Storage Spaces, the implementation is optimized for minimized user complexity, maximized flexibility in physical disk utilization and allocation, and fast recovery from physical disk failures. Given these significant differences in objectives and implementation between Storage Spaces and traditional inflexible RAID implementations, the RAID nomenclature is not used by Storage Spaces.
How does the read performance of a space compare to RAID 0 or RAID 10?
For both mirrored and striped spaces, read performance is very competitive with optimized RAID 0 or RAID 10 implementations.
Can I use a RAID enclosure with Storage Spaces for additional reliability and/or performance? Is that a good idea?
This is not recommended. Storage Spaces were designed to work with off-the-shelf commodity disks. This feature delivers easy-to-use resiliency to disk failures, and optimizes concurrent usage of all available disks within the pool. Using a RAID enclosure with Storage Spaces adds complexity and a performance penalty that does not provide any improvement in reliability.
Can I boot from a space?
No, you cannot boot from a space.
What is the minimum number of disks I can use to create a pool? What is the maximum?
You can create a pool with only one disk. However, such a pool cannot contain any resilient spaces (i.e. mirrored or parity spaces). It can only contain asimplespace which does not provide resiliency to failures. We do test pools comprising hundreds of disks, such as you might see in a datacenter. There is no architectural limit to the number of disks comprising a pool.
How will I know when a physical disk fails? How do I replace a failed disk?
If the physical disk is contained within an enclosure that supports the SCSI Enclosure Services protocol, we will activate a red LED (if present) next to the failed physical disk. A standard notification will pop up in the desktop. You can also see information about the failure in the Storage Spaces Control Panel. Here is what that looks like:
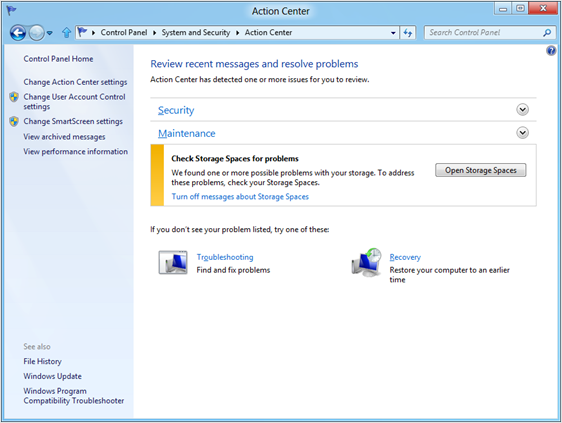
Figure 19: Disk Problem in Action Center
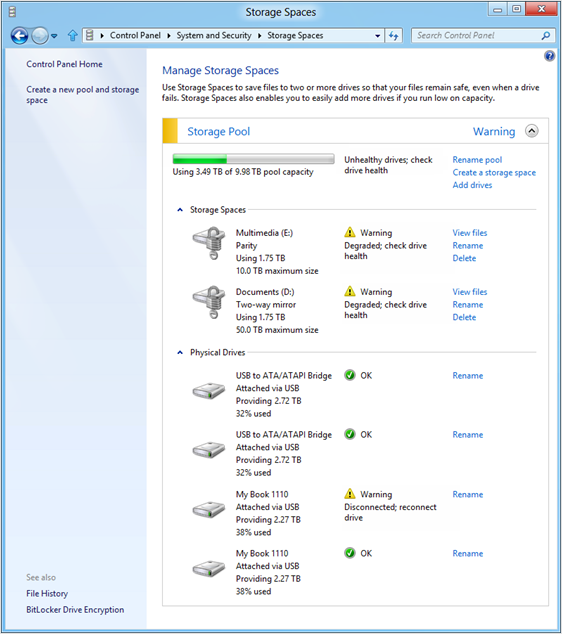
Figure 20: Locating a failed disk
After you detect the failed disk, you can physically disconnect it at any time. Replacing a failed physical disk is easy – after removing the failed disk, you simply connect the replacement disk to the computer, and then add the disk to the pool.
How do I replace a working drive with a bigger one (or just cycle drives)? Does it require a rebuild?
As long as you have created mirrored or parity spaces, you can always simply remove a physical disk within the pool, and add a larger disk in its place. Within a short period of time, the affected spaces will automatically be resynchronized (the Storage Spaces design optimizes this operation to be faster than traditional RAID rebuilds). You can determine whether all spaces are healthy – data has been resynchronized so as to maintain the designated number of copies, for example – either via Control Panel or via PowerShell™ commands.
What kind of disks will Storage Spaces work with? Are there any special requirements? What about custom enclosures housing these disks?
You can use Storage Spaces with any physical disk that otherwise works with Windows, connected via USB, SATA, or SAS. If the physical disks are connected via some custom enclosure (such as in JBOD configurations), Storage Spaces will utilize the SES protocol (if supported by the enclosure), to identify physical slots where the disks are located. When needed, Storage Spaces will also use SES (SCSI Enclosure Services) to light up failure LEDs associated with physical disks (assuming that the enclosure has such LEDs).
For Storage Spaces to use enclosure capabilities, the enclosure must conform to the Windows logo requirements. Enclosure vendors have been made aware of these requirements and we expect increasing conformance over time. If your disks are housed within an enclosure, and if Storage Spaces either does not provide you with slot information associated with the physical disks or does not light up LEDs on the enclosure, you can assume that the enclosure does not conform to Windows logo requirements.
Is there a defrag or CHKDSK equivalent for pools?
No. Storage Spaces optimally utilizes all physical disks. In the event that Storage Spaces metadata on a physical disk becomes corrupt (which will be obvious since the disk health will indicate a problem with the physical disk), you can treat the disk just as you would any other failed disk – simply remove it from the pool. If the physical disk is healthy, you can subsequently re-add it to the pool.
Can I change the maximum size of a space? Are there advantages or disadvantages to just making every space 50TB?
You can increase the logical size of a space at any time. Decreasing the logical size is not supported (or needed), given thin provisioning. It makes no difference whether you specify the initial logical size to be a smaller number (say 1TB) and grow it as needed, or set it to a very large number (say 50TB) right from the beginning. The latter may save you time and effort later.
Can I change the slab size to something other than a multiple of 256MB?
No. The slab size is automatically determined by Storage Spaces based on a multitude of factors to deliver an optimal experience in terms of performance and availability.
Does the pre-defined slab size result in sub-optimal utilization of capacity? For example, what if most of my files are very small? What if they're all large video files?
The slab size is an internal unit of capacity that we use for provisioning across multiple spaces within the same pool. Its value has no bearing on optimal storage of files, regardless of file size.
Can I move a storage pool from one computer to another, once created? For example, if I have a cage with 6 removable drives?
Yes. Just connect the physical disks comprising the pool to the new computer.
Say I have 3 external enclosures and I remove them one at a time. I then plug them into another Windows 8 computer in reverse order. Will the new computer think I have a broken pool or will it eventually catch up? What if I never plug in one of the enclosures?
You can plug enclosures back in in any order. When Storage Spaces detects a sufficient number of disks for quorum, it activates the pool and contained spaces. You can plug in more enclosures later. If the data on any disks becomes out of sync, Storage Spaces will automatically sync them. Even if you never plug in some enclosures, as long as Storage Spaces detects the minimum number of disks needed, you can continue working with your data. Storage Spaces informs you that physical disks are missing, and encourages you to plug them back in.
You mentioned that quorum for the pool requires a simple majority of healthy and connected physical disks. Does that mean I always need to have an even number of physical disks in the pool? Or do I need an odd number of physical disks? What about two-disk pools?
There is no requirement for an even or odd number of physical disks. Storage Spaces correctly handles two-disk pools and continues delivering resiliency to failures for a two-way mirrored space contained within such a pool, even if one physical disk fails or is disconnected.
What happens when I plug physical disks comprising a pool into a Windows 7 machine?
Windows 7 does not support Storage Spaces and will treat the physical disks just as it would any disk with an unfamiliar partitioning scheme.
For More Information
For more information, please see the following article:
Virtualizing storage for scale, resiliency, and efficiency
https://blogs.msdn.com/b/b8/archive/2012/01/05/virtualizing-storage-for-scale-resiliency-and-efficiency.aspx
Try This: Storage Spaces
- Use Disk Management to create multiple VHD files larger than 4GB.
- Create both a mirrored and parity storage space from the pool.
- Create an additional VHD and add it to the Storage Space
ONiehus, Microsoft