Viewing WOPI Traffic in Action Using Message Analyzer
This article demonstrates how to use Microsoft Message Analyzer to capture MS-WOPI protocol traffic and the payload it carries during a conversation between a SharePoint server (WOPI server) and an Office Web Apps Server (WOPI client).
High-level view of the MS-WOPI Protocol
As implemented in the Office Web Apps Server, the key role for the MS-WOPI (Web Application Open Platform Interface Protocol) is to enable clients to view and edit the content of documents. Microsoft's Office Web Apps Server is one example of a WOPI implementation. Microsoft developed MS-WOPI for use with several products that were released in 2013, including SharePoint, Office, Exchange, and Lync.
For a deeper understanding of the inner workings of the MS-WOPI protocol, I suggest downloading a copy of the [MS-WOPI] specification on MSDN, which has all the details about the protocol. The Overview section of this document includes the following sequence diagram that serves as a useful high-level view of the communications between the various WOPI agents:
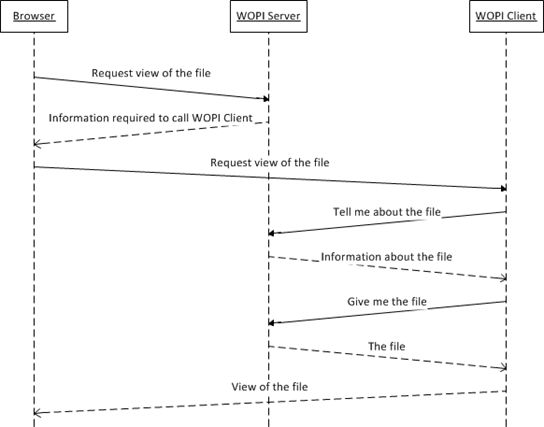
Figure 1: Sequence diagram from the MS-WOPI protocol specification
As with all Microsoft open specifications, the MS-WOPI protocol specification applies to any implementation of the protocol, but for the purposes of this article, the "WOPI server" is a SharePoint 2013 server, and the WOPI client is an Office Web Apps server. The browser used for this particular scenario is Internet Explorer, but any viewer capable of accessing and displaying web content could have been used.
As shown in the flow diagram, the browser initiates the process by sending an HTTP/HTTPS request to the WOPI Server (SharePoint) to view a file stored on the server. In response, the WOPI server returns URLs that contain information about the abilities of the WOPI client; this information is obtained by the WOPI server from the WOPI client in a process call "WOPI Discovery." From there, the WOPI server and client have a back-and-forth interaction that culminates in an image of the document being presented on the user's browser.
Scenario
For this scenario, I use Message Analyzer and the FSSHTTP and WOPI 1.2 protocol parser to capture the MS-WOPI protocol traffic on the local network interface of a WOPI Web Apps server while interacting with the Word Web App from a SharePoint Document Library. As with my previous article, everything is performed in a Hyper-V test environment; therefore, communications are sent via HTTP.

Figure 2: Diagram of the network setup for this scenario
Message Analyzer (v1.2 or later) is run on the Office Web Apps Server. The browser client in this scenario is on the SharePoint server, but it could have been a browser on a different machine on the network. However, because the network conversation that we're interested in capturing takes place between the SharePoint host and the Office Web Apps server, the trace must be run on either the WOPI server or WOPI client network interface in order to capture the WOPI traffic. Clients that use the Office Web Apps feature from a SharePoint site via a browser merely interact with the SharePoint host and do not contact the Office Web Apps Server directly.
The scenario demonstrates how to capture the WOPI and HTTP traffic generated when a user makes a request to view a Word document on a SharePoint server using Word Online.
Here are the steps in this trace scenario:
- Using a web browser, navigate to a Document Library on the SharePoint 2013 server (WOPI server).
- Create a new Word document by clicking new document and then choosing Word document from the menu that appears. When prompted, provide a name for the document and then click OK. An online version of the new document should open.
- Add some text and an image to the document, then save the document either by pressing Ctrl+S or by clicking the Save icon.
- Close the Word Web App and return to the SharePoint Document Library. The document should now appear in the list of documents.
- On the Office Web Apps Server (WOPI client), start Message Analyzer as an administrator.
- From the File menu, select Quick Trace and then choose Local Network Interfaces (Win 8.1 and later) . A new capture session starts. When accessing the SharePoint server using a VPN connection, you will need to use the "Network Tunnel Traffic and Unencrypted IPSEC" trace scenario.
- Return to the SharePoint server and click the link for the file you created in the previous step. It should open in the Word Web App.
- Once you see the document in the browser, stop the Message Analyzer trace.
Trace Results
Much of the traffic that was captured will consist of messages from the lower-level TCP/IP protocols. You can clear away these messages and just show the messages from MSWOPI and HTTP by typing "MSWOPI or HTTP" in the View Filter pane and clicking Apply. You can also save a copy of this filtered trace by clicking File > Save As and selecting the Filtered Messages for Analysis Grid option.
With the filter applied, I ended up with 7 messages in the analysis grid—2 WOPI messages and 4 HTTP operations.

Figure 3: Message Analyzer grid showing the filtered results
The Message details can be viewed in Message Analyzer by selecting the message row in the analysis grid and viewing the Details Tool Window. There, you can view field names, values, types, and other data associated with the selected message. Another way to inspect message data is to select the message row and then pressing Ctrl+Enter. This creates a navigable dropdown list that provides field information from the Fields tab and a protocol/module stack view from the Stack tab. Let's walk through the highlights of this capture.
As soon as I clicked the link to the file from SharePoint, Message Analyzer began to pick up the MSWOPI and HTTP traffic on the WOPI Client network interface. Here are the basic server-client communications in the order they took place.
When the user clicks the file link, an HTTP POST message is sent from the WOPI host that navigates the browser along with a query string that includes the language code, WOPI Source, and session context information. The client responds with a status code 200 (OK).
Next, the WOPI client initiates a CheckFileInfo operation. As defined in section 3.3.5.1.1 of the [MS-WOPI] specification, CheckFileInfo is used by the WOPI client to obtain information about the selected file and the permissions the requesting user has been granted for that WOPI Source. The request consists of a URI and several HTTP headers. The URI sent by the WOPI client in the CheckFileInfo operation consists of an OAuth access token that the WOPI host will use to handle the authentication and authorization of such transactions.

Figure 4: Details of the CheckFileInfo request message
It's worth pointing out here that all custom headers that appear in the capture are defined in section 2.2.1 of [MS-WOPI]. Of the HTTP headers that are included in the request, only the Authorization header is actually required in a WOPI implementation. Per the protocol specification, Authorization MUST have the value "Bearer " + <token>, where <token> is the same value as the access token used in the URI mentioned above.
The WOPI host responds in turn with a CheckFileInfo response,which includes a JSON-formatted data object that carries the information requested by the client. The body of the response message carries dozens of parameter values. See section 3.3.5.1.1.2 of [MS-WOPI] for descriptions of these parameters. Here is a screenshot from the Details pane, without expanding the message body node:

Figure 5: Details of the CheckFileInfo response messageOnce it receives the file information, the WOPI server performs several GET operations against the WOPI client, whereby the WOPI client returns the requested document data. This image can be viewed in Message Analyzer's Field Data window by clicking the HTTP operation and then clicking Payload in the Details Window. In the following screenshot, you can see an image of the document contents displayed in the Field Data window:

Figure 6: Screenshot of the WOPI payload
Conclusion
I hope this simple demonstration provides some inspiration as to how you might be able to use Message Analyzer to study the behavior of implemented Office protocols and to test and troubleshoot your own implementations. For further information about WOPI and Message Analyzer, consider visiting the following sites:
- Introducing WOPI—by S.D. Oliver
- Introducing Office Web Apps Server—by Nick Simmons
- WOPI-related videos on Channel 9
- Message Analyzer blog on TechNet—by Paul E. Long