Using the Person Business Type in Cloud Business Apps
The Person business type is a feature of the new Cloud Business App project introduced in Visual Studio 2013. The Cloud Business App project streamlines the way you build modern business applications for Office 365 and SharePoint 2013. The Person business type makes it easy to add and manage people-related data in your application. In this post, we will show you how to use the Person business type and what it can do for you.
If you’re new to Cloud Business Apps in Visual Studio 2013—read Andy’s post first: Building a Cloud Business App: Kudos
Getting Started
Business Types provide declarative formatting and validation over storage types which helps speed up development of business applications. For example, when designing entities, in addition to all the base storage types like String, Integer, Boolean, etc., properties can be of type Phone Number, Email Address, Web Address, Person, Money, Percent and these types come with built-in validation, formatting and controls. Let’s see how the Person business type works.
Suppose you are building an application to track mobile devices that a developer organization is using for testing applications they write. A device can be either checked out to a specific person or be in storage. Here is what a Device entity might look like in the Data Designer.
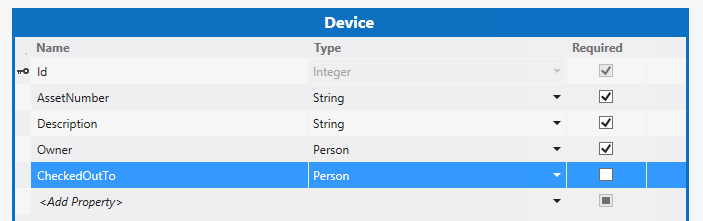
Figure 1. The Device Entity
In this example, we set the Owner and CheckedOutTo properties to be of type Person. Person is a business type, a type of .NET Framework string. It is designed to store people identities: values that uniquely identify individuals.
You can store any identity value that you want in a Person field, but we make some assumptions about the identity format. So, if you want the Person type to fully work and bring back rich information about a logged in user, you will want the identity to be the user’s primary email address.
Here, we provide a simple API to get the identity value for the current user of the application. Use this API to get more information about a person represented by a given identity value. So, working with Person properties do not require you to handle the particulars of the different authentication mechanisms.
Rich Information via Info Properties
The entity class we generate from your data model includes two properties for each Person property: the property containing the raw identity (identity property of type string) and a property ending with an “Info” suffix of type PersonInfo (info property). In our example, the identity property “CheckedOutTo” has a corresponding info property named “CheckedOutToInfo”. Similarly, there is Owner-OwnerInfo property pair.
The info property exposes information about a person identified by the corresponding identity property. Info properties are read-only; the data source is a directory service. You can use the info property value in your code to write business logic. For example, the following code shows how to use the entity Info property to send an email when a Device is saved.
partial void Device_Updating(Device entity)
{
if (entity.Details.Properties.CheckedOutTo.IsChanged
&& !string.IsNullOrEmpty(entity.CheckedOutTo))
{
O365PersonInfo owner = entity.OwnerInfo;
O365PersonInfo currentUser = entity.CheckedOutToInfo;
if (string.IsNullOrEmpty(owner.FullName)
|| string.IsNullOrEmpty(currentUser.FullName))
{
// We could not resove the owner or the current user of the device.
// Continue without sending email.
return;
}
string emailBody = "Hey, just FYI, your device " + entity.AssetNumber
+ " (" + entity.Description + ") has been checked out to "
+ entity.CheckedOutToInfo.FullName;
SendEmail("DeviceTracker@contoso.com",
entity.OwnerInfo.Email,
"Device " + entity.AssetNumber + " checked out",
emailBody);
}
}
How to: Handle Data Events discusses adding code to the update pipeline.
If the identity property contains a value that the directory does not recognize, the info property returns an object that represents the unresolved, raw identity and the full person information will be unavailable.
In Visual Studio 2013, Cloud Business Apps use either Active Directory or Azure Active Directory (for on-premises vs. cloud-based applications, respectively) to retrieve contact, organizational and security-related information about people. If the application uses Windows or Forms authentication, only basic, security-related information is exposed via info properties.
Current User Data
Information about the current user of the application is available via the User property of the global Application object. In Visual Studio 2013, this property will return an object of PersonInfo type, so you can handle the “current” user and other users in the application in the same way as shown in the following code.
partial void Devices_Inserting(Device entity)
{
// If the Owner has not been set, assume the current user is the owner
if (string.IsNullOrEmpty(entity.Owner))
{
entity.Owner = Application.User.PersonId;
}
}
We use the PersonId property to retrieve the identity of the current user in a format that is appropriate for the authentication mechanism used by the application.
Filtering Data for the Current User
A common scenario in a business application is to filter data based on the current user. This would show the most relevant data for the user to consume. For example, in the device tracking application we want to have a screen that shows all the devices checked out to the current user. To support this case, two Global types are available in the query designer–Current User and Anonymous User. Current User refers to the user who is currently logged into the app. Anonymous User is one that the server is not able to authenticate.
To use these Global types, use the Query Designer to add a query to the Device table. Add a filter on the query designer. Choose CheckedOutTo as the left operand. From the operator type dropdown, choose Global. Choose Current User as the right operand. The filter should be as shown in the following figure.

Figure 2. Specifying a person filter in the Query Designer
Now a screen that uses this query as a data source will display all devices that are checked out to the current user logged into the app. Notice that this filtering can only happen at the server side since the current user information is available only at the server.
How to: Design a Query by Using the Query Designer discusses building queries.
Working with People Data
There are a couple things worth remembering when working with people data and PersonInfo types.
First, you can store any value in a Person property, including values that are not resolvable. These might be identities that have become invalid or valid identities that the directory service does not know how to resolve later. Before using any Info property, check whether it was properly resolved. The presence or absence of the FullName is a good way to check this (see the first code example).
Second, it is not impossible for the same person to have multiple identities or for her identity (email address, login name) to change. It is even possible to have the same identity be assigned to a different person. The Person type does not have any specific support for these scenarios, so you must perform any checks or compensation logic. With unrestricted read/write access to the raw identity in the Person type, you can do what you want in your business logic.
Person Viewer and Picker Controls
Visual Studio 2013 introduces two new controls for the Person type—Person Viewer and Person Picker.
Person Viewer is a read-only control that shows the user’s full name, title, picture, and Lync Presence Status. The Person Viewer control uses NameCtrl ActiveX to display Presence Status. The Lync Contact Card is shown on mouse hover on this control. Choose this control to navigate to the user’s SharePoint profile site.
The Person Picker control is an editable text control. This control is used to search for a person and select one from the results shown in the dropdown menu.
To see how these controls work, let’s build some screens for the device tracker application. Let’s say we need screens that allow browsing through a list of devices available for the development team, view details of the selected device, and add or edit device details. To add a screen, navigate to Screens node located under the HTML client project in the Solution Explorer. Choose Add Screen… from the context menu. This will open the Add New Screen dialog box that has the necessary templates to simplify the creation of browse, view, and add/edit screens.
To create a screen that can display a list of devices, choose the Browse Data Screen template, provide a name for this screen, and choose Devices entity for Screen Data as shown in the following figure.
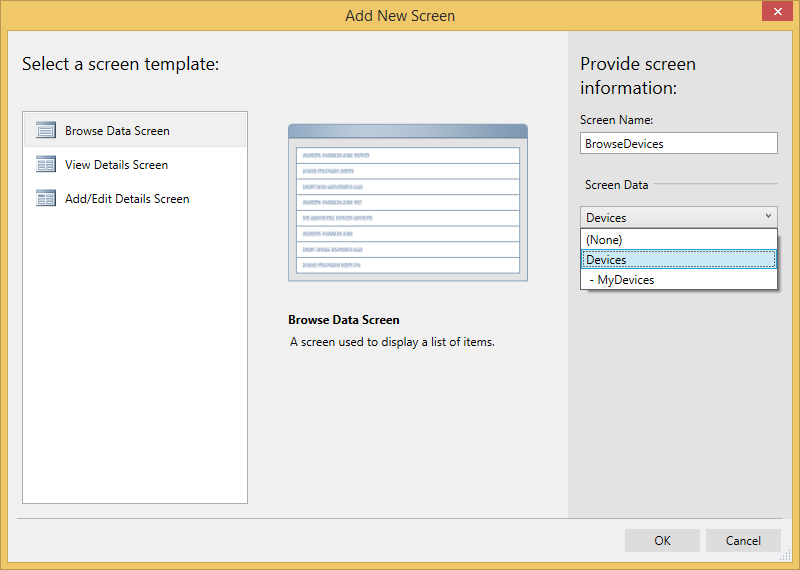
Figure 3. Adding a Browse Data Screen template
Similarly, add a screen using the View Details Screen template to view details of a particular device and a screen using Add/Edit Details Screen to add a device or edit details of a device.
The browse screen will be the default home screen for the app. Navigation logic to View Details and Add/Edit screens need to be added in the Browse screen. For example, choosing a particular device listed in the Browse screen should open View Details screen. This logic can be designed with a few steps.
Open the Browse screen in Screen Designer. The designer layout will be as shown in the following figure.
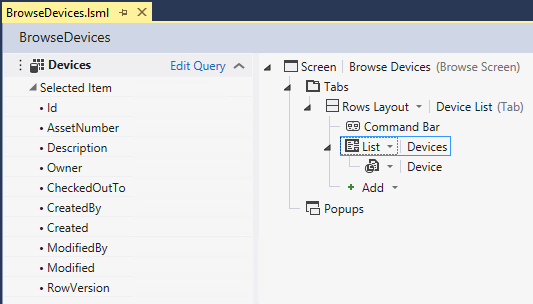
Figure 4. Specifying a tap action for a list item in the Screen Designer
Select Devices list in the content tree and open the Properties window. Notice that under Actions property sub group there is Item Tap property. This property indicates the action that will be performed when a user chooses an item in the list. The default value of this property is None, which indicates no action. Let’s set the tap action to navigate to View Details screen. Choose None to open Edit ItemTap Action window. Choose viewSelected from the dropdown menu under “Choose an existing method” choice as shown in the following figure.
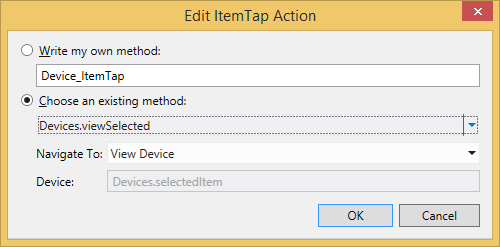
Figure 5. Selecting a tap action
Another option for screen navigation is through Command Bar buttons. For example, let’s add a Command Bar button that when chosen will open Add/Edit Details screen. In the Browse screen, choose Command Bar node located in the screen content tree and choose Add. This opens the Add Button window, which looks similar to Edit ItemTap Action window. In this window, choose “addAndEditNew” from the dropdown menu under “Choose an existing method:” choice. Choose OK to close the window. Notice that Add Device button is added under the Command Bar node in the screen designer. In the Properties window of this button, the Tap action will be set to a built-in method called “addAndEditNew”.
The Picker or Viewer control is automatically chosen based on the type of a screen. For example, on a screen that uses the View Details Screen template, a Person property will use the Viewer control. Whereas, the same property in a screen built with Add/Edit Details Screen template will use the Picker control. You can change this in the Screen Designer. The following figure shows View Detail screen. Notice that Owner, Checked Out To, Created By, and Modified By are Person type properties and use the Person Viewer control.
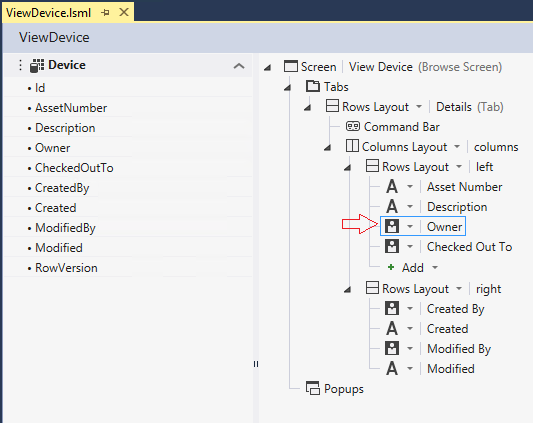
Figure 6. The person type control in the Screen Designer
The Person Viewer can display a person in two ways. The first option, which is the default, shows just the user name. The second options shows the title and picture in addition to the person’s name. This choice can be selected in the Properties window of the Person property as shown in the following figure.
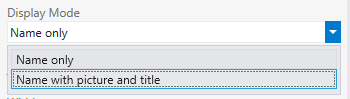
Figure 7. Specifying the display mode of the person type
Similar to Person Viewer controls, Person Picker control’s search results can be customized to show just the user name or user name along with title and picture. Using the “Name only” option would only show full names in search results.
Run the app (F5) and see how these controls work. The Browse screen will be the home page. Since this is a new app, there will be no devices listed. To add a new device, choose the Add Device button on the Command Bar. This will open up a dialog box to enter device details as shown in the following figure. Notice the Person Picker control shows all the matches for “Karol Z” among the SharePoint users.
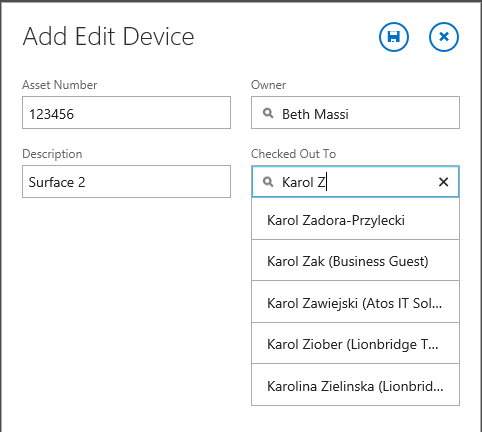
Figure 8. Selecting a person using the person picker control
Now, the browse screen will have the new device listed. A tap or click on this device will show the device details as shown in the following figure. Notice the Person Viewer Control has name, title, and picture shown for “Owner” and “Checked Out To” properties. Presence Status information of these users is also available. A mouse hover on Owner property shows the user Lync Contact Card.

Figure 9. Viewing person information using the person viewer control
These controls behave in a certain way depending on the underlying components that are used to integrate SharePoint and Lync. Some of these behaviors include:
- The Lync 2013 desktop application needs to be running in the background and you need to be logged in using the same credentials that were used to log into SharePoint.
- If the app is not able to resolve the person correctly then the Viewer control will show the person ID in plain text. Reloading the app should allow it to re-query SharePoint and resolve the person correctly. If the problem persists, it is most likely due to SharePoint Cross Domain Library is unable to connect to SharePoint. One reason this could happen is the SharePoint site uses “https” and the app can only run “http” thus putting them in different protection levels.
- NameCtrl is a 32-bit ActiveX control. Such controls have some limitations:
- These work only in 32-bit browsers (IE Desktop, Chrome Desktop, and Firefox Desktop). There is a workaround to make these controls work in a 64-bit browser.
- The control must be allowed to run in the browser
- If you are using a SharePoint server on premises (not Office 365) then the user’s profile picture in Viewer control will not show. However, the Lync contact card will have the correct picture.
Wrapping Up
We hope that the Person type proves useful in your Cloud Business Applications. Install Visual Studio 2013, try it and let us know what you think by leaving a comment or visiting the forums!
Karol Zadora-Przylecki, Lead Developer, Cloud Business Apps
Ravi Eda, Tester, Software Development Engineer in Test, Cloud Business Apps