Using Office 365 APIs in your MVC and Windows 8.1 Applications – Part II
UPDATE 5/12/2014 - A new preview is available. You can now access the Office 365 APIs using client libraries available for .NET and JavaScript. See: .NET and JavaScript libraries for Office 365 APIs
In last month’s blog post , we announced the Office 365 API Tools – Preview add-in for Visual Studio 2013. By using Office 365 APIs, developers can access users’ data in the Office 365 cloud, e.g., reading calendar information, storing documents, or sending emails on behalf of users. The Office 365 APIs are an open platform that is available across a variety of languages and technologies. If you’re developing Model-View-Controller (MVC) web projects or Windows 8.1 applications, our Office 365 API Tools for Visual Studiowill make it that much easier to add Office 365 APIs to your solution.
The previous post focused on getting started with the tooling and the Office 365 APIs – going through the registration piece and exploring the sample code. This post continues from where the previous post left off, going from using the generated sample code to authoring your own. If you haven’t already done so, I highly recommend reading the previous post before continuing with this one.
Note A couple of weeks ago (April 7, 2014), we released an updated (1.1) version of the Office 365 API Tools – Preview, which offers some reliability improvements to the tool, along with some slightly modified sample code (particularly in relation to SharePoint). Today’s blog post assumes you are using the latest version of the tools and the accompanying samples.
Recap of the Project Structure
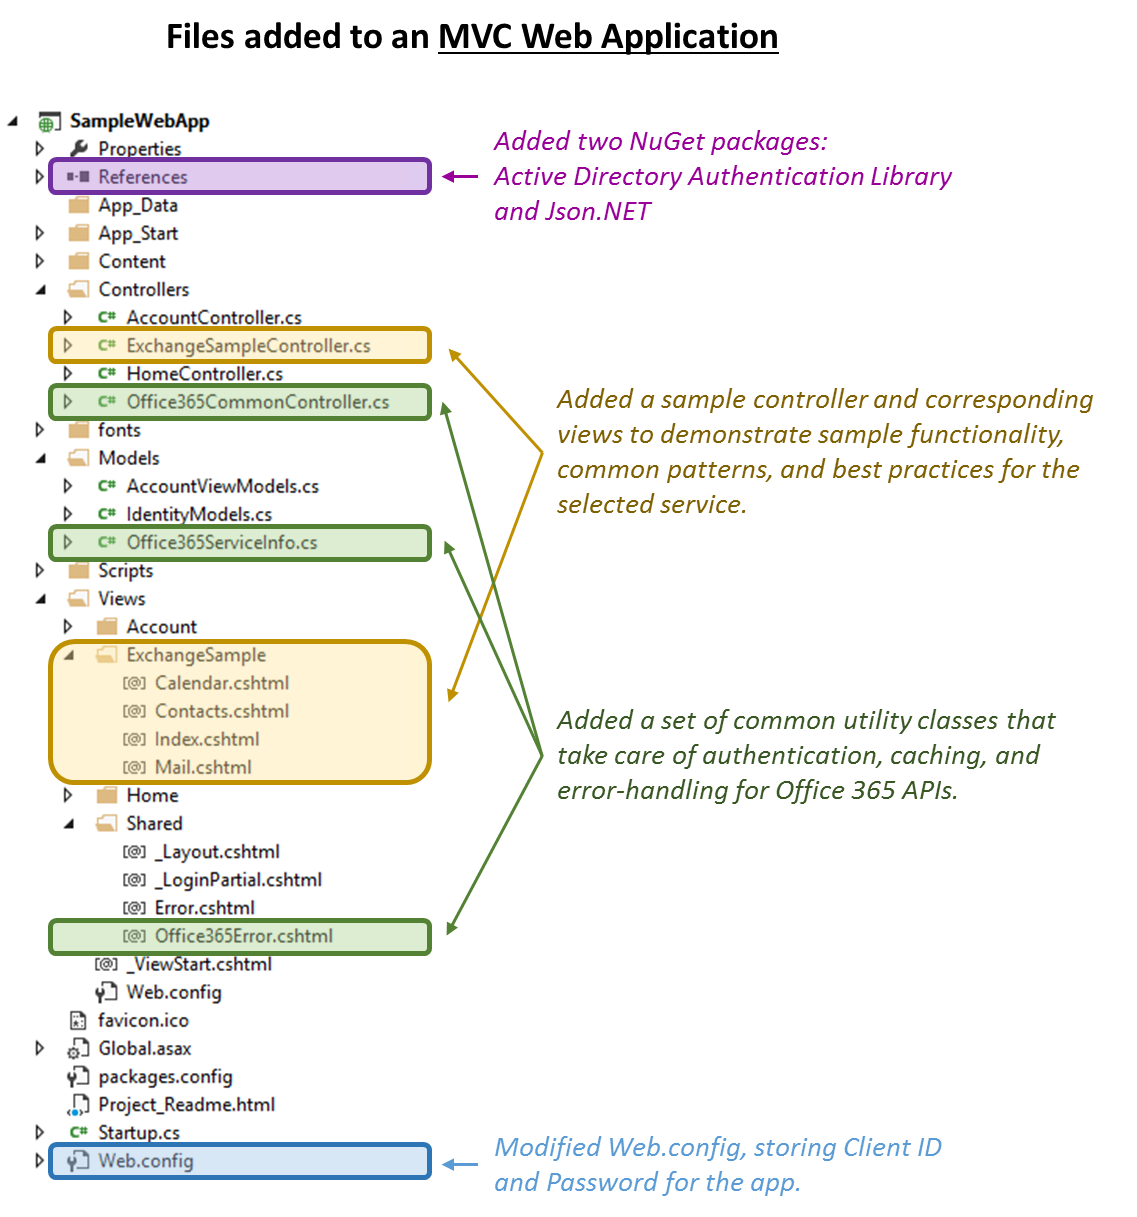
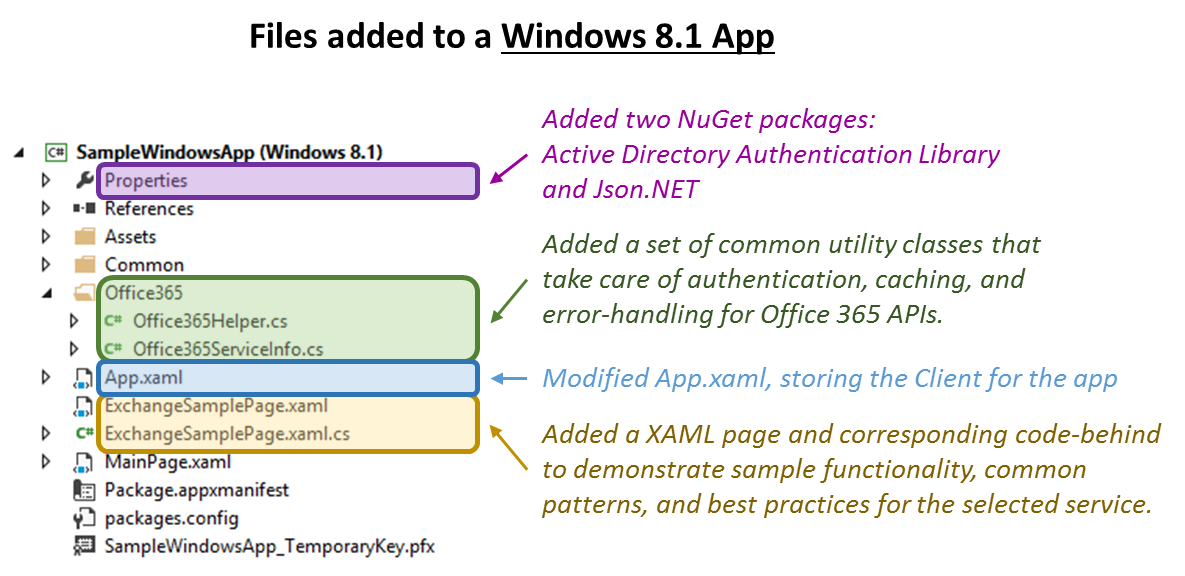
In last month’s blog post, we took a look at the files that are added by the Office 365 API Tooling. If you have not already, I would encourage you to read the “Exploring the project structure” section of that post – including the diagrams that show which files are added to the MVC Web Application and the Windows 8.1 app. In a nutshell, after registering an app with the Azure Active Directory, the Office 365 API Tools make the following modifications to a project:
- Add NuGet packages for Active Directory Authentication Library and Json.NET.
- Add a set of common helper files (files whose names start with "Office365*," such as "Office365ServiceInfo") that are common across different services.
- Add a set of service-specific sample files (for example, ExchangeSampleController and its accompanying View folder for MVC, or ExchangeSamplePage.xaml and its accompanying code-behind for Windows 8.1).
- Modify Web.config or App.xaml to include the Client ID (and, in the case of web apps, the Password) for the app.
The NuGet additions and the Web.config/App.xaml modifications are fairly straightforward, so in terms of new files added to the project, we’re left with the helper files and the service-specific sample files. The helper files are designed to be fairly transparent to the developer, as they encapsulate functionality that you shouldn’t need to worry about. The one exception is error-handling, where you may want to customize the experience by customizing the UI or writing the errors to a log or database. We’ve left a TODO flag in the Office365Helper and Office365CommonController files to make it clear where such error-handling logic should be implemented. For the rest of the helper-class implementations, you can treat those files as library files and generally avoid peeking into them, except to satisfy your academic curiosity.
Instead of exploring the underlying plumbing of the helper files, this blog post will focus on showing you how to use the files to accomplish your business needs.
A note on the differences between MVC Web Apps and Windows 8.1 apps
No doubt, every developer has faced the frustration of learning to do something one way – and then needing to re-learn a completely different approach for a similar scenario.
When designing our helper classes, we worked hard to ensure that much of the individual differences between platforms and services are abstracted away. Using our helper classes, accessing Exchange from a Windows 8.1 app feels no different than accessing SharePoint from an MVC web app. For example, authentication on Windows 8.1 apps has different caching mechanisms than web applications, but our helper classes handle it transparently for the developer in either case. Likewise, accessing OneDrive for Business in SharePoint requires an extra discovery step, whereas accessing Exchange does not; but again, this is not be something that a developer needs to remember. By using our helper classes, the code that you author will be similar both in spirit and structure, no matter which project type and which service you choose to target.
So, what does the sample code look like when the individual differences are abstracted away by helper classes? Let us take a function that retrieves calendar events from Exchange and take a look, step by step.
Performing a GET request
Step 1: Obtain information for communicating with the service
To use the helper functionality, first you need to create an object to represent the service. The object type is one of the helper classes, Office365ServiceInfo. This class encapsulates information about a service’s API endpoint, resource ID, access token, error handling, and more (generally speaking, much of this information should be transparent for your code). All you need to do is obtain an instance of the service, and then pass it around to other helper functions.
To construct an Office365ServiceInfoinstance, the Office365ServiceInfo file offers a number of static methods that construct an instance of a particular service type:
MVC Web App |
Office365ServiceInfo serviceInfo = Office365ServiceInfo.GetExchangeServiceInfo(); if (!serviceInfo.HasValidAccessToken) { return Redirect(serviceInfo.GetAuthorizationUrl(Request.Url)); } |
Windows 8.1 |
Office365ServiceInfo serviceInfo = await Office365ServiceInfo.GetExchangeServiceInfoAsync(); if (!serviceInfo.HasValidAccessToken) { returnnull; } |
By necessity, this preamble to get the Office365ServiceInfo object is somewhat different between the two project types – but it does stay identical between services (merely substituting GetExchangeServiceInfoAsync for GetOneDriveServiceInfoAsync, GetActiveDirectoryServiceInfoAsync, etc).
As a side note, the reason for the difference is that a web project must redirect to a login page and then back to itself in order to show a login UI, whereas a Windows 8.1 project is able to display the login screen as an overlay dialog. Thus, whereas the MVC code needs to redirect to the authorization URL if no access token is retrieved, the Windows 8.1 code does not. The difference also accounts for the need to “await” the dialog in Windows 8.1 (though certain services, like GetOneDriveServiceInfoAsync, still need to be async even in the case of an MVC Web App, as they first require a call to a Discovery service).
Step 2: Create a URL for retrieving the data
The next step is to construct a URL to call into the service. This code is completely the same across project types (though it is different for different service types).
How do you know which URL to use for the service, and which query parameters to pass in? In the MSDN Office 365 APIs Preview documentation, choose an appropriate section for your service type, such as the article on Using the Mail, Calendar and Contact REST APIs. For this example, the “Work with calendar items” section describes the format of the query to retrieve calendar data and even suggests a filter that you can apply, which is part of the standard ODATA syntax.
GET https://outlook.office365.com/ews/odata/Me/Calendar/ Events?$filter=Start le 2014-02-14T05:00:00Z and End ge 2014-02-10T05:00:00Z HTTP/1.1
Accept: application/json
Armed with the example above, we can create our own query. In the case of the sample code that the tool produces, this query will retrieve the top 10 upcoming calendar events (and minimize data sent over the wire by doing only a select on a few fields):
Both MVC and Windows 8.1 |
string[] queryParameters = { String.Format(CultureInfo.InvariantCulture, "$filter=End ge {0}Z", DateTime.UtcNow.ToString("s")), "$top=10", "$select=Subject,Start,End" }; string requestUrl = String.Format(CultureInfo.InvariantCulture, "{0}/Me/Calendar/Events?{1}", serviceInfo.ApiEndpoint, String.Join("&", queryParameters)); |
Note that to reduce error, the code above substitutes serviceInfo.ApiEndpoint into the beginning of the query, so that you don’t have to type out the same API endpoint (“https://outlook.office365.com/ews/odata”) every time. In addition to saving on typing, this pattern also makes calling different services consistent, whether the API endpoint is static (as it is for Exchange and Active Directory Graph) or dynamically discovered (as in the case of OneDrive for Business).
Step 3: Prepare the HTTP request
Now that the URL for obtaining the data is prepared, the next step is to create HttpClient and HttpRequestMessage objects. While the sample code creates a new HttpClient object every time, you may instead choose to keep it around for easy reuse. The code is the same across project types and fairly similar across service types as well. Differences worth noting are things like substituting odata=verbose versus odata=minimalmetadata for the Accept headers, depending on the service type. For such things, the MSDN documentation gives guidance on which Accept or ContentType headers the REST calls expect.
For the case of doing a simple Get on Exchange, the following will suffice:
Both MVC and Windows 8.1 |
using (HttpClient client = newHttpClient()) { Func<HttpRequestMessage> requestCreator = () => { HttpRequestMessage request = newHttpRequestMessage( HttpMethod.Get, requestUrl); request.Headers.Add("Accept", "application/json;odata=minimalmetadata"); return request; };
<Upcoming code here> } |
You may wonder, why do we create a lambda (e.g., a function that returns an HttpRequestMessage) rather than just creating the appropriate HttpRequestMessage object? The reason is that a request could fail because of an expired access token, in which case a new access token would need to be created and a new request dispatched to the service. Because an HttpRequestMessage object cannot be used more than once, the procedure for creating the request is captured as a lambda.
The whole business of retrying a request sounds tricky, but fortunately our helper code handles it for you. All you need to do is use the helper, and then you can just read the data. The only difference between the MVC code and the Windows 8.1 code is the name of the helper: Office365Helper vs. Office365CommonController.
MVC Web App |
using (HttpResponseMessage response = awaitOffice365Helper. SendRequestAsync(serviceInfo, client, requestCreator)) { <Upcoming code here> } |
Windows 8.1 |
using (HttpResponseMessage response = awaitOffice365CommonController. SendRequestAsync(serviceInfo, client, requestCreator)) { <Upcoming code here> } |
Step 4: Read the response and de-serialize the data
With the response received, it’s time to read the response object; and, in case of failure, to use the common error-handling function to parse out the human-readable error from the response and display it to the user. As mentioned before, the error-handling implementation has a basic default behavior, but you can customize it to suit your needs. The code is the same across service types, and only mildly different between platforms (redirecting to a special error view in the case of MVC, versus displaying an error dialog in the case of Windows 8.1)
MVC Web App |
string responseString = await response.Content.ReadAsStringAsync(); if (!response.IsSuccessStatusCode) { returnOffice365CommonController.ShowErrorMessage( serviceInfo, responseString); } |
Windows 8.1 |
string responseString = await response.Content.ReadAsStringAsync(); if (!response.IsSuccessStatusCode) { awaitOffice365Helper.ShowErrorMessageAsync( serviceInfo, responseString); returnnull; } |
Finally, if the response was successful, you typically want to perform some action based on the response. For GET operations such as retrieving mail, calendar, or files, this may involve de-serializing the data. For POST operations, you may still want to de-serialize the data, or you might be content to know that the operation succeeded.
If you do need to de-serialize the data, using a library such as Json.NET (which is added automatically to the project when you add an Office 365 service) makes it possible to work with the returned data as if it is a .NET object. First, however, you need to define the shape of the data that you expect to receive over the wire. The same MSDN documentation as before will show the shape of the returned data. Thus, continuing with the previous example, the section on Work with calendar items defines not only the query format, but also the entirety of the object that you will get back.
Trimming for brevity, the MSDN documentation shows something like this:
{
   "@odata.context": "https://outlook.office365.com/EWS/OData/$metadata#Me/
Calendar/Events", "value": [
{
       "@odata.id": "https://outlook.office365.com/EWS/OData/Users
('sadie@contoso.com')/Events('AAMkAGI3...')",
...
"Subject": "Lunch",
...
"Start": "2014-02-13T20:30:00Z",
"End": "2014-02-13T21:00:00Z",
...
},
{
       "@odata.id": "https://outlook.office365.com/EWS/OData/Users
('sadie@contoso.com')/Events('AAMkAGI3...')",
...
"Subject": "Test new REST API",
...
"Start": "2014-02-13T16:00:00Z",
"End": "2014-02-13T17:00:00Z",
}
]
}
Tip While MSDN can be great for initial familiarization with the data step, sometimes you want to experiment with the data against live data in real-time. A common technique is to dispatch the request and then watch the response using a debugging proxy such as Fiddler. In fact, if you run the sample code, you can use Fiddler to intercept the request (Access Token and all) – and then use the Composer tab in Fiddler to re-issue the request with minor modifications.
In any case, once you know the JSON shape, you can create a plain C# class with properties that match the names of the JSON fields. In the case of the sample files, this class is defined towards the top of the files. Alternatively, you could also extract it into a separate file, for example, to reuse across your project.
Both MVC and Windows 8.1 |
publicclassCalendarEvent { publicstring Subject { get; set; } publicDateTime Start { get; set; } publicDateTime End { get; set; } } |
With the data structure defined, all that remains is to de-serialize it. The exact call can differ slightly between service types, depending on how nested the JSON structure is. For Exchange, it looks like this:
Both MVC and Windows 8.1 |
var events = JObject.Parse(responseString)["value"]. ToObject<SampleModel.Exchange.CalendarEvent[]>(); |
Also depending on the service, you may need to do additional post-processing on the results. For example, Exchange does not yet support ordering events on the server, so the sample sorts them locally:
Both MVC and Windows 8.1 |
events = events.OrderBy(e => e.Start).ToArray(); |
With that, you have successfully accessed data from the Office 365 cloud. From here, the samples display the data in a basic MVC view or a Windows 8.1 page – but for authoring your own code, the sky’s the limit.
Performing a POST request
The sample code produced by the Office 365 API Tools shows only GET requests. Now that you’ve seen how a GET request works, how do you go about authoring a POST request? The answer: Follow the exact same pattern!
To demonstrate that the patterns are in fact the same, I will round off this article with an example of issuing a POST request, such as adding a new contact to Exchange.
As before, we start with looking at the MSDN documentation to see the prototypical way to create a contact. In the Create a contact section, we see:
To create a contact, send a POST request to the Contacts property of the contacts folder with a JSON representation of the new contact in the payload. The following example creates a new contact in the default Contacts folder.
POST https://outlook.office365.com/ews/odata/Me/Contacts HTTP/1.1
Accept: application/json
Content-Type: application/json;odata.metadata=full
Expect: 100-continue
{
"@odata.type": "#Microsoft.Exchange.Services.OData.Model.Contact",
"GivenName": "Mara",
"Surname": "Whitley",
"EmailAddress1": "mara@fabrikam.com"
}
First, ensure you have appropriate permissions by going back to the Services Manager dialog. For this example, select Exchange, then Configure, and then Have full access to the users’ contacts.
With this done – and having added an entry point (such as a method off of a button click, with appropriate error handling) for invoking the action – you would follow the same steps as before. In broad strokes:
- Obtain information for communicating with the services.
- Create a URL corresponding to the ODATA request – and, in the case of a POST request, prepare a data structure for transmitting the data.
- Prepare the HTTP request.
- Send the request.
- Read the response and handle errors.
The biggest difference is in step #3, when preparing the HttpRequestMessage object:
- The request must be a POST rather than a GET.
- The Accept header may need to be adjusted, depending on what the documentation prescribes.
- A Content header must be added.
- The request content must be set to the serialized JSON.
Here is the code in its entirety, for a Windows 8.1 app:
privateclassContact
{
[JsonProperty("@odata.type")]
publicstring EntityType { get; set; }
publicstring GivenName { get; set; }
publicstring Surname { get; set; }
publicstring EmailAddress1 { get; set; }
}
privateasyncTask AddContact() {
// Obtain information for communicating with the service:
Office365ServiceInfo serviceInfo = await
Office365ServiceInfo.GetExchangeServiceInfoAsync();
if (!serviceInfo.HasValidAccessToken)
{
return;
}
// Create the data structure and the URL corresponding to the ODATA request
Contact contact = newContact()
{
EntityType = "#Microsoft.Exchange.Services.OData.Model.Contact",
GivenName = "Mara",
Surname = "Whitley",
EmailAddress1 = "mara@gabrikam.com"
};
string requestUrl = String.Format(CultureInfo.InvariantCulture,
"{0}/Me/Contacts",
serviceInfo.ApiEndpoint);
// Prepare the HTTP request:
using (HttpClient client = newHttpClient())
{
Func<HttpRequestMessage> requestCreator = () =>
{
HttpRequestMessage request = newHttpRequestMessage(
HttpMethod.Post, requestUrl);
request.Headers.Add("Accept", "application/json;odata.metadata=full");
request.Content = newStringContent(
JsonConvert.SerializeObject(contact));
request.Content.Headers.ContentType =
newMediaTypeHeaderValue("application/json");
return request;
};
// Send the request using a helper method, which will add an authorization header to the request,
// and automatically retry with a new token if the existing one has expired.
using (HttpResponseMessage response = awaitOffice365Helper.SendRequestAsync(
serviceInfo, client, requestCreator))
{
// Read the response and deserialize the data:
string responseString = await response.Content.ReadAsStringAsync();
if (!response.IsSuccessStatusCode)
{
awaitOffice365Helper.ShowErrorMessageAsync(serviceInfo, responseString);
return;
}
awaitnewMessageDialog("Contact added successfully!", "Success!").ShowAsync();
}
}
}
For an MVC project, the code would be largely the same. For real-world applications, though, the one important difference between Windows 8.1 and MVC code is the initial authentication piece. Whereas a Windows 8.1 app will display a dialog box that prompts the user to enter credentials – and which the code can just “await” – an MVC web project must do a redirect to an authentication provider (e.g., redirect to https://login.windows.net/) before getting redirected back to the MVC controller. As such, if the action is state-full (e.g., you’re adding a contact based on information submitted by the user), you will need to ensure that this information is persisted when the login page returns. You can do this in a variety of ways – for example, storing a cookie, encoding the information as a query parameter on the URL passed to serviceInfo.GetAuthorizationUrl, or ensuring that even a blank form requires the user to log in first.
I hope this blog post has helped you to get started with authoring your own Office 365 APIs code. To learn more, I invite you to read the MSDN documentation on Office 365 APIs, and – if you’ve haven’t already – to watch The Office 365 API Tools for Visual Studio video on Channel 9 that touches upon many of the points in this post.

Video: Office 365 API Tools for Visual Studio
- Michael Zlatkovsky, Program Manager on the Office Developer Tools team at Microsoft