Building great-looking apps for Office using the new project templates
In last month's release of Office Developer Tools for Visual Studio 2012, the app for Office project templates were redesigned―adding better styling, better structure, and better code to newly-created projects. This post will highlight the benefits offered by the new templates, along with tips for using the templates more effectively.
When creating the new templates, we want new projects to look great and work great. Note that the new structure is certainly not a requirement. Once a project is created, developers can customize the structure their web projects. Existing projects will continue to work with the new tooling.
This post includes the following sections:
Better User Experience
The documentation on dev.office.com provides a comprehensive set of user experience guidelines for apps for Office. In the past, however, it was up to individual developers to implement these guidelines – which was not necessarily an easy feat. Now, with the new project templates, the UX guidelines are built in!
Here is the task pane project you get when you choose “File>New Project”, select “App for Office”, and press F5.
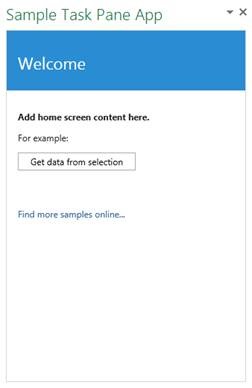
Figure 1. New task pane app template
Note that:
- The template is pre-configured with a header and a scrollable section for the main content.
- All the padding, fonts, and control styling is in place.
- When you choose “Get data from selection” you get a notification toast, just as described in the UX guidelines.
Mail apps are similarly styled, and likewise give an example of showing a toast notification (in this case, exposing more detail when I choose the “from” field of the sample content).
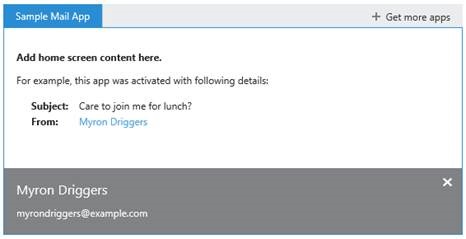
Figure 2. Mail app template that demonstrates the notification functionality
Finally, content apps provide additional UI features and built-in functionality that is custom-tailored to their use pattern. Content apps are typically bound to some data, so two screens were created: one for displaying the data, and another for generating sample data or binding to existing cells. As you’ll see in a later section, helpful boilerplate was added code that tracks data-bindings, handles navigation, and responds to errors.
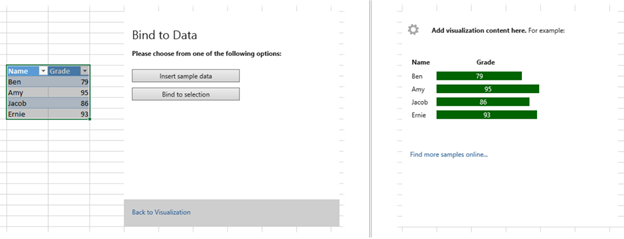
Figure 3. New content app template with navigation between the home page and the “Bind to Data” page automatically built-in
Better Structure
In the past, project code was scattered across multiple directories: “Pages” held the HTML, “Content” held the CSS, and “Scripts” held the JavaScript. Unfortunately, with a client-side programming paradigm like in apps for Office, I always found myself jumping back and forth between the HTML and JavaScript files, and getting rather lost in the Solution Explorer. Moreover, any time I would add a NuGet package, my Scripts and Content folders would get a half-dozen files added to it, making it hard to find just my code. If I added a secondary task pane or content app to the same project, things would get even more confusing.
Enter the new project structure design. When you create a new project, your app-specific code will be generated in an “App” folder, which serves as a place for just your code, away from references to external libraries and other miscellaneous files. If you do add another app to the same project, another root-level node will be created (e.g., “SecondTaskPane”) for that app, so that code belonging to different apps stays self-contained.
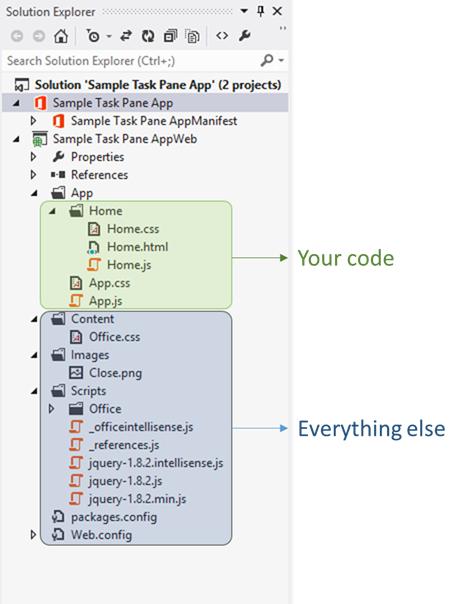
Figure 4.New project structure with all app-specific code residing under one folder
The code inside the App folder is also organized in a convenient, modular way. App.js and App.css are the “common” files: they represent code that is common to your app irrespective of what page you’re on. Each individual page, meanwhile, is composed of an HTML/JS/CSS trio that is grouped like JavaScript Windows Store app pages.
For task pane and mail apps, a single “Home” page is created; for content apps, a “DataBinding” page is added. Note that navigating to an entirely new page (as opposed to loading content dynamically) does take an extra moment due to the network lag, so the convenience of modularizing the code does need to be balanced with performance considerations. In the case of a data-binding page, this is something that is separate enough from the normal flow (normally a one-time operation per document) that keeping it in a separate page made sense. If something were more common (e.g., an “Add Item” dialog box for a task-list app), keeping the code in the same HTML/JS/CSS trio would provide better performance and hence a better user experience.
The new project structure is something we hope will be helpful for most users – but, if you’d rather use a different layout, that is your option. Just delete the “App” folder, and you’ve got yourself an empty project that you can use as you like. Just remember to update the Source Location in the project manifest to reflect any structural changes to the project.
Better Code
In re-designing the templates, we took time to ensure that the sample code created in new projects is helpful, follows best practices, and is easy to work with. To this end:
- The “app.showNotification” method is exposed for displaying notifications on screen.
- Content apps provide a lot of the boiler-plate structure.
- Sample code is either useful to keep, or simple to delete – the distinction between real code and content-placeholders should be pretty self-evident. Code under App.js and App.css is meant to be expanded upon, but is generally something we expect users to keep and use.
- All code is wrapped in self-executing functions, to prevent polluting the global namespace.
- The code follows general JS/CSS best practices and naming conventions.
- Office.css is clean and well-documented.
Tips & Tricks
When you’re using the new templates, here are some handy tips:
- Use the structure
The new template is set up to keep your code easily organized and accessible. So, when you add new code to your project, keep the following in mind:- Is the new code a script you copied from the Internet? If it’s just a few lines, you could add it to App.js, but in most cases, you’re better off keeping it in a separate file under the Scripts folder.
- Is the new code something you’re writing yourself? If it relates to just a single page, place it the JS or CSS file belonging to the page. If it’s more global to the app, place it in App.js or App.css.
- If you add any new files, remember to add references to them in the HTML pages that use those files.
- Are you modifying Office.css? Don’t. Remember that files under Scripts and Content are best treated as “external”, so that you can replace them with newer versions without having to make any local changes. Any changes you’re making to Office.css can be made in App.css, but this will ensure the conceptual separation between external code and your own code.
- Use app.showNotification
The toast notification produced by “app.showNotification” is handy for user-facing code, but it can also be used for quick debugging. Apps for Office do not support the use of “alert()”, so app.showNotification can be a handy replacement. Just remember that app.showNotification does not pause JavaScript execution in the way “alert()” does (that’s the reason why alert is not allowed – to prevent freezing the UI), so showNotification should be used for displaying final results – not for stepping through a loop. If you need to pause execution and inspect some values, the debugger is helpful. - Use the Content App’s boilerplate code
If you’re building a content app that will bind to data and display results or a visualization, there is a lot of boilerplate code: code to ensure that the app is bound to data, that the data contains sufficient data points, that the app is notified anytime the data is modified, etc. The content app template is designed to handle most of that complexity for you.
For this sort of app, modifying the contents of “App/Visualization.js” (and of course adding any relevant libraries/styles to the project, and referencing them in “Home.html”) should be a good starting point. Don’t recreate code unless you have to. - Last, but not least: Use the DOM Explorer
This is not strictly related to the new project templates, but this tip will save you time. If your computer has Internet Explorer 10 installed, you can debug the app DOM (Document Object Model) via a “DOM Explorer” (similar to the F12 browser tools). With the DOM Explorer open, hover over the items on the left pane, and you will see the live DOM elements light up in your app. You can also change styles on the fly and effectively experiment with your CSS before making those changes in the real file.
To start the DOM Explorer, run (F5) your app as normal. Then, while Visual Studio is in Debug mode, enter “DOM Explorer” into the “Quick Launch” window at the top of Visual Studio (it may be handy to remember the shortcut). DOM Explorer is an indispensable tool for inspecting and manipulating the inner state of your app DOM.
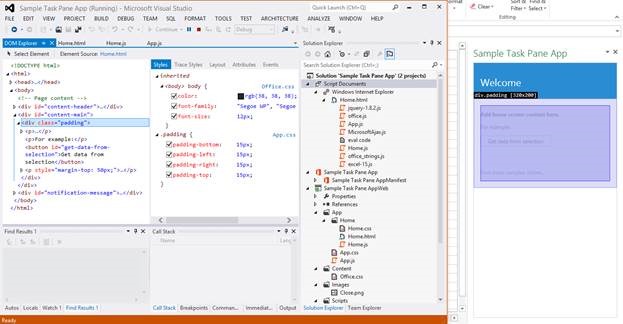
Figure 5.Debug mode: Visual Studio DOM Explorer attached to an app for Office
Happy coding with the new app templates! If you have any questions or suggestions for future improvements to the templates – please leave us a comment.
- Michael Zlatkovsky | Program Manager, Visual Studio Tools for Office & Apps for Office