Microsoft Graph – Excel REST API (C#) を使い Range を操作するサンプル コード
※ この記事は以下の Office サポート フォーラムに移行しました。 https://social.msdn.microsoft.com/Forums/ja-JP/f1bb2a2a-b3ce-445e-8744-ccbb615c2235/webapimicrosoft-graph-excel-rest-api-c-range-
こんにちは、Office Developer サポートの森 健吾 (kenmori) です。
今回の投稿では、Microsoft Graph – Excel REST API を使用して、指定されたアドレスの Range オブジェクトを操作するプログラムを、実際に C# で開発するエクスペリエンスをご紹介します。
ウォークスルーのような形式にしておりますので、慣れていない方も今回の投稿を一通り実施することで、プログラム開発を経験し理解できると思います。前回の OneDrive API のウォークスルー同様、本投稿では、現実的な実装シナリオを重視するよりも、Excel REST API を理解するためになるべくシンプルなコードにすることを心掛けています。例外処理なども含めていませんので、実際にコーディングする際には、あくまでこのコードを参考する形でご検討ください。
Excel REST API は、OneDrive API が前提となります。OneDrive API エンドポイント配下で取得したファイルに対してのみ、Excel REST API は使用できます。Office 365 という前提はありますが、一度慣れてしまえばオートメーションの要件において、OpenXML などのプログラムを実装するよりも開発生産性が高いと思います。
事前準備
以前の投稿をもとに、Azure AD にアプリケーションの登録を完了してください。少なくとも以下の 2 つのデリゲートされたアクセス許可が必要です。
・Have full access to all files user can access
・Sign users in
その上で、クライアント ID とリダイレクト URI を控えておいてください。
開発手順
1. Visual Studio を起動し、Windows フォーム アプリケーションを開始します。
2. ソリューション エクスプローラにて [参照] を右クリックし、[NuGet パッケージの管理] をクリックします。
3. ADAL で検索し、Microsoft.IdentityMode.Clients.ActiveDirectory をインストールします。
4. [OK] をクリックし、[同意する] をクリックします。
5. 次に同様の操作で Newtonsoft で検索し、Newtonsoft.Json をインストールします。
6. 次にフォームをデザインします。
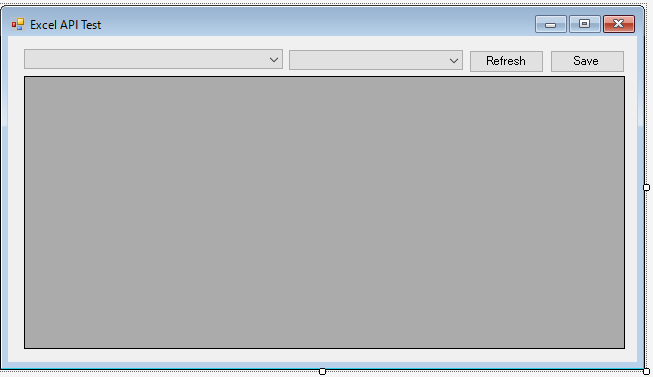
コントロール一覧
- ExcelTestForm フォーム
- fileListCB コンボボックス
- worksheetCB コンボ ボックス
- refreshBtn ボタン
- saveBtn ボタン
- rangeGV グリッド ビュー
7. プロジェクトを右クリックし、[追加] – [新しい項目] をクリックします。
8. MyFile.cs を追加します。
9. 以下のような定義 (JSON 変換用) を記載します。
 using Newtonsoft.Json;
using System.Collections.Generic;

namespace ExcelAPITest
{
    public class MyFile
    {
        public string Name { get; set; }
    }

    public class MyFiles
    {
        public List<MyFile> Value;
    }

    public class WorkSheet
    {
        public string Name;
    }

    public class WorkSheets
    {
        public List<WorkSheet> Value;
    }

    public class Range
    {
        public List<List<string>> Values;
        public List<List<string>> Formulas;
    }
}
10. フォームのコードに移動します。
11. using を追記しておきます。
 using Microsoft.IdentityModel.Clients.ActiveDirectory;
using Newtonsoft.Json;
using System;
using System.Collections.Generic;
using System.Net.Http;
using System.Net.Http.Headers;
using System.Text;
using System.Threading.Tasks;
using System.Windows.Forms;
12, フォームのメンバー変数に以下を加えます。
※ clientid や redirecturi は Azure AD で事前に登録したものを使用ください。
         const string resource = "https://graph.microsoft.com";
        const string clientid = "xxxxxxxx-xxxx-xxxx-xxxx-xxxxxxxxxxxx";
        const string redirecturi = "urn:getaccesstokenfordebug";
        // ADFS 環境で SSO ドメイン以外のテナントのユーザーを試す場合はコメント解除
        // const string loginname = "admin@tenant.onmicrosoft.com";
         string AccessToken;
13. フォームのデザインでフォームをダブルクリックし、ロード時のイベントを実装します。
         private async void ExcelTestForm_Load(object sender, EventArgs e)
        {
            // デザイナーで設定しても構いません。
            rangeGV.AllowUserToAddRows = false;
            rangeGV.AllowUserToDeleteRows = false;
            rangeGV.ColumnHeadersVisible = false;
            rangeGV.RowHeadersVisible = false;

            AccessToken = await GetAccessToken(resource, clientid, redirecturi);
            DisplayFiles();
        }

        private async Task<string> GetAccessToken(string resource, string clientid, string redirecturi)
        {
            AuthenticationContext authenticationContext = new AuthenticationContext("https://login.microsoftonline.com/common");
            AuthenticationResult authenticationResult = await authenticationContext.AcquireTokenAsync(
                resource,
                clientid,
                new Uri(redirecturi),
                new PlatformParameters(PromptBehavior.Auto, null)
                // ADFS 環境で SSO ドメイン以外のテナントのユーザーを試す場合はコメント解除
                //, new UserIdentifier(loginname, UserIdentifierType.RequiredDisplayableId)
            );
            return authenticationResult.AccessToken;
        }

        private async void DisplayFiles()
        {
            using (HttpClient httpClient = new HttpClient())
            {
                httpClient.DefaultRequestHeaders.Authorization = new AuthenticationHeaderValue("Bearer", AccessToken);
                HttpRequestMessage request = new HttpRequestMessage(
                    HttpMethod.Get,
                    new Uri("https://graph.microsoft.com/v1.0/me/drive/root/children?$select=name")
                );
                var response = await httpClient.SendAsync(request);
                MyFiles files = JsonConvert.DeserializeObject<MyFiles>(response.Content.ReadAsStringAsync().Result);
                fileListCB.Items.Clear();

                foreach (MyFile file in files.Value)
                {
                    if (file.Name.ToLower().EndsWith(".xlsx"))
                    {
                        fileListCB.Items.Add(file.Name);
                    }
                }
                if (fileListCB.Items.Count > 0)
                {
                    fileListCB.SelectedIndex = 0;
                }
            }
        }
14. fileListCB の SelectedIndexChanged イベントをダブルクリックして、処理を実装します。
         private async void fileListCB_SelectedIndexChanged(object sender, EventArgs e)
        {
            string fileLeafRef = fileListCB.SelectedItem.ToString();

            using (HttpClient httpClient = new HttpClient())
            {
                httpClient.DefaultRequestHeaders.Authorization = new AuthenticationHeaderValue("Bearer", AccessToken);

                HttpRequestMessage request = new HttpRequestMessage(
                    HttpMethod.Get,
                    new Uri(string.Format("https://graph.microsoft.com/v1.0/me/drive/root:/{0}:/workbook/worksheets", fileLeafRef))
                );

                var response = await httpClient.SendAsync(request);
                // UI コントロールの表示アイテムのクリア
                workSheetsCB.Items.Clear();
                rangeGV.Rows.Clear();
                rangeGV.Columns.Clear();

                WorkSheets worksheets = JsonConvert.DeserializeObject<WorkSheets>(response.Content.ReadAsStringAsync().Result);
                foreach (WorkSheet worksheet in worksheets.Value)
                {
                    workSheetsCB.Items.Add(worksheet.Name);
                }

                if (workSheetsCB.Items.Count > 0)
                {
                    workSheetsCB.SelectedIndex = 0;
                }
            }
        }
15. workSheetsCB の SelectedIndexChanged イベントをダブルクリックして、処理を実装します。
         private void workSheetsCB_SelectedIndexChanged(object sender, EventArgs e)
        {
            DisplayData();
        }

        private async void DisplayData()
        {
            string fileLeafRef = fileListCB.SelectedItem.ToString();
            string WorkSheetName = workSheetsCB.SelectedItem.ToString();
            using (HttpClient httpClient = new HttpClient())
            {
                httpClient.DefaultRequestHeaders.Authorization = new AuthenticationHeaderValue("Bearer", AccessToken);
                HttpRequestMessage request = new HttpRequestMessage(
                    HttpMethod.Get,
                    new Uri(string.Format("https://graph.microsoft.com/v1.0/me/drive/root:/{0}:/workbook/worksheets(%27{1}%27)/range(address=%27A1:E5%27)", fileLeafRef, WorkSheetName))
                );

                var response = await httpClient.SendAsync(request);
                range = JsonConvert.DeserializeObject<Range>(response.Content.ReadAsStringAsync().Result);
                RenderRangeData(range);
            }
        }

        private void RenderRangeData(Range range)
        {
            rangeGV.Columns.Clear();
            // 列名はダミーとする (非表示)
            rangeGV.Columns.Add("A", "A");
            rangeGV.Columns.Add("B", "B");
            rangeGV.Columns.Add("C", "C");
            rangeGV.Columns.Add("D", "D");
            rangeGV.Columns.Add("E", "E");
            rangeGV.Rows.Clear();
            foreach (var RowData in range.Values)
            {
                int rowIndex = rangeGV.Rows.Add();
                var Row = rangeGV.Rows[rowIndex];
                for (int j = 0; j < RowData.Count; j++)
                {
                    Row.Cells[j].Value = RowData[j];
                    if (RowData[j] != range.Formulas[rowIndex][j])
                    {
                        Row.Cells[j].ReadOnly = true;
                    }
                }
            }
        }
16. refreshBtn をダブルクリックして、Click イベントを実装します。
         private void refreshBtn_Click(object sender, EventArgs e)
        {
            DisplayData();
        }
17. saveBtn をダブルクリックして Click イベントを実装します。
         private async void saveBtn_Click(object sender, EventArgs e)
        {
            string fileLeafRef = fileListCB.SelectedItem.ToString();
            string WorkSheetName = workSheetsCB.SelectedItem.ToString();

            using (HttpClient httpClient = new HttpClient())
            {
                httpClient.DefaultRequestHeaders.Authorization = new AuthenticationHeaderValue("Bearer", AccessToken);
                HttpRequestMessage request = new HttpRequestMessage(
                    new HttpMethod("PATCH"),
                    new Uri(string.Format("https://graph.microsoft.com/v1.0/me/drive/root:/{0}:/workbook/worksheets(%27{1}%27)/range(address=%27{1}!A1:E5%27)", fileLeafRef, WorkSheetName))
                );
                range = GetRangeData();
                request.Content = new StringContent(JsonConvert.SerializeObject(range), Encoding.UTF8, "application/json");
                var response = await httpClient.SendAsync(request);
                MessageBox.Show(response.StatusCode.ToString());
            }
        }

        private Range GetRangeData()
        {
            int rowIndex = 0;
            Range temprange = new Range();
            List<List<string>> formulas = new List<List<string>>();
            List<List<string>> values = new List<List<string>>();
            foreach (DataGridViewRow Row in rangeGV.Rows)
            {
                List<string> formulasInRow = new List<string>();
                List<string> valuesInRow = new List<string>();
                for (int j = 0; j < rangeGV.Columns.Count; j++)
                {
                    string CellData = (Row.Cells[j].Value == null) ? "" : Row.Cells[j].Value.ToString();
                    valuesInRow.Add(CellData);
                    if (Row.Cells[j].ReadOnly)
                    {
                        formulasInRow.Add(range.Formulas[rowIndex][j]);
                    }
                    else
                    {
                        formulasInRow.Add(CellData);
                    }
                }
                formulas.Add(formulasInRow);
                values.Add(valuesInRow);
                rowIndex++;
            }
            temprange.Values = values;
            temprange.Formulas = formulas;
            return temprange;
        }
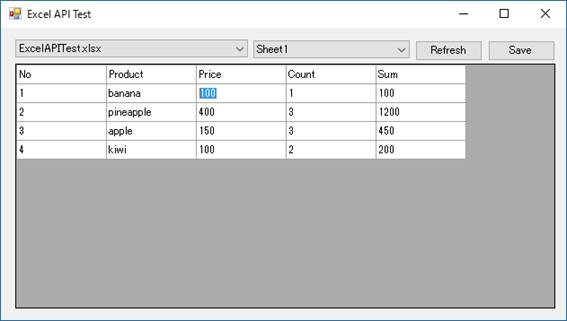
上記ソリューションをビルドして、Excel REST API の動作をご確認ください。
動作概要
・左上から最初のコンボボックスにOneDrive 上にある xlsx ファイルを格納されます。
・左上から 2 番目のコンボボックス名には、ワークシート名が格納されます。
・ファイル名、シートをもとにセル (左上から縦横5 マス) が表示されます。
・数式のセルは読み取り専用になります。
・[Save] ボタンをクリックすると変更内容が保存されます。
Excel API の大きな特徴として、更新内容は共同編集セッションで更新されます。Excel ファイルを誰かが開いているから競合するなどといった状況もありません。今回の場合更新対象のセルは左上から縦横 5 マス (A1:E5) ですので、それ以外のセルについては他ユーザーの編集は保持されます。
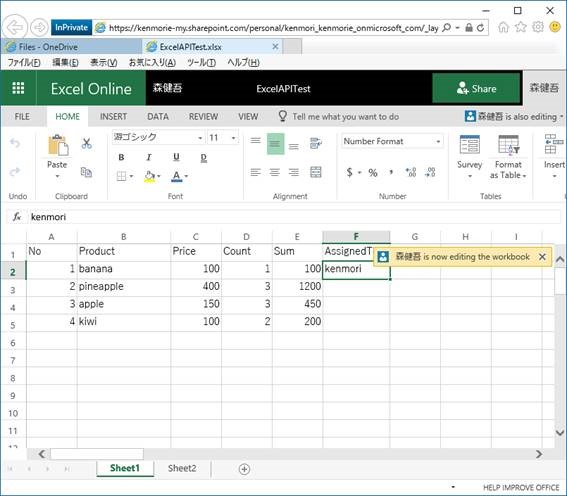
上図は、他のユーザーがブラウザーで編集していた際の画面です。別セッションで、アプリケーションが Save をクリックした際に、シートの右上に共同編集者の更新が通知されます。
参考情報
Excel REST API をさらに使用する場合は、以下の情報をご参考にしてください。
タイトル : Microsoft Graph での Excel の操作
アドレス : https://graph.microsoft.io/ja-jp/docs/api-reference/v1.0/resources/excel
タイトル : New additions to the Excel REST APIs on the Microsoft Graph endpoint
アドレス : https://dev.office.com/blogs/additions-to-excel-rest-api-on-microsoft-graph
タイトル : Power your Apps with the new Excel REST API on the Microsoft Graph
アドレス : https://dev.office.com/blogs/power-your-apps-with-the-new-excel-rest-api
前回の投稿と繰り返しとなりますが、Json.NET に関するドキュメントは以下をご参考にしてください。
タイトル : Json.NET Documentation
アドレス : https://www.newtonsoft.com/json/help/html/Introduction.htm
タイトル : Serializing and Deserializing JSON
アドレス : https://www.newtonsoft.com/json/help/html/SerializingJSON.htm
開発工数削減のため、アプリケーション開発前に Graph Explorer, Fiddler や Postman などを使用して、あらかじめ使用する REST を確立しておくことをお勧めします。デバッグ方法については、以下をご参考にしてください。
タイトル : Microsoft Graph を使用した開発に便利なツール群
アドレス : https://blogs.msdn.microsoft.com/office_client_development_support_blog/2016/12/13/tools-for-development-with-microsoft-graph/
Excel REST API については、今後も何度かにわけて様々なサンプルを記載しようと思います。
今回の投稿は以上です。