
[Tutorial & Sample] How to enable authentication for metadata documents in the OData Client Code Generator
Currently, the OData Client Code Generator doesn’t support authentication for metadata documents. Although authenticating the access to OData metadata documents is not encouraged for service builders unless they has a good reason to do so, However, it might not be easy to exclude $metadata from the authentication required by the service.
So in this tutorial, I will give a sample on how to update the OData Client Code Generator to customize the metadata documents authentication support.
Update the Code Generator Files
You can follow “How to use OData client code generator to generate client side proxy class” to add OData client proxy file into your project. It will add two files. One is “*.odata.config”, another is “*.tt”. (I will use “ODataT4Template.odata.config” and “ODataT4Template.tt” in this doc). Now, you can begin to implement the metadata documents authentication support.
In this Tutorial, I will take the basic username-password authentication as an example.
Define authentication information in ODataT4Template.odata.config
“ODataT4Template.odata.config” is a file to collect all input information. Users can add following codes into “ODataT4Template.odata.config”.
Every time a user generates client code for a service which needs authentication, the user should set this information.
Apply authentication logic in “ODataT4Template.tt”
To support the basic username-password authentication, we plan to use “HttpWebRequest.Credentials“ to set authentication information for requests. So in ODataT4Template.tt file, we add a “NetworkCredential“ property into the OData Code Generator.
Please add following code to the highlighted place
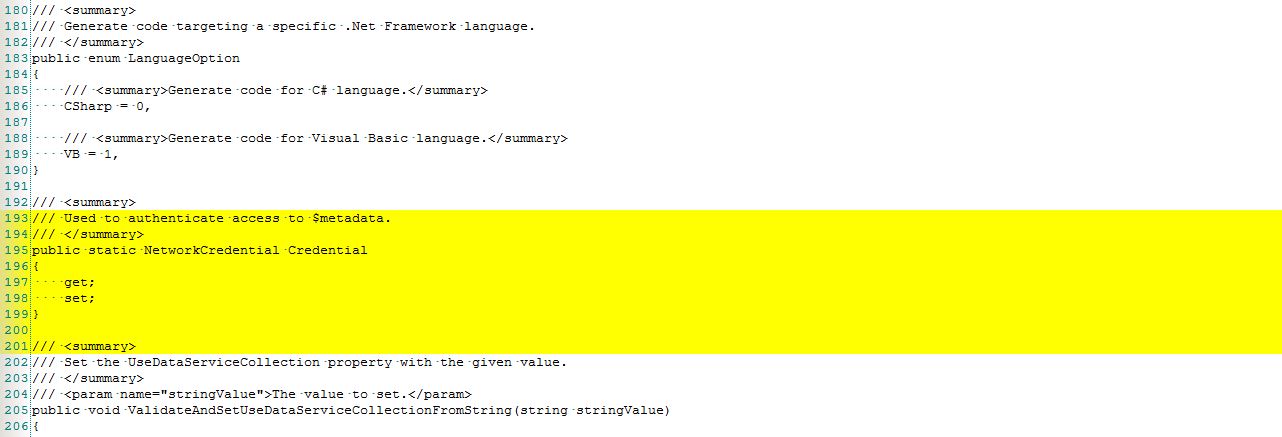
We also need to add a logic to parse the credential information from “ODataT4Template.odata.config“ into the property. Since the existing ODataT4Template.tt file has contained a method “ApplyParametersFromConfigFile“ to parse the configuration file. So we only need to add the logic for authentication information.
New the networkCreditial, and set all the properties.
Then, we need a way to send those authentication information along with http requests to the server. Here, we define a “Customization.CustomizeHttpRequestAuthentication“ method to set the credential for requests.
Add following code to the highlighted place

Call the customized method before sending requests by “Customization.CustomizeHttpRequestAuthentication(webRequest, Credential)”
Now you have enabled the basic username-password authentication for accessing OData metadata documents.
In conclusion, the main flow is as following.
1. Add configuration items in “ODataT4Template.odata.config“ to set authentication information.
2. In the code generator, define a property to store the authenticate information.
3. Add logic to parse those information from the configuration file to the property.
4. Define a method to add authentication information into requests. And call it before you send the requests.
Users can follow this flow to customize their own way to authenticate access to $metadata.
Prepare a VSIX installation Package
If you want to contribute these changes to your team, then you can apply your changes into the ODataT4Template.vsix. Then your team members just need to install the vsix to enable authentication support.
Download the VSIX Package
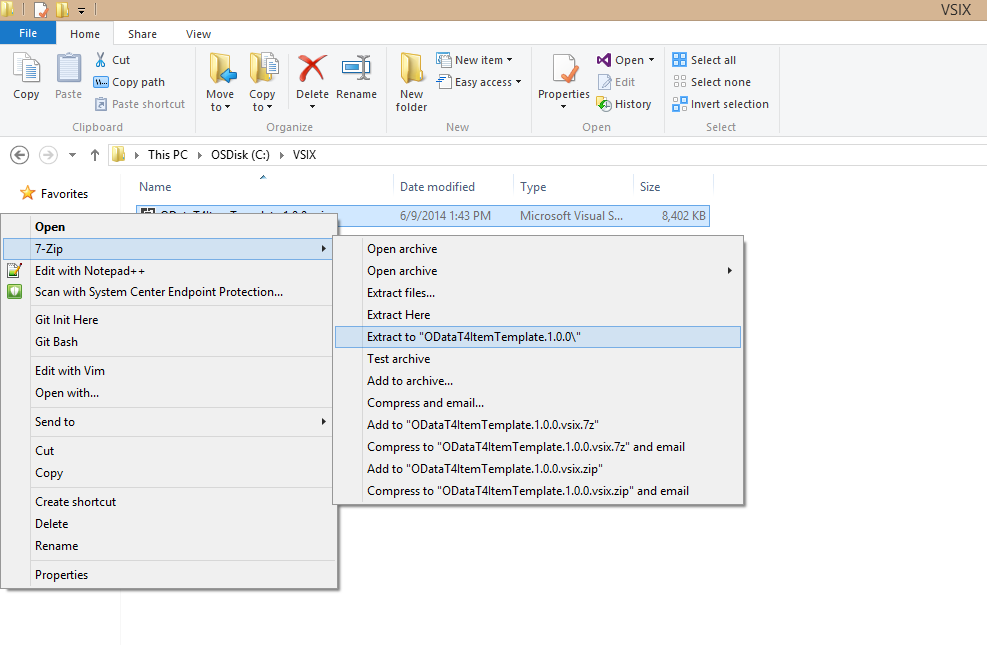
Access the “OData Client Code Generator“ page. Click “Download“. Save the VSIX package to the local machine. (Example: C:VSIX)
Unpackage the VSIX Package
1. In the folder “C:VSIX“, unzip “ODataT4ItemTemplate.1.0.0.vsix“ to “ODataT4ItemTemplate.1.0.0“.
2. Open the folder “C:VSIXODataT4ItemTemplate.1.0.0T4CSharpCode”.
3. Unzip “ODataT4TemplateCSharp.1.0.0.zip” to “ODataT4TemplateCSharp.1.0.0”
Open the “ODataT4TemplateCSharp.1.0.0” folder. You can update “ODataT4Template.tt” and “ODataT4Template.odata.config” to customize authentication.
Note
If you are using VB on client, you can find that “ODataT4Template.tt” and “ODataT4Template.odata.config” for VB are packaged in “ODataT4TemplateVisualBasic.1.0.0.zip” under “C:VSIXODataT4ItemTemplate.1.0.0T4VisualBasicCode”. Then you can take this tutorial as reference to update those files.
Update Code Generator Files
Refer to “Update the Code Generator Files” section above.
Repack the Updated Code Generator Files
After all files have been updated, you should pack them back to the original package. Make sure the structure of the zip file is same as before.
1. In folder “C:VSIXODataT4ItemTemplate.1.0.0T4CSharpCodeODataT4TemplateCSharp.1.0.0“, package all files into “ODataT4TemplateCSharp.1.0.0.zip“.

2. Use this file to replace the same named file in folder “C:VSIXODataT4ItemTemplate.1.0.0T4CSharpCode“.
3. Delete the folder “ODataT4TemplateCSharp.1.0.0“.
4. In folder “C:VSIXODataT4ItemTemplate.1.0.0“, package all files into “ODataT4ItemTemplate.1.0.0.zip“
5. Rename “ODataT4ItemTemplate.1.0.0.zip“ to “ODataT4ItemTemplate.1.0.0.vsix“
Then, you can uninstall the old ODataT4ItemTemplate.1.0.0.vsix, and reinstall this VSIX package. You will find that the basic username-password authentication has been enabled for accessing OData metadata documents.
 Light
Light Dark
Dark
0 comments