Connecting to an OAuth 2.0 protected OData Service
This post creates a Windows Phone 7 client application for the OAuth 2.0 protected OData service we created in the last post.
Prerequisites:
To run this code you will need:
- An AppFabric Access Control Services (ACS) instance & OData Service configured as described in the previous blog post.
- Windows Phone 7 Developer Tools
- Data Services client binaries for Window Phone from odata.codeplex.com
- ACS phone sample (we borrow lots of code from this excellent sample).
Our application:
Our application is a very basic Windows Phone 7 (WP7) application that allows you to browse favorites and if logged in create new favorites and see your personal favorites too. The key to enabling all this is authenticating our application against our OAuth 2.0 protected OData service, which means somehow acquiring a signed Simple Web Token (SWT) with the current user’s emailaddress in it.
Our application’s authentication experience:
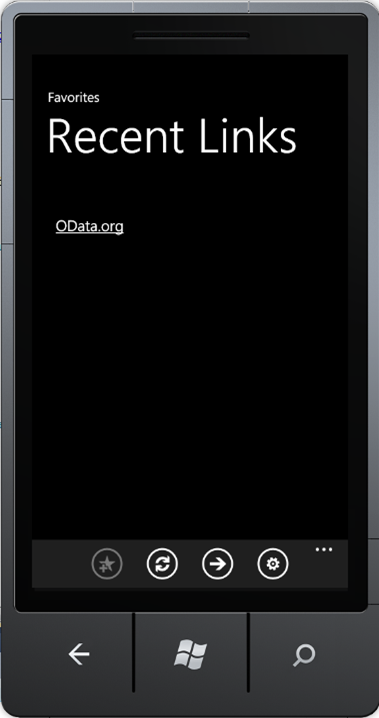
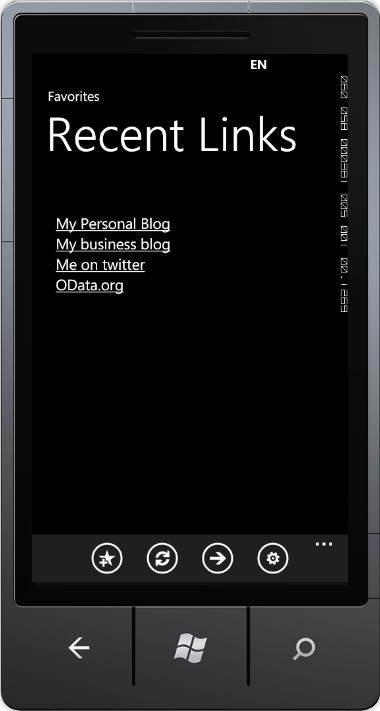
When first started our application will show public favorites like this:
To see more or create new favorites you have to logon.
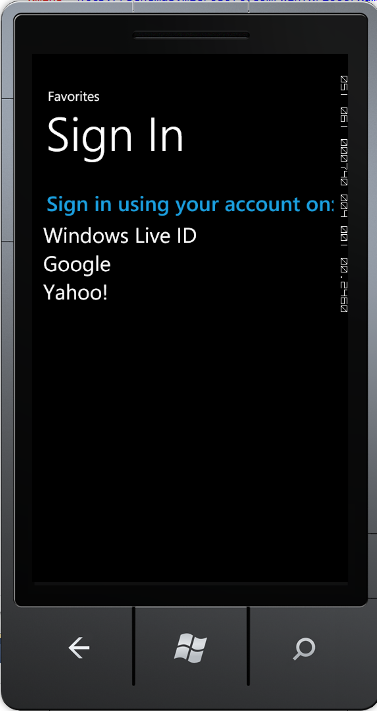
Clicking the logon button (the ‘gear’ icon) makes the application navigate to a page with an embedded browser window that shows a home realm discovery logon page – powered by ACS. This home realm discovery page allows the user to choose one of the 3 identity providers we previously configured our relying party (i.e. our OData Service) to trust in ACS:
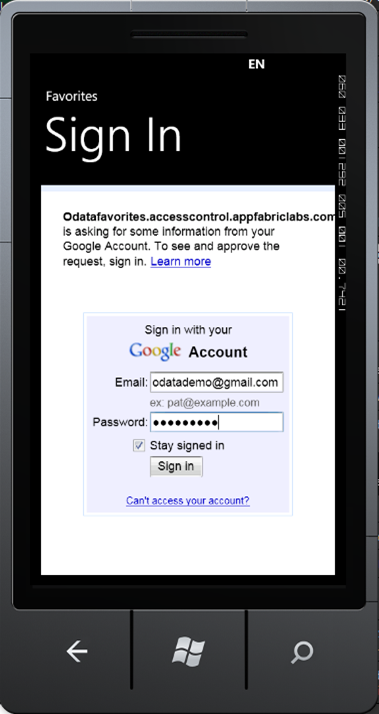
When the user clicks on the identity provider they want to use, they will browse to that identity provider and be asked to Logon:
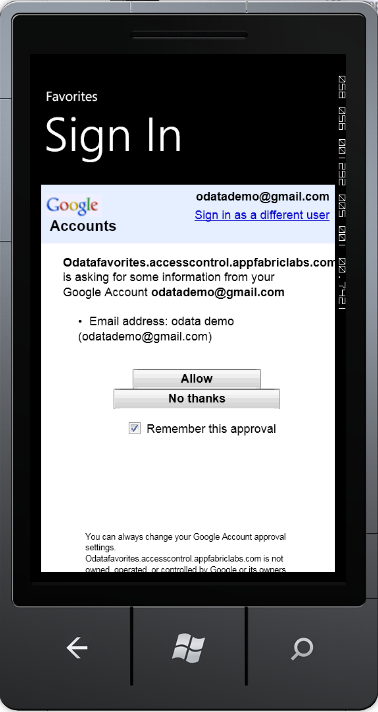
Once logged on they will be asked to grant our application permission to use their emailaddress:
If you grant access the browser redirects back to ACS and includes the information you agreed to share – in this case your email address.
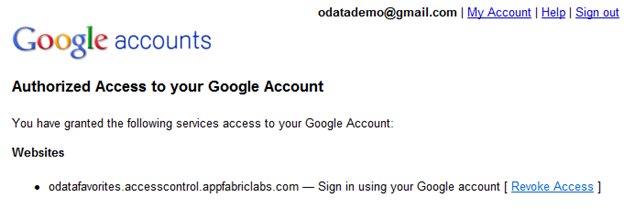
Note: because we are using OAuth 2.0 and related protocols your Identity provider probably has a way to revoke access to your application too. This is what that looks like in Google:
The final step is to acquire a SWT signed using the trusted signing key (only ACS and the OData service know this key) so that we can prove our identity with the OData service. This is a little involved so we’ll dig into it in more detail when we look at the code – but the key takeaway is that all subsequent requests to the OData service will use this SWT to authenticate, and gain access to more information:
How this all works:
There is a fair bit of generic application code in this example which I’m not going to walk-through; instead we’ll just focus on the bits that are OData and authentication specific.
Generating Proxy Classes for your OData Service
Unlike Silverlight or Windows applications, we don’t have an ‘Add Service Reference’ feature for WP7 projects yet. Instead we need to generate proxy classes by hand using DataSvcUtil.exe, something like this:
DataSvcUtil.exe /out:”data.cs” /uri:”http://localhost/OnlineFavoritesSite/Favorites.svc”
Once you’ve got your proxy classes simply add them to your project.
I chose to create an ApplicationContext class to provide access to resources shared across different pages in the application. So this property, which lets people get to the DataServiceContext, hangs off that ApplicationContext:
public FavoritesModelContainer DataContext {
get{
if (_ctx == null)
{
_ctx = new FavoritesModelContainer(new Uri(“http://localhost/OnlineFavoritesSite/Favorites.svc/”));
_ctx.SendingRequest += new EventHandler<SendingRequestEventArgs>(SendingRequest);
}
return _ctx;
}
}
Notice that we’ve hooked up to the SendingRequest event on our DataServiceContext, so if we know we are logged (we have a SWT token in our TokenStore) we include it in the authentication header.
void SendingRequest(object sender, SendingRequestEventArgs e)
{
if (IsLoggedOn)
{
e.RequestHeaders[“Authorization”] = “OAuth ” + TokenStore.SecurityToken;
}
}
Then whenever the home page is displayed or refreshed the Refresh() method is called:
private void Refresh()
{
AddFavoriteButton.IsEnabled = App.Context.IsLoggedOn;
var favs = new DataServiceCollection<Favorite>(App.Context.DataContext);
lstFavorites.ItemsSource = favs;
favs.LoadAsync(new Uri(“http://localhost/OnlineFavoritesSite/Favorites.svc/Favorites?$orderby=CreatedDate desc”));
App.Context.Favorites = favs;
}
Notice that this code binds the lstFavorites control, used to display favorites, to a new DataServiceCollection that we load asynchronously via a hardcoded OData query uri. This means whenever Refresh() is executed we issue the same query, the only difference is that because of our earlier SendingRequest event handler if we are logged in we send an Authorization header too.
NOTE: If you are wondering why I used a hand coded URL rather than LINQ to produce the query, it’s because the current version of the WP7 Data Services Client library doesn’t support LINQ. We are working to add LINQ support in the future.
Logging on
The logon button is handled by the OnSignIn event that navigates the app to the SignOn page:
private void OnSignIn(object sender, EventArgs e)
{
if (!App.Context.IsLoggedOn)
{
NavigationService.Navigate(new Uri(“/SignIn.xaml”, UriKind.Relative));
}
else
{
App.Context.Logout();
Refresh();
}
}
The SignIn.xaml file is a modified version of the one in the Access Control Services Phone sample. As mentioned previously, it has an embedded browser (in fact the browser is embedded in a generic sign-on control called AccessControlServiceSignIn). The code behind the SignIn page looks like this:
public const string JSON_HRD_url = “https://odatafavorites.accesscontrol.appfabriclabs.com:443/v2/metadata/IdentityProviders.js?protocol=wsfederation&realm=http%3a%2f%2ffavourites.odata.org%2f&reply_to=http%3a%2f%2flocalhost%2fOnlineFavoritesSite%2fSecurity%2fAcsPostBack&context=&version=1.0&callback=”;
public SignInPage()
{
InitializeComponent();
}
private void PhoneApplicationPage_Loaded(object sender, RoutedEventArgs e)
{
SignInControl.RequestSecurityTokenResponseCompleted += new EventHandler<RequestSecurityTokenResponseCompletedEventArgs>(SignInControl_GetSecurityTokenCompleted);
SignInControl.GetSecurityToken(new Uri(JSON_HRD_url));
}
This tells the control to GetSecurityToken from ACS. The JSON_HRD_url points a url exposed by ACS that returns the list of possible identity providers in JSON format.
The underlined and bolded part of the string corresponds to an MVC action we are going to add to our OData service website to get the SWT token into our WP7 application.
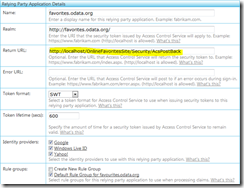
You can configure the url of your MVC action via the Relying Party screen for your application in IIS:
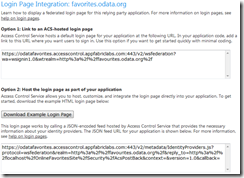
Once you’ve set the Return URL correctly, to get the JSON Home Realm discovery URL from ACS, click on ‘Application Integration’ and then click on ‘Logon Pages’ and then click on your Relying Party, then you should see something like this:
The second URL is the one we need.
That’s essentially all we need on the client for security purposes. Remember though we need a page in our website that acts as the Return URL.
We choose this URL ‘http://localhost/OnlineFavoritesSite/Security/AcsPostBack’ to receive the response so we need to create a SecurityController with an AcsPostBack action something like this:
public class SecurityController : Controller
{
const string Page = @”<html xmlns=””http://www.w3.org/1999/xhtml””>
<head runat=””server””>
<title></title>
<script type=””text/javascript””>
window.external.Notify(‘{0}’);
</script>
</head>
<body>
</body>
</html>”;
//
// POST: /Security/AcsPostBack
[HttpPost]
[ValidateInput(false)]
public string AcsPostBack()
{
RequestSecurityTokenResponseDeserializer tokenResponse = new RequestSecurityTokenResponseDeserializer(Request);
string page = string.Format(Page, tokenResponse.ToJSON());
return page;
}
}
This accepts a POST from ACS. Because ACS is on a different domain, we need to include [ValidateInput(false)] which allows Cross Site posts.
The post from ACS will basically be a SAML token that will includes a set of claims about the current user. But because our Phone client is going to use REST we need to convert the SAML token which is not header friendly into a SWT token that is.
The RequestSecurityTokenResponseDeserializer class (again from the ACS phone sample) does this for us. It repackages the claims as a SWT token and wraps the whole thing up in a bit of JSON so it can be embedded in a little Javascript code.
The html we return calls window.external.Notify(‘{0}’) to get the token to the AccessControlServiceSignIn control in phone application, which then puts it in the TokenStore.SecurityToken so that it is available for future requests.
Once we have finally got the token this event fires:
void SignInControl_GetSecurityTokenCompleted(
object sender,
RequestSecurityTokenResponseCompletedEventArgs e)
{
if (e.Error == null)
{
if (NavigationService.CanGoBack)
{
NavigationService.GoBack();
}
}
}
This code takes us back to the Main page, which forces a refresh, which in turn re-queries the OData service, this time with the SWT token, which gives the user access to all their personal favorites and allows them to create new favorites.
Mission accomplished!
Summary
In this post you learned how to use ACS and the Data Services Client for WP7 to authenticate with and query an OAuth 2.0 protected OData service. If you have any questions let me know.
Alex James
Program Manager
Microsoft

 Light
Light Dark
Dark
0 comments