How to Secure Your Customers' Data in Azure
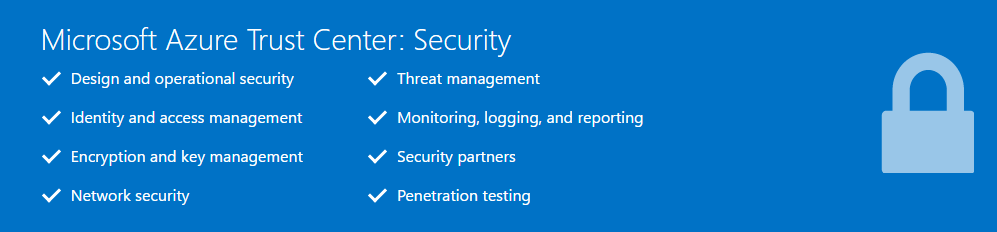
One of the great benefits of hosting your application or website on Microsoft Azure is the ability to leverage Microsoft's investments in security and data protection. Microsoft embed security best practices into every layer of Azure from development techniques to intrusion detection and prevention and distributed denial of service attack (DDOS) mitigation. Leveraging this makes sense as it takes a lot of the overhead away from you compared to what you would need to do within your own data centre. Don't just take my word for it either, we have tonnes of independent certifications to prove it, click here to find more information in our Trust centre.
The reality is, however, that securing your customers' data is a joint responsibility between you and Microsoft. We secure the platform and you use the platform in a secure and responsible way. One way of doing this is to secure your Azure virtual networks as well as the applications within them.
Securing Your Azure Network and Applications
Unfortunately there are people out there that like to exploit websites and steal your data, or worse, your customers' data. If your website is an eCommerce site and processes credit card details this is especially problematic but any personally identifiable data you process should be protected. Notice also that I use the word process and not store. Some people think they only need to worry about security if they are storing sensitive data and an SSL certificate is all that is needed to protect data in transit or being processed. This is not the case, in fact, the first place hackers will look to compromise your data is the public endpoints to the data and that means your website. So it is crucial that your site is protected. The following tutorial will show you how to setup your networking in Azure and make sure it is secure. We will use the Azure Security Centre to ensure we have no risks and we will deploy a Barracuda web application firewall to act as a reverse proxy and monitor all traffic coming from the web. Barracuda WAF will allow us to detect, contain and respond to web application threats, such as SQL injection, distributed denial of service, cross-site scripting and more,
The steps we will follow are as follows:
- Create a virtual network (VNet) in Azure. This VNet will host all of the virtual machines (VM) we need. We will create the VNet using the new Azure Resource Manager model and create everything within a single resource group so we can manage all resources as one collection. If you do decide to architect for HA or DR then you can place resources from different data centers in a single resource group too, but that is beyond the scope of this post.
- Create subnets within our VNet to seperate the tiers of our application. We will create a subnet for a DMZ or Perimiter Network and a subnet for our application tier. We will just create two subnets for simplicity but you may want to create another for the Data tier. You may also decide to use Hybrid Connections or a VPN to keep your data tier in a different data centre. These are all options but for simplicity we will just create two tiers, one for our website and one for our application protection where we will deploy our Barracuda WEB Application firewall (WAF).
- Deploy two VMs into the relevant subnets. As part of this we will create a single network interface for each VM and the appropriate security configurations and IP addresses.
- We will configure our Barracuda WAF to allow public access to the eCommerce site. Traffic from the internet will not be allowed hit the eCommerce site directly but only through the WAF giving us application protection from DDOS, SQL injection, cross-site scripting and other application level attacks.
The following steps can be carried out using the new portal or Powershell. For this post I will focus on the new Portal only.
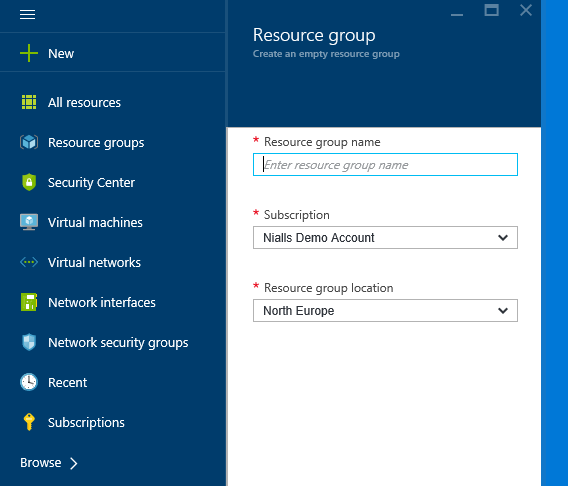
Create a Resource Group
Start by creating a new Resource Group which will logically group all of your resources. The benefit of using a resource group I have found is that I can quickly tear down all of my demo resources. From an operational perspective the major benefit is that you can assign role based access rights to everything within the resource group. For example, you may allow developers access to configure VMs but not the virtual network and an IT admin to configure the network but not access the VMs within it. This is a very powerful capability when it comes to governing the use of your cloud resources. From the left menu click resource groups and then click add. Give the resource group a name, e.g. DemoRG, select a region and click create. Resources from different regions can be added to a resource group but the region you select here will be used as the default.
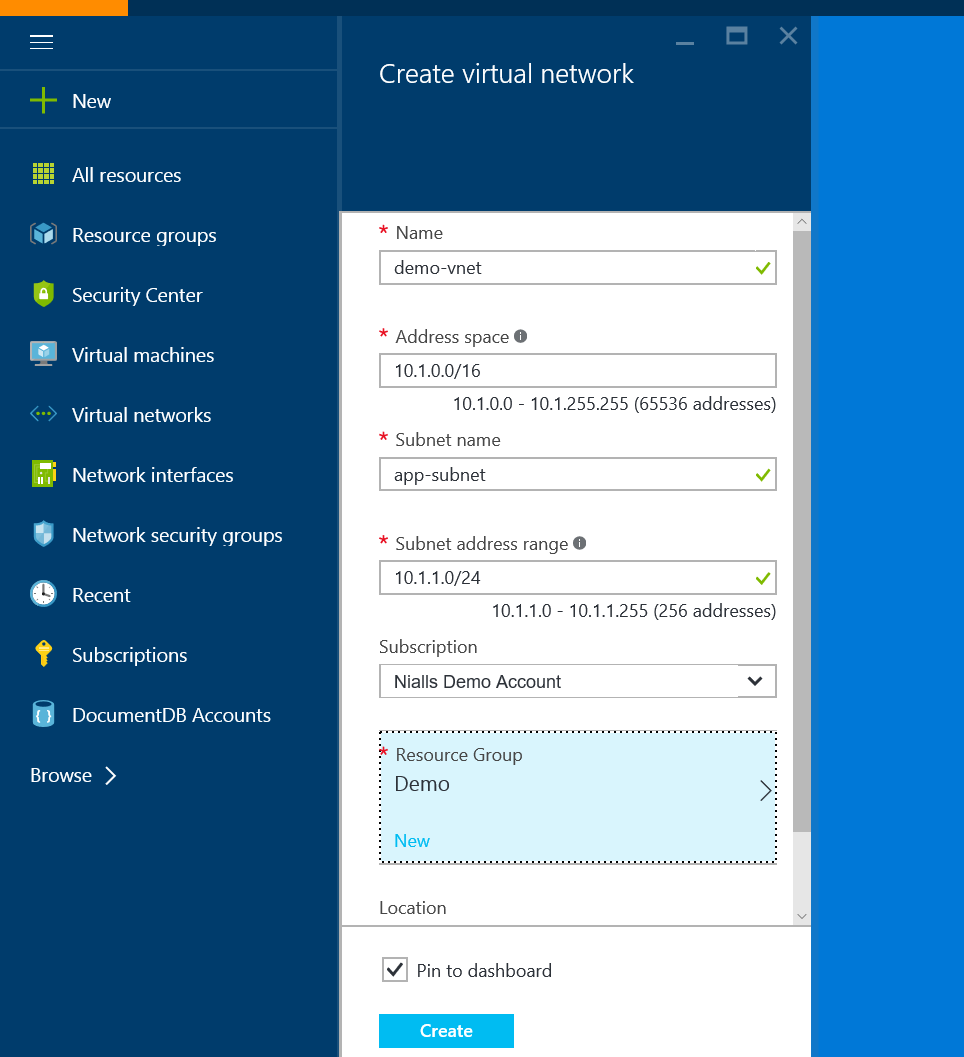
Create a Virtual Network
This step will create a Virtual Network (VNet) with one subnet, our application subnet. This is where we will create our application VMs later.
- On your left menu click Browse->Virtual networks and then Add.
- Give the Vnet a name, e.g. Demo-vnet and then give the subnet a name, e.g. App-Subnet.
- You can leave the Address Space and default subnet IP address range with their default values but I always like to change the subnet to 10.1.1.0/24 so that I can easily distinguish between VMs created in the app subnet and others. Also, make sure to select the resource group created in the first step.
Create the DMZ Subnet
A DMZ is a subnet within the network that can be accessed from the internet. All public access will go through the DMZ and no public access will be allowed to the App subnet created in the previous step.
- On the left menu click Browse->Virtual Networks and select the Vnet just created.
- In the settings blade click on subnets and the click Add.
- Enter DMZ-subnet for the name and 10.1.2.0/24 for the IP range.

Create the Wordpress Virtual Machine
For the sake of this demo I will create a Wordpress site using a Virtual Machine running Docker with two containers, one for MySQL and one for the Wordpress application. This is actually very simple as there is a preconfigured VM in the marketplace.
- In the portal click New and in the search box type WordPress and press return. Or click Compute -> See All and then search for Wordpress
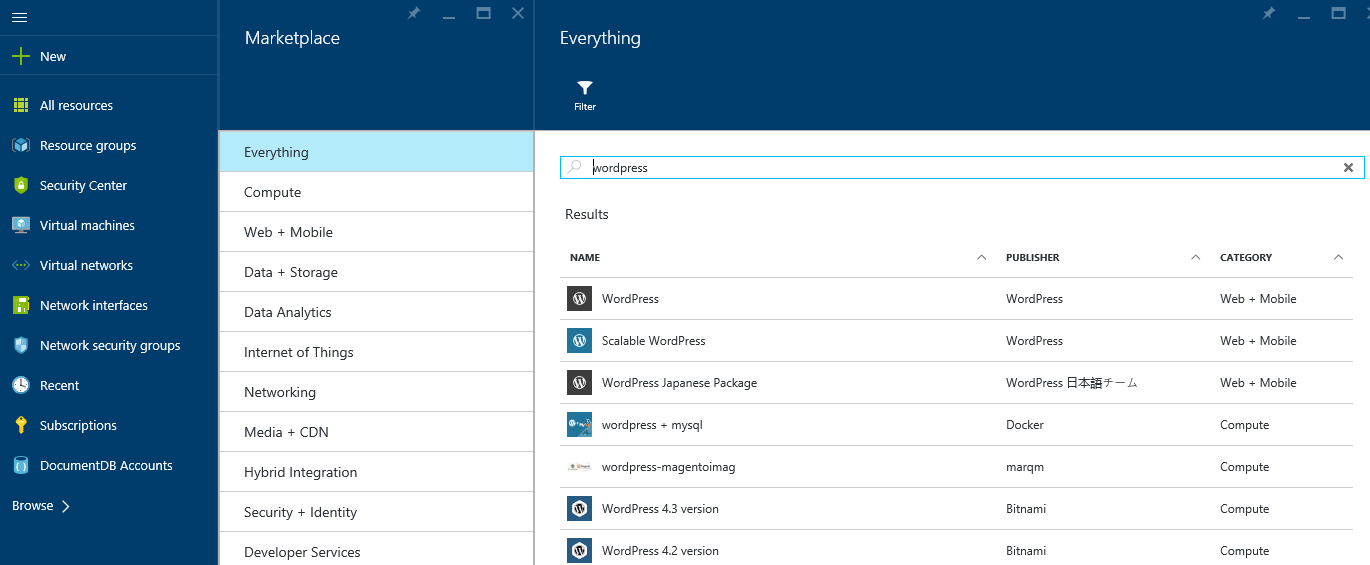
- You will notice a number of results for Wordpress, from a scalable web app option to offerings from Bitnami and Docker. For this demo select the Wordpress + MySQL with Docker option and on the blade that follows click create, making sure the deployment model is set to resource manager.
- On the next blade enter the relevant information and make sure to select our demo resource group. I typically at this point name my VMs with vm at the end of the name, e.g. demo-wp-vm. This becomes very handy later on when trying to identify the type of any particular resource. Click OK.
- On the next blade select the instance size. The options showing are the recommended instance sizes for WordPress, but if you want to see a full list just click the 'view all' link beside recommended.
- The next blade allows you to select the networking options and is very important.
- Make sure to select the VNet created earlier.
- Select the app-subnet. This will ensure the VM is placed in the app subnet.
- For this website we do not want a public IP address. This is important as we will never expose this VM to the internet. So select the public IP address and on the blade that follows click none. Leave availability set blank as we will not deal with high availability in this post.
Create the Barracuda Virtual Machine
Creating the Barracuda VM is very similar to creating the Wordpress VM except we will choose the Barracuda WAF marketplace appliance and we will define an IP address.
- In the portal click New and in the search box type Barracuda WAF and press return. Or click Compute -> See All and then search for Barracuda WAF.
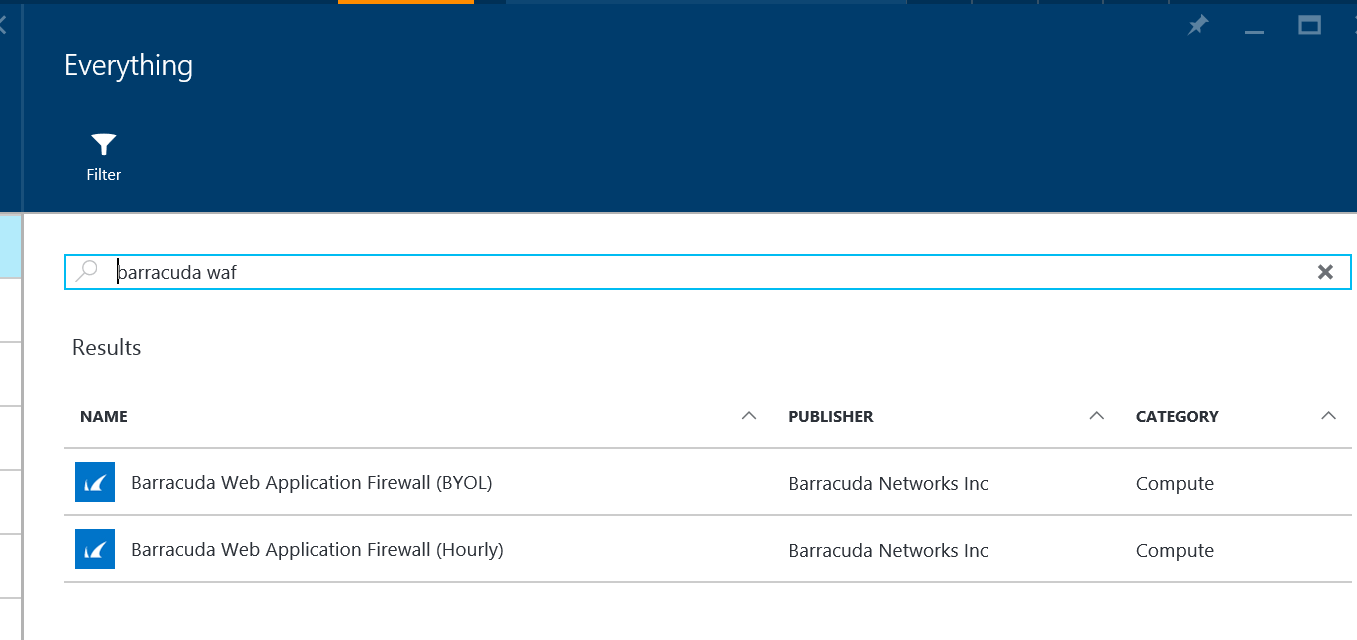
- You will notice two results for Barracuda. These results define the licensing model that Barracuda use to sell their solution. For the purposes of this demo select the BYOL option and we will use a trial license to get up and running. This trial will last for 30 days and give you plenty of time to monitor traffic to the Wordpress site. The hourly option is a great option if you decide to use the Barracuda appliance in production and would like to rent the license. In this scenario you will be charged for the Barracuda license on a monthly basis as overage on your Azure bill. More details here.
- On the next blade change the deployment model to Resource Manager, the default will be classic.
- On the next blade enter the relevant information and make sure to select our demo resource group. I typically at this point name my VMs with vm at the end of the name, e.g. demo-waf-vm. This becomes very handy later on when trying to identify the type of any particular resource. Click OK.
- On the next blade select the instance size. The options showing are the recommended instance sizes for Barracuda, but if you want to see a full list just click the 'view all' link beside recommended.
- The next blade allows you to select the networking options and is very important.
- Make sure to select the VNet created earlier.
- Select the dmz-subnet. This will ensure the VM is placed in the dmz subnet.
- For this website we do want a public IP address. This is important as we will expose this VM to the internet. So select the public IP address and on the blade that follows add IP to the end of the name, e.g. demo-waf-vm-ip and click OK. Again this makes it very simple to identify the type of your resources later on.
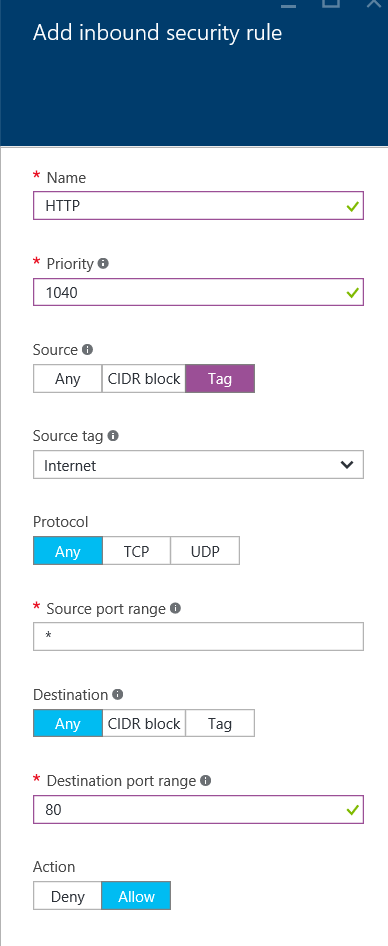
- A network security group is defined at this point for the VM. The NSG is used to define inbound and outbound rules to the default network interface on this VM. Click the NSG and change the name by adding NSG to the end, e.g. demo-waf-vm-nsg. In this blade you will notice the rules that have been setup.
- The first rule allows access to anybody on port 8000. This is the port used for the admin interface for Barrcuda. It is a good idea to restrict this access to specific IP addresses, so I would suggest clicking CIDR block in the source and change the source IP to the public IP that your computer goes out to the internet on. You can find this by accessing the site https://whatsmyip.net/ and then enter your IP address xxx.xxx.xxx.xxx/32 which indicates just your address.
- The second rule allows HTTPS access. We will not get into deploying an SSL cert on the Barrcuda WAF but in a production site this would be vital. Click here for more details on how to do this if it is important to you.
- The third rule defines SSH access to the VM. We don't need this so change the action to deny and click OK.
- Add a new Inbound rule and define the following settings. This will allow anybody to access the VM on port 80. Later we will configure the Barracuda device to forward this traffic to the Wordpress VM having analysed the traffic for threats.
-
- Leave availability set blank as we will not deal with high availability in this post.
- Click OK twice.
- The next blade will show you terms and conditions for your purchase as well as any costs. Assuming you selected BYOL earlier the value of Barracuda license should be zero. Click purchase.
Configure the Barracuda Web Application Firewall
Now that we have created our Virtual Machines it's now time to tell the Barracuda appliance to inspect traffic destined for the Wordpress VM. Remember we didn't give the Wordpress VM a public IP address and hence there is no way to directly access it from the internet. Instead we will setup the Barracuda VM as a reverse proxy to handle port 80 traffic, inspect it and forward the request on to the Wordpress VM.
- Establish the IP address of the Barracuda VM by browsing your list of Virtual Machines. Use the left menu and you will find your new VMs under Virtual Machines and not Virtual Machines (classic) which is only available to see VMs created using the old model and not the Resource Manager model.
- Click the Barracuda VM which will be named something like demo-waf-vm.
- In the general blade notice the Public IP address in the Essentials panel, copy this IP address.
- In a separate browser tab type the URL as follows https://xxx.xxx.xxx.xxx:8000 using the public IP just copied.
- You should now see the Barracuda WAF startup screen as shown below. If you do not then please check that the VM is running and browse for the Network Security group and ensure that port 8000 is accessible to your outgoing IP address. You could change this rule to allow all traffic just to identify the problem as it is usually down to an incorrect or changing IP address entered.
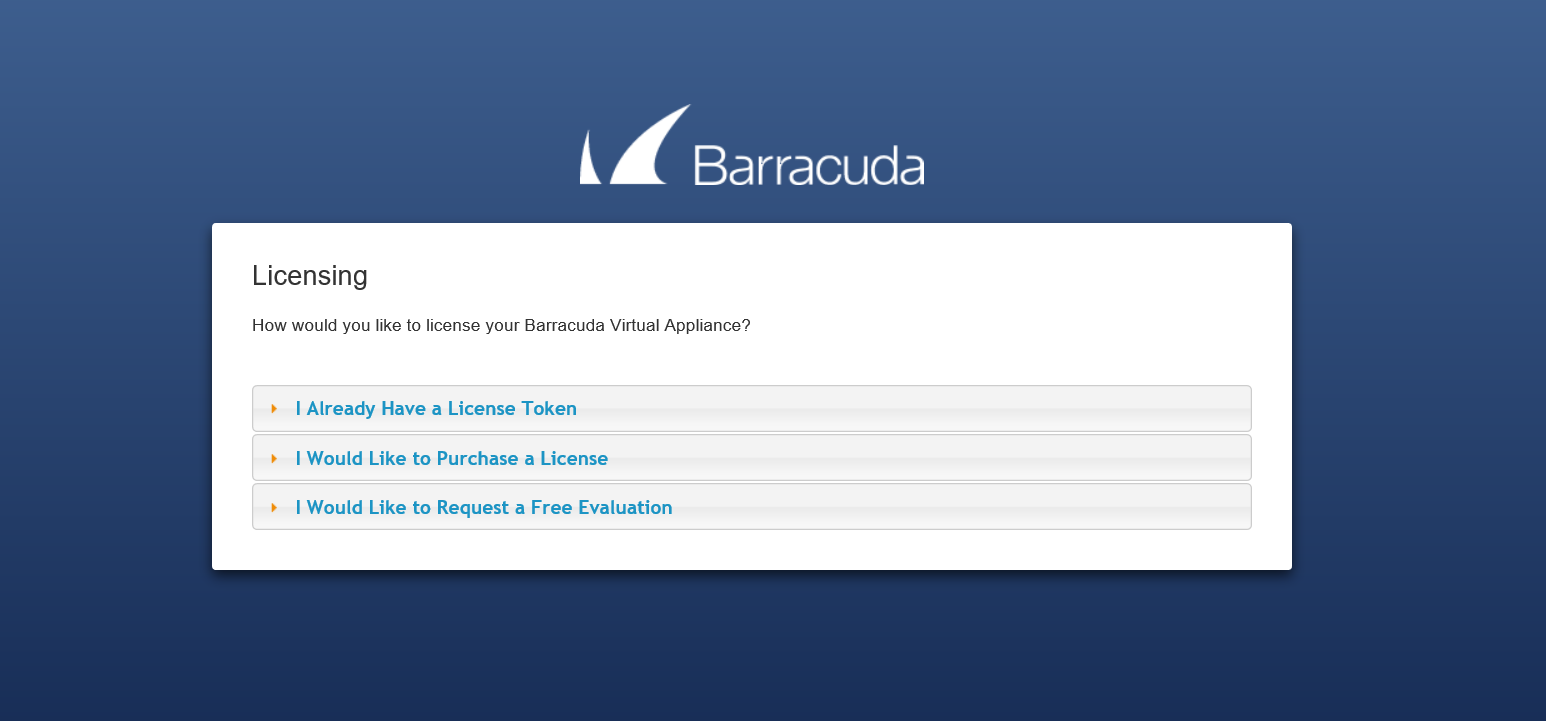
- Click the option to request a free trial and fill out the form, for now just use any domain name and Level 1. Click Evaluate just once. The VM will go into a configuration cycle, just let it do that and once it's finished the VM will reboot and the administration interface login will be displayed. If for some reason after 10 minutes the 'please wait' screen is still displayed just refresh the browser.
- While you are waiting on the above we need to go and find out the private IP address of the WordPress site. This is the address that the Barracuda device will forward traffic to, so go back to your Azure portal.
- Browse for your virtual machine and this time click the WordPress VM, name demo-wp-vm.
- In the settings blade click 'Network Interfaces' and note the private IP, it should be something like 10.1.1.x.
- Login to your Barracuda VM using admin and admin for username and password. Remember to change these once logged in.
- The Barrcuda WAF dashboard shows a list of the attacks that the appliance looks for, performance stats as well as a report on any attacks blocked.
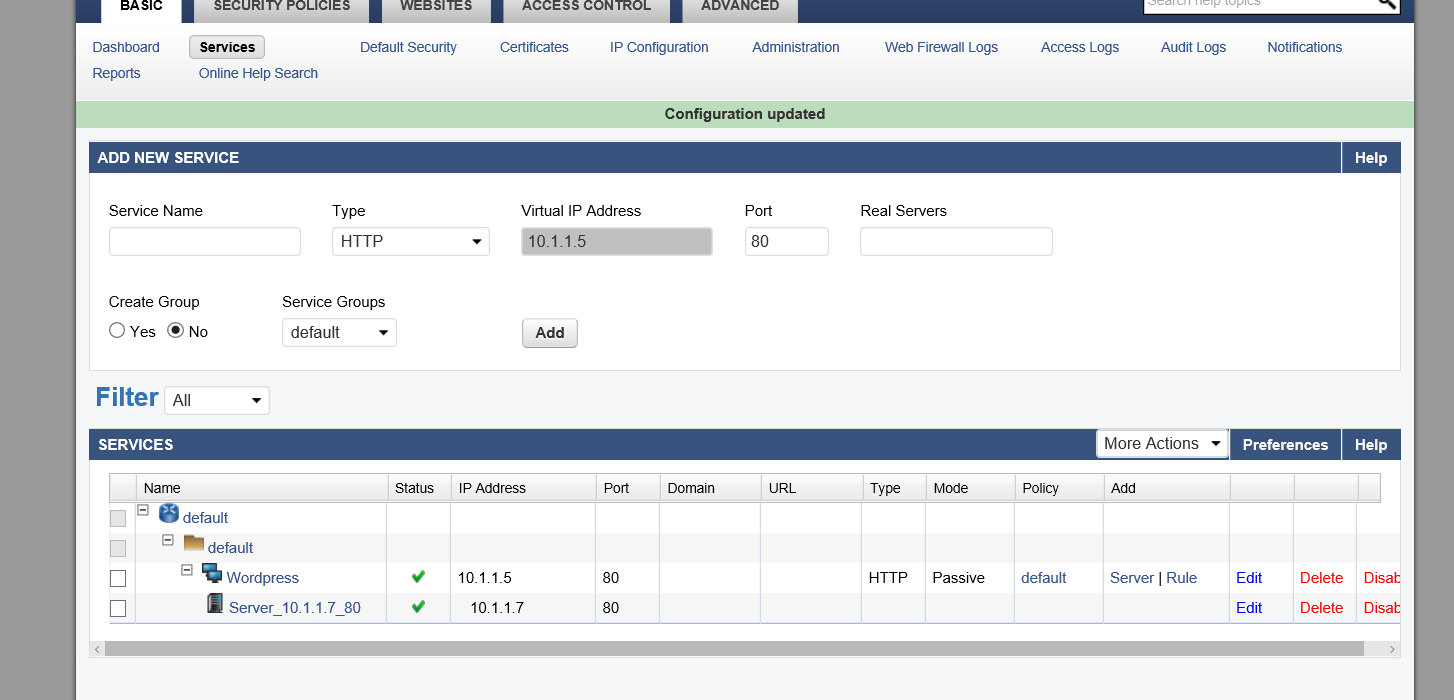
- We now need to add a service to the Barracuda firewall. Click the 'Services' link at the top of the Basic tab.

- In the Add New Service panel enter a name like 'Wordpress' and enter a real service IP address which is the private IP of the WordPress VM that you recorded earlier.
- Now click Add
- If this is successful you should see a service list with green ticks for status. You will now be able to navigate to port 80 on the Barracuda VM and traffic will be inspected and then forwarded to the WordPress VM
- In a new browser tab type https://publicipofbarracudavm and you should see the Wordpress setup interface.
Summary
What I have shown is a very simple example of how you should protect your data or customer data when deploying an application to Azure. The main idea is that we separate our application tiers and create a DMZ that is exposed to the internet. This Tier then monitors all public requests for any sort of intrusion and only forwards the request on to the WordPress site if no issue is found.
Some organisations will separate their tiers using Virtual Networks and will then deploy network intrusion detection into the networks to monitor cross VNet traffic. This is a good pattern if you are connecting your Azure VNet to a network outside of Azure or in another Azure region via a VPN or if you just want extra protection.
The solution we use in this tutorial is Barracuda but the Azure marketplace contains many more that you can review to see which is more appropriate.
As always, please ask questions or provide feedback in the comments below and follow me on Twitter for more information @niallermoran