Building the USB driver under the Micro Framework Version 3 Porting Kit
The version 3 Micro Framework Porting Kit includes a working USB sample driver for partners to support their USB-based development boards. In this first part of a two-part posting, we will step through the process of building a USB driver. We'll follow-up in a later note with a short recipe explaining how to sign the USB driver to pass the Vista 64-bit validation requirement.
There are roughly four steps to a building working driver from the sample in the V3 porting kit:
- Setup the environment.
- Build the driver.
- Customize the INF file, prepare an install package, and if appropriate apply a test-signature.
- Install the driver.
Setting up the Build Environment
Your first step is to create the build environment. The latest Windows Development Kit was released with Windows Server 2008 and since its initial release, the kit now has a service pack. You don't need the service pack for the USB build task. Download the kit from https://connect.microsoft.com/.
The Micro Framework team development team also uses the WDK and we actually use the same Connect public distribution for our Porting Kit testing. When installing the kit, the default location is, C:\WinDDK\6001.18001\. Since I traverse this path many times a day, I suggest a simpler path that I customize at WDK install time. I use: C:\apps\WDK for the development kit root.
Building the USB driver
Here are build steps for retail flavor Windows XP driver.
Open a command prompt.
C:\apps\WDK\bin\setenv.bat C:\apps\WDK FRE WXP
Upon success, there is an environment variable, BASEDIR = the root of the WDK. My BASEDIR=C:\apps\WDK. Please ignore the V3 setenv.CMD found in the USB_DRIVERS folder.
CD PK\USB_DRIVERS\MFUSB_PortingKitSample
Here, PK means the root folder of the porting kit. You'll notice that we don't need the environment settings in the porting kit to build the USB driver. I chose to build the "MFUSB_PortingKitSample" because it supports the most common case, that is, Micro Framework managed code deployment to a device and debug via the USB connection.
BUILD -C
The commands above build the sample USB driver for Windows XP FREE (retail) installation. If you want a driver for kernel-mode debug, use CHK instead of FRE. If you want Vista-64 bit support, use x64 instead of WXP. Most importantly, you cannot re-use a command shell to build a different flavor after the environment is assigned using WDK SETENV.BAT. It's a bit unforgiving. To get the full list of SETENV usage, run "apps\WDK\bin\setenv.bat /?" in a new command shell". And unless you are doing other tasks with the WDK (such as driver test-signing), we are done with the WDK command prompt.
Customizing the INF file
The next step is to customize the INF file. You must update the USB VID/PID values in the INF so that it matches the same values in the porting kit configuration. You'll need to customize the INF file , so I recommend that you make a backup copy. The modified INF file supports the driver for all OS platforms and will be replicated in the installation for each OS platform. You'll make two sets of changes to the INF. One set will update the vendor and product identification numbers (VID and PID) that match those found in the file:
PK\solutions\iMXS\DeviceCode\USB\USB_CONFIG.CPP
Where iMXS solution is used only as an example.
The #defines in the USB_CONFIG.cpp file are VENDOR_ID and PRODUCT_ID.
Update VID and PID in the USB_CONFIG.CPP.
Update VID and PID in the INF meaning use an editor to globally replace PID_0000 with PID_WXYZ and VID_ABCD where WXYZ and ABCD are hexadecimal digits.
The second customization is to update the descriptive string that describes the device driver. This string will appear in the OS installation wizard and the device manager.
Update the descriptive string in the INF file - Line 142 to match a description of your device.
Gather the files for installation
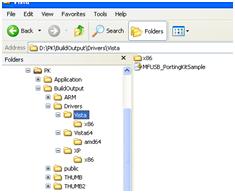
Gather the SYS and INF files using the following package layout pattern. I'll assume you have not modified the SYS folder path or name defined in the INF and that you are prepping a Windows XP x86 USB driver. Let's gather the materials under BUILDOUTPUT and then later, you can archive and distribute the driver package.
Open a command prompt.
CD C:\PortingKit
setenv_vs9.cmd
Run the setenv command only to get a %SPOCLIENT% environment variableCD %SPOCLIENT%\BUILDOUTPUT
MD Drivers
CD Drivers
MD XP Vista Vista64
Makes three directories ...Since this is an XP driver:
CD XP
MD X86
Copy %SPOCLIENT%\USB_DRIVERS\MFUSB_PortingKitSample\sys\objfre_wxp_x86\i386\MFUSB_PortingKitSample.sys X86\
Copy %SPOCLIENT%\USB_DRIVERS\MFUSB_PortingKitSample\INF\MFUSB_PortingKitSample.inf
Porting partners will want to support their USB drivers on at least XP, Vista and Vista64 platforms. You'll need to repeat the build and gather the materials in a layout as shown in the figure below. After installing, testing, and perhaps signing the driver (discussed later), you can package the DRIVERS folder contents for distribution.
Installing the USB driver
The driver is ready to install and the steps on XP are:
Open the device manager, (devmgmt.msc).
Open the USB device tree.
Attach the MF device.
If a Micro Framework USB driver is already installed, right click the device and select uninstall
If working on a Vista or later OS , the check the box on the uninstall dialog to remove driver.Now, rescan (right-click the root node).
A wizard appears and you are back to installing a driver.Select, "No, not this time" on the first wizard dialog, meaning don't search.
Select, "Install from a specific location".
Select, "Don't search".
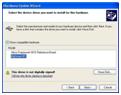
Select, "have disk" to browse, in the "Found New Hardware" dialog.
Browse to your install folder, (for example: ..\Drivers\XP) open the folder that matches your OS and then select the INF file.
In the depicted in the figure, the driver name that matches the description you customized in the INF file should appear. Double-click to install.
The installation should complete successfully.
The steps above are basic steps to installing, uninstalling and revising a USB driver. You'll want to use this when you and your customers refresh their Micro Framework drivers from version 2.5, when customers install drivers for the first time, or as I'll soon explain, replace the USB driver to support a Micro Framework device with enhanced USB capability. In the next blog posting, I'll complete the USB installation basics explaining end-to-end how to self-sign a test certificate used to validate 64-bit USB driver installation.
Jeff Simon
.Net Micro Framework
SDET - Porting Kit