HowTo: Create a Custom Action for an Office SharePoint Designer Workflow - Part 3
Ok, so if you've been following along up to this point in grand anticipation, this is going to be a happy time for you...we now get to test our custom action.
Step 1 – Create the Workflow
1. Open SPD to the site https://<yourmachineanddomain.com>/FleetCustomers by clicking File > Open Site.
2. Click on the root folder and then select File->New->Workflow.
3. Give the Workflow the name 'Fleet Customer" and attach it to the 'Fleet Customer Lib Request' document library. Make sure the workflow can be started manually.
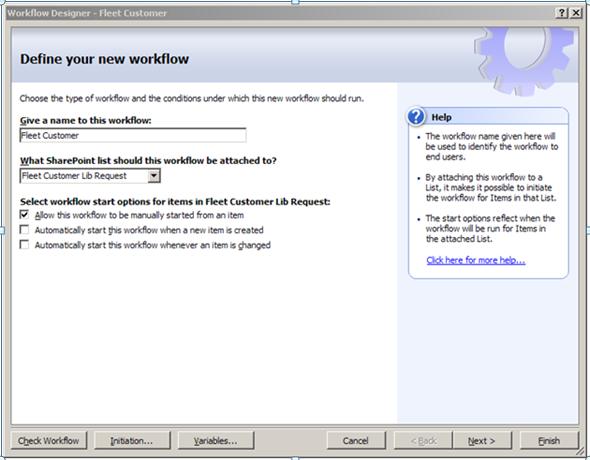
4. Click Next.
5. Name the Step ‘Create Doc Lib’ .
6. Select the Actions button and then select 'Create Fleet Document Library' .
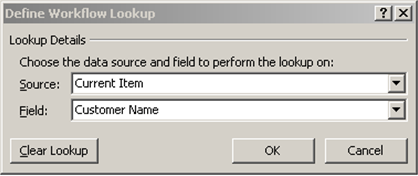
7. Click Name of the doclib and using the Function button, select Current Item and then ‘Customer Name'.
8. Click Link to site and type in a site name of https://<yourmachineanddomain.com>/FleetCustomers . (the /fleetcustomers sub-site is hard coded in the application)
Your Action should look like this:

9. Check the Workflow for Errors. Select Finish.
Step 2 – Testing the Workflow
1. Go back to the site https://<yourmachineanddomain.com>/FleetCustomers via Internet Explorer.
2. Click on Fleet Customer Lib Request in the Documents menu and create a new document. It does not matter at this point what the content of the Word document is or the name that you save it as. What is important is that you fill in the Customer Name and Title on the document properties ribbon bar.
This information will be used to create the new doc lib.
3. Put in a customer name of 'MyFleetCustomer' and a title of 'I want a new truck'.
4. Save the document to the Fleet Customer Lib Request document library.
5. Execute the Fleet Customer workflow against the new document by clicking the drop-down arrow adjacent to the document name and then selecting Workflows then Fleet Customer.
6. You will be prompted to start the workflow, select the Start button.
7. Go back to the root site.
8. Click on Tasks. You should see a new task that was created for the administrator to read.
9. Click on the Fleet Customers site menu item.
10. Click on View All Site Content. You should see the new MyFleetCustomer document library.
So there you have it! In this three part series, we have created a custom activity that represents our new action, created an .ACTIONS file that will be used by SharePoint to know what to display on the menu and which fields the action needs and, we've tested the workflow.
I hope you find this information useful. Let me know if you find anything wrong our have better suggestions on how to do something.