
Manually restoring the NAV 2013 Demo Database
With the release of Microsoft Dynamics NAV 2013, there are some new procedures for restoring the demo database manually. I have outlined the necessary steps below.
1) From within the Microsoft SQL Server Management Studio, restore the Microsoft Dynamics NAV 2013 demo database from the installation media (..\SQLDemoDatabase\CommonAppData\Microsoft\Microsoft Dynamics NAV\70\Database).
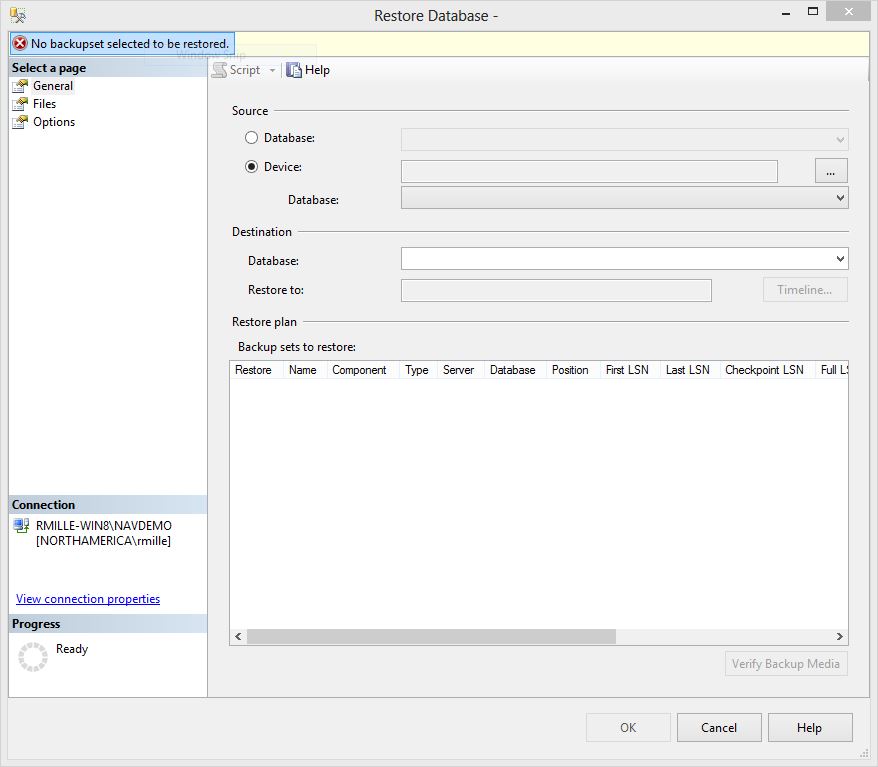
2) To restore the database from the Microsoft SQL Server Management Studio, open the Object Explorer and click on Databases. With Databases highlighted, right click and select Restore Database.

3) This will open up the Restore Database window. Select the Device option in the Source grouping.
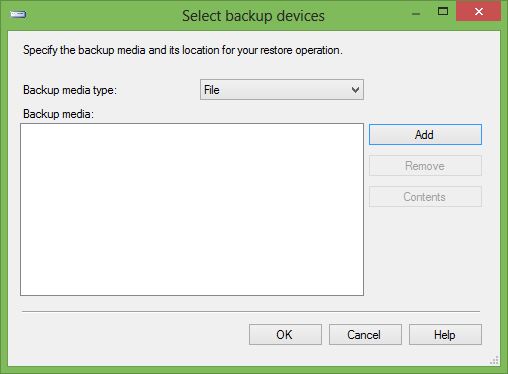
4) Now click on the assist edit button (![]() ) and this will launch the Select backup devices window.
) and this will launch the Select backup devices window.
5) Next, click on the Add button to launch the Locate Backup File window and select the demo database backup file.
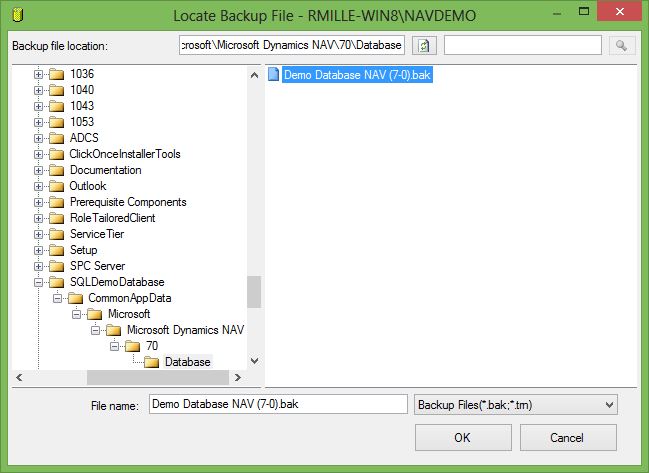
6) Once you have selected your file, click OK to exit the Locate Backup File window. Once you return to the Select backup devices window, click on OK again.
7) You should now be on the Restore Database – Demo Database NAV (7-0) window – unless you have changed the value of the Database field then the window title would differ. Make sure that the file listed in the Backup sets to restore section has a check mark next to it. If you want to change where the database files are created, you can specify this on the Files page. If you want to specify any Restore options this can be done on the Options page. For this blog, it is assume that you will take the default settings.
8) Click OK to restore the database.
9) After the restore finishes, go to the Object Explorer and expand the Databases object. The list of database objects should now have one named Demo Database NAV (7-0).
10) Next, expand the Demo Database NAV (7-0) object and select the Security\Schemas object. Expand this object and make sure the $ndo$listener schema doesn’t already exist. If you had already installed NAV 2009 on this SQL Server, then this schema may already exist. If it does, go to step 12. If it doesn’t, then right click on the Schemas object and select New Schema.
11) With the Schemas Properties window open, enter $ndo$navlistener in the Schema Name field.
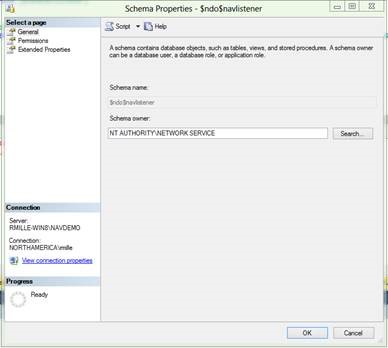
Note: You will not be able to state a schema owner until the next step. There are no values to fill in on either the Permissions or Extended Properties tabs.
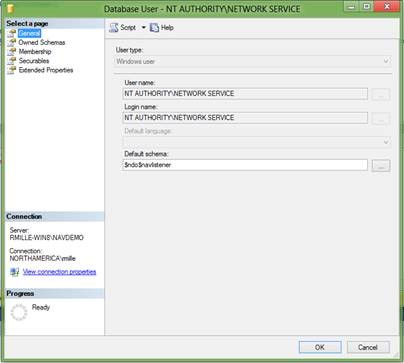
12) Create a user in the Demo Database NAV (7-0) named NT AUTHORITY\NETWORK SERVICE or whatever user that will be used to login the NAV Server Service.
13) Enter $ndo$listener in the Default schema field on the General page.
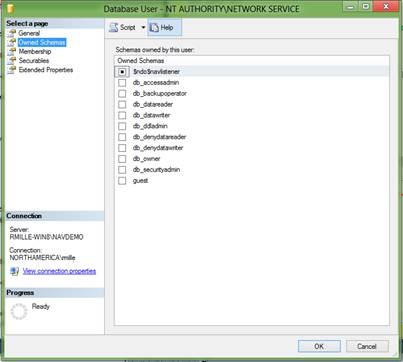
14) On the Owned Schema page, make sure the $ndo$listener is marked.
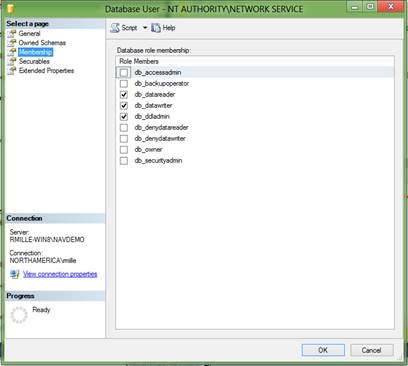
15) On the Membership page, make sure that the following Role Members are selected
-
db_datareader
-
db_datawriter
-
db_ddadmin
16) On the Securables or Extended Properties pages, there is no information to fill in.
17) The last step before starting your new NAV Server, locate your new database and right-click and select the Properties option. Select the Permissions Page. You should see NT AUTHORITY\NETWORK SERVICE or whatever user that will be used to login the NAV Server Service on the right side of the page.
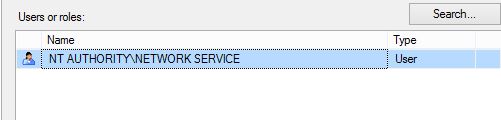
Below that you will see a tab for Explicit Permissions for NT AUTHORITY\NETWORK SERVICE or whatever user that will be used to login the NAV Server Service. Make sure that is a check in the following permissions
-
Connect
-
View database state
Once those are selected then click OK.
18) Use the Microsoft Dynamics NAV Administration tool to update the NAV Server settings with the new demo database name and restart the NAV Server.
NOTE: If you were to use the Microsoft Dynamics NAV 2013 Installer to install the demo database, it would have run a script that would have executed each of these steps for you.
Now, enjoy using Microsoft Dynamics NAV 2013!!!


