Best Practices For Using Azure Resource Manager Templates
Editor's note: The following post was written by Visual Studio and Development Technologies MVP Peter Groenewegen *Microsoft Azure MVP Pascal Naber as part of our Technical Tuesday series. Mia Chang of the Technical Committee served as the Technical Reviewer of this piece. *
This article focuses on best practices regarding the automated deployment of resources to Azure. We have implemented Continuous Deployment (CD) pipelines including the provisioning of Azure resources for many customers, and we would like to share our experience so you can benefit from it. These practices will help you create more reliable, testable, reusable, and maintainable templates.
Automate deployments to Azure
Azure Resource Manager templates (ARM templates) are the preferred way of automating the deployment of resources to Azure Resource Manager (AzureRM). ARM templates are JavaScript Object Notation (JSON) files. The resources that you want to deploy are declaratively described within JSON. An ARM template is idempotent, which means it can be executed as many times as you wish, and the result will be the same every time. Azure takes care of the execution and identifies the changes that need to be executed.
When provisioning infrastructure, we apply the same best practices as with deploying applications. This is also known as Infrastructure as Code. Applying CD enables you to develop your infrastructure in a repeatable and reusable way, and you can reuse your ARM templates over multiple teams by applying these practices. This allows you to use a dashboard to monitor the quality of the infrastructure provisioning.
To execute ARM templates in a CD pipeline, our preferred method uses Visual Studio Team Services (VSTS). The execution is being done by a VSTS task: “Azure Resource Group Deployment”.
Make a VSTS dashboard to monitor all your builds and releases, and this will give you a quick overview of the state of your environments and the quality of your templates. It is very useful to show your team and other stakeholders what you are doing.
[caption id="attachment_29345" align="alignnone" width="800"]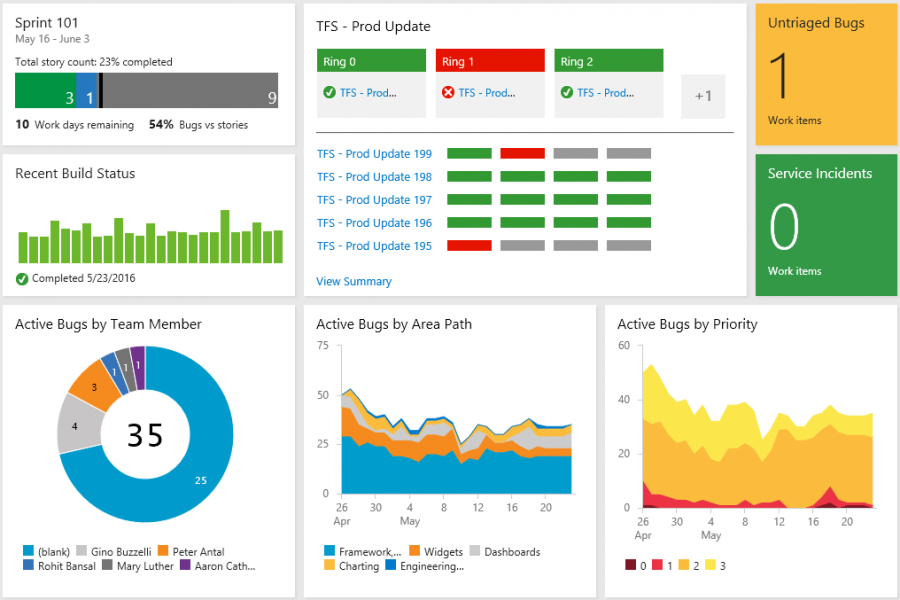 Figure 1: Sample VSTS dashboard with release monitoring[/caption]
Use linked ARM templates
When you create an ARM template for multiple resources, for instance for a whole project environment, ARM templates allow you to declare multiple Azure resources in one ARM template (Figure 2). For example you can create one big ARM template for a Storage Account, Azure SQL, Azure Web App and an Azure Redis Account. Although this is technically possible, we have learned from experience that it’s a good practice to declare each resource in its own separate ARM template. In effect, we apply the Single Responsibility Principle for Azure Resources in our Infrastructure as Code solution. In this sample, we would create one ARM template for the creation of a Storage Account, one ARM template for Azure SQL, one for the Azure Web App, and one for the Redis Account. But how can you glue the resources together so that the result is the whole project environment, and deploy it in one step? The answer is using Linked ARM templates.
[caption id="attachment_29365" align="alignnone" width="671"]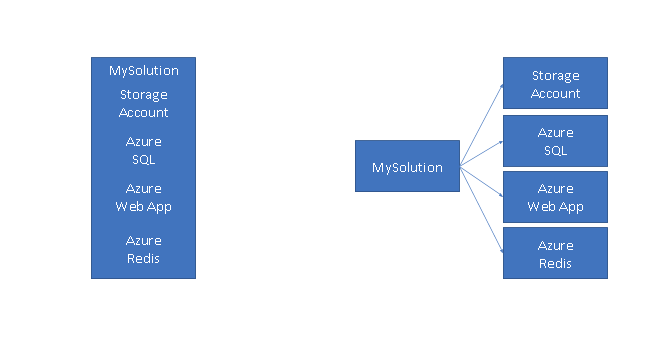 Figure 2: A single ARM template with all resources versus a Linked ARM template linking to separate ARM templates per resource type.[/caption]
Linked ARM templates enable you to link from one template to another template. Linking templates enables you to decompose your templates into purpose-specific reusable parts. These parts are more readable, testable and reusable then when you would copy them to other deployment templates. The main template links to multiple sub-templates, which can be another composition of sub-templates or actual resource templates themselves. The composition of the resources hides the implementation details of the underlying resources by only exposing an interface by means of the parameters that can be changed in the customer environment.
An example of a linked template:
 "resources": [
  {
      "apiVersion": "2017-05-10",
      "name": "linkedTemplate",
      "type": "Microsoft.Resources/deployments",
      "properties": {
        "mode": "incremental",
        "templateLink": {
          "uri": "https://www.contoso.com/AzureTemplates/myLinkedTemplate.json",
          "contentVersion": "1.0.0.0"
        },
        "parameters": {
          "myparameter":{"value": "myparametervalue"}
        }
      }
  }
]
The provisioning of a resource group normally has multiple high-level resources and their sub-resources (Figure 3). In practice, you’ll get a main template which references multiple composed templates. These composed templates reference lower level composed templates or the actual resource templates that create resources. In most cases, at the leaf level of this tree hierarchy, a template only contains one resource. These leaves are easy to test by themselves and they are reusable in multiple compositions.
Note on the usage of linked templates: The http or https address in the templateLink property has to be accessible for the Resource Manager service to execute the ARM template. When you make use of a publicly available web address, this is easy.
But if you don’t want to make your underlying ARM templates available for everyone, it’s easy to store the ARM templates in a private container in Azure Storage and access the ARM templates with a SAS token. Check out Pascal's blog titled 'VSTS task to create a SAS token' here.
[caption id="attachment_29385" align="alignnone" width="800"]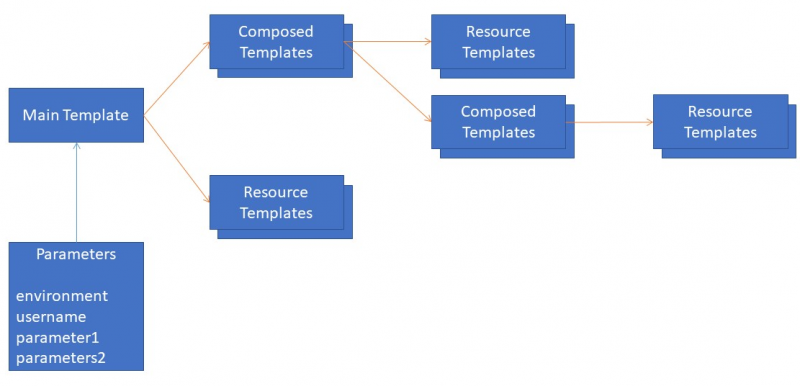 Figure 3: Breakdown of linked ARM templates[/caption]
Apply T-Shirt sizes
T-Shirt sizes are named configurations which have proven to be working. The name encapsulates the underlying sizing of the Azure Resources. The consumer of the ARM template can only choose known working configurations. This will also prevent configuration errors and it saves time when creating new templates.
In case you are provisioning Virtual Machines (VM), the ARM templates can offer a wide range of possibilities in configuration combinations. All input parameters of the Virtual Machine (VM) template can be exposed. Now you could create combinations of resources that are not supported by AzureRM. For example, a DS VM with Standard storage is not allowed.
A good way to manage different sizes of resources, which also minimizes the various configuration types, is using known configurations, also called T-Shirt sizing (source). For example, a T-Shirt size is an abstraction, like a Small, Medium or Large version of a VM (see more information here). The sizing hides the underlying real sizes of the created resources. For example, a Small T-Shirt size would deploy a combination of small resources of the underlying templates. You can test the various T-Shirt sizes, which prevents creating combinations that are not working. This also takes away the complexity of the underlying resource combination from the consumer of the template.
Test every template and automate it
Testing your templates helps you to maintain your quality. Testing the ARM template is done by executing the ARM template. This is the smallest possible unit that can be provisioned. It also provides samples for the consumers of your templates. Create at least one test deployment for each ARM template you have. Run the tests on each new version to see whether the ARM templates are working. The smaller the tests, the more specific and faster it is to nail a specific issue, e.g. typos and misconfigurations. This will save you time in the long run.
Use output parameters
When you want to use the connection string of the Azure SQL database in the Azure Web App, you need to use an output parameter in the ARM template of the Azure SQL resource. This output parameter contains the connection string, which is an input parameter in the Azure Web App. The Linked ARM template glues the output of the Azure SQL template together with the input of the Azure Web App.
This will make the templates less prone to errors. When you change something in the Azure SQL Template, all depending templates will get the new value because they reference the output parameters of the first template.
Another benefit is that the order of execution is automatically recognized by AzureRM, based on these output parameters. Templates which are set up like this don’t need a dependsOn property to specify dependencies. This way you don’t have to interpret the sequence of execution of ARM templates yourself. We consider the usage of dependsOn an anti-pattern in a linked ARM template .
Output parameter:
 …
"outputs": {
    "myResourceName" : {
        "type" : "string",
        "value": "[reference(resourceTemplate).name)]"
    }
}
Usage of output parameter:
         "parameters": {
          "myparameter":{"value": "reference('myResourceWithOutput').outputs.myResourceName.value"}
        }
Make a naming convention template
The first discussion that always comes up during a workshop on applying CD to Azure resources is the naming convention for these resources. After finding out how you want to name resources, you have multiple possibilities. When you pass the whole name of the resource that needs to be created using a parameter file, you’ll find yourself creating duplicate code because the largest part of the name is defined by a standard pattern. Another way is to apply a naming convention, in which case you only need to pass parts of the name. For example, the ARM template of Azure SQL generates the resource name based on the input parameters and pattern. But each resource has a slightly different name, which means that each ARM resource contains this pattern. It often happens that the naming convention changes. In both cases you must change either all your ARM templates or all your ARM parameter templates.
To apply the Single Responsibility pattern and to prevent duplicate code, we apply a naming convention template. We make use of the fact that ARM templates don’t always have to create resources, but can do other things as well. In the naming convention template, no resources are declared. It does make use of input parameters and the name of the resource is returned as an output parameter.
 {
  "$schema": "https://schema.management.azure.com/schemas/2015-01-01/deploymentTemplate.json#",
  "contentVersion": "1.0.0.0",
  "parameters":{
    "shortDescription":{
        "type":"string",
        "maxLength":2
    },
    "shortEnviroment":{
        "type":"string",
        "maxLength":1
    },
    "location":{
        "type":"string",
        "maxLength":2
    }
  },
  "variables":{    "nameconvention":"[concat('myname',parameters('shortDescription'),parameters('shortEnviroment'),parameters('location'))]"
  },
  "resources":[
    ],
    "outputs":{
      "name" : {
        "type" : "string",
        "value": "[variables('nameconvention')]"
      }
    }
 }
[caption id="attachment_29395" align="alignnone" width="800"]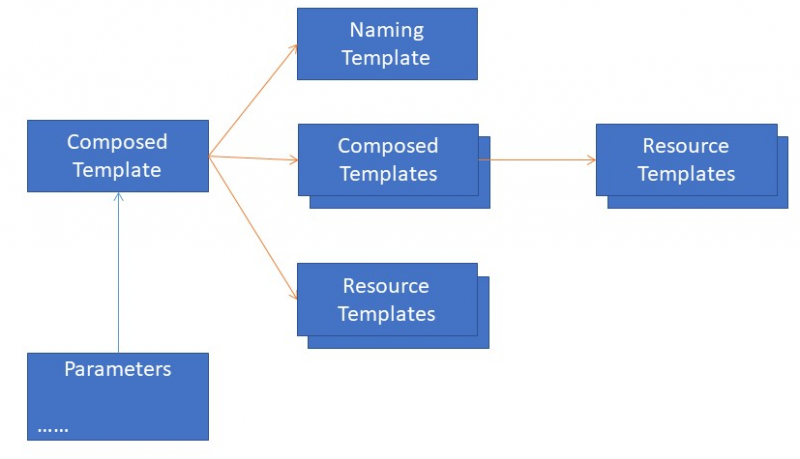 Figure 4: Using a named template in a composed template[/caption]
Minimize the number of parameters
When using linked templates, make the number of parameters the smallest set possible. Do this by only parameterizing the variables that are different over your environments. This way you keep the input of your templates small and changes that can cause misconfiguration become less likely.
Don’t misuse the default value for parameters
Don’t set default values for required input parameters or parameters that need to differ over environments. We often see the misuse of default values. The default value is chosen for a single deployment to a single environment without thinking about future deployments. If you want to pass a value, you must use a parameter file.
One deployment per resource group
Another question that comes up very often is how to apply a logical division of resources over resource groups. Technically it is possible to deploy all resources to a single resource group. In practice, it is handy to provision resources with the same lifecycle grouped into the same resource group. Many side services of your application have a different lifecycle from the application itself, for example the data, logging, authentication, networking, etcetera. When you remove your application from Azure, these side services will still exist. You can find these services in the Azure Portal or query them with the Azure tooling you are using (PowerShell/CLI). An ARM template is executed on a single resource group by default and this is also considered a best practice. An application can be deployed to multiple resource groups. Each resource group has its own ARM template with resources. Manage your resource group based on the lifecycle of the resources in that resource group.
Keep secrets out of your deployment parameters
There are multiple ways to keep your secrets out of your deployment parameters so developers do not have to know or see the secrets. If you are using parameters for secrets that can be provided by Azure resources, then use output parameters to ‘stream’ the secret directly to the resource that needs it. For example, if you are using an Azure SQL connection string as a parameter in your current deployment, you can get the connection string directly from the Azure SQL Database by using an output parameter.
If you have other secrets, such as ssh keys, disk encryption keys, passwords, etcetera, you have the possibility of using variables in VSTS and mark them as secret. For Azure WebApp web settings, you can use a VSTS task Azure Web App Configuration to apply (secret) variables to your WebApp, or for other resources provide the secrets by using the Azure Key Vault. The person who is responsible for creating the templates does not have to know secrets in the provisioned environment, for example by putting the sensitive data into the Key Vault. If you grant your deployment pipeline access to the Key Vault, the developers don’t have to know the secrets in the Key Vault. Read how you can apply the Key Vault to your deployments here.
Use a complete deployment mode as much as possible
When deploying resources to a resource group, complete deployments will guarantee that your resources in the resource group are the same as in your source control.
When you manage your resources in AzureRM with ARM templates, you have three options for execution:
- Validate
- Incremental (default)
- Complete (advised)
Validate means that the AzureRM validates the template. This can be useful to see whether a change in a template or variable passes the basic validation. The template is compiled, but not applied on Azure. This can be done as a first step in a provisioning pipeline. After validation, you know that the syntax is correct, simply because it compiles. It can still fail when you execute the template, however you have checked the schema and syntax before execution of the template.
Incremental is the default mode. It only deploys the new resources in the ARM template. No resources are removed. So, if you have renamed an SQL Server database, the database you created earlier will still exist after applying the ARM template with the new database.
Complete executes the template and applies the template idempotently. When finished, only resources that are defined in the template are in the resource group. This way your AzureRM resources are managed from your template alone. If you remove a resource from the template, it will also remove that resource from AzureRM. For example, when removing Network Security Groups or Firewall rules from a template, the resources will be removed when you execute the template. All resource management is done from the ARM templates (Infrastructure as Code). The best practice is to deploy your ARM templates in Complete mode.
All ARM templates should be able to be executed idempotently, but unfortunately, not all ARM templates can be executed idempotently. This is considered a bug. You can check whether there is a newer version of the API in which this has been fixed. If the ARM template is not idempotent and you configure your deployment as Complete, the provisioning can fail. In this case, mark the deployment as Incremental and isolate the incremental part.
Idempotent:
The execution of an ARM template is an idempotent operation. The execution of the same template should result in the same result each time. Only the required changes are applied to AzureRM. When building and executing ARM templates this property should be used in your advantage.
Conclusion
When you have embraced Azure for your applications, you should have a CD pipeline to take full advantage of the cloud. This CD pipeline should also contain the provisioning of the Azure resources you are using. Microsoft makes it possible to provision resources with ARM templates, but you have to spend time to create these ARM templates. Provisioning AzureRM with ARM templates will result in a more maintainable and reusable way of managing the resources. The best practices in this article have a learning curve, however, in the end you will be able to manage your resources more reliably and in less time. Setting up deployment pipelines for the resources, also known as Infrastructure as Code, is an investment you will benefit from in the long run. The result is that you’ll never have to access the Azure portal to add or change resources anymore and you are fully in control over what is deployed in your Azure Resource Manager environment from source control. For sample ARM templates, see the Enterprise Application Template gallery on Github.
Additional tricks and tips
Assign tags
Tagging will help you with organizing your resources. A tag adds a custom property to a resource that can be queried later. Some samples of tags that can help you:
- Billing (Cost Center tag)
- Which department
- Environment
Assign policies
Policies can help you with establishing conventions for resource deployments. A resource deployment that does not follow the conventions will be rejected. Some building policies are:
- Allowed locations
- Allowed resource types
- Allowed storage account SKUs
- Allowed virtual machine SKUs
- Apply tag and default value
- Enforce tag and value
- Resource types that are not allowed
- Require SQL Server version 12.0
- Require storage account encryption
What are resource policies? Read an overview here.
Prevent accidental deletion of resources
Locks help you prevent users or templates deleting resources by accident. If you have crucial resources in your deployment that should not be deleted, a lock prevents accidental deleting. A lock can only be removed from the portal or PowerShell.
Check out Peter's blog on how to lock Azure resources here.

Peter Groenewegen has been programming computers since he was six. Currently, he focusses on implementing cloud strategies on Microsoft Azure, Software Architecture, DevOps and Application Lifecycle Management. He works as an Azure Cloud Consultant at Xpirit, where he helps clients hands-on with their Cloud implementations. Peter is active on Stackoverflow (https://stackoverflow.com/users/707458/peter), writes blogs (https://pgroene.wordpress.com) and speaks at conferences. Follow him on Twitter @pgroene.
 Pascal Naber helps companies embrace Microsoft Azure and build large scale distributed systems with modern architectures based on microservices. Pascal works as an Azure Cloud Consultant at Xpirit. He is the co-founder of the Dutch Azure Meetup and is awarded by Microsoft with the MVP award for Microsoft Azure. In his spare time he enjoys killing monoliths, just for fun. Follow him on Twitter @pascalnaber.