Integrating Azure Security Center Into Your Workday
Editor's note: The following post was written by Cloud and Datacenter ManagementMVP Timothy Warneras part of our Technical Tuesday series. Daron Yondemof the MVP Award Blog Technical Committee served as the technical reviewer for this piece.
Hey, I get it. You are a busy Azure administrator. Your company is moving more and more of its workloads into the Microsoft Azure public cloud, and you wonder if your already packed daily schedule can stand any more pressure.
The bad news is that security threats to your Azure infrastructure are ever-present and never going away. The good news is you have Azure Security Center (ASC) to give you a significant helping hand. By the end of this article you will work in concert with ASC to prevent, detect, and respond to security threats in your Azure subscriptions. Let's get started!
What is Azure Security Center?
Azure Security Center is what I call an "intelligence engine" that provides real-time monitoring, analytics, and reporting on the following Azure resources:
- Virtual machines
- Virtual networks
- Azure SQL
- Azure Web Apps deploying into App Service Environments (ASEs)
I say "intelligence engine" because ASC leverages Azure machine learning to interpret the enormous data corpus Microsoft receives from its customers and partners, and applies that threat intelligence to your Azure resources.
"How much does it cost?" you wonder. I show you the pricing tier tiles from the Azure portal in Figure 1.
[caption id="attachment_25335" align="alignnone" width="552"]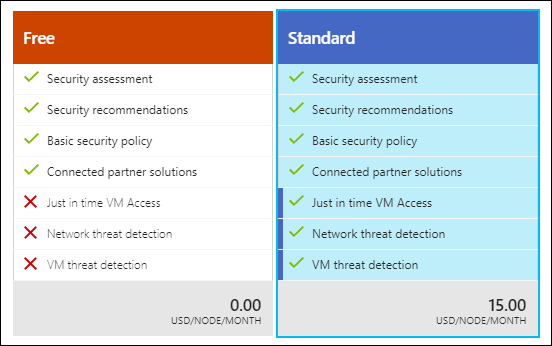 Figure 1. Azure Security Center pricing tiers[/caption]
The Free tier gives you basic security recommendations. The Standard tier, priced per node per month, gives you alerts (what Microsoft calls "threat detection") and Just in Time (JIT) VM access, which I'll go into a little later.
Onboard Your Virtual Machines
Your first task is to make sure that Azure is collecting data from your virtual machines. Pop open the Azure portal, open Azure Security Center, and navigate to the Security policy setting.
You enable data collection at the subscription level, but you can override settings at the resource group level if necessary. Figure 2 shows you the relevant journey:
[caption id="attachment_25355" align="alignnone" width="900"]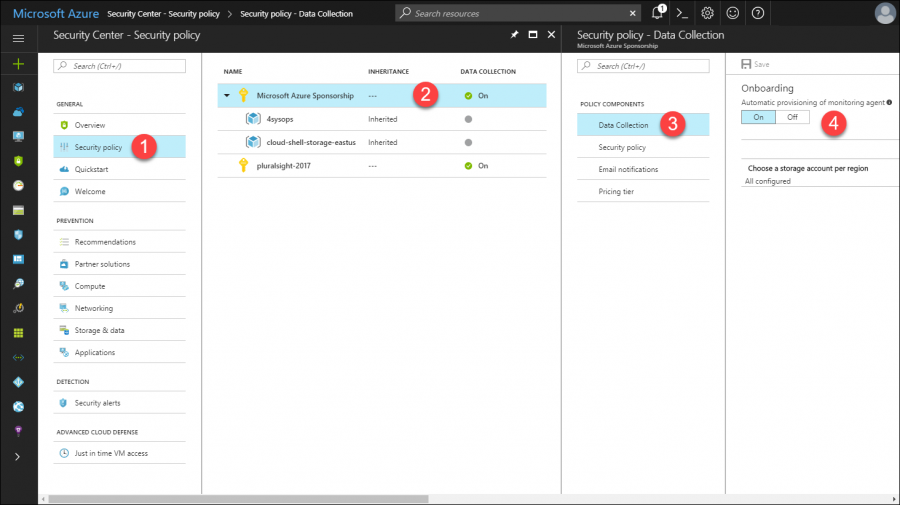 Figure 2. Enable data collection for virtual machines in Azure[/caption]
Perform the following two actions to enable Azure Security Center data collection:
- Allow Azure to deploy the Microsoft Monitoring Agent (the same software used in Operations Management Suite [OMS] and System Center Operations Manager) to your VMs
- Choose an Azure storage account for ASC to store its monitoring data
A security policy has other crucial metadata. For example, the Security policy setting gives you the ability to customize the ASC recommendations list. If you turn this setting "up to 11" (if you don't mind the Spinal Tap reference), Azure will present recommendations for the following subsystems:
- System updates
- OS vulnerabilities
- Endpoint protection
- Disk encryption
- Network security groups (NSGs)
- Web application firewall
- Next-generation firewall
- Vulnerability assessment
- Storage encryption
- JIT Network Access
- SQL auditing and threat detection
- SQL encryption
Note that some of the aforementioned recommendations only apply to the ASC Standard pricing tier.
The Email notifications setting is important to save you from having to remember to check ASC every day for new notifications. Azure can send you recommendations and alerts either by email or by text message. The Pricing tier blade is where you select your ASC service level.
Cool! Believe it or not, that's it. Once you have your security policy defined, you can sit back and let Azure Security Center work its magic.
Respond to Recommendations
As you can see in Figure 3, the Azure Security Center dashboard can be overwhelming at first. Let me break it down for you into its requisite sections.
[caption id="attachment_25356" align="alignnone" width="900"]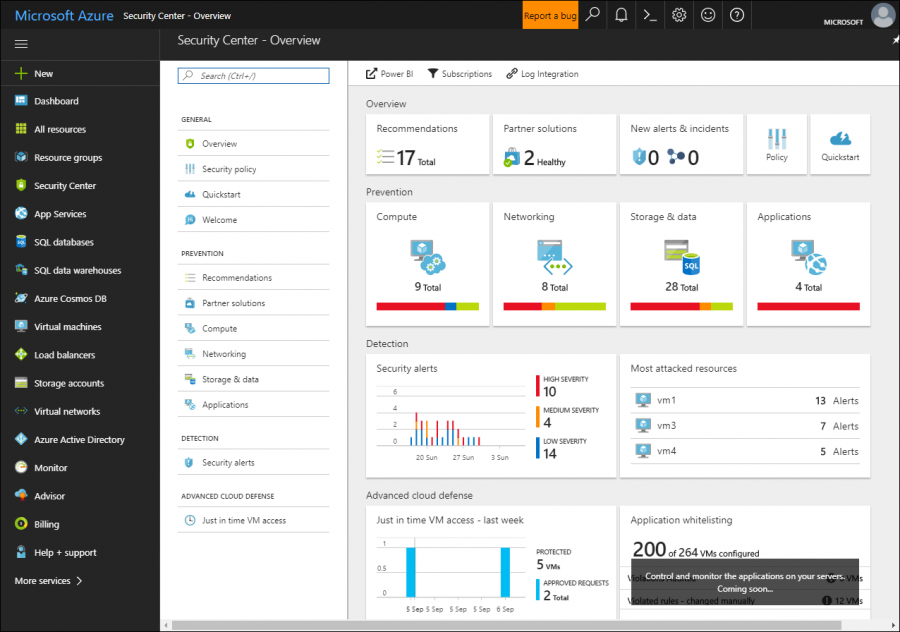 Figure 3. Azure Security Center dashboard[/caption]
- Overview: Recommendations and connected third-party partner solutions
- Prevention: Recommendations by subsystem (compute, networking, storage, applications)
- Detection: Security alerts (high-, medium-, and low-severity) and most attacked resources
- Advanced cloud defense: Just in Time (JIT) VM access requests over the past week
Let's navigate to the Recommendations blade and review our recommendations. Take a look at Figure 4 - Azure Security Center told me I am missing Microsoft Endpoint Protection on four of my virtual machines.
[caption id="attachment_25365" align="alignnone" width="900"]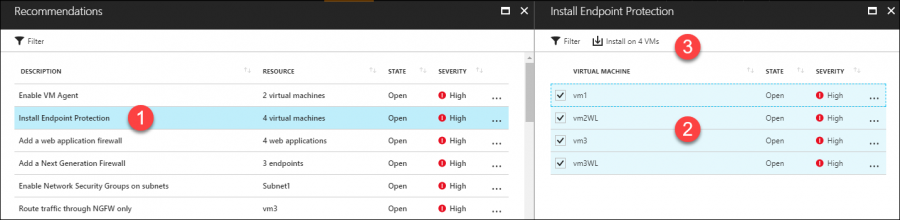 Figure 4. ASC recommendations and remediation[/caption]
Here's the kicker: Examine the toolbar in the Install Endpoint Protection blade and check out the Install on 4 VMs button. ASC doesn't stop at detecting security issues, but provides remediation guidance, including tasks that you can undertake from within ASC!
Another recommendation may involve ASC suggesting that you deploy a next-generation firewall to one of my virtual networks. Figure 5 shows what happens if you decide to act on the recommendation:
[caption id="attachment_25375" align="alignnone" width="576"]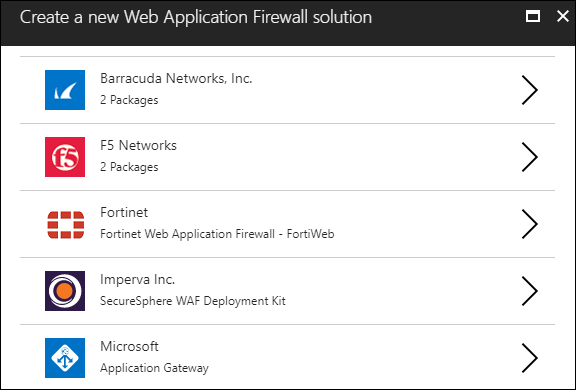 Figure 5. Third-party solution providers are included in ASC recommendations[/caption]
Microsoft partners with several third-party vendors to integrate their virtual appliances and security software into ASC recommendation. It's a great value-add.
Respond to Alerts
Security recommendations represent information security best practices. By contrast, alerts (part of the Standard ASC pricing tier) represent more "clear and present" danger to your Azure resources.
Check out Figure 6, which shows the contents of my Security alerts ASC blade. You can see a histogram depicting alerts raised over the past week, and a table that you can quick-sort by clicking a column heading.
[caption id="attachment_25385" align="alignnone" width="900"]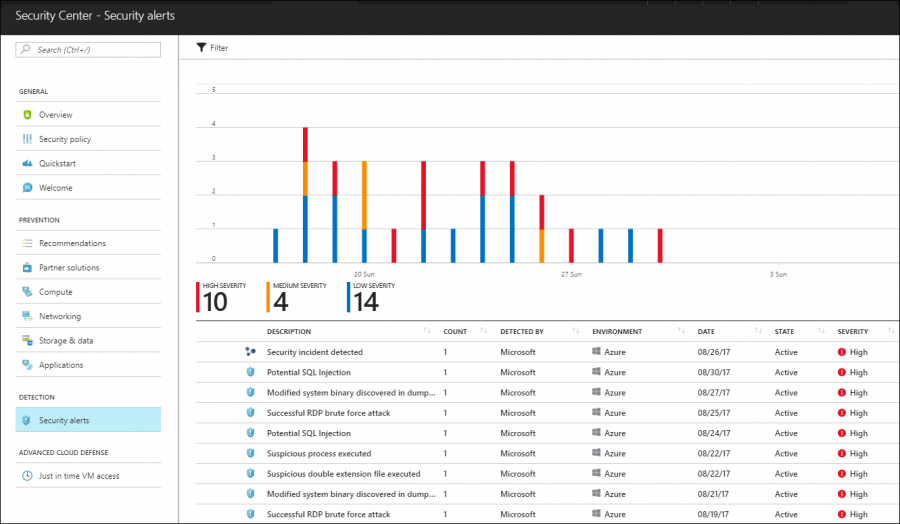 Figure 6. ASC security alerts[/caption]
You will see two types of alerts. Individual alerts, indicated by the shield icon, and incidents, indicated by the graph icon. Once again, Azure Security Center not only provides robust reporting on individual alerts, but also gives you step-by-step remediation guidance.
Figure 7 shows you the summary screen for a scary Successful RDP brute force attack security alert.
[caption id="attachment_25395" align="alignnone" width="300"] Figure 7. Security alert guidance[/caption]
Individual alerts are fine, but due to their standalone nature they fail to tell the "story" behind an attack. That's why ASC security incidents exist. Azure Security Center employs its machine learning power to correlate related alerts.
For example, by inspecting the Alerts included in this incident table in Figure 8, we can hypothesize what happened on vm1:
[caption id="attachment_25405" align="alignnone" width="807"]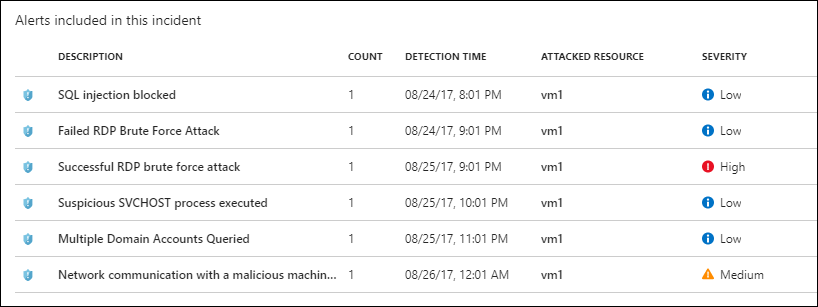 Figure 8. ASC security incident details[/caption]
- The attacker began his or her attack with a SQL injection, which Azure blocked.
- After several failed Remote Desktop Protocol (RDP) brute force attempts, the attacker successfully breached VM1.
- The attacker launched a suspicious process, which enumerated Active Directory domain accounts.
- Ultimately, the malicious process "phoned home" to a known malicious Internet-based server
Powerful intelligence, right? This is a case where Just-in-Time (JIT) VM access comes in handy. Thus, let's wrap up by examining that feature.
Just-in-Time VM Access
JIT VM access answers the question "How can I leave my VM running in Azure, but block all incoming connections except ones I explicitly allow on a per-session basis?" Let's face it - network security groups (NSGs), Azure load balancers, and Network Address Translation (NAT) have their place. However, in this context the door remains ever-so-slightly ajar for attackers who want to breach your virtual machines running in Azure.
In Azure Security Center, open the Just in time VM access blade and we'll learn by doing. Figure 9 shows you how I set up my mem1 virtual machine.
[caption id="attachment_25406" align="alignnone" width="807"]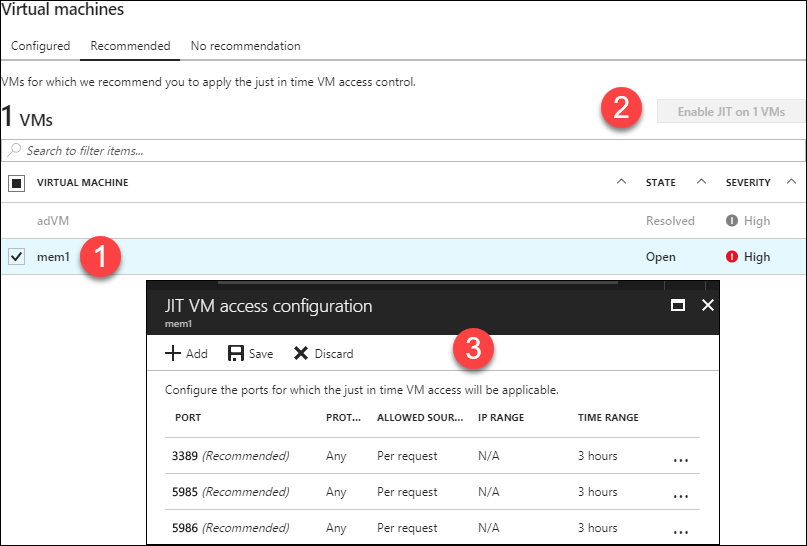 Figure 9. JIT VM access[/caption]
Enabling JIT VM access involves setting two properties for each VM:
- Which connection ports you want to open (in my example, I open the RDP and WS-Man PowerShell remoting ports)
- How long you want to open access per request (the default is 3 hours)
After you enable JIT VM access, you need to remember to request access before attempting a connection. To do this, click the Just in time VM access tile in Azure Security Center, select the target VM under Virtual machines, and then click Request access.
You then see the Request access blade, shown in Figure 10. Here you can customize the JIT VM access properties for the current request, including access duration and opened ports.
[caption id="attachment_25416" align="alignnone" width="800"]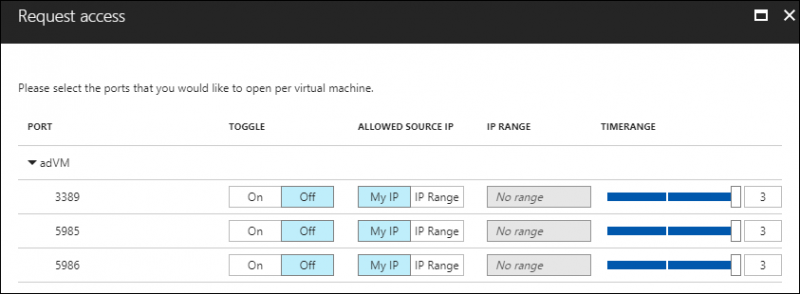 Figure 10. Customizing JIT VM access session properties[/caption]
Conclusion
There you have it! I hope you learned a lot and are now much more confident in using Azure Security Center. As is my habit as your teacher, I will leave you with hand-selected documentation resources to give you another leg up on your learning curve. Take care!
 Timothy Warner is a Microsoft Most Valuable Professional (MVP) in Cloud and Datacenter Management who is based in Nashville, TN. His professional specialties include Microsoft Azure, cross-platform PowerShell, and all things Windows Server-related. You can reach Tim via Twitter @TechTrainerTim, LinkedIn or his personal website, techtrainertim.com.