Getting Started With Microsoft Azure PowerShell
Editor's note: The following post was written by Cloud and Datacenter Management MVP Timothy Warner as part of our Technical Tuesday series. Daron Yondem of the MVP Award Blog Technical Committee served as the technical reviewer for this piece.
Azure Resource Manager (ARM) is an enormous collection of services, all of which are undergirded by a consistent Representational State Transfer (REST) application programming interface (API).
You can access the ARM API in a number of different ways, including:
- Azure Portal
- Azure Command Line Interface (CLI) v2.0
- Azure software development kits (SDKs)
- Azure command-line tools (AzCopy.exe, AzureStorageEmulator.exe, and so on)
As you would logically expect, the ARM PowerShell cmdlets give Azure administrators and developers a familiar control surface over all Azure services. Today you'll learn how to install and use the Azure PowerShell commands quickly and easily. Let's get started!
NOTE: Azure has two fundamental APIs: ARM and Azure Service Management (ASM), which is also called the "Classic" deployment model. This article focuses exclusively on ARM because Classic deployment and its associated Azure PowerShell Service Management module are in maintenance mode and should not be used for new deployments except when absolutely necessary.
Install Azure PowerShell
As is the case with any procedure in Windows, a number of methods exist for installing Azure PowerShell. If you're not already proficient with PowerShell, then it might make sense to visit the Azure SDKs and Tools web page and download the Web Platform Installer (WebPI).
As you can see in Figure 1, the WebPI allows you to browse across a number of Microsoft product families to download components you need. In this case, we want the Microsoft Azure PowerShell entry.
[caption id="attachment_24946" align="alignnone" width="895"]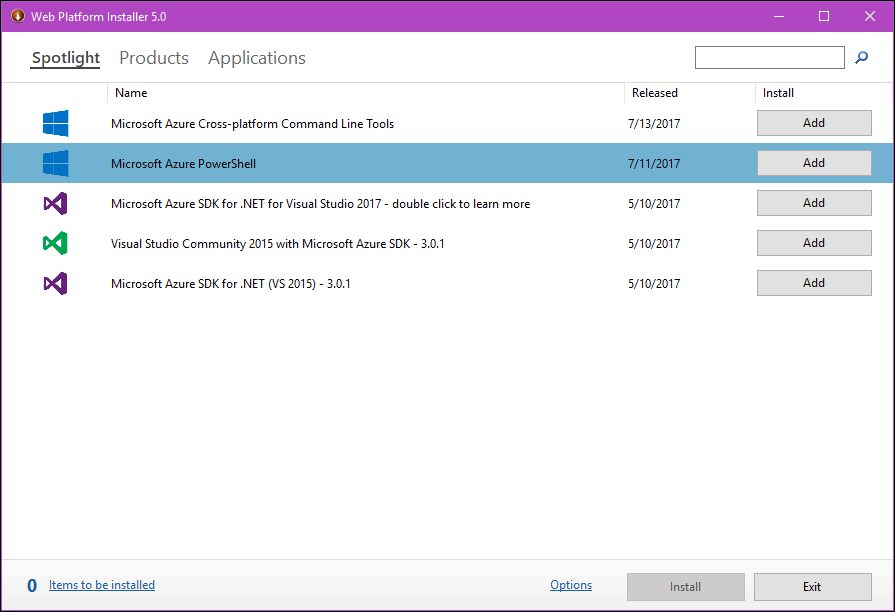 Figure 1: Web Platform Installer[/caption]
Here are two tips to keep in mind in regard to installing and updating the Azure PowerShell modules via the WebPI:
- The relevant Azure product groups release new Azure PowerShell versions regularly (approximately every month).
- To update your Azure PowerShell modules, simply re-run the WebPI to check whether a new release is listed.
As evidence of that first bullet point, look at the Azure PowerShell releases for 2017 thus far:
Find-Module - Name AzureRM - AllVersions | Select-Object - Property Version, Name, PublishedDate
 4.2.0          AzureRM      7/11/2017 4:49:01 PM

4.1.0          AzureRM      6/8/2017 4:43:51 PM

4.0.2          AzureRM      5/24/2017 4:50:56 PM

4.0.1          AzureRM      5/13/2017 1:34:28 AM

4.0.0          AzureRM      5/10/2017 4:38:25 PM

3.8.0          AzureRM      4/5/2017 4:42:56 PM

3.7.0          AzureRM      3/9/2017 10:16:18 PM

3.6.0          AzureRM      2/22/2017 5:23:05 PM

3.5.0          AzureRM      2/8/2017 6:05:14 PM

3.4.0          AzureRM      1/18/2017 5:23:38 PM
If you are already proficient with PowerShell, then you can use the PowerShellGet module and the PowerShell Gallery to download the AzureRM modules. How do you know if you have PowerShellGet? Here's how:
- Windows 10 and Windows Server 2016 already run Windows Management Framework (WMF) 5.x, so no further action is necessary.
- Windows 8.1 and Windows Server 2012 R2 systems can be updated to WMF 5.
- Systems running PowerShell v3 or v4 can still use PowerShellGet via the PackageManagement modules.
Open up an elevated PowerShell console and temporarily relax your script execution policy:
Set-ExecutionPolicy -ExecutionPolicy Bypass -Scope Process -Force
We can then leverage the PowerShell pipeline to (a) discover and (b) install the AzureRM module from the PowerShell Gallery.
Find-Module -Name AzureRM | Install-Module -Verbose -Force
A couple points I want to make about the previous pipeline:
- AzureRM is actually a "bootstrapper" module that orchestrates the installation of the entire ARM module suite. The Azure product groups made the wise decision in ARM to separate the modules by function.
- Use the -Force switch parameter to upgrade existing ARM modules.
Discover Commands
You may be familiar with the following "holy trinity" PowerShell commands:
- Get-Command: discovery
- Get-Help: documentation
- Get-Member: property and method enumeration
Let's use the related Get-Module command to see exactly what the ARM PowerShell modules look like. You can see partial output in Figure 2.
Get-Module -ListAvailable -Name AzureRM.* | Select-Object -Property Name, ExportedCommands
[caption id="attachment_24955" align="alignnone" width="900"] Figure 2: Azure Resource Manager PowerShell modules[/caption]
Once again, some notes:
- Reference the specific modules using "dot notation"; for instance, AzureRM.Compute.
- The standard noun prefix for these commands is AzureRM.
We run Get-Command to tip into an ARM module to see what's available. For instance, the AzureRM.Profile module contains important account/login-related commands:
Get-Command -Module AzureRM.Profile | Select-Object -Property CommandType, Name
 CommandType           Name

-----------           ----

      Alias           Login-AzureRmAccount

      Alias           Resolve-Error

      Alias           Select-AzureRmSubscription

     Cmdlet           Add-AzureRmAccount

     Cmdlet           Add-AzureRmEnvironment

     Cmdlet           Disable-AzureRmDataCollection

     Cmdlet           Enable-AzureRmDataCollection

     Cmdlet           Get-AzureRmContext

     Cmdlet           Get-AzureRmEnvironment

     Cmdlet           Get-AzureRmSubscription

     Cmdlet           Get-AzureRmTenant

     Cmdlet           Import-AzureRmContext

     Cmdlet           Remove-AzureRmEnvironment

     Cmdlet           Resolve-AzureRmError

     Cmdlet           Save-AzureRmContext

     Cmdlet           Send-Feedback

     Cmdlet           Set-AzureRmContext

     Cmdlet           Set-AzureRmEnvironment
As you know, PowerShell ships with no local help, so be sure to run Update-Help:
Update-Help -Force -ErrorAction SilentlyContinue
And then run Get-Help with the -ShowWindow switch parameter to learn all the command syntax and view examples in a convenient second window:
Get-Help -Name Login-AzureRMAccount -ShowWindow
Log Into Your Subscription
We use Login-AzureRmAccount to log into our Azure subscription. You can log in by using either a Microsoft Account (MSA) or an Azure Active Directory (Azure AD) account, also called a work, school, or organizational account, that has access to an Azure subscription.
This method is interactive, as you can see in Figure 3. Note that you can create a service principal to automate the Azure authentication process; this is especially useful for automation scripts.
[caption id="attachment_24965" align="alignnone" width="845"]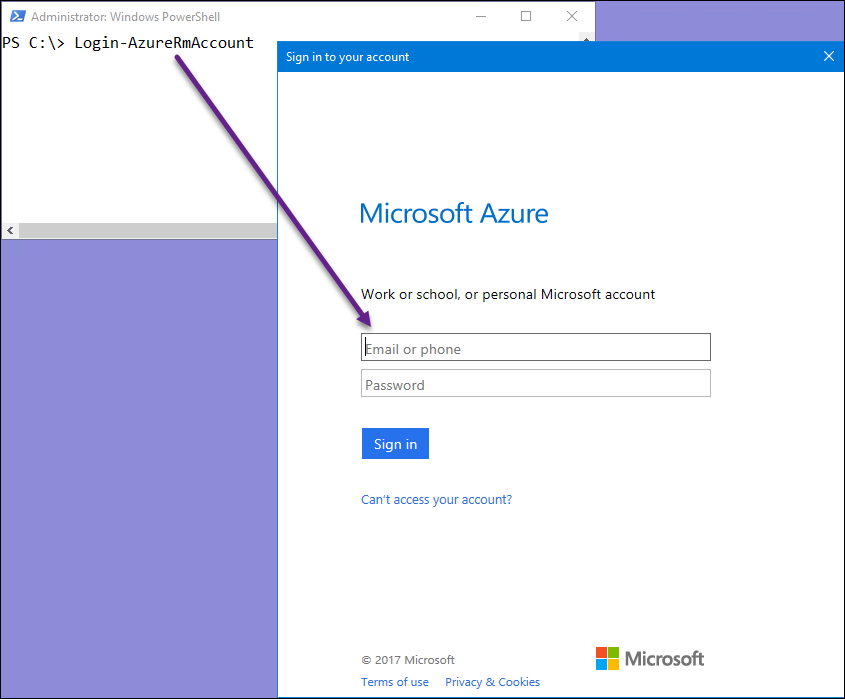 Figure 3: Azure account login[/caption]
Once you receive your authentication token, you'll be shown your Azure context, which consists of:
- Environment: public Azure cloud or private government/sovereign cloud
- Account: MSA or Azure AD account
- TenantID: Unique identifier of the current Azure AD instance
- SubscriptionID: Unique identifier of your Azure subscription
- SubscriptionName: Friendly name of Azure subscription
- CurrentStorageAccount: Active storage account context
In my case, I have more than one subscription, so I normally use Select-AzureRMSubscription to switch the active subscription, and then Get-AzureRMContext to verify:
 Select-AzureRmSubscription -SubscriptionName 'Microsoft Azure Sponsorship'

Get-AzureRmContext

Environment           : AzureCloud

Account               : tim@timw.info

TenantId              : 144f6983-44a7-4037-8eea-1d9a231ebcc8

SubscriptionId        : 2fbf806e-1101-4cc0-b64f-adc32e362fff

SubscriptionName      : Microsoft Azure Sponsorship

CurrentStorageAccount :
NOTE: You can also add the -SubscriptionName parameter to Login-AzureRmAccount to log into a specific named Azure subscription.
Perform a Task
You should consult the wonderful Azure documentation for task-oriented help. For our purposes today, the simplest administrative action we can take with Azure PowerShell is to create a new resource group (you can also create a storage group, etc). First, let's apply command discovery to locate the proper cmdlet:
Get-Command -Noun AzureRM*resourcegroup* -Verb New | Select-Object -Property Name
 Name

----

New-AzureRmResourceGroup

New-AzureRmResourceGroupDeployment
Okay, we have the command. Next, let's look up examples:
Get-Help -Name New-AzureRmResourceGroup -Examples
Armed with syntax information, we are ready to create a new resource group:
New-AzureRmResourceGroup -Name 'NewRG1' -Location 'South Central US'
Finally, we'll trust Azure, but verify nonetheless:
 Get-AzureRmResourceGroup -Name 'NewRG1'

ResourceGroupName : NewRG1


Location          : southcentralus

ProvisioningState : Succeeded

Tags              :

ResourceId        : /subscriptions/2fff917e-1101-3cc0-b64f-adc44e523bbf/resourceGroups/NewRG1
Learn More
There you have it! We covered quite a bit of ground in this tutorial. Above all else I want to drive home the fact that Azure PowerShell behaves the same way as PowerShell does in any other domain. After all, consistency is one of PowerShell's great beauties.
I'll leave you with a few hand-selected resources you can study to broaden and deepen your Azure PowerShell knowledge:
- Learn Windows PowerShell in a Month of Lunches, 3rd Edition
- Azure PowerShell Modules
- Deploy Resources with ARM Templates and PowerShell
- Azure resources at the PowerShell Gallery
- Azure product groups' presence at GitHub
 Timothy Warner is a Microsoft Most Valuable Professional (MVP) in Cloud and Datacenter Management who is based in Nashville, TN. His professional specialties include Microsoft Azure, cross-platform PowerShell, and all things Windows Server-related. You can reach Tim via Twitter @TechTrainerTim, LinkedIn or his personal website, techtrainertim.com.