Testing PowerShell with Pester
Editor's note: The following post was written by Cloud and Datacenter Management MVP Adam Bertram as part of our Technical Tuesday series. Albert Duan of the MVP Award Blog Technical Committee served as the technical reviewer for this piece.
Getting Started
As PowerShell scripts become more and more important to organizations, simply eyeballing the results a few times and confirming that they do not return an error isn't good enough. Especially if the PowerShell code you write is maintaining production systems, it's critical that some extra steps are taken to run that script through many different scenarios to ensure it's rock-solid. The way to do this is by creating Pester unit tests. Pester is an open source unit testing framework developed specifically to test PowerShell code. It is a PowerShell module that is used to write tests for PowerShell code to confirm that what it does is what you expect. In a nutshell, Pester is the code that's written "on top of" your code to act as quality assurance. Fortunately, Pester itself is written in PowerShell, so you don't have to be a software developer to learn how to use it. As long as you can learn a few syntactical differences between vanilla PowerShell and Pester, you'll be okay.
Note: Before we get too far here it's important we clarify "tests." In our case, we're going to be focusing on unit tests. These kinds of tests differ from other types of tests you might hear thrown around like infrastructure, integration or acceptance tests. The primary difference is that unit tests test the code itself while the other kinds of tests test how that code interacts with the environment. If you'd like an example of infrastructure testing, check out my Infrastructure Testing with Pester talk .
Since Pester is just a PowerShell module, we can easily download and install it from the PowerShell Gallery. Downloading from the PowerShell Gallery will get you the latest version. However if for some reason, you don't want to get the most recent version, Pester comes installed by default on Windows 10.
Install-Module -Name Pester
Once you've got the Pester module installed, it's now time to start creating some tests. Pester tests are just PowerShell scripts written a specific way, but we recommend that all test scripts end with .Tests.ps1. Naming all Pester test scripts like this isn't technically required but does come in handy later when invoking lots of test scripts at once.
Pester test scripts are broken down into a hierarchy of three distinct "levels." These levels are describe, context and it. All are mandatory except for the context block.
 describe 'Describe level' {
    context 'context level' }
        it 'it level' {

        }
    }
}
At the highest "level," the describe block is a container for multiple it blocks. The describe block can be created different ways, but one common method is to build a describe block per function. Then, inside of the describe block you include multiple it blocks - these are your actual tests, which then include one or more assertions (a term used to describe comparing the actual state with an expected state).
Assertions are where the proverbial rubber meets the road. They are how a user compares the actual state against an expected state. Pester defines assertions using the should function. The should function then has various operators to compare two different states across a broad range of scenarios. Should assertions are used by piping the actual value to then then use an operator to define the type of comparison necessary. For example, if we're ensuring that 1 + 1 = 2, our assertion statement may look something like this:
1 + 1 | should be 2
Notice above that I'm using the be operator, which is essentially the same thing as PowerShell's -eq operator. Pester has a lot of these operators to choose from.
Simple Pester Unit Test
Now that we've got all the basics out of the way, let's start off with writing a real unit test for a super-simple function. In our example, I have a function that adds one to a number given as a parameter. This function is saved into a file called Add-One.ps1.
 function Add-One {
    param($Number)
    $Number + 1
}
Unit tests can test lots of different scenarios. For this example, we're going to test given a particular number, for which the function returns that number plus 1. I'm going to create a new Pester test script and call it Add-One.Tests.ps1. It looks like this:
  ## Ensure the function is available
. .\Add-One.ps1

describe 'Add-One' {

    $TestNumber = 1
    $result = Add-One -Number $TestNumber

    it 'should return 2' {
        $result | should be 2
    }

}
I'll then run this test script using the Invoke-Pester command. Invoke-Pester1 is the command that we will use to run all Pester tests. Invoke-Pester1 has a few parameters but the most common you'll be using is thePath` parameter to specify the test script to execute.
PS> Invoke-Pester -Path 'C:\users\Adam\Add-One.Tests.ps1'

Notice we've got a single passing test, but perhaps we'd like to test a few different numbers to ensure the function also returns the expected result. We can do this by making $TestNumber a collection of numbers and testing each one. Since a Pester script is just PowerShell, you can use the power of PowerShell to do whatever you'd like. But don't overcomplicate your test scripts, because at some point you may have to test your test scripts!
  describe 'Add-One' {

    $TestNumber = 1,2,3,4
    foreach ($num in $TestNumber) {
        $result = Add-One -Number $num

        $expectedResult = $num + 1
        it "should return $expectedResult" {
            $result | should be $expectedResult
        }
    }
}
You'd then see each of those additional tests created and passing. 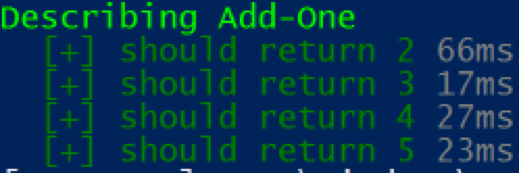
Understanding What to Test and Mocking
You've just built your first unit test. Let's now go a little deeper into Pester and go over an example that is a little bit closer to a real-world scenario. To demonstrate, I have a function that accepts a single parameter ComputerName and then returns either $true if the computer is online or $false if the computer is offline.
  function Ping-Computer {
    param($ComputerName)

    Test-Connection -ComputerName $ComputerName
}
Granted, this isn't the most creative example function because you'd just call Test-Connection by itself . But pretend Test-Connection is in a larger function that may test multiple connection attributes.
Before writing a unit test, you must ask yourself, "What does this function actually do?" Defining this for a function may seem obvious, but it's important to slowly walk through the scenarios in which it might be executed.
- What happens when $ComputerName is FOO and FOO isn't even a real computer?
- What happens when $ComputerName is BAR and BAR is a real computer but can't be resolved via DNS?
- What happens when $ComputerName is a real computer but does not respond to ping?
- What happens when $ComputerName is a real computer but does respond to ping?
These are the kinds of questions you must ask yourself to begin to build real tests. For now, we're just going to assume that ComputerName is a real computer and can be resolved via DNS.
Since we're making this assumption, we then only have to create two tests; one test to ensure $true is returned and one test to ensure $false is returned given the particular scenario of Test-Connection returning $true or $false. But, how do we make Test-Connection return $true or $false. We're not going to do some DNS trickery or something environmental. Instead, we can mock Test-Connection to force it to return whatever we want.
Let's create a simple describe block and two it blocks representing our scenario.
  describe 'Ping-Computer' {

    it 'should return $true when the computer is online' {

    }

    it 'should return $false when the computer is offline' {

    }
}
We now need to figure out how to simulate "the computer is online" and "the computer is offline." To do this, we'll create a mock for Test-Connection.
mock 'Test-Connection' -MockWith { $true }
Mocks, in Pester, are ways to force commands to return what we need them to given the situation. In this case, we need Test-Connection to return $true or $false at will. Above, you can see that I'm forcing Test-Connection to return $true. I will go ahead and insert this into my test as well as the opposite $false situation.
  describe 'Ping-Computer' {

    it 'should return $true when the computer is online' {
        mock 'Test-Connection' -MockWith { $true }

        Ping-Computer -ComputerName 'DOESNOTMATTER'
    }

    it 'should return $false when the computer is offline' {
        mock 'Test-Connection' -MockWith { $false }

        Ping-Computer -ComputerName 'DOESNOTMATTER'
    }
}
Also, notice that we're running the function inside of each it block. Pester is, in a sense, "recording" that execution and capturing how it's running. Once we manipulate how the function is run, we can now use the should keyword to compare the actual output of the function to what we expect it to be.
  describe 'Ping-Computer' {

    it 'should return $true when the computer is online' {
        mock 'Test-Connection' -MockWith { $true }

        Ping-Computer -ComputerName 'DOESNOTMATTER' | should be $true
    }

    it 'should return $false when the computer is offline' {
        mock 'Test-Connection' -MockWith { $false }

        Ping-Computer -ComputerName 'DOESNOTMATTER' | should be $false
    }
}
This test can now be run using the Invoke-Pester command inside of the Pester module. You can see that it returns two successes.
  PS> Invoke-Pester -Path C:\Ping-Computer.Tests.ps1

Describing Ping-Computer
 [+] should return $true when the computer is online 285ms
 [+] should return $false when the computer is offline 144ms
Building Testable Code
The code that we wrote tests for was simple in the examples above. We started with a small piece of code and wrote some simple tests for it. But what if you'd like to write unit tests for that 500-line long script that's performing some business critical process? That script was written way before you knew anything about testing and whenever you begin writing tests for it, you get discouraged. The code you're testing just doesn't seem to even be testable given Pester's design philosophy. In this case, you've discovered a situation where the code being tested needs to change before a single test is written.
For example, perhaps you've got a script that's used to check for Active Directory health. Part of this script uses the dcdiag.exe tool. Inside of the script dcdiag.exe is invoked, and its output is read. Depending on the output, the script then performs one of two different actions.
  Invoke-DomainHealthCheck.ps1
$result = dcdiag /a
if ($result -notmatch 'Passed') {
    ## Something is wrong. Do something to remediate it here
} else {
    ## All is good. Continue with other checks here
}
This code may work just fine, but it's going to be impossible to write a Pester test for. Why? It's because Pester does not understand file executions. Pester loves functions and understands them. It's not possible to control the dcdiag output through a mock, thus there's no way to write a reliable unit test. As a result, you're forced to wrap the dcdiag invocation in a function making the script look like this:
  Invoke-DomainHealthCheck.ps1

function Invoke-DcDiag {
    param($Arguments)

    dcdiag $Arguments
}

$result = Invoke-DcDiag -Arguments '/a'
if ($result -notmatch 'Passed') {
    ## Something is wrong. Do something to remediate it here
} else {
    ## All is good. Continue with other checks here
}
Refactoring code may seem like a significant time drain, but as you're forced to split up the code into small functions, you'll begin to notice development becomes easier. You'll start to get in a better coding routine for developing reusable building blocks rather than lumping all code into a single script or one large function. Writing tests forces you to look your ugly code in the face and do something about it rather than just ignoring it because it "works."
Wrap Up
Writing a Pester test is the easy part. Wrapping your head around testing in general for many IT professionals seems to be the hardest part. Many new to Pester are also new to testing, which makes the learning curve that much steeper. I encourage anyone new to testing to not focus all attention on Pester itself. Pester is just a tool used to create tests. To create useful tests requires first understanding the code, what to test and how to write tests in a way that catch problems.
Similar to learning a new programming language where all share common traits like variables, loops, functions, etc., if you understand unit tests and what to test, the rest just comes down to syntax. This is much easier to grasp.
There's a lot more to Pester and unit testing in general. If you’re interested in getting a deeper dive into testing PowerShell as well as using Pester for other purposes like infrastructure testing with tons of example and best practices, I encourage you to check out The Pester Book. I go over all of the syntaxes and go into tons of scenarios using best practices to ensure you go from knowing nothing about Pester, to being a pro.
 Adam Bertram is a Senior Systems Automation Engineer, technical writer, trainer and presenter. Adam specializes in consulting and evangelizing all things IT automation, mainly focused around PowerShell. Adam is a Microsoft Cloud and Datacenter Management MVP and authors IT pro course content for Pluralsight. He is a regular contributor to numerous print and online publications and presents at various user groups and conferences. You can find Adam at adamtheautomator.com or on Twitter at @adbertram.