Ask Learn
Preview
Please sign in to use this experience.
Sign inThis browser is no longer supported.
Upgrade to Microsoft Edge to take advantage of the latest features, security updates, and technical support.
Note
Access to this page requires authorization. You can try signing in or changing directories.
Access to this page requires authorization. You can try changing directories.
Editor's note: The following post was written by Visual Studio and Development Technologies MVP Francesco Abbruzzese as part of our Technical Tuesday series. Ovais Mehboob of the MVP Award Blog Technical Committee served as the technical reviewer for this piece.
The re-engineering job behind the new ASP.NET Core MVC sensibly improved the way validation messages are handled and customized. While default messages automatically displayed because of a user’s wrong inputs were stored and handled next to their sources in the previous ASP.NET MVC version, they have now all been moved to the same place - the ASP.NET MVC option object.
Moreover, the new validation provider architecture made it easy to override the default messages built-in, in the .Net validation attributes with customized default messages defined in resource files. This way, the user can provide global custom messages once and for all, thus avoiding the burden of having to specify an error message in each occurrence, of each attribute.
This article goes into detail about how to customize both all ASP.NET MVC specific error messages, and all default messages coming from validation attributes.
In general, default validation error messages are format strings with placeholders for various parameters. They come from 3 sources:
We need an Asp.net core application to describe and test all customization techniques:
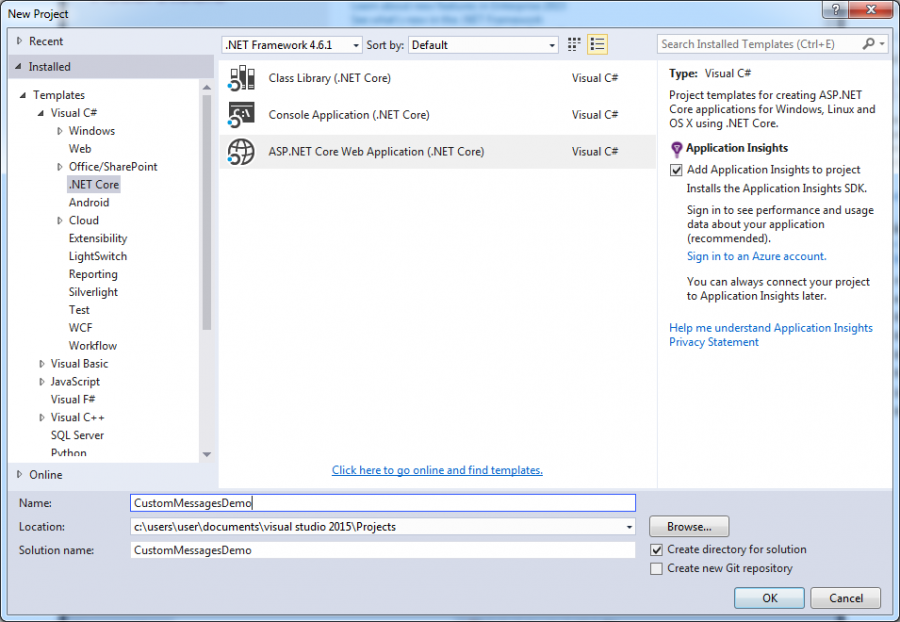
Let’s call it “CustomMessagesDemo”. Then select Web Application and no authentication. In order to test validation messages, we need a ViewModel, a test Controller and test View. Now, we add a “ViewModels” folder to our project. A ViewModel with a single decimal property is enough for our purposes; let’s call it “TestViewModel”:
 using System.ComponentModel.DataAnnotations;

namespace CustomMessagesDemo.ViewModels
{
    public class TestViewModel
    {
        [Range(1, 10)]
        public decimal ADecimal { get; set; }
    }
}
Now let’s open the “Controllers\HomeController.cs” file and substitute the “Index” action method with the code below:
 using CustomMessagesDemo.ViewModels;
using Microsoft.AspNetCore.Mvc;

namespace CustomMessagesDemo.Controllers
{
    public class HomeController : Controller
    {
        public IActionResult Index()
        {
            return View();
        }
        [HttpPost]
        public IActionResult Index(TestViewModel vm)
        {
            return View(vm);
        }
Finally, we’ll substitute the whole content of the “Views\Home\Index.cshtml” view with:
 @model CustomMessagesDemo.ViewModels.TestViewModel

@{
    ViewData["Title"] = "Custom default messages";

}

<h2>@ViewData["Title"]</h2>

<form asp-action="Index" asp-controller="Home">
    <div class="form-group">
        <label asp-for="ADecimal"/>
        <input type="text" asp-for="ADecimal" class="form-control">
        <span asp-validation-for="ADecimal" class="text-danger"></span>
    </div>
    <button type="submit" class="btn btn-default">Submit</button>
</form>
@section Scripts {
<script src="~/lib/jquery-validation/dist/jquery.validate.min.js"></script>
<script
 src="~/lib/jquery-validation-unobtrusive/jquery.validate.unobtrusive.min.js"></script>
}
We enforced a type text for our unique input in order to easily test ill formatted numbers, and send them to the server.
Now, let’s run the application, insert an ill formatted number, and try submitting the form. The message “The field ADecimal must be a number” appears. This is the client side default error message for ill formatted numbers. Note down this message, and try server side errors, too. We can do it by disabling client side validation in our test view as shown below:
 @model CustomMessagesDemo.ViewModels.TestViewModel

@{
    ViewData["Title"] = "Custom default messages";
    ViewContext.ClientValidationEnabled = true;
}
Submit the form - first with an ill formatted number, and then with an empty input field. Also note down the model binder ill formatted, and implicit required default error messages triggered by these submit actions.
In this first customization step, we’ll provide new default messages for the three errors analyzed above. Let’s define a new resource file in which we’ll store all our new error messages. We’ll place this in the root of our project and call it “SiteResources.resx.” Now let’s add all entries shown below:

Now we must declare our new default message in the MVC option object. There are several ways to do this, but the simplest one is to pass a lambda function in the “services.AddMvc” instruction in the “startup.cs” file:
 public void ConfigureServices(IServiceCollection services)
{
    // Add framework services.
    services.AddApplicationInsightsTelemetry(Configuration);

    services.AddMvc(o =>
    {
        o.ModelBindingMessageProvider.ValueMustNotBeNullAccessor =
            value =>
            SiteResources.CustomImplicitRequired;
        o.ModelBindingMessageProvider.AttemptedValueIsInvalidAccessor =
            (value, fieldName) =>
            string.Format(SiteResources.CustomInvalidValue, value);
        o.ModelBindingMessageProvider.ValueMustBeANumberAccessor =
            fieldName =>
                string.Format(SiteResources.CustomNumeric, fieldName);
    });
}
The first two assignments redefine model-binder validation messages, while the third one redefines the client-side default error for ill formatted numbers. Here, we can’t change the client side implicit required error message, since it is the default error message of the “RequiredAttribute”. We will show how to change it, together with all validation attributes default error messages, in the next section.
We are ready to test our new messages. Let’s keep client validation disabled and trigger the two model binder validation errors again. Both of them changed! You may also test the new client side ill formatted number error message by enabling client side validation once again.
First, define a name convention for the entries in the resource file. We can use the name of the validation attribute itself; so for instance, the name of the entry for the required attribute would be “RequiredAttribute.”.
Let’s add two more entries to our resource file, one for the required attribute, and the other one for the range attribute: 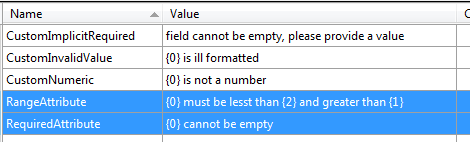
The plan is to loop through all validation attributes associated with each rendered property to add our custom messages. More specifically, whenever the attribute doesn’t have an error message already specified and there is an entry for that attribute in our resource file, we need to set its “ErrorMessageResourceType” property to the type associated to our resource file, and its “ErrorMessageResourceName” property to the name of the entry in the resource file.
In ASP. NET Core MVC, validation metadata are handled by validation metadata providers, which are implementations of “ IValidationMetadataProvider” and whose unique member is the method “CreateValidationMetadata”. The main purpose of validation metadata providers is to extract validation rules from property information, and metadata by other parts of the framework. However, we may also use them to modify and filter the validators added by other providers, since the list of all validators added so far is contained in the context object passed to the “CreateValidationMetadata” provider method together with all input metadata.
So, the addition of our custom error messages to the validation attributes may be carried out in the “CreateValidationMetadata” method of a custom implementation of “IValidationMetadataProvider”:
 using System;
using System.Linq;
using System.ComponentModel.DataAnnotations;
using System.Reflection;
using System.Resources;
using Microsoft.AspNetCore.Mvc.ModelBinding.Metadata;

namespace CustomMessagesDemo.Validation
{
    public class CustomValidationMetadataProvider:IValidationMetadataProvider
    {
        private ResourceManager resourceManager; private Type resourceType;
        public CustomValidationMetadataProvider(string baseName, Type type)
        {
            resourceType = type;
            resourceManager = new ResourceManager(baseName,
                type.GetTypeInfo().Assembly);
        }
        public void CreateValidationMetadata(
            ValidationMetadataProviderContext context)
        {
            if (context.Key.ModelType.GetTypeInfo().IsValueType &&
                context.ValidationMetadata.ValidatorMetadata
                    .Where(m => m.GetType() == typeof(RequiredAttribute)).Count()==0)
                context.ValidationMetadata.ValidatorMetadata.
                    Add(new RequiredAttribute());
            foreach (var attribute in context.ValidationMetadata.ValidatorMetadata)
            {
                ValidationAttribute tAttr = attribute as ValidationAttribute;
                if (tAttr != null && tAttr.ErrorMessage == null
                        && tAttr.ErrorMessageResourceName == null)
                {
                    var name = tAttr.GetType().Name;
                    if (resourceManager.GetString(name) != null)
                    {
                        tAttr.ErrorMessageResourceType = resourceType;
                        tAttr.ErrorMessageResourceName = name;
                        tAttr.ErrorMessage = null;
                    }
                }
            }
        }
      }
}
Our implementation constructor receives all the information needed to create a resource manager for the resource file containing the custom messages. It then stores both the type associated to the resource file and the resource manager.
The first “if” adds a “RequiredAttribute” to the list of all validators - if not already in the list, and if the type is a value type, or one that is implicitly required. Later on, other built-in providers that handle client validation would have performed the addition of this “RequiredAttribute” on value types, but we anticipate this operation here to have the possibility of adding our custom validation message.
The “foreach” loops through all validators added so far, and if they are validation attributes with no messages already specified, it tries to add both the type of the resource file passed in the constructor and proper entry.
According to the name convention previously established, the entry name should match the type name of the attribute. We use the resource manager to verify if there was an entry for the current attribute, otherwise the addition of the not existing entry to the “ErrorMessageResourceName” property of the attribute would trigger a runtime exception.
Installing our provider is easy! We just need to add it to the list of all validation metadata providers contained in the MVC option object:
 services.AddMvc(o =>
    {
        o.ModelBindingMessageProvider.ValueMustNotBeNullAccessor =
            value =>
            SiteResources.CustomImplicitRequired;
        o.ModelBindingMessageProvider.AttemptedValueIsInvalidAccessor =
            (value, fieldName) =>
            string.Format(SiteResources.CustomInvalidValue, value);
        o.ModelBindingMessageProvider.ValueMustBeANumberAccessor =
            fieldName =>
                string.Format(SiteResources.CustomNumeric, fieldName);
        o.ModelMetadataDetailsProviders.Add(
            new CustomValidationMetadataProvider(
                "CustomMessagesDemo.SiteResources",
                typeof(SiteResources)));

    });
}
Now let verify that client validation is enabled. Run the project, and try submitting an empty input field: 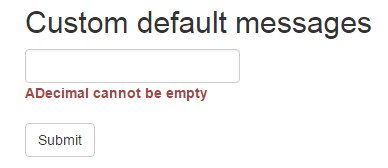
Our custom message appears! Then try to submit an out of range number, say 11: 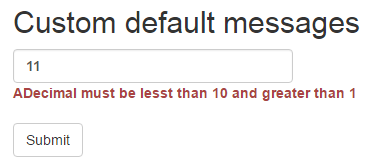
Again, our custom message appears!
To sum everything up, in the new core version of ASP.NET MVC, customizing default validation messages is quite easy. ASP.NET MVC specific messages are easily changed in the MVC options object, while all default messages coming from validation attributes may be customized by writing a few lines short implementation of “IValidationMetadataProvider”.
Francesco Abbruzzese implements Asp.net MVC applications, and has offered consultancy services since the beginning of the technology. He is the author of the famous MVC Controls Toolkit, and his company offers tools, UI controls, and services for Asp.net MVC. He's moved from decision support systems for banks and financial institutions, to the Video Games arena, and finally started his .Net adventure with the first .Net release. Follow him on Twitter @F_Abbruzzese
Please sign in to use this experience.
Sign in