Part Two: Become Acquainted With PowerApps and Flow
Editor's note: The following post was written by Windows Development MVP Toni Pohl as part of our Technical Tuesday series. Tony Champion of the MVP Award Blog Technical Committee served as the technical reviewer for this piece.
Introduction
As we saw in Part 1, Microsoft PowerApps and Flow provide a complete framework for creating, deploying and maintaining custom apps within an organization. Before we look into how to design an app, I briefly want to explain the requirements to ensure the implemented use case will work for all users.
Access and Licensing
Every user accessing a PowerApp needs to have an Office 365 account and a PowerApps - and if needed, a Flow - license. If you plan to give access to external vendors to PowerApps in your company’s Office 365 tenant, you need to provide the external users a login and a license. You can find more information about licensing at https://powerapps.microsoft.com/en-us/pricing/ and for Flow at https://flow.microsoft.com/en-us/pricing/. There also more information in my blog at https://blog.atwork.at/post/2017/01/05/Tips-for-PowerApps-(When)-does-a-user-need-a-license.
Currently, PowerApps can only be shared within your own Office 365 tenant, but multi tenant support is tracked in the PowerApp team backlog. So, we hope to see multi tenant support in the future. Anyway, if this scenario does not work for you today, you could try a mobile app solution made with Xamarin and using AAD authentication.
There’s also another key point. You need authentication and permission to access the Office 365 resources or any cloud service that is covered with a standard connector. For example, if the data source is a SharePoint Online list, the user working with a PowerApp needs to authenticate against the resource in SharePoint Online, and needs to have permissions to access that list.
Let’s start
To show the designing process, I use a very simple scenario that’s common in organizations: a vacation request form. A custom SharePoint Online list will hold the data, the end users will use a PowerApp to enter their requests, and the manager will approve or decline the request for time off.
First, the data source is created. This is usually the beginning of a design process.
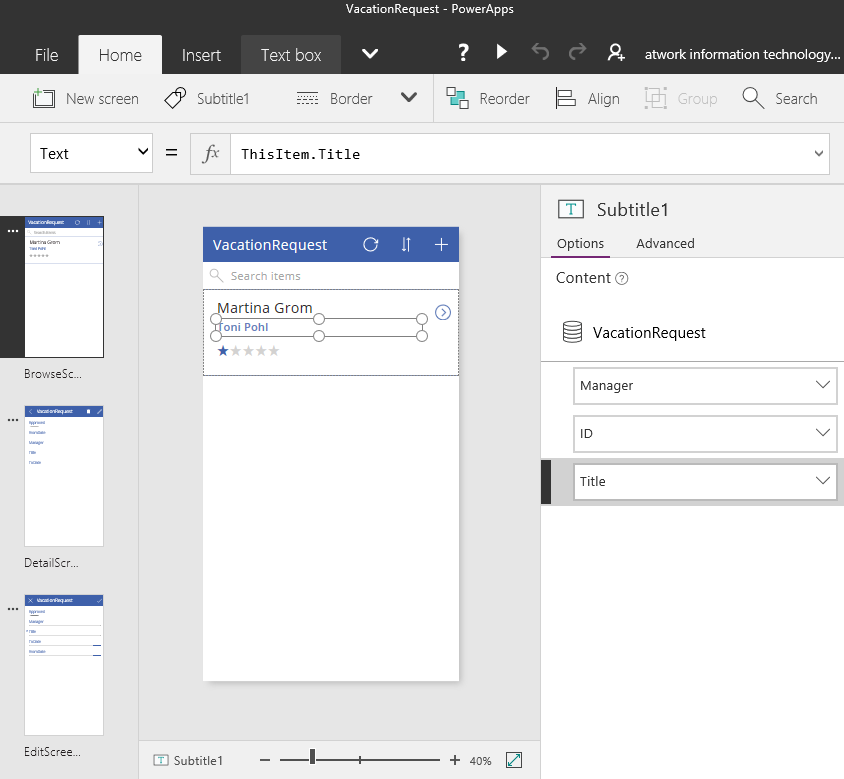
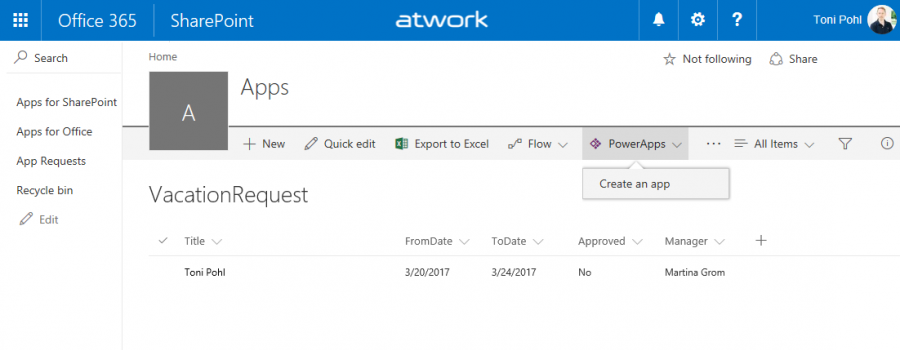
In a SharePoint Online site I created a new “app”- a custom list named “VacationRequest.” Additional fields FromDate, ToDate, Approved and Manager are added to the already existing Title field as shown here.
 The user name is added to the “Title” field, both dates are of type date, Approved of type Boolean and the Manager is a simple text field as well. Of course, this may not represent a full set of required properties in the real world, but I wanted to keep this simple. I added one record with “Quick edit” as an example to show the data structure.
After the definition is done, we are ready to create the PowerApp. The good news is that the modern SharePoint lists offer a “PowerApps/Create an app” menu out of the box. A wizard in the task pane opens and asks for a name of the app. After the name “VacationRequest” is provided, the user needs to authenticate on PowerApps. Then the app is created.
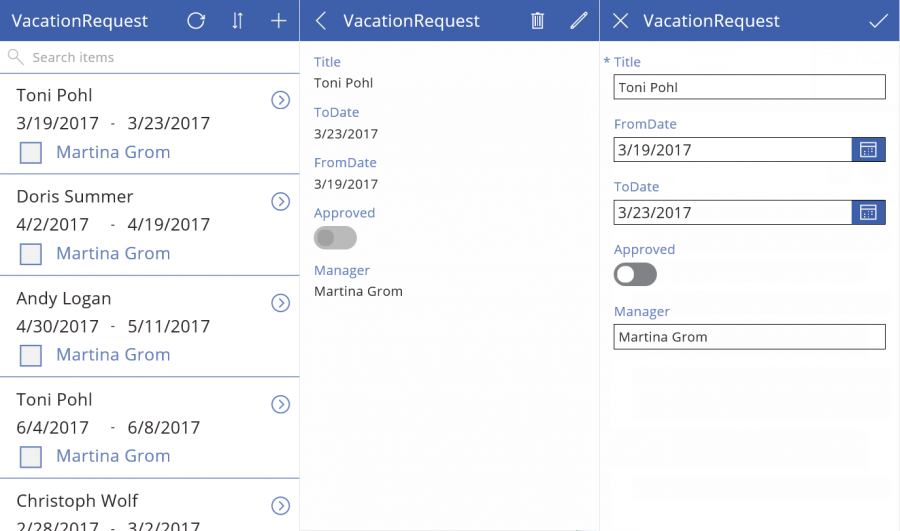
Voila! A 3-screen PowerApp for the custom SharePoint Online list in is created automatically in a phone design. The BrowseScreen shows all records and allows us to switch to the DetailScreen, or to the EditScreen for modifying and creating new items into that list. The data source allows for Create-Update-and-Delete (CRUD) operations and is available for a PowerApp user from anywhere.
The PowerApp is always created in the default environment of the Office 365 tenant. As a creator, you can use the PowerApps Studio in the web - which is opened automatically from SharePoint Online - or you can modify the app with the Desktop version of PowerApps Studio as well.
Evolve the PowerApp
Now we can start modifying the app to fit our needs. I added more records for other users at my company to have some sample data. I also rearranged the fields in all screens to have them in the proper order.
First of all, I wanted to make sure each user only sees their own vacation requests. Since the connector unfortunately does not support SharePoint views, another workaround is required. This can be accomplished easily. If we look at the Items property in the list “BrowseGallery1”, we see that the list binding is filtered with the following expression:
 SortByColumns(Filter(VacationRequest, StartsWith(Manager,
TextSearchBox1.Text)), "Manager", If(SortDescending1, Descending,
Ascending))
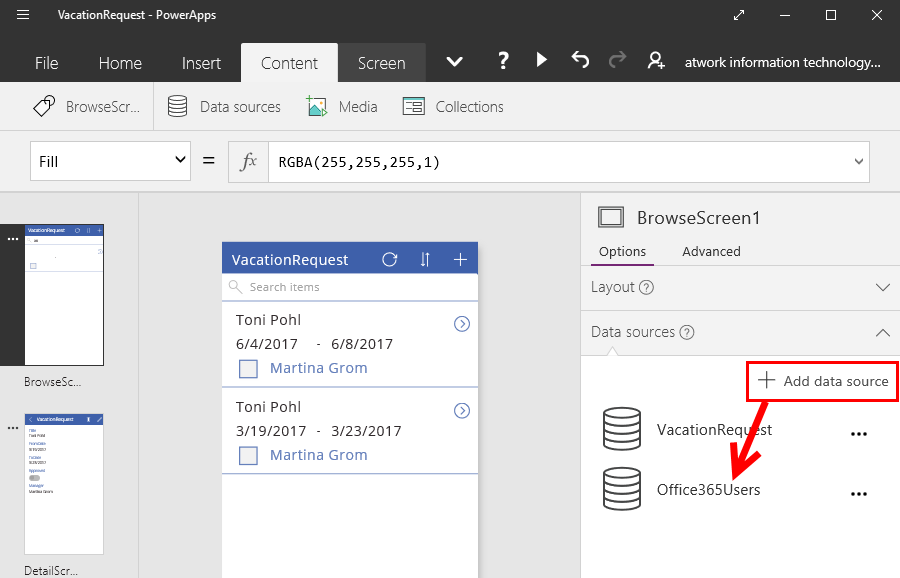
The generated filter expression filters the string in the search box with a “starts with” method against the Manager property of the list. I want to filter by signed-in user. So, I need to add another data source to get the Office 365 user name. This can be done in the Content and Data source menu and “Add a new data source” named “Office365Users” as shown here.
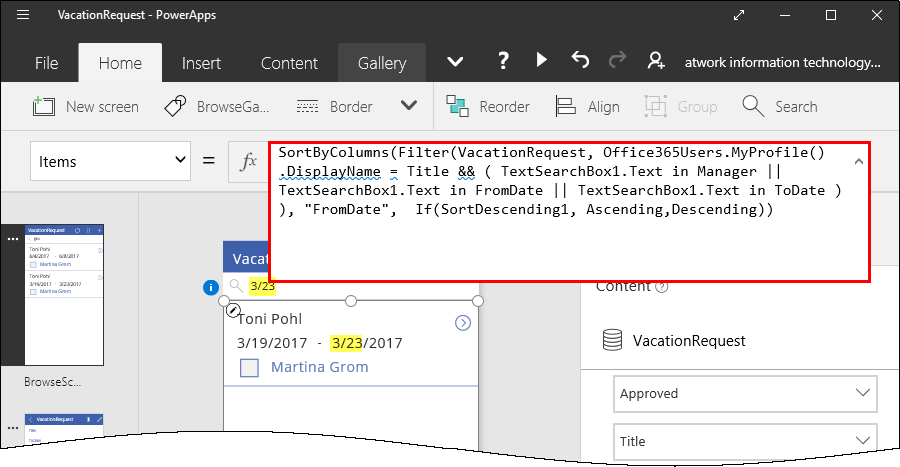
Now I can work with that data source and get the DisplayName of my user (Office365Users.MyProfile().DisplayName). The new filter expression shows only records where my username equals the Title column in the list. This is the basic filter; no other records will be visible. We sort by FromDate, depending on the status of the sort-icon (IconSortUpDown1). This is the formula for that functionality:
 SortByColumns(Filter(VacationRequest,
Office365Users.MyProfile().DisplayName = Title), "FromDate",
If(SortDescending1, Ascending,Descending))
Additionally, I can add logical AND (&&) and OR (||) to the filter expression. This way, the user can search by any expression in the search box (TextSearchBox1) The list is filtered by FromDate, ToDate and the Manager name as well. The extended version looks like this:
 SortByColumns(Filter(VacationRequest,
Office365Users.MyProfile().DisplayName = Title && ( TextSearchBox1.Text
in Manager || TextSearchBox1.Text in FromDate || TextSearchBox1.Text in
ToDate )), "FromDate", If(SortDescending1, Ascending,Descending))
Since the PowerApps Studio also shows data on the fly, the filter should work even in design mode. In this example, I search for the end date (3/23) of a vacation request, and it works.
It also only shows the data of the logged in user. Additionally, the list can be searched by all properties of our SharePoint list. Cool, right?
To get a full list of supported functions in PowerApps see the following link: https://powerapps.microsoft.com/en-us/tutorials/formula-reference/
Extended features
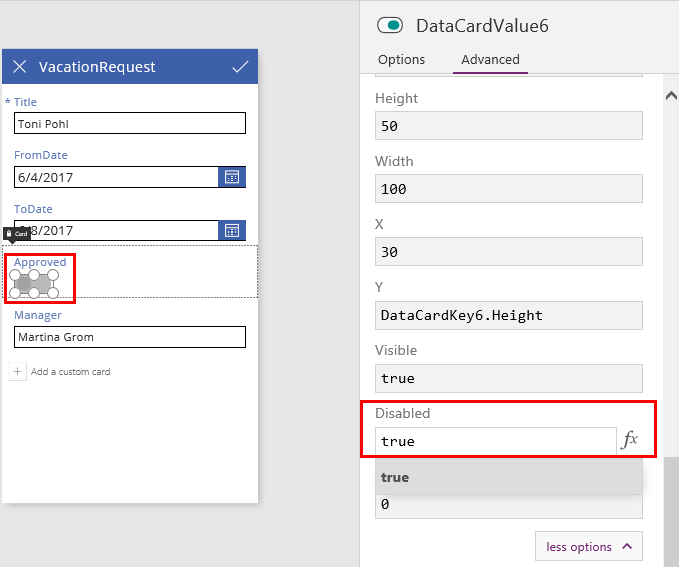
We are almost done. Of course, the “Approved” toggle won’t be available for the end user, otherwise he could approve his own vacation request. So I set the “Disabled” property of the toggle control to “true” in the right panel. Now the user cannot change this status in the EditForm of the PowerApp.
Tip: If you want to handle enabled/disabled status dynamically, have a look at this quick workaround in the PowerApps forum: https://powerusers.microsoft.com/t5/PowerApps-Forum/How-to-turn-a-button-visible-false-or-disabled-true/td-p/1620
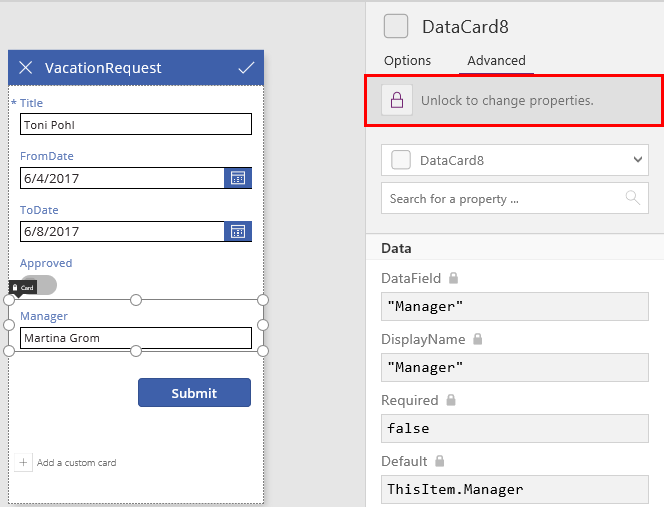
Additionally, you can implement more improvements for a good user experience. This can be accomplished in the Advanced settings of the controls. Don’t forget to click the “Unlock to change properties” toggle to modify the advanced properties. Since many users are wondering how to set that, I want to point out this an unimpressive, but important little switch.
Ok, now I can set the signed-id user in the Title field by replacing the Default property and “ThisItem.Title” with “Office365Users.MyProfile().DisplayName.”
Also, the Manager can be pre- filled from Azure Active Directory automatically by setting the Manager Default property from “ThisItem.Manager” to “Office365Users.Manager(User().Email).DisplayName.” This looks up the manager of the signed-in user and prefills the user name (or the email address, or other properties) in the Manager field.
Because of these simple assignments, a new record can be inserted quickly in the edit form. That’s effective, isn’t it?
Adding Flow
Now we want to add a simple approval process. Microsoft Flow is a cloud-based service that automates common business tasks and processes in a robust and scalable way. Flow is similar to services like IFTTT, and on an enterprise level, with BizTalk.
I add a “Submit” button to the EditForm and create a new Flow directly from the PowerApps Studio in the Action / Flows / Create a new flow menu.
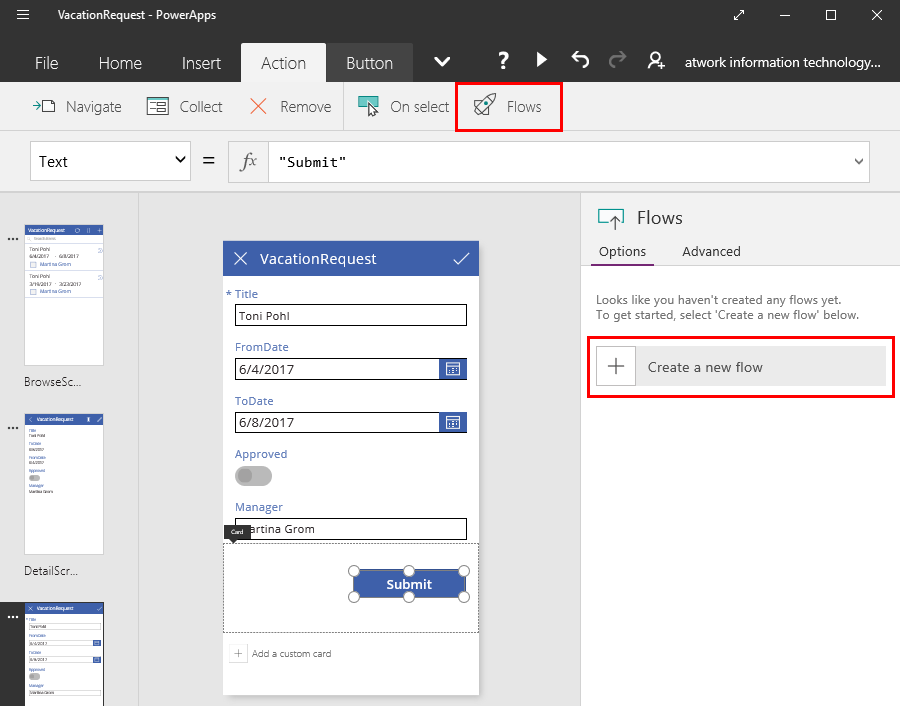
The browser opens (https://flow.microsoft.com), and it’s here a designer can create a new workflow. In the Flow designer, I can add actions and other constructs sequentially step-by-step. For our scenario with PowerApps as a trigger, an action named “PowerApps” must be added as first step. This connector is fired directly from PowerApps with the Submit button, by calling the generated flow HTTP endpoint. There are no more properties to be set. 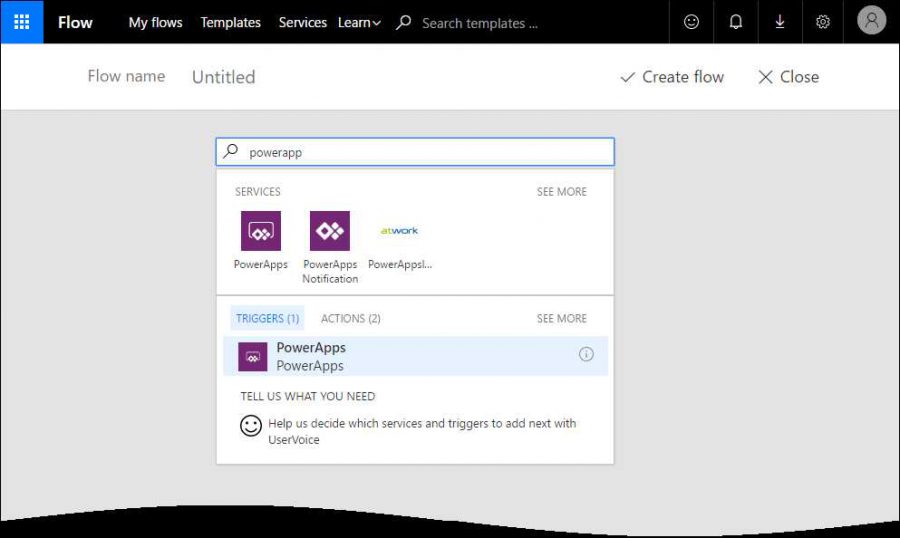
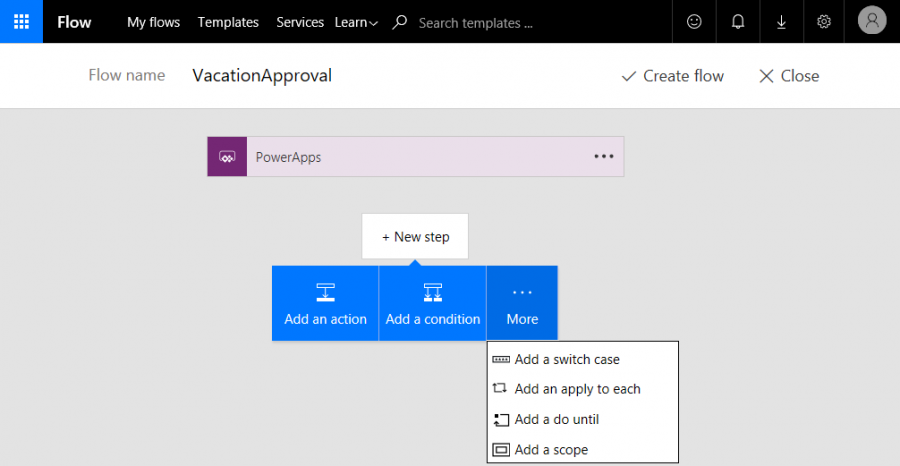
After the trigger has been fired, the workflow can start working with data. I can add a single action, a condition or more logic steps as a switch case construct, loops of scope. Flow even handle simple conditions and work with the data without coding.
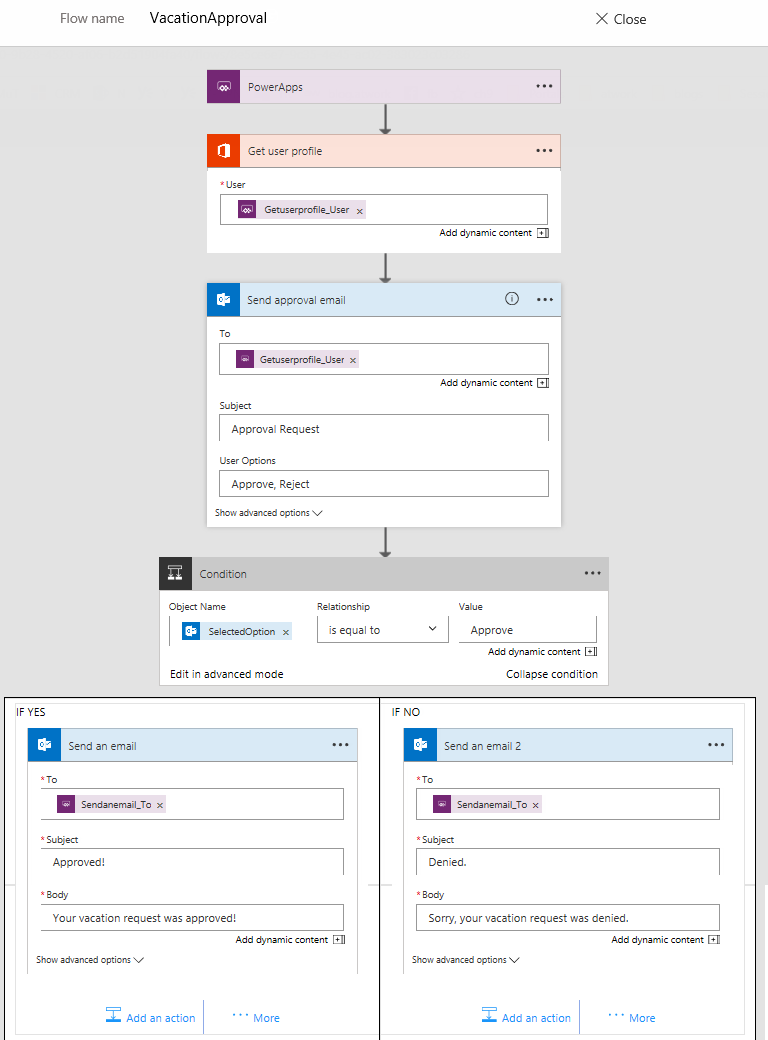
In our scenario, we want to send an email to the manager and give them the option to approve or deny the vacation request. Afterwards, the creator will get the response over email. In that case, we need the email address of the both participants. We can get them with a connector to Office 365. So, actions are added and configured as shown here.
The next step is to add an action for “Office 365 Get user profile” in order to lookup the email address of the person who will approve the request. I pass that as parameter by selecting “Ask in PowerApps.” This will add a variable Getuserprofile_User to the flow.
Then, we add the “Office 365 Send approval email.”An email will be sent to the email address of the approver. Depending on the decision of the approver (Approve or Reject), an email is sent to the creator of the vacation request to inform them about the result. The following graphics shows the basic flow with these steps.
You can add multiple steps to a flow. Be aware that the designer has its limits, especially if the flow gets complex and large scale. If there is too much logic, you can use Azure Logic Apps, custom code, or even Azure Functions to outsource complexity and use the operation in a flow to simplify.
When the designing is finished, the flow must be saved ('VactationApproval'). Now I can leave the flow website and return to the PowerApps Studio.
This is the last step. The flow will be used in the PowerApp when the user clicks the “Submit” button.
Since I added some parameters in the flow process, I need to pass them from the PowerApp. The formula for the “Submit” button – depending on the parameters used – looks like this:
VacationApproval.Run(Manager,Title)
In real world, you would pass more data from the PowerApp to the Flow - like the vacation duration (FromDate, ToDate), and other properties you want to use. This sample just illustrates the process of combining a Flow with a PowerApp. Today, only text values can be passed as parameters. If you want to work with a photo you shot in the PowerApp, for example, you need to store that in a central location like Azure Storage or OneDrive, and pass the URL to the Flow to work with that data. Custom code can be integrated in Flow as well, so you are wide open for extensions.
It’s important to know that flows run in the context of the user who triggers the process. Since this February, there’s “Team flow.” This allows multiple people in an organization to own and manage a flow – imagine the owner of a flow is no longer in the organization, so other owners can modify the existing flow easily. Currently, there is no method to move an existing flow between these two types, so it’s best to create a team flow right at the beginning.
In comparison to Azure Logic Apps, this service can be seen like a “big brother” of Flow with more management functionality. Anyway, for most use cases, Power Users can use flow as a robust and handy workflow engine.
Central managed data
The data source is updated every time a modification is made in the PowerApp (or Flow), or in the data source itself. So, our central data is stored in a SharePoint Online list for further use.
Of course, the PowerApp user must be online to access the central data. To enable an offline experience, PowerApps offers a local SaveData and LoadData method to allow you to persist locally while the connection is offline. Later you can push those changes to the server once the connection has been established again, but this is a bit of effort.
The PowerApps team is very open about comments and features and offline capabilities are on the top requested features. Let’s see if more will come in near future. You can vote and follow the discussion about offline features at the “PowerApps Ideas” forum here: https://powerusers.microsoft.com/t5/PowerApps-Ideas/Offline-mode/idi-p/825#comments .
Summary
PowerApps and Flow are cool and powerful tools to create custom apps for users within your organization. As Martina wrote in part one, the app framework allows one to concentrate on the use case and the solution. I hope this small scenario for vacation request showed the most important aspects of how these tools can develop such small solutions.
In the last part of this article series, Adis will show custom development with a custom WebAPI and a Swagger definition, to allow integration of the PowerApps framework into own backend systems. With that technology, developers can easily add other services - like picture processing, picture analyzing with Cognitive Services or simply sending text data to any backend system with PowerApps.
Happy developing without or with code with PowerApps and Flow!

Toni Pohl is a Windows Development MVP and a Principal at atwork.at living in Vienna, Austria. He has worked in the IT industry for 20 years in various roles, including as a consultant, blogger, author, as well as a conference presenter. Toni is an expert in the development of online technologies, Office 365 and Azure. Find more about Toni at https://about.me/toni.pohl. Follow him on Twitter @atwork.