Build your own IoT device with ESP8266 system-on-a-chip, Azure Event Hub, Stream Analytics and Azure Storage
Editor's note: The following post was written by Microsoft Azure MVP Marcel Meurer as part of our Technical Tuesday series. James Chambers of the MVP Award Blog Technical Committee served as the technical editor for this piece.
IoT is a big buzz word. I wanted to make it more tangible for me. So, I decided to build a small WiFi based sensor to monitor temperature and humidity, and to send these data to Azure. For my scenario at home I need less than 12 sensors, but the solution scales up to hundreds - even thousands - of sensors. That’s why I used Azure Event Hub and Stream Analytics.
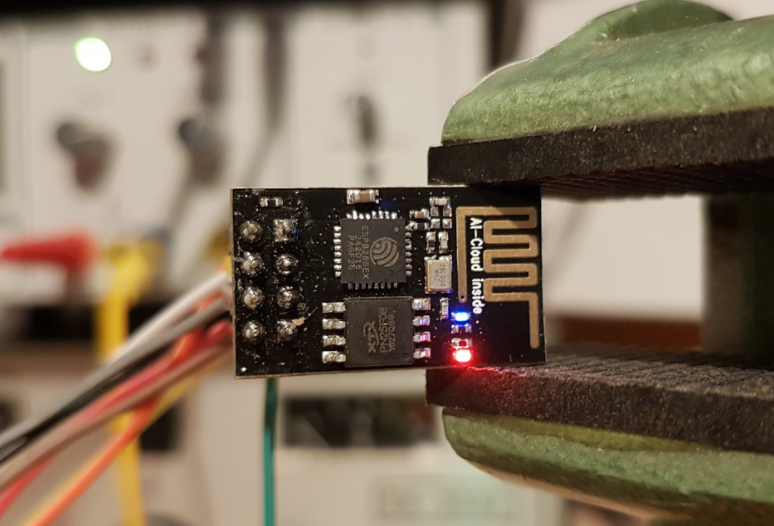
The sensor ESP8266-01 – WiFi SoC
I want to build a very small sensor that can connect to my WiFi and execute a short program, as well. The System-on-a-Chip ESP8266-01 is ideal for this purpose. Its PCB Version 01 is flat and has a small form factor, less than 25mm x 15mm. The chip itself works with WiFi (including TCP/IP) and can be flashed with one’s own programs. It’s also brings two I/O ports (GPIO) to connect to - for example, a temperature/humidity sensor. In my case it’s a DHT22 – a digital temperature and humidity sensor. The ESP and the sensor together cost less than $7.
Test the ESP8266-01
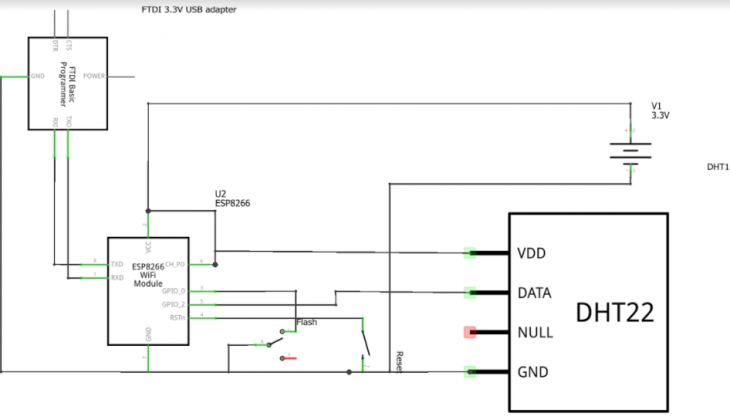
It’s easy to connect the ESP8266 to a Windows computer. You need a USB to serial adapter with a 3.3 Volt level (this is very important, do not connect the chip to a 5 Volt source!). This adapter is often called FTDI 3.3 Volt. A bread board with male/male and male/female cable helps you to connect the different parts.
If you have the components, connect the pins:
- Connect all GND’s: ESP8266-01, FTDI and the sensor DHT22
- Connect all power supplies (Vcc): ESP8266-01, FTDI and the sensor DHT22
Note: If your circuit is unstable while programming - or you don’t get data from the sensor - disconnecting Vcc from FTDI and power the ESP and the sensor with an external 3.3 Volt power supply. - Connect CH_PD from the ESP with Vcc
- Connect the data pin of the DHT22 sensor to GPIO 2 of the ESP
- Prepare ESP’s GPIO 0 with a wire to set it to GND if you want to enable the flash mode (programming)
- Prepare ESP’s RST pin with a wire to set it to GND if you want to send a reset command
- To send and receive data via the FTDI connect RX with UTXD and TX with URX
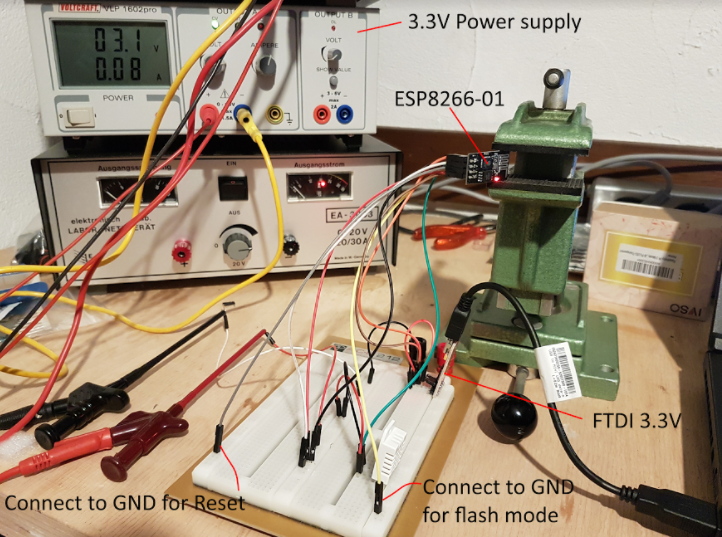
You can now connect your circuit with your Windows computer via a USB cable.
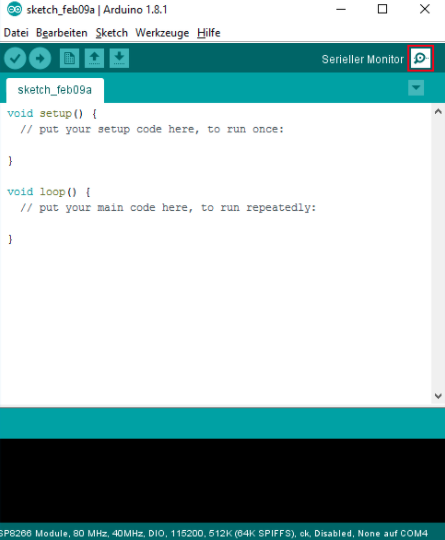
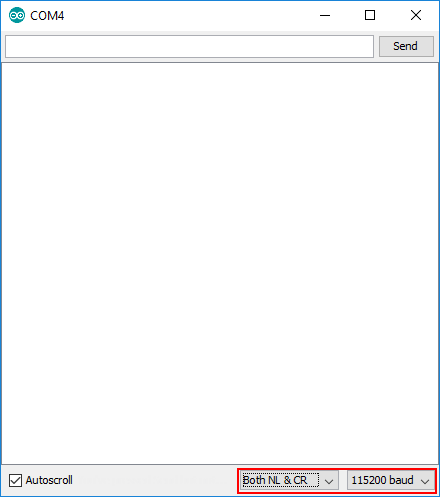
Install the Arduino IDE to program and test the chip (https://www.arduino.cc/en/main/software). The IDE also includes a terminal program to communicate with the ESP. Open it by clicking the upper right corner. In the terminal window select the speed (115200 baud) and “Both NL & CR”. Note: The connection speed can differ. If it does not work, choose 9600 baud.
If your ESP is fresh with a standard bootloader, you can send AT commands to it. The following commands show WiFi networks:
AT OK AT+CWMODE=3 OK AT+CWLAP +CWLAP:(0,"",0) +CWLAP:(3,"SSID1234",-80) +CWLAP:(3,"FRITZ!Box 7490",-26) OK
Search “esp8266 at command reference” online for more AT commands.
Prepare the Arduino IDE to program the chip
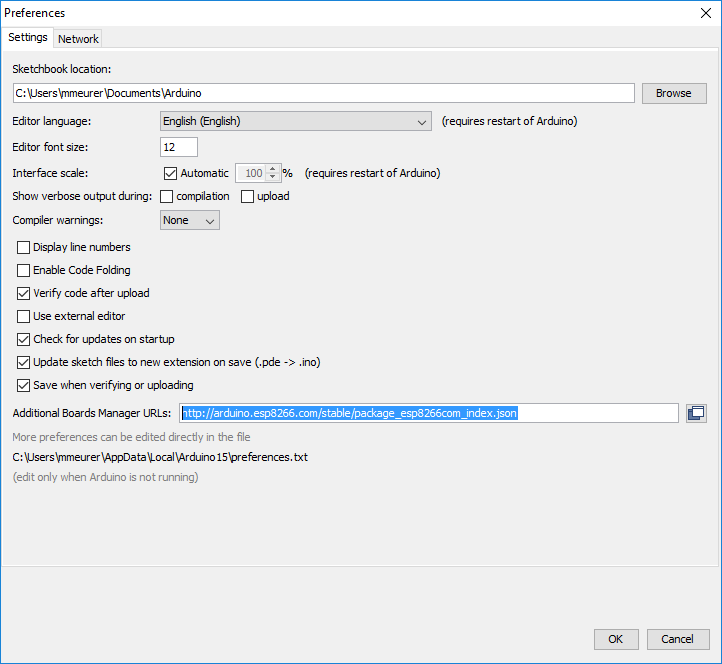
Now we can access the chip and send programs to it with the Arduino IDE. These programs are saved permanently and executed on start up. Open the Arduino IDE and include the board definition for ESP8266 chips: File -> Preferences -> Additional Boards Manager URLs and add https://arduino.esp8266.com/stable/package_esp8266com_index.json.
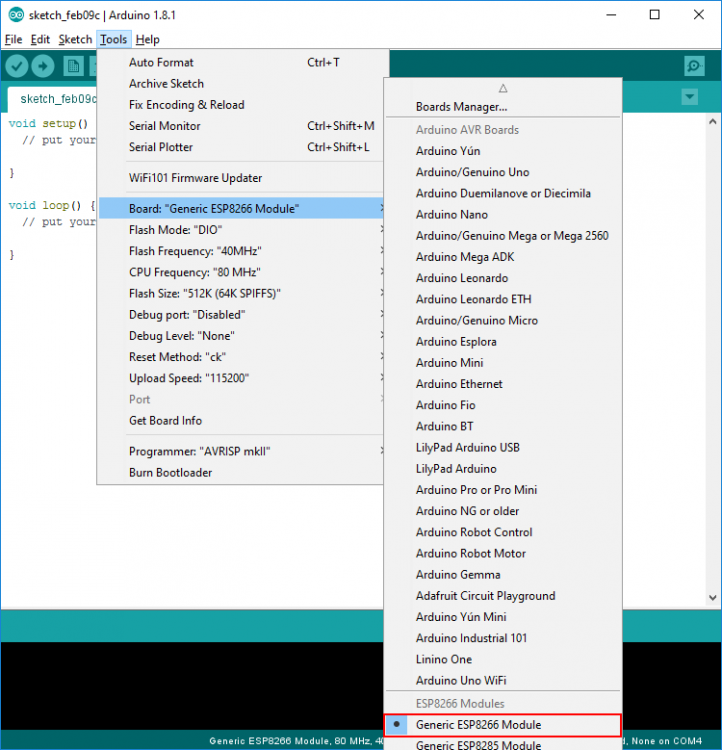
To switch your current program to use the ESP board, select: “Generic ESP8266 Module” in Tools -> Board.
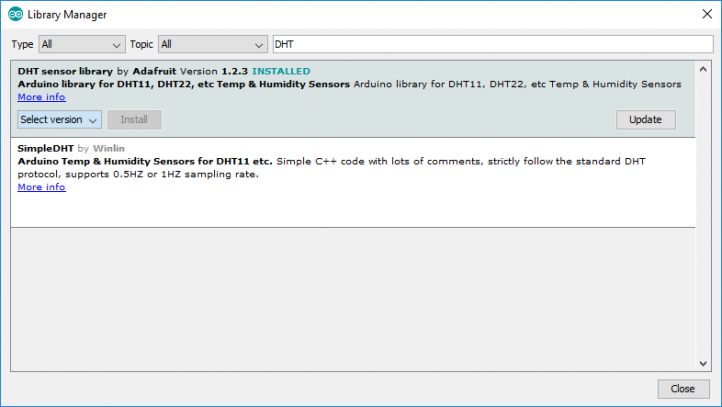
To write a short program - called sketch - that you want to access the DHT22 sensor, include the library for this sensor: Sketch -> Include Library -> Manage Libraries search for “DHT” and include the library “DHT sensor library by …” in version 1.2.3 (for the first steps: don’t use 1.3.0).
Now we can write the first sketch:
 // Libraries
#include
#include
#include  //Version 1.2.3

// WiFi settings
const char* ssid = "SID";
const char* password = "Password";

// DHT Sensor setting - https://learn.adafruit.com/esp8266-temperature-slash-humidity-webserver/code
#define DHTTYPE DHT22
#define DHTPIN  2
DHT dht(DHTPIN, DHTTYPE, 11);
float humidity, temp;  // Values read from sensor
unsigned long previousMillis = 0;        // will store last temp was read
const long interval = 2000;              // interval at which to read sensor

// Main program settings
const int sleepTimeS = 10;


void setup() {
  // Init serial line
  Serial.begin(115200);
  Serial.println("ESP8266 starting in normal mode");

  // Connect to WiFi
  WiFi.begin(ssid, password);
  while (WiFi.status() != WL_CONNECTED) {
    delay(500);
    Serial.print(".");
  }
  Serial.println("");
  Serial.println("WiFi connected");

  // Print the IP address
  Serial.println(WiFi.localIP());
}

void loop() {
  // Read sensor
  unsigned long currentMillis = millis();
  if(currentMillis - previousMillis >= interval)
  {
    // save the last time you read the sensor
    previousMillis = currentMillis;
    // Reading temperature for humidity takes about 250 milliseconds!
    // Sensor readings may also be up to 2 seconds 'old' (it's a very slow sensor)
    humidity = dht.readHumidity();          // Read humidity (percent)
    temp = dht.readTemperature(false);     // Read temperature as Celcius
    // Check if values present
    if (isnan(humidity) || isnan(temp)) {
      Serial.println("Failed to read from DHT sensor!");
    } else
    {
      String Data="Temperature: "+String(temp)+"  -  Humidity: "+String(humidity);
      Serial.println(Data);
    }
    }
  Serial.print("Waiting...");
  delay(5000);
  Serial.println("Done.");
}
There are two functions:
- Setup(): Initialize the sensor (runs once after each start). Here, connect to WiFi with the ssid name and password. Note: If you have special characters like “ in your password, escape it with \ (“ = \”)
- Loop(): Runs after setup() continuously. Here, measure the temperature/humidity and print it to the serial line
To program the ESP you must switch the chip into the flash mode. For that connect GPIO 0 with GND and then reset the chip (put RST short to GND). The chip restarts in flash mode and you can upload your sketch with the “upload” button:

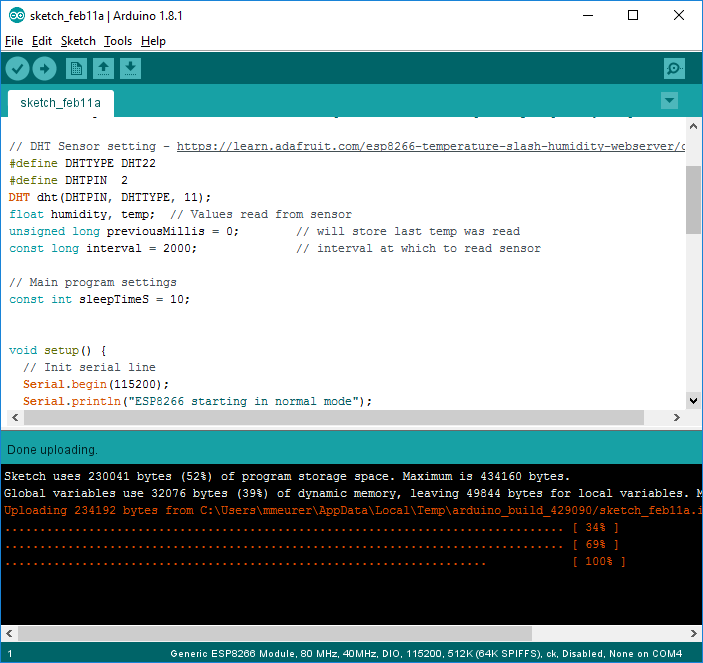
After a successful flash the ESP starts the sketch:
Note: To change the temperature value in Fahrenheit change “dht.readTemperature(false);” in “dht.readTemperature(true);”.
You can upload new sketches after each reset while GPIO 0 is connected to GND. If you want to reset your chip without programming, disconnect GPIO 0 from GND.
Building Event Hub and Stream Analytics services for IoT data
If it works as expected, we can now build our Azure services to collect data sent from our IoT device – after this we must extend our sketch to send data to the Event Hub.
To receive data from sensors/IoT devices I use an Event Hub and a Stream Analytics service in Azure. I don’t use an IoT Hub because I only want to have a one-way transmission to the cloud and don’t need to control my sensor(s).
Both services are responsible for:
- Event Hub: a high-speed data hub to which 100,000s of sensors can send data to. An event hub queues all data (messages) for a later processing. We can’t access the data on an Event hub directly.
- Stream Analytics: collects the queued data from the Event Hub and sends the messages to an Azure Storage (or others, like PowerBI).
Go to the Azure Portal, create a resource group and add an Event Hub:
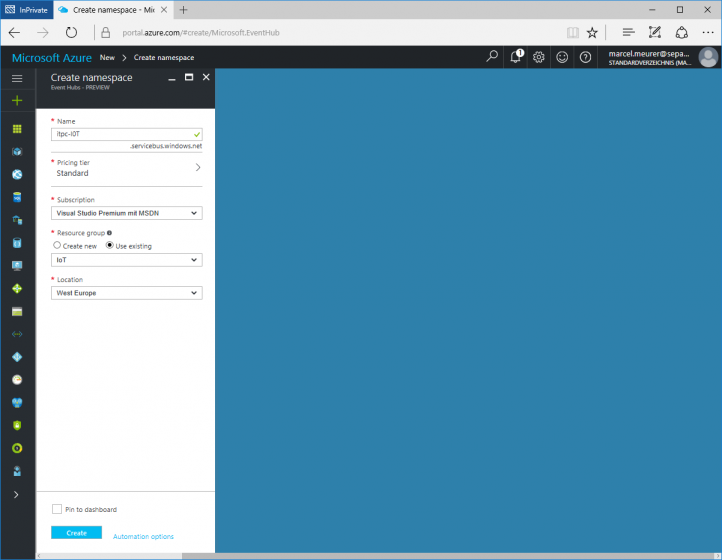
To configure the hub, in Event Hub click “+ Event Hub” and configure a name. In my case I name it “sensors.”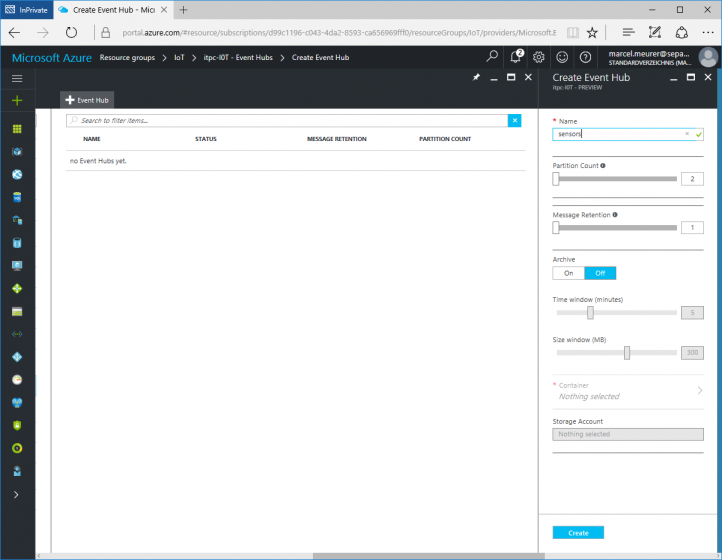
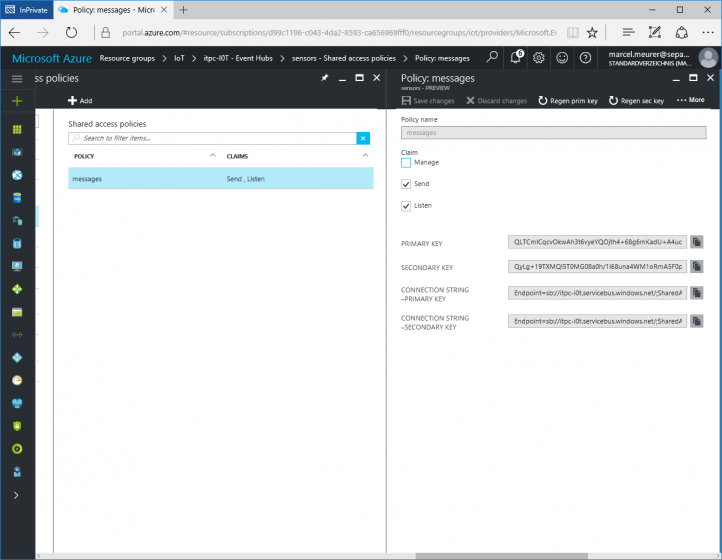
Select “sensors” and configure an access policy in “Shared access policies.” I named it “messages” and selected “send.” Now you can configure a second policy with “Listen” to read the data later with Stream Analytics, or also select it for the “messages” (don’t do this in production – separate it). In my case I selected both for “messages.” After creating it, copy the primary key and primary connection string for later use.
In the Azure Portal add a simple storage account to save the data later with Stream Analytics.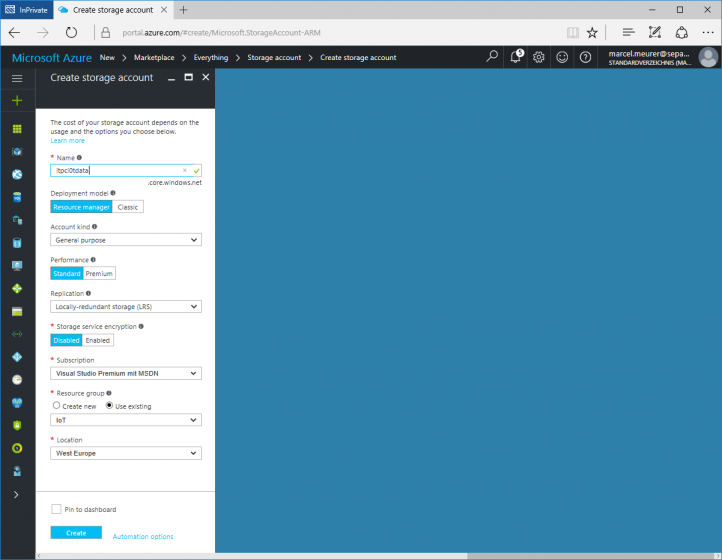
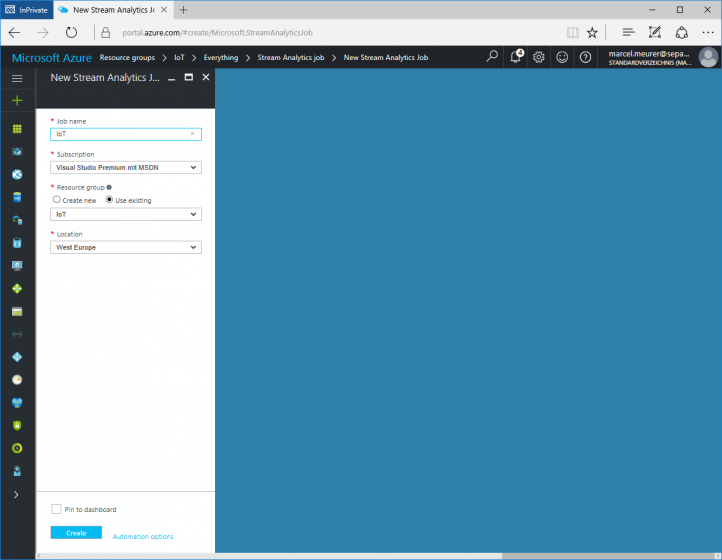
In the Azure Portal add a Stream Analytics Job service in your resource group named “IoT."
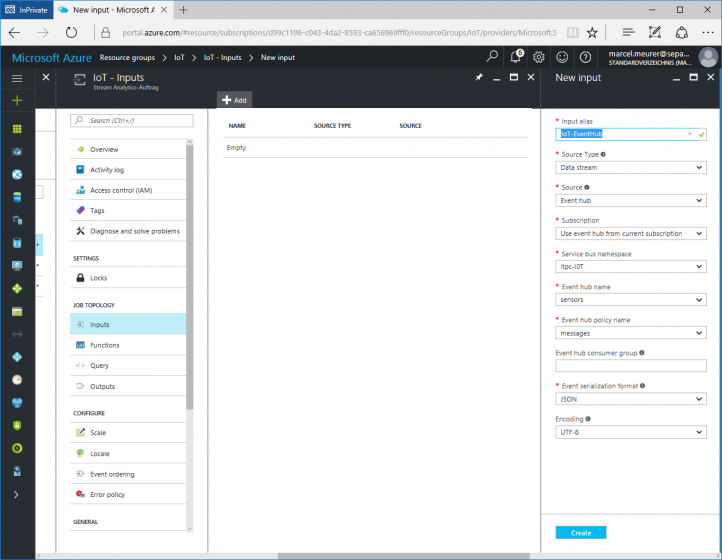
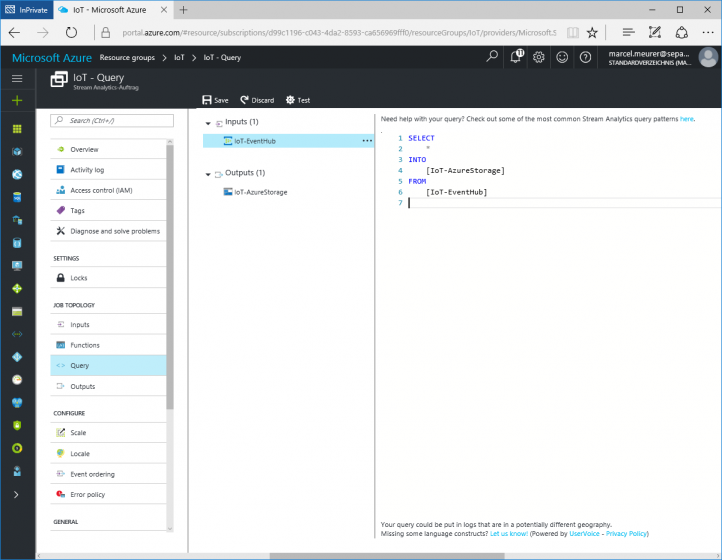
Configure Stream Analytics and add a new input in “Inputs”. I called it “IoT-EventHub”. Select the other fields to select the created Event Hub as input.
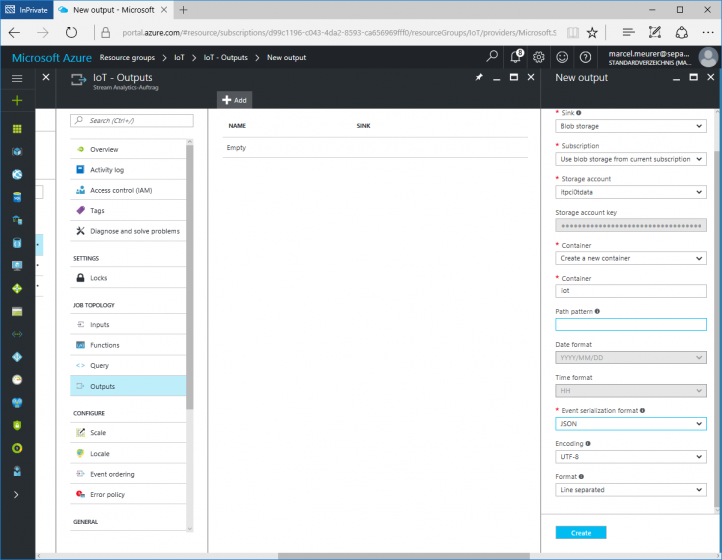
Add your storage as output by adding it to “Outputs.” The name is IoT-AzureStorage. Select Blob storage, type a container name (“iot”) and click “create.”
Finally, configure a query to transport the incoming messages to the storage. Configure the query via “Query,” - like this:
SELECT * INTO [IoT-AzureStorage] FROM [IoT-EventHub]
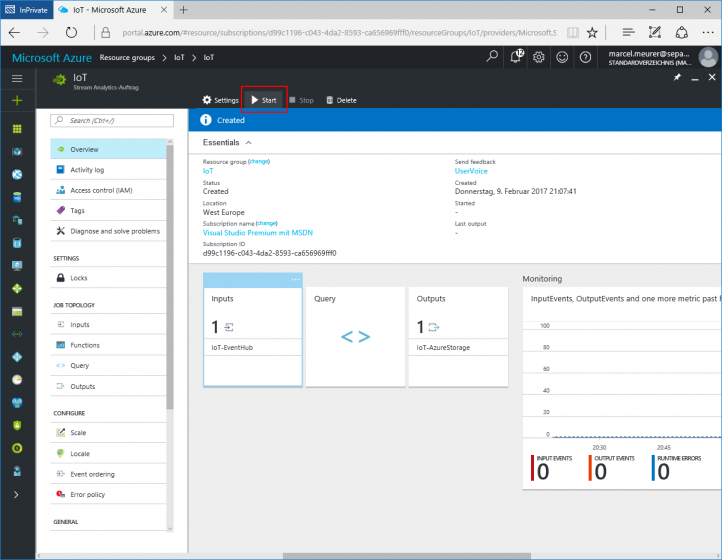
Save the query. Now you can start the job. See Azure pricing for the cost while the job is running. For a few sensors, it’s too expensive for a month. This hi-scalable service is for more than hundreds of sensors.
Generate a long-lasting authorization code for the sensors
The sketch we built before must now be extended to send the data to Azure. But first we need an Authorization code to communicate with the REST API. We can create this code based on the saved connection string from the shared access policy “messages.”
Connection string:
Endpoint=sb://itpc-i0t.servicebus.windows.net/;SharedAccessKeyName=messages;SharedAccessKey=qWE2E+ifahvxyop7S2/Dz/8a/YttQKuiu2hfbpu5KG8=;EntityPath=sensors
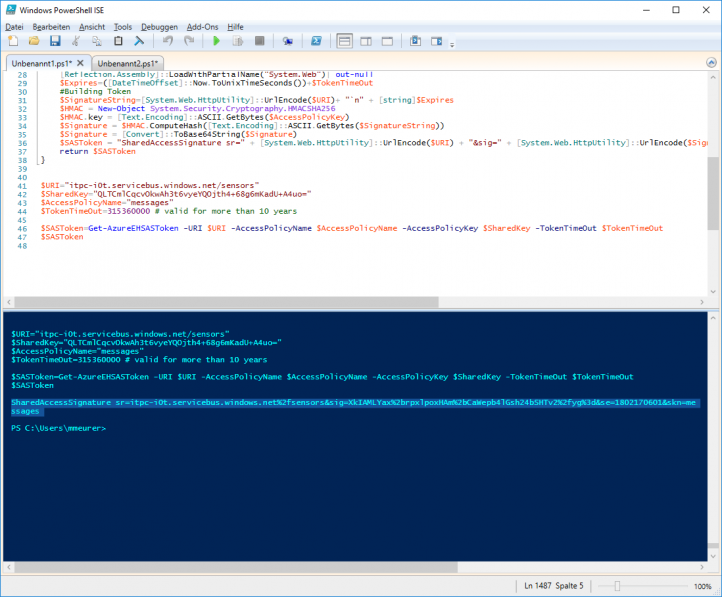
Grab the URI (green), access policy name (blue) and access key (red) to have the right parameter and calculate a long-lasting authorization code. Use PowerShell to calculate the key:
$URI="itpc-i0t.servicebus.windows.net/sensors"
$SharedKey="qWE2E+ifahvxyop7S2/Dz/8a/YttQKuiu2hfbpu5KG8=;"
$AccessPolicyName="messages"
$TokenTimeOut=315360000 # valid for more than 10 years
The full code:
 function Get-AzureEHSASToken
{
 <#
   .DESCRIPTION
    Compute a valid SAS-token for accessing an Azure Event Hub / Service Bus
    .PARAMETER URI
  URI of the Azure Event Hub without https:// (.servicebus.windows.net/)
  .PARAMETER AccessPolicyName
 Name of the access policy (Event Hub - Configure - Shared access policies)
  .PARAMETER AccessPolicyKey
  Key for the access policy (Event Hub - Configure - Shared access policies)
  .PARAMETER TokenTimeOut
 Timeout in seconds for the SAS-token (default 1800 seconds)
 .EXAMPLE
    Get-AzureEHSASToken -URI "sepagolabs-eventhub.servicebus.windows.net/workplaceclients" -AccessPolicyName "ReceivePolicy" -AccessPolicyKey "OmT7XZxxxTdIWYblKZ5ReJ/xxxxxxxxxxxxxxxxxw8="
 .NOTES
    Author: Marcel Meurer, marcel.meurer@sepago.de, Twitter: MarcelMeurer
 #>
   PARAM(
      [Parameter(Mandatory=$True)]
        [string]$URI,
       [Parameter(Mandatory=$True)]
        [string]$AccessPolicyName,
      [Parameter(Mandatory=$True)]
        [string]$AccessPolicyKey,
       [int]$TokenTimeOut=1800
 )
   [Reflection.Assembly]::LoadWithPartialName("System.Web")| out-null
  $Expires=([DateTimeOffset]::Now.ToUnixTimeSeconds())+$TokenTimeOut
  #Building Token
 $SignatureString=[System.Web.HttpUtility]::UrlEncode($URI)+ "`n" + [string]$Expires
 $HMAC = New-Object System.Security.Cryptography.HMACSHA256
  $HMAC.key = [Text.Encoding]::ASCII.GetBytes($AccessPolicyKey)
   $Signature = $HMAC.ComputeHash([Text.Encoding]::ASCII.GetBytes($SignatureString))
   $Signature = [Convert]::ToBase64String($Signature)
  $SASToken = "SharedAccessSignature sr=" + [System.Web.HttpUtility]::UrlEncode($URI) + "&sig=" + [System.Web.HttpUtility]::UrlEncode($Signature) + "&se=" + $Expires + "&skn=" + $AccessPolicyName
   return $SASToken
}


$URI="itpc-i0t.servicebus.windows.net/sensors"
$SharedKey="QLTCmlCqcvOkwAh3t6vyeYQOjth4+68g6mKadU+A4uo="
$AccessPolicyName="messages"
$TokenTimeOut=315360000 # valid for more than 10 years

$SASToken=Get-AzureEHSASToken -URI $URI -AccessPolicyName $AccessPolicyName -AccessPolicyKey $SharedKey -TokenTimeOut $TokenTimeOut
$SASToken
The code above generates the token. Change the variables for your needs.
Save the authorization code:
SharedAccessSignature sr=itpc-i0t.servicebus.windows.net%2fsensors&sig=XkIAMLYax%2brpxlpoxHAm%2bCaWepb4lGsh24bSHTv2%2fyg%3d&se=1802170601&skn=messages
Extend the sketch to send data to the Event Hub
To send data to the Event Hub we must extend our sketch (see below). For this, we need some variables to configure the Azure connection:
 // Azure Setting
const String AzureEventHubURI="https://itpc-i0t.servicebus.windows.net/sensors/messages?timeout=60&api-version=2014-01"; //messages is fix and not the name of the access policy
const String AzureEventHubFingerPrint="f6 1f e9 82 21 c6 c2 66 df 6e 07 44 52 15 e1 5f 56 cd 2e 5e";
const String AzureEventHubAuth="SharedAccessSignature sr=itpc-i0t.servicebus.windows.net%2fsensors&sig=XkIAMLYax%2brpxlpoxHAm%2bCaWepb4lGsh24bSHTv2%2fyg%3d&se=1802170601&skn=messages";
Build AzureEventHubURI with your connection string. Watch “sensors” and “messages” (Event Hub name and policy name). AzureEventHubAuth is the authorization key and AzureEventHubFingerPrint the SHA256 finger print of the SSL certificate for the URI above. To capture this fingerprint value, open the site in IE, view the certificate and type it into your sketch.
Note: Don’t use copy and paste. You will have an invisible character and your sketch will not work! 
Now build the complete sketch:
 // Libraries
#include <ESP8266WiFi.h>
#include <ESP8266HTTPClient.h>
#include <DHT.h> //Version 2.1.3

// WiFi settings
const char* ssid = "SID";
const char* password = "Password";

// Azure Setting
const String AzureEventHubURI="https://itpc-i0t.servicebus.windows.net/sensors/messages?timeout=60&api-version=2014-01"; //messages is fix and not the name of the access policy
const String AzureEventHubFingerPrint="f6 1f e9 82 21 c6 c2 66 df 6e 07 44 52 15 e1 5f 56 cd 2e 5e";
const String AzureEventHubAuth="SharedAccessSignature sr=itpc-i0t.servicebus.windows.net%2fsensors&sig=XkIAMLYax%2brpxlpoxHAm%2bCaWepb4lGsh24bSHTv2%2fyg%3d&se=1802170601&skn=messages";

// DHT Sensor setting - https://learn.adafruit.com/esp8266-temperature-slash-humidity-webserver/code
#define DHTTYPE DHT22
#define DHTPIN  2
DHT dht(DHTPIN, DHTTYPE, 11);
float humidity, temp;  // Values read from sensor
unsigned long previousMillis = 0;        // will store last temp was read
const long interval = 2000;              // interval at which to read sensor

// Main program settings
const int sleepTimeS = 10;


void setup() {
  // Init serial line
  Serial.begin(115200);
  Serial.println("ESP8266 starting in normal mode");

  // Connect to WiFi
  WiFi.begin(ssid, password);
  while (WiFi.status() != WL_CONNECTED) {
    delay(500);
    Serial.print(".");
  }
  Serial.println("");
  Serial.println("WiFi connected");

  // Print the IP address
  Serial.println(WiFi.localIP());
}

void loop() {
  // Read sensor
  unsigned long currentMillis = millis();
  if(currentMillis - previousMillis >= interval)
  {
    // save the last time you read the sensor
    previousMillis = currentMillis;
    humidity = dht.readHumidity();          // Read humidity (percent)
    temp = dht.readTemperature(false);     // Read temperature as Fahrenheit
    // Check if any reads failed and exit early (to try again).
    if (isnan(humidity) || isnan(temp)) {
      Serial.println("Failed to read from DHT sensor!");
    } else
    {
      String PostData="{ \"DeviceId\":\"ESP8266-0001\",\"Temperature\":"+String(temp)+",\"Humidity\":"+String(humidity)+"}";
      Serial.println(PostData);
      // Send data to cloud
      int returnCode=RestPostData(AzureEventHubURI,AzureEventHubFingerPrint,AzureEventHubAuth,PostData);
    }
    }
  Serial.print("Waiting...");
  delay(5000);
  Serial.println("Done.");
}


// Functions
int RestPostData(String URI, String fingerPrint, String Authorization, String PostData)
{
    HTTPClient http;
    http.begin(URI,fingerPrint);
    http.addHeader("Authorization",Authorization);
    http.addHeader("Content-Type", "application/atom+xml;type=entry;charset=utf-8");
    int returnCode=http.POST(PostData);
    if(returnCode<0)
  {
    Serial.println("RestPostData: Error sending data: "+String(http.errorToString(returnCode).c_str()));
  }
    http.end();
  return returnCode;
The function “RestPostData” sends data to an Azure Event Hub. The data in “PostData” must be JSON-formatted. “fingerPrint" is the fingerprint of the SSL certificate. The REST-API of Azure Event Hub is defined in /en-us/rest/api/eventhub/event-hubs-runtime-rest.
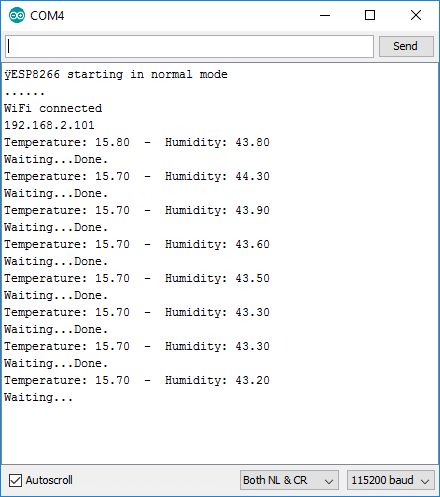
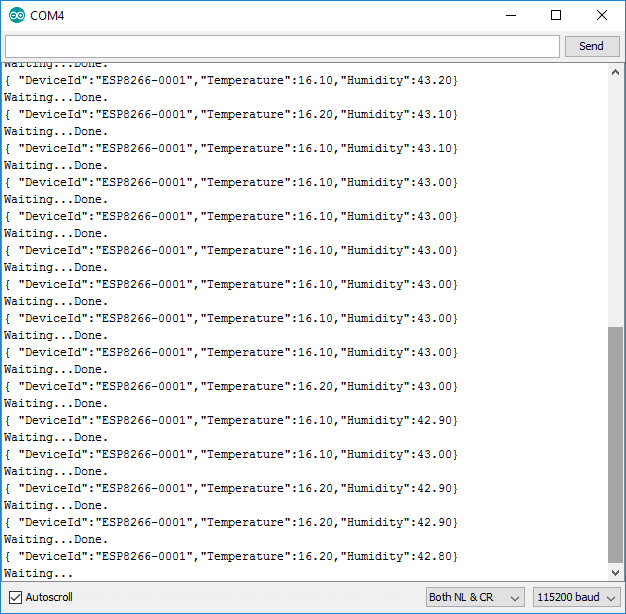
Upload and – if everything works – you will see the following in the terminal:
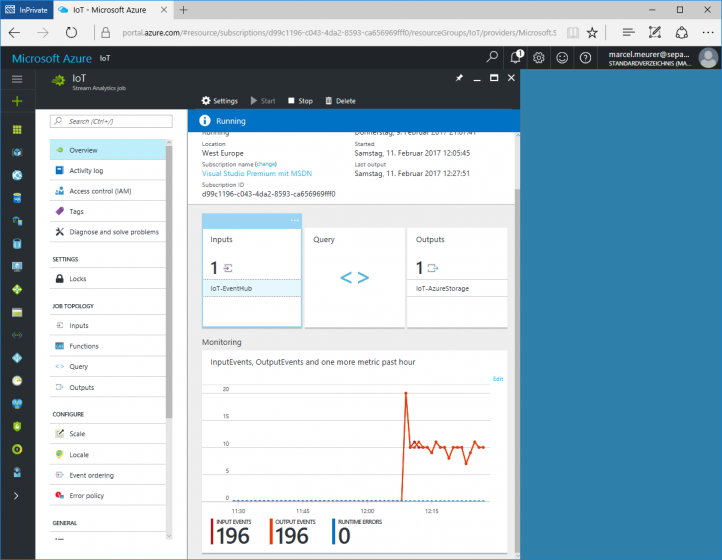
And after a few minutes in the running Stream Analytics job you will see:
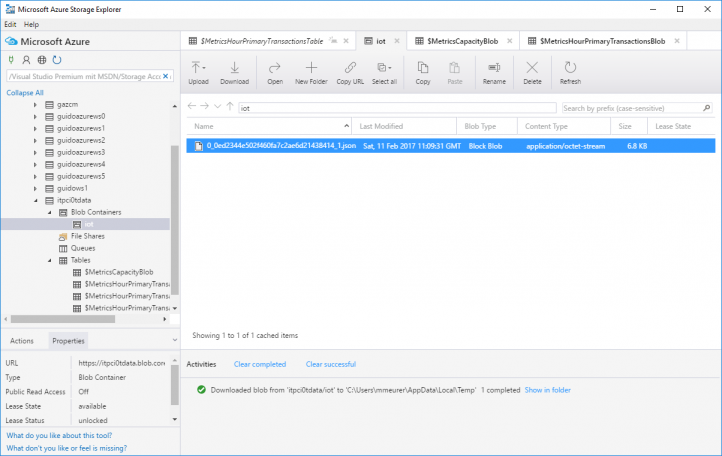
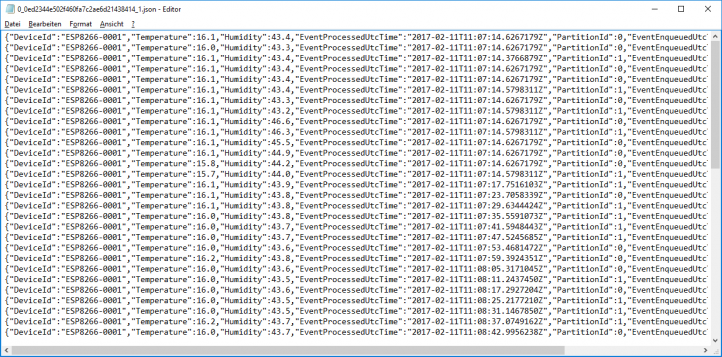
And to be sure, on the Azure storage the data files occur:
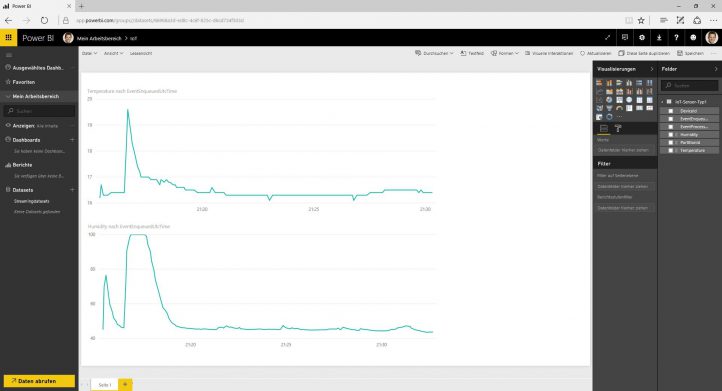
If you connect it to PowerBI, you can have these charts:
Next steps: The ESP has a deep-sleep function. If I use this, I can build a small and cheap sensor powered with batteries for up to 12 month. Then I will use some sensors in and around my house (without the bread board – soldered).
I hope this helps you to get started with IoT and Azure. If you have any questions, send me an email
Marcel
References:
Microsoft Storage Explorer: https://storageexplorer.com/
Arduino IDE: https://www.arduino.cc/en/main/software
Microsoft PowerBI: https://powerbi.microsoft.com
Azure pricing: https://azure.microsoft.com/en-us/pricing
Free Azure test account: https://azure.microsoft.com/en-us/free
 Marcel Meurer is responsible for a business division at sepago GmbH in Cologne. In this role, he leads a team of consultants who deliver their expertise to customers and partners. Before this, he worked as a consultant himself. His IT career started in the early 90s with personal computers (and therefore, Commodore 64). He began with assembling and programming, as well as hardware programming - which was the IoT of the 90s. Follow him on @MarcelMeurer.