Using State Triggers to Customize UWP apps Across Devices
Editor’s note: The following post was written by Windows Development MVP Tony Champion as part of our Technical Tuesday series with support from his technical editor, Windows Development MVP James Ashley.
One of Windows 10’s most attractive offers for developers is the ability to write a single app and deploy it across multiple platforms. Now developers can deploy their apps to desktops, mobile devices, Xbox, as well as specific devices such as HoloLens and Surface Hub without changing their code or having to create device specific builds. This opens up a huge number of opportunities for UWP developers. However, there is one catch that at some point every developer will come across when building apps targeted to multiple devices.
Just because your app can be deployed to multiple device types, doesn’t mean that it will look right or run well on every device.
There are many factors that developers need to take into consideration when building for multiple devices. The chief among them is how the UI will look on each device. Apps designed for a mobile platform might not scale well moving to Xbox. Desktop users might have access to different features in your app than mobile users. The app might need to have different navigation patterns or unique views for a particular device. Whatever the reasoning, it is very likely that you will need to make changes to your app as you move across devices.
Code to Write Device Specific Code
One of the first questions that you will find yourself asking is, “How do I know what platform I am running on?” The Windows SDK provides a static class, AnalyticsInfo (found in the Windows.System.Profile namespace), which contains information about the current device. This includes a property and VersionInfo, which identifies what device family the app is currently running on as well as the version number in the instance that AnalyticsVersionInfo that is returned. The device family information found in the DeviceFamily property holds the key to customizing an app for different devices.
DeviceFamily returns a string in the format of “Windows.{device}.” For instance, it will return values such as “Windows.Desktop,” “Windows.Mobile,” and “Windows.Xbox.” These values are returned in a string over something more structured like an enum. This allows the number of device families Windows 10 can run on to not be held up by adding additional values to an enum, thus needing a new release. This string value can open you up to possible typo issues, so it’s important to code accordingly.
Let’s take a look at our new friend in action. Create a new Blank App (Universal Windows) project in Visual Studio 2015 and call it “MultipleDevices.” This code works on all versions of Windows 10, so your target and minimum versions can be set to whatever your needs require. 
Once the app is created, add a TextBlock, named “txtHello” to the MainPage.xaml for our testing purposes.
 <TextBlock x:Name="txtHello"
                     HorizontalAlignment="Center"
                     VerticalAlignment="Center"
                     FontSize="24"/>
Since this is our first app targeted for multiple devices, it’s only fitting we create our own version of Hello World. In the code behind for the MainPage class, let’s modify the constructor to populate the text for the TextBlock we just created. Using the String.Format method, we will build a string that includes the current DeviceFamily information.
 public MainPage()
{
    this.InitializeComponent();

    txtHello.Text = String.Format("Hello {0}!",
                                            Windows.System.Profile.AnalyticsInfo.VersionInfo.DeviceFamily);
}
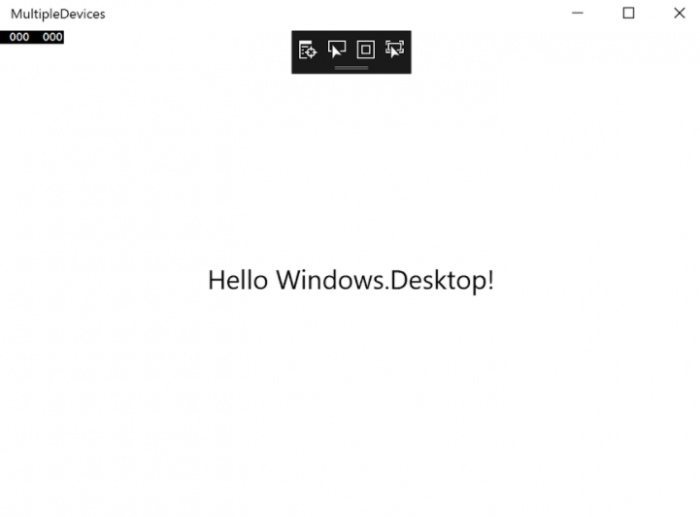
This app can now be deployed on a range of Windows 10 devices, and will have a different display on each device family. The following is an example of the app running on a desktop.
Use Trigger in Visual State Manager
One of the new additions to the Visual State Manager (VSM) in UWP is the concept of state triggers. A state trigger allows you to build a class that defines and sets custom view states within the Visual State Manager. UWP includes a very useful state trigger, AdaptiveTrigger, that allows you to change the state of your UI based on the width and height of the app.
Instead of writing code that tracks changes in the window size and then changing your UI from code, use AdaptiveTrigger and setters in the VSM. By adding the following example to the Grid in our MainPage.xaml, our app will now change colors dynamically based on the width of the app.
 <VisualStateManager.VisualStateGroups>
    <VisualStateGroup x:Name="AdaptiveStates">
        <VisualState x:Name="Wide">
            <VisualState.StateTriggers>
                <AdaptiveTrigger MinWindowWidth="1000"/>
            </VisualState.StateTriggers>
            <VisualState.Setters>
                <Setter Target="grdMain.Background" Value="Green"/>
            </VisualState.Setters>
        </VisualState>
        <VisualState x:Name="Normal">
            <VisualState.StateTriggers>
                <AdaptiveTrigger MinWindowWidth="700"/>
            </VisualState.StateTriggers>
            <VisualState.Setters>
                <Setter Target="grdMain.Background" Value="Blue"/>
            </VisualState.Setters>
        </VisualState>
        <VisualState x:Name="Narrow">
            <VisualState.StateTriggers>
                <AdaptiveTrigger MinWindowWidth="1"/>
            </VisualState.StateTriggers>
            <VisualState.Setters>
                <Setter Target="grdMain.Background" Value="Red"/>
            </VisualState.Setters>
        </VisualState>
    </VisualStateGroup>
</VisualStateManager.VisualStateGroups>
Looking at the code, we have three states based on size. If the width of the window is greater than 1000, we set the background color to green, between 700 and 1000 the color is blue, and between 1 and 700 the color is red.
Note: One more addition that is needed for this to run is to name you Grid to “grdMain”.
<Grid x:Name="grdMain" Background="{ThemeResource ApplicationPageBackgroundThemeBrush}">

Building a Device State Trigger
State triggers makes a perfect vehicle to enable you to create XAML layouts that update base on the device type that the app is running on. UWP makes it easy to create your own state triggers by creating a class that inherits the base class StateTriggerBase (found in the Windows.UI.Xaml namespace). Begin by adding a new class to your project and call it DeviceStateTrigger.cs.
Once the class is created, we can set up our state trigger by inheriting StateTriggerBase.
 public class DeviceStateTrigger : StateTriggerBase
{
}
If you look at the AdaptiveTrigger example above, you will see that we set our states using the MinWindowWidth property. Your custom state trigger should expose at least one property that allows the developer to set different states in your trigger. For our device state trigger, let’s add a string property DeviceStateTrigger. The value of the property will be stored in a private string _deviceFamily.
 private string _deviceFamily;

public string DeviceFamily
{
    get { return _deviceFamily; }
    set { _deviceFamily = value; }
}
Now that we have a DeviceFamily property added to our state trigger, there is one more thing we need to do to enable a particular state. StateTriggerBase has a protected method, SetActive, which accepts a Boolean that activates a particular state. In our state trigger, we want to set the active state of the trigger to true when the DeviceFamily is the same returned in AnalyticsInfo.VersionInfo.DeviceFamily. The following is the full code for our new state trigger.
 public class DeviceStateTrigger : StateTriggerBase
{
    private string _deviceFamily;

    public string DeviceFamily
    {
        get { return _deviceFamily; }
        set
        {
            _deviceFamily = value;
            SetActive(_deviceFamily == Windows.System.Profile.AnalyticsInfo.VersionInfo.DeviceFamily);

        }
    }
}
The DeviceStateTrigger is now ready to be used in the VSM. In the MainPage XAML let us add a new VisualStateGroup that will use our new state trigger. In this example, we will add two visual states, one for “Windows.Desktop” and one for “Windows.Mobile.” Each state will update the text in our txtHello TextBlock that is unique to the two platforms. To make the rest of the demos a little less colorful, the previous AdaptiveTrigger XAML has been removed from the project.
Note: Before adding the new code, first go back into your MainPage code and remove the code we added when we set the text to txtHello.
 <VisualStateGroup x:Name="DeviceStates">
   <VisualState x:Name="Desktop">
        <VisualState.StateTriggers>
            <local:DeviceStateTrigger DeviceFamily="Windows.Desktop"/>
        </VisualState.StateTriggers>
        <VisualState.Setters>
            <Setter Target="txtHello.Text" Value="Hello from the Desktop State"/>
        </VisualState.Setters>
    </VisualState>
    <VisualState x:Name="Mobile">
        <VisualState.StateTriggers>
            <local:DeviceStateTrigger DeviceFamily="Windows.Mobile"/>
        </VisualState.StateTriggers>
        <VisualState.Setters>
            <Setter Target="txtHello.Text" Value="Hello from the Mobile State"/>
        </VisualState.Setters>
    </VisualState>
</VisualStateGroup>
Since this VisualStateGroup only addressed the two device types, it will not make any changes if you run the app on a different device family - like Xbox or HoloLens - however, you can add support for new devices by adding additional states.
[caption id="attachment_20206" align="alignnone" width="700"] Running app on a mobile device[/caption]
[caption id="attachment_20215" align="alignnone" width="700"]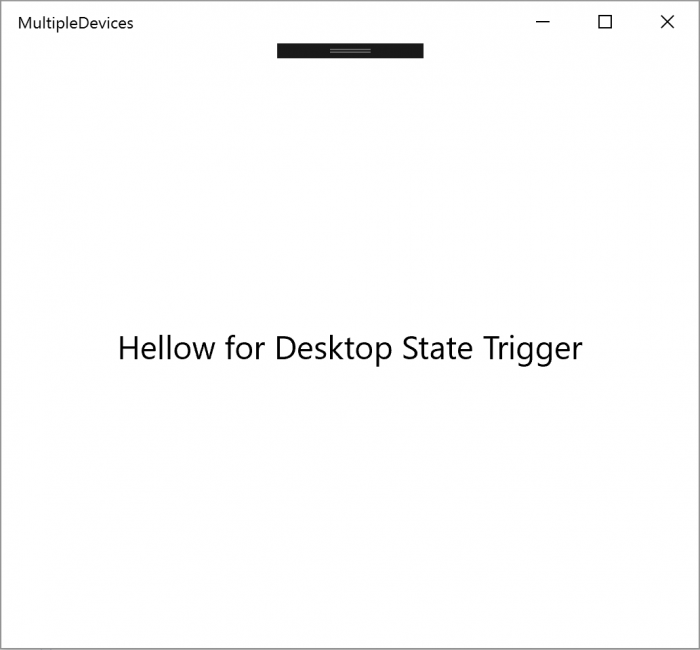 Running app on the desktop[/caption]
Protecting Against Typos
If you take a look at the XAML we added above, you might have noticed that the DeviceFamily property is being manually added. If you make a typo in this app the mistake is fairly obvious, but in an app with 10’s or even 100’s of instances of our device state trigger this could easily open you up to making mistakes. To address this issue, we can create and consume some string resources to help against typos.
For this app, we will add our resources to App.xaml, but these can also be added to a resource dictionary. Open the App.xaml and add a new Application.Resources element. In that element, add two x:String resources, one for desktop and one for mobile, and set the strings to the correct device family names.
 <Application.Resources>
    <x:String x:Key="Desktop">Windows.Desktop</x:String>
    <x:String x:Key="Mobile">Windows.Mobile</x:String>
</Application.Resources>
We can now go back to our MainPage and use the new resources instead of manually typing in the values. If we make a typo in adding the static resource key value, the app will fail with a runtime error. Here is the updated VisualStateGroup.
 <VisualStateGroup x:Name="DeviceStates">
    <VisualState x:Name="Desktop">
        <VisualState.StateTriggers>
            <local:DeviceStateTrigger DeviceFamily="{StaticResource Desktop}"/>
        </VisualState.StateTriggers>
        <VisualState.Setters>
            <Setter Target="txtHello.Text" Value="Hello for Desktop State Trigger"/>
        </VisualState.Setters>
    </VisualState>
    <VisualState x:Name="Mobile">
        <VisualState.StateTriggers>
            <local:DeviceStateTrigger DeviceFamily="{StaticResource Mobile}"/>
        </VisualState.StateTriggers>
        <VisualState.Setters>
            <Setter Target="txtHello.Text" Value="Hello for Mobile State Trigger"/>
        </VisualState.Setters>
    </VisualState>
</VisualStateGroup>
Wrap up
Every developer wants, or should want, their apps to shine on any device they’re running on. While UWP allows you to easily create apps that run on multiple devices, it is up to you to make sure that your users have a good experience on each device. In most cases, that will mean a certain level of changes to the user interface. Creating a device state trigger will allow you to make those changes in XAML and prevent code behind changes.
 Tony Champion is a software architect with over 20 years of experience developing with Microsoft technologies. Tony is an active participant in the community as a Microsoft MVP, international speaker, published author, and blogger. He focuses on a wide range of technologies - from web solutions to native apps across platforms, including Windows, Xbox One, iOS, and Android. He can be found on his blog at tonychampion.net and on twitter @tonychampion.