Part 3: Working with Office 365 Groups and Connectors
Editor’s note: The following post was written by Windows Development MVP Toni Pohl as part of our Technical Tuesday series with support from his technical editor, Office Development and Office Servers and Services MVP Stephane Eyskens.
In the first two parts of this series (see part 1 and part 2), we outlined the options for sending data to an Office 365 group with ready-to-use Connectors, and with the Incoming Webhook Connector. These methods are easy for end users, as well as for IT-Pros who want to connect their own external systems to a group.
The last article of this series will demonstrate how to integrate Office 365 Connectors into your own application. A web application will allow users to configure the app to send data to any group.
Working with Connectors in your app
The Webhook Endpoint usually does not exist when writing an application. So, the Webhook URL is unknown. However, the user of my app needs to be able to add any Office 365 group, from any tenant, to the app. Once this is accomplished, my app must store the Connector URL and be able to send data to that endpoint. This article shows how this works.
Playing in the sandbox
You can learn about Connectors at https://dev.outlook.com/Connectors.
And about Connectors Sandbox at https://connectplayground.azurewebsites.net/. In the sandbox, you can authenticate, paste your webhook URL, modify your message, as well as preview and post the custom connector card. This enables you to prepare the message you want to send from your app without the need to develop own code.
Create your application
To simulate a custom application, you can create a new ASP.NET solution with Visual Studio and use that as the LOB app. Open Visual Studio, and create a new project called “Office365ConnectorsDemo.” Choose C# and ASP.NET framework 4.6. Next, create a MVC application and let Visual Studio do the provisioning. Run the application (F5) to see if it works properly on your localhost. You will need the (final) URL for the connector later, but let’s start with the local development.
In my case, the URL of my app is https://localhost:52023/.
Now the customization starts. Adapt the \Views\Home\Index.cshtml file and remove unnecessary HTML code. You need very little information on the app start page for the demo. The following HTML snippet is the streamlined code.
@{
ViewBag.Title = "Home Page";
}
<div class="row">
<div class="col-md-12">
<h1>Office 365 group connector demo</h1>
<p>Office 365 Connectors are a great way to get useful information and content into your Office 365 Groups or Microsoft Teams.</p>
<p><a href="https://dev.outlook.com/Connectors" class="btn btn-primary btn-lg">Learn more »</a></p>
</div>
<div class="col-md-12">
<h1>Connect to an Office 365 group</h1>
<p>Click this button to allow this application to send data to your Office 365 group.</p>
<!-- placeholder -->
</div>
</div>
For the beginning, that’s it. We continue online.
Integrating a connector
Microsoft provides a method for developers to integrate unknown connectors into their applications - a user can add a connector at runtime. The user simply selects their group and allows the application to access it. The application then gets the endpoint, which is created by the wizard.
Open the Connectors Developer Dashboard at https://outlook.office.com/connectors/publish. You must have an Office 365 account to access the Connectors Developer Dashboard. The developer’s tenant is non-essential. The Dashboard shows all your existing Connectors and allows you to configure them. 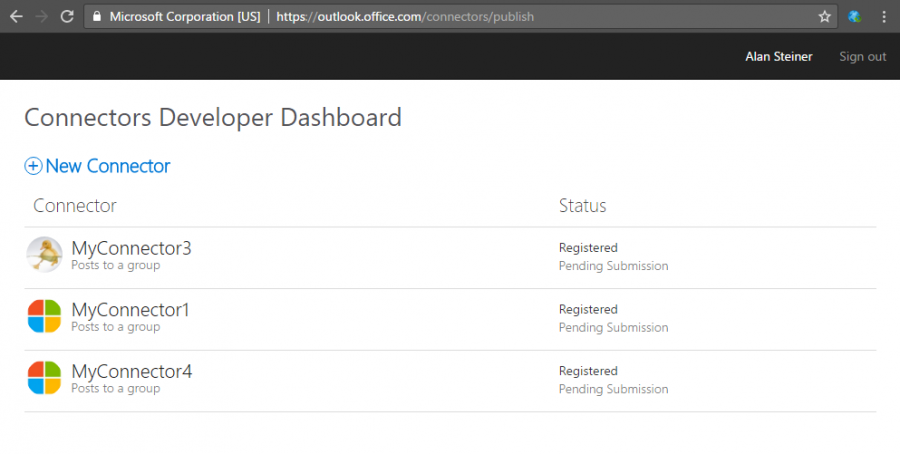
Your dashboard might be empty, so let’s create a new Connector. Click “New Connector." Now, fill the form in. We´ve named the Connector “MyConnector1." All properties describing the Connector must be completed. Even a logo is mandatory.
The important part is the Redirect URL at the end of the form. This must be the URL of your own application. Since we want to react on the callback, I changed that URL to https://localhost:52023/Home/Callback. 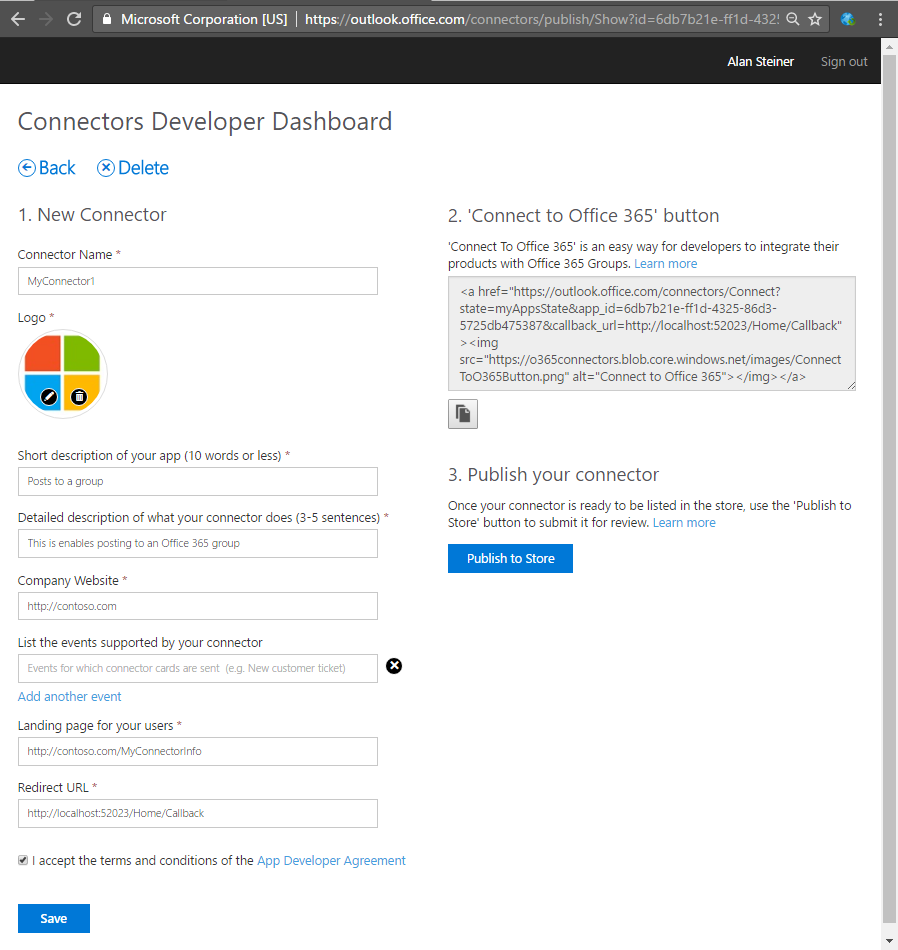
Click “Save." After the Connector description is complete, the dashboard generates a “Connect to Office 365 button” code as HTML snippet. In my case this looks as follows. Well, I corrected the wrong ending tag of the image, so I pasted this code in my index.cshtml page.
 <a href="https://outlook.office.com/connectors/Connect?state=myAppsState&app_id=6db7b21e-ff1d-4325-86d3-5725db475387&callback_url=https://localhost:52023/Home/Callback">

<img src="https://o365connectors.blob.core.windows.net/images/ConnectToO365Button.png" alt="Connect to Office 365" />
This Link replaces the “<!-- placeholder -->”. As you can see, this produces a button with a call to https://outlook.office.com/connectors/Connect. So, when you click that button, you´ll get redirected to a Microsoft page.
Now let’s create the callback view and the controller in our MVC ASP.NET application. Open the /Views/Home node in the project and add a new View named “Callback." Replace the View with this HTML and Razor code.
 @{
ViewBag.Title = "Callback";
}
<div class="row">
    <div class="col-md-12">
        <h2>Callback</h2>
        <p>This application will use this URL to post to an Office 365 group:</p>
        <p>@ViewBag.PostUrl</p>
        <p>We will store this URL for communication with the group.</p>
    </div>
</div>
Finally, add the code behind - for our demo we simply use the existing Home controller. Insert this code to show the result right after the public ActionResult Index() method in \Controllers\HomeController.cs.
       public ActionResult Callback(string state, string webhook_url, string group_name, string error = null)
     {
            // now we get the webhook URL back
         ViewBag.PostUrl = webhook_url;
            return View();
     }
It’s a good idea to set a breakpoint in the Callback method to see what information you get from the user.
Ok, that’s our code. Let’s continue.
See the user experience
Now, try it out and run the web app. The customized start page opens. Click the orange “Connect to Office 365 button.” 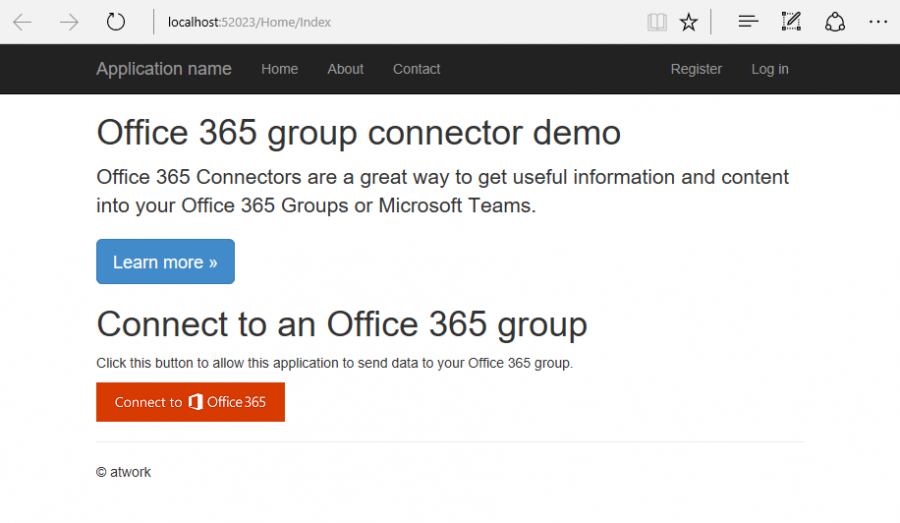
A redirect happens and the connectors connect websystem overtakes. You will need to select one of the Office 365 groups you want to have data sent to. The dialogue shows only groups that the user has permissions for. 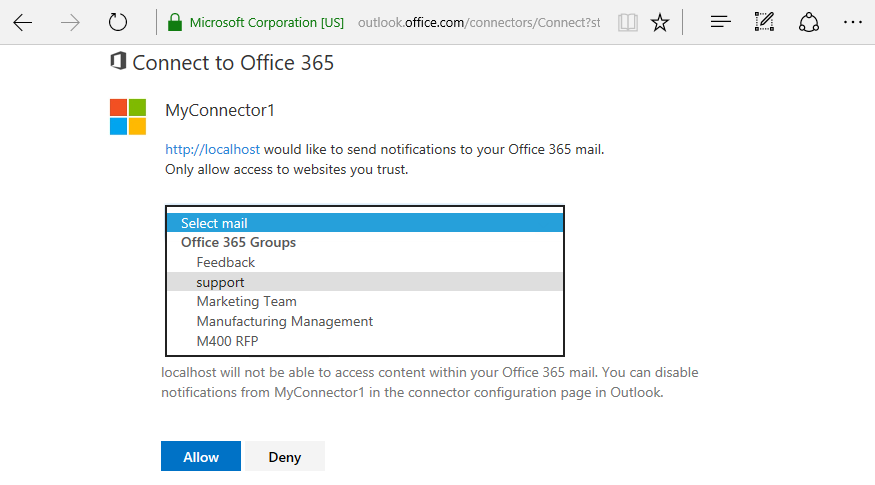
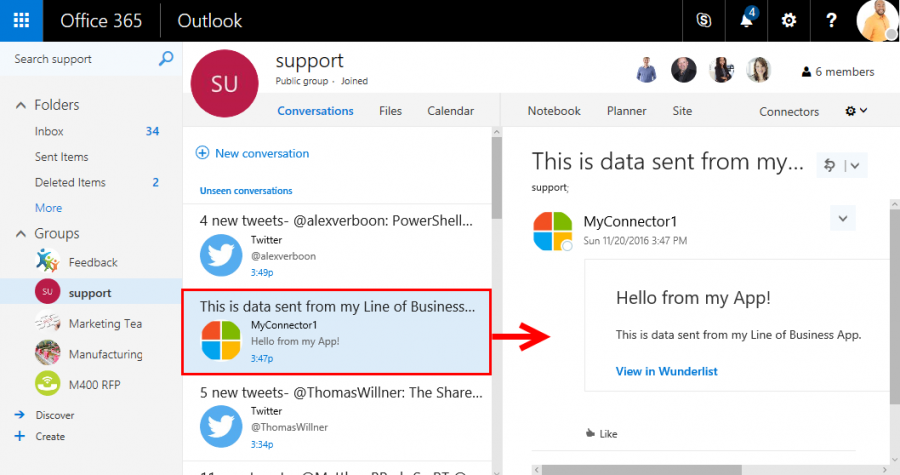
In our sample, we want to post data to the “support” group we created in part 1 of this article series. Continue with “Allow." And guess what happens now? The connectors website redirects to the Redirect URL, passing over some values. 
As we saw before, this is our key for sending data into the selected group the user gave us permission to use. The breakpoint gets hit and shows four parameters: Callback (string state, string webhook_url, string group_name, string error = null). As you see, we get back the values we need for the app configuration, which enables us to send data to the selected group. 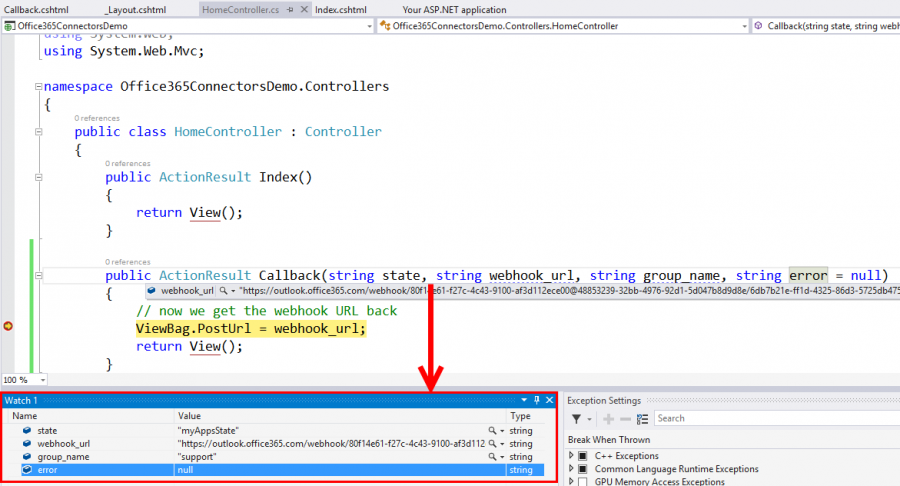
So, we now have the key for sending data. You need to store that in a safe place, in a configuration file or database. Our sample code does nothing for storing, it just shows the endpoint address for demo purposes. So, I copied that code for later.
Is this identical with an Incoming Webhook?
Yes, it is. The user wizard generated a new Connector with an endpoint. Of course, the generated Connector is manageable in Outlook Connectors as well. To check that, open Outlook and Connectors and you see the “MyConnector1” and who added it. 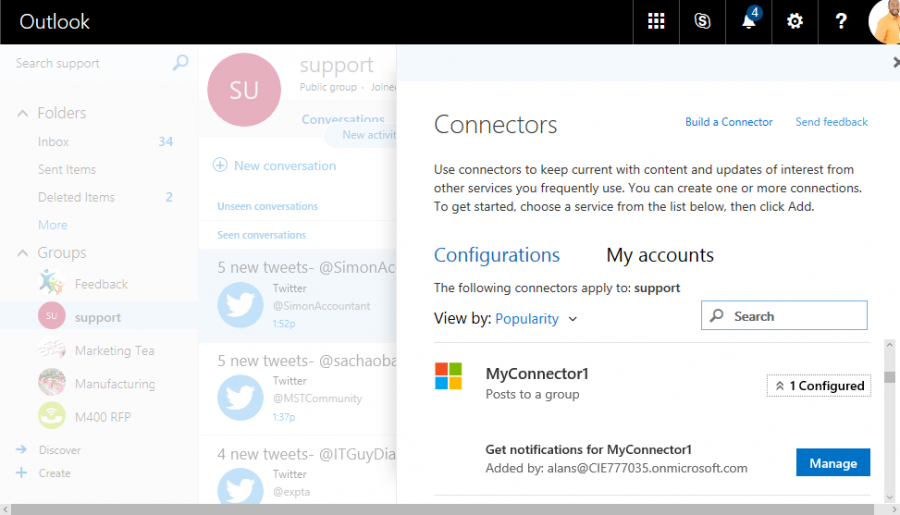
Send message from custom code
As final exercise, we want our application to use this saved key and send data to the support group. For example, if the app user clicks a specific button. So, end the web app and extend it with some more code.
First, add two models for sending a message and for getting the response. In this, add two new classes in the \Models directory: MessageModel.cs and PostModel.cs.
This is the model for Messages to an Office 365 group (MessageModel.cs):
 namespace Office365ConnectorsDemo.Models
{
    public class MessageModel
{
        public class PotentialAction
     {
            public string @context { get; set; }
            public string @type { get; set; }
            public string name { get; set; }
            public List<string> target { get; set; }
     }
        public class Message
     {
            public string text { get; set; }
            public string title { get; set; }
            public List<PotentialAction> potentialAction { get; set; }
     }
     }
}
And the model for the result when sending (PostModel.cs):
 namespace Office365ConnectorsDemo.Models
{
    public class PostModel
{
        public string Title { get; set; }
        public string Text { get; set; }
        public string Result { get; set; }
         }
}
Now add some HTML and Razor code to index.cshtml. Add another div at the end, right before the last closes.
     <div class="col-md-12">
        <h1>Send message to Office 365 group</h1>
        <p>Click this button to send a message to the support group.</p>
        <p>
          @using (@Html.BeginForm("Send", "Home", FormMethod.Post))
         {
            <input type="submit" value=" Send " /><br />
            if (null != Model?.Result)
                 {
                <label>Result: </label><span>@Model.Result</span>
                 }
         }
        </p>
    </div>
Finally, add the code for sending data. In this sample, I replaced the webhook URL with the one I got from the wizard before and send a hardcoded message from my app. The HomeController.cs is extended with that C# code:
          [HttpPost]
        public ActionResult Send(PostModel model)
       {
            // Send a message to the webhook
            var message = new MessageModel.Message
          {
              text = "This is data sent from my Line of Business App.",
              title = "Hello from my App!",
                potentialAction = new List
               {
                    new MessageModel.PotentialAction {
                       @context = "https://schema.org",
                        @type = "ViewAction",
                      name = "View in Wunderlist",
                       target = new List { "https://wunderlist.com/lists/1101/overview"}
                  }
              }
          };

            using (System.Net.WebClient client = new System.Net.WebClient())
           {
                // Unfortunately the JSON body of Connectors is using the "@" symbol for field names... this is a workaround for C#
                string json = JsonConvert.SerializeObject(message).Replace("context", "@context").Replace("type", "@type");
              client.Headers[HttpRequestHeader.ContentType] = "application/json";
                // We need our webhook here:
                var url = "https://outlook.office365.com/webhook/80f14e61-f27c-4c43-9100-af3d112ece00@48853239-32bb-4976-92d1-5d047b8d9d8e/6db7b21e-ff1d-4325-86d3-5725db475387/1cefa41a1ed745ecb9cf12c6df519a43/a1aaa1a5-8009-49dc-adf4-37b43ff169fd";
                var result = client.UploadString(url, "POST", json);
                // if everything was ok, we get "1" back
             model.Result = result;
         }
            return View("Index", model);
     }
The only particularity in that code is, that the key names for @context and @type include the “@” symbol at the beginning, which is not allowed for a property in C#. The simple workaround is to replace these both values in an extra step, so that the final message is valid.
Again, it’s a good idea to add a breakpoint in the Send function to see what the code does.
Final run
Let’s see if the application and our custom code work. Run the web app. As before, we start on localhost and now we see the third “send” button. So, let’s click it. 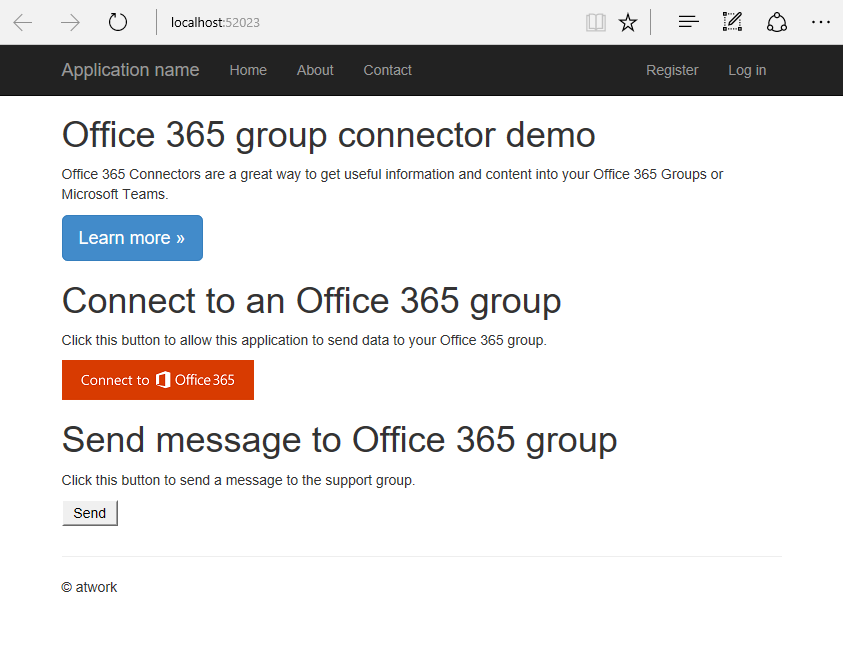
If the code works correctly, we get back the – usual – “1”. In the code, we simply take that value and send it back to the View as output. 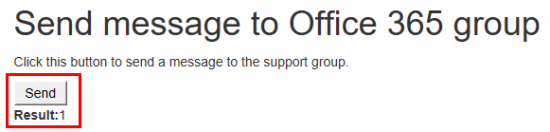
In real world applications, the result should be handled correctly. Sending a message from any application is easy with an HTTP POST request to the group endpoint. It does not make any difference if the user in my custom app is authenticated or not - again, the group URL is the key to the selected group.
Note: Although authentication doesn’t matter from an Office 365 Group perspective, if the data sender gets compromised, this could lead to polluting the 365 Group. So, in the enterprise world, I’d still make sure that the sender is somehow protected (via authentication or IP restriction etc…). Plus, if the user accessing the sender web app is authenticated, their identity could be mentioned as well in the card.
Go further
In real world, the Redirect URL must be changed in the Connectors Developer Dashboard to a valid one, hosted on a webserver. If the Connector will only be used internally in your organization, you do not need to publish the Connector. The Connector is available for all users of your app.
If you want to offer a Connector for your app that is publicly available (or in a marketplace), continue to publish your app. 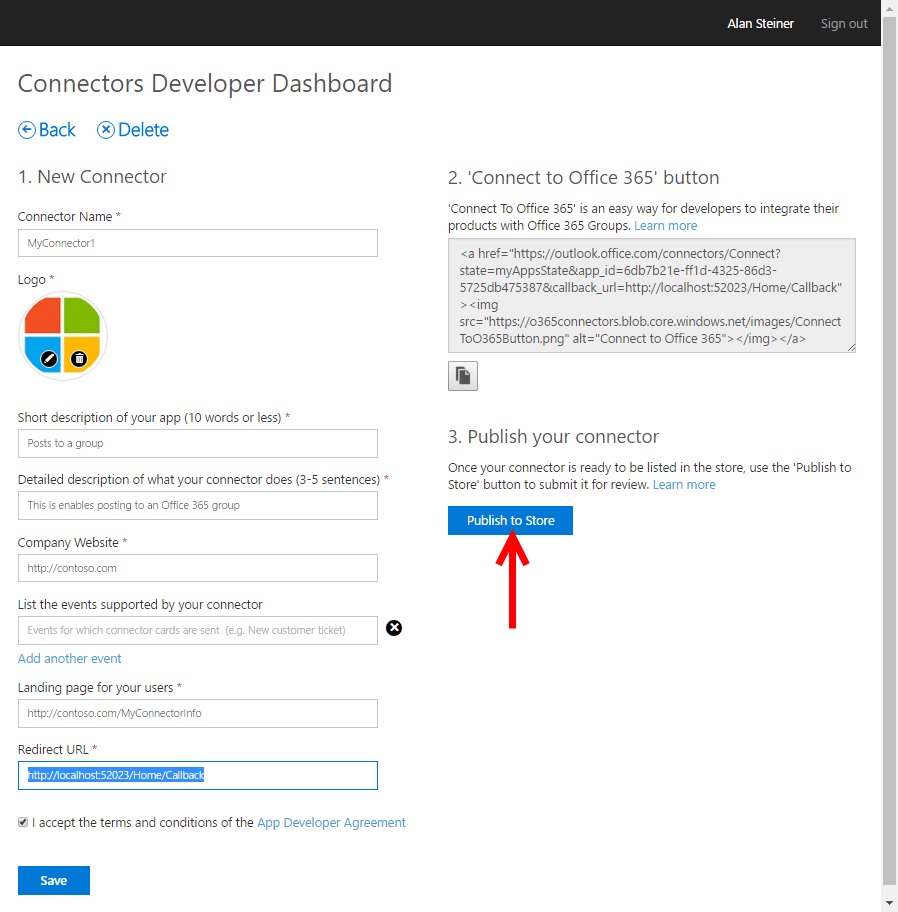
In this case, fill out more information about your Connector and send this form to Microsoft. The team will check your data, try it out and if everything fits, your Connector can be published to the Microsoft Store. 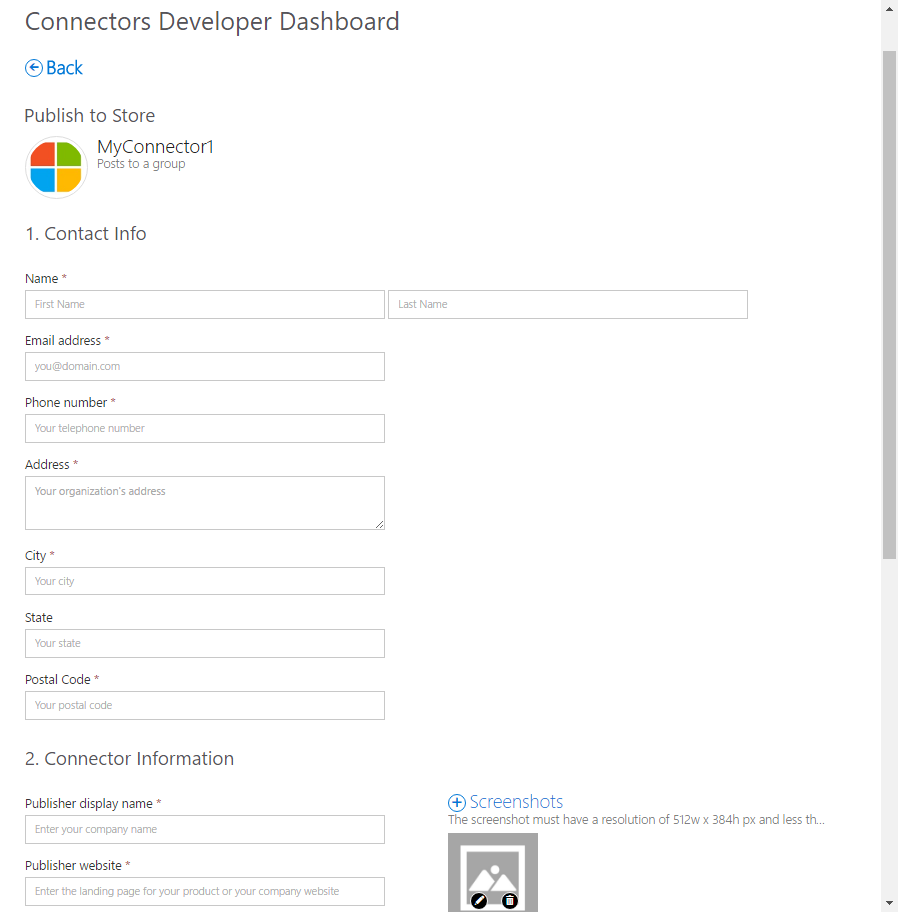
Summary: Try it out!
This article shows how business applications operate with user interaction and automatic connector creation. It demoed a sample web app to illustrate how the integration works.
You can download the full sample web app at https://github.com/tonipohl/Office365Connectors.
Even more, there’s additional Connector stuff to come in future, for the personal inbox and other Office 365 services.
If you want to provide feedback on Office 365 Connectors or if you want to vote for existing requests, go to https://officespdev.uservoice.com/connectors.
As you saw, it’s very easy to integrate data based triggers or services to Office 365 groups. Try it out!
I hope this three-article series delivered insight into Connectors for Office 365 groups, and you will find many use cases for working with all types of Connectors.
 Toni Pohl is a Windows Development MVP and a Principal at atwork.at living in Vienna, Austria. He has worked in the IT industry for 20 years in various roles, including as a consultant, blogger, author, as well as a conference presenter. Toni is an expert in the development of online technologies, Office 365 and Azure. Find more about Toni at https://about.me/toni.pohl.
Follow him on Twitter @atwork