Part 2: Working With Office 365 Groups And Connectors
Editor’s note: The following post was written by Windows Development MVP Toni Pohl as part of our Technical Tuesday series with support from his technical editor, Office Development and Office Servers and Services MVP Stephane Eyskens.
Office 365 groups provide collaboration tools for teams within the Office 365 world. In part one (see here), we saw how groups work and how ready-to-use connectors can be utilized to send data from public services - like blogs, Twitter and Wunderlist - to a group. In this part two, we’ll concentrate on individual connectors, and how to send data from our own scripts or systems.
This is part 2 of a 3-part article series.
Adding Custom Connectors
It’s quite simple to add custom connectors to an Office 365 group. The secret for adding your own data, is the “Incoming Webhook” Connector.
In our scenario, we need to check the status of a backup operation from a script, and add the daily result to our group for all members of the support group to see. Simply open the “Connectors” menu and add Incoming Webhook. 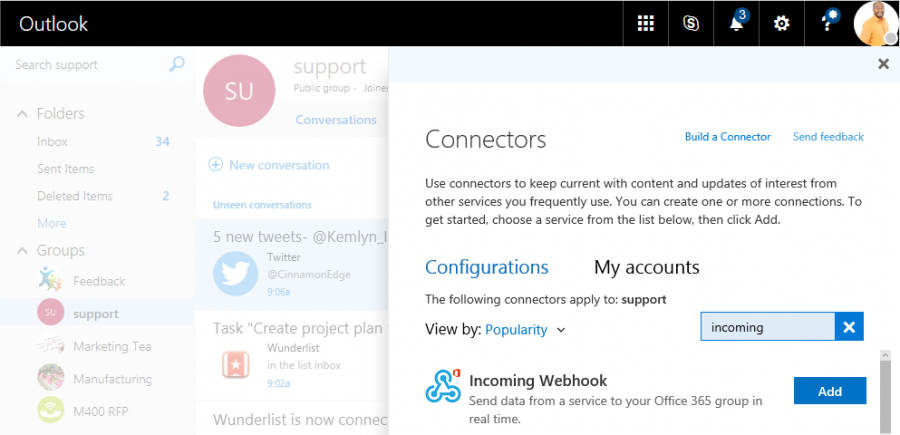
We need to provide a name for this connector and use “Backup Status”, then, click “Create.” If you wish, you can upload a Webhook picture, which should be in a square format and not too large. This picture can then be seen in the messages gathered from the data source. 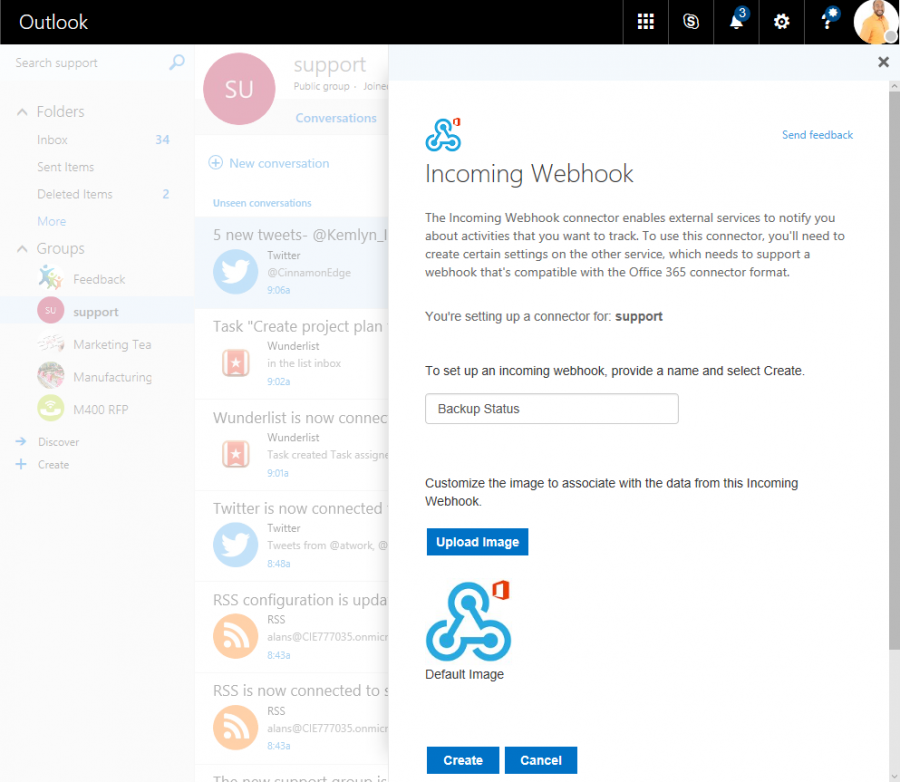
In the background, there is an HTTP endpoint created for the tenant and the group. The wizard shows the URL to send data to: https://outlook.office365.com/webhook/<tenantid>/IncomingWebhook/<groupid>/<webhookid>
The webhook uses the subdomain “outlook.office365.com/webhook” and the <id> parts are filled out by long global Identifiers (GUIDs). 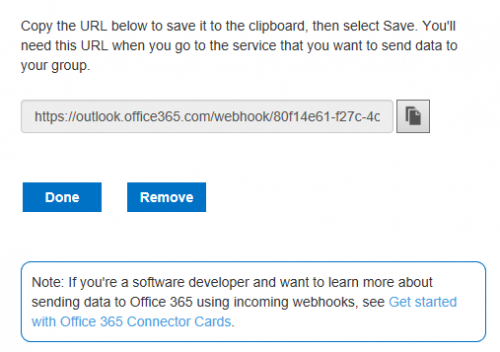
Copy and remember that URL. Click “Done” when you’ve saved the URL to leave the Connectors configuration.
Security aspects
As you see, there is no authentication included. We assume that this URL is unique, only the creator of the Connector knows it, and that no one figures it out. It’s a GUID-world. This URL is the key to send data into our group. However if this URL happens to be compromised, delete the webhook and create a new Incoming Webhook. It’s as simple as that.
See how it works behind the scenes
To send a message, just send an HTTP POST request using a JavaScript Object Notation format (JSON) payload to this URL. To understand the concept, my first sample is provided with the Fiddler Proxy tool, and is available for free at: https://www.telerik.com/download/fiddler.
In Fiddler, go to the “Composer” tab and set the HTTP request to “POST.” Copy the Webhook URL into the address field. To complete the message, add that we are sending a message in the “Content-Type: application/json” format, followed by the message itself in the body. The red fields in the following graphics show the necessary inputs.
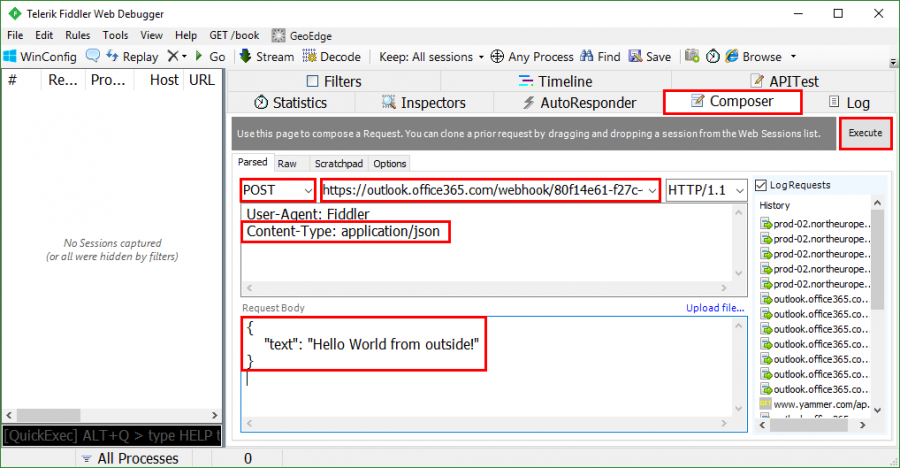
The message must comply to a specific format, called the “Connector Card message.” This is a JSON formatted text that must include a “text” message within the {} brackets. In our sample, we send the text below and click the Execute button.
{ "text": "Hello World from outside!" }
As result, we should get an HTTP 200 status – saying the message transfer was ok. If our syntax and the webhook address was accepted, we get an extensive result: 1. 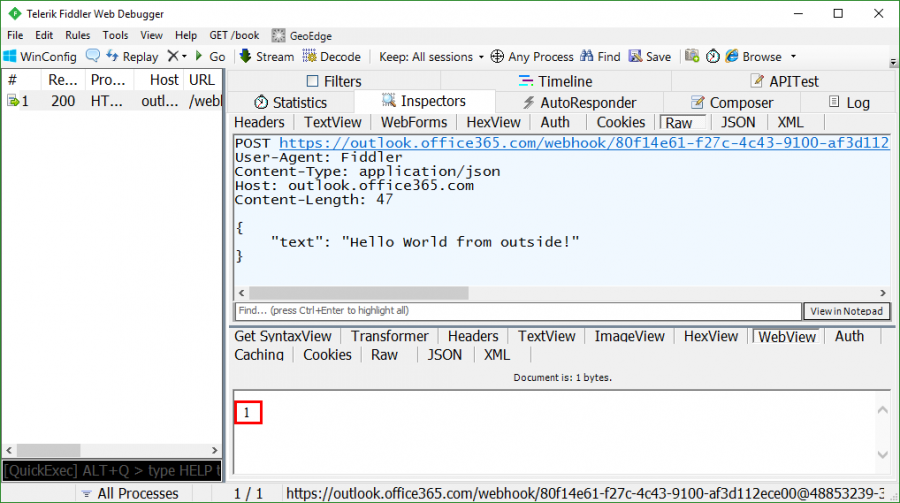
The result “1” means the message was accepted by the Connector. If an invalid syntax is sent, we receive HTTP/1.1 400 Bad Request. In that case the result returns “Bad payload received by generic incoming Webhook.”
Check it out in the group
The Outlook client should instantly show the new group activity. This is how the self-constructed message looks: 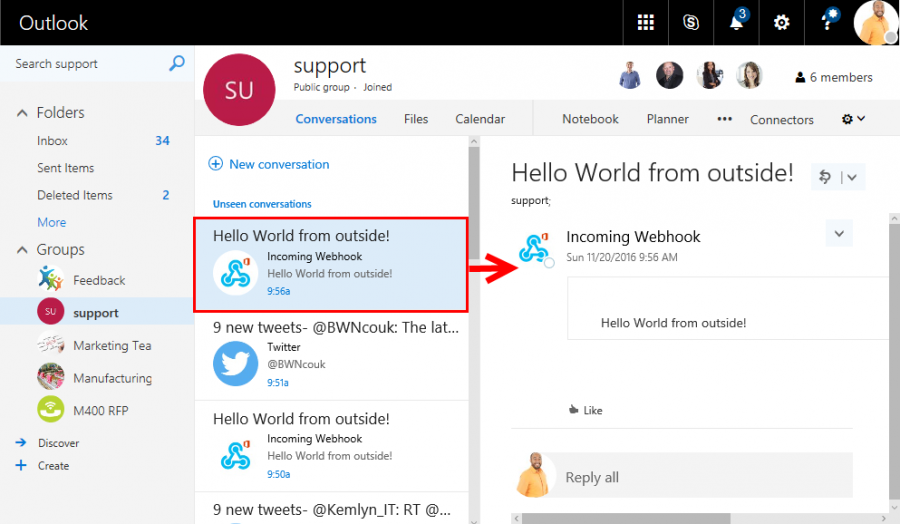
Of course, you could also send an email to that group providing information from the external systems. But there are two main differences:
- The webhook Connector forces the application to use a specific format defined in the Connector cards, to ensure the information is structured and looks clean.
- The Webhook “key” - the URL - allows only specific applications to send data to the group.
Since it is so easy to send data to a group, the webhook is usually the preferred way to do it. This leads us to formatting the Connector Cards.
Connector Cards
For our first transfer, we used just a text message. Of course, there are more properties you can fill. See all formats at https://dev.outlook.com/Connectors/reference.
See this extended sample, that shows a link and a button leading to a specific Wunderlist task.
 {
  "text": "Click here to edit the [corresponding ticket!](https://www.wunderlist.com/webapp#/tasks/2300072611/title/focus)",
  "title": "Reminder for task 2300072611",
  "potentialAction": [
 {
      "@context": "https://schema.org",
   "@type": "ViewAction",
     "name": "View in Wunderlist",
      "target": ["https://www.wunderlist.com/webapp#/tasks/2300072611/title/focus"]
  }
  ]
}
Visual Studio Code (see https://code.visualstudio.com/) works very well with JSON files, in order to prepare messages. So, copy this message and send it via Fiddler as before. This is what we see as result: 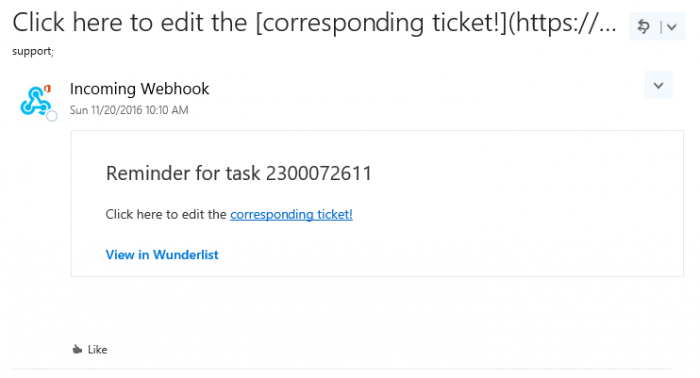
When users click one of the links, they get redirected to the ticket in the external system - in our sample to the Wunderlist task. There are more options – and more will come in future. To see how an extensive message looks, see this sample from: https://dev.outlook.com/Connectors/reference. 
Remember, pictures must be available publicly. Azure Storage is highly recommended as a storage location, but of course one’s own Webserver or system accessible by an URL is also good.
Send messages to the Webhook Connector
Now that we understand the concept and the basic syntax, how can one easily send messages from outside? There are the following options:
- Use a tool as CURL
- Use PowerShell
- Use custom code (this will be covered in the next part of this article)
Using CURL
CURL is a handy and free tool for working with HTTP, FTP and similar requests. You can download the tool for x86 and x64 systems from https://winampplugins.co.uk/curl/. Once installed, it is a good idea to add the program path to the system PATH, so that you can use the CURL command line tool in every directory. You can do so in System / Advanced / Environment Variables… and edit the PATH variable. 
Now, we’re ready to use the CURL tool from our batch scripts. Let’s assume we have a backup operation, and at the end we want to send a message to the support group. This is how we can accomplish that operation.
Tip: CURL is a command line tool and requires each quote to be phrased as “\”. So, every quote character must be replaced by this.We simulate the backup procedure with a parameter passed to the batch file. The batch file is saved in C:\Demo\script\curldemo.cmd.
 @echo off
curl -H "Content-Type: application/json" -d "{\"title\":
\"Backup-Operation Status\", \"text\": \"The backup returns this
status: %1\", \"themeColor\": \"EA4300\"}"
https://outlook.office365.com/webhook/...
echo.
When executing the script in the Command Prompt with parameter “OK”, we get the result “1” for a successful send. The same script with parameter “ERROR” produces a second message. 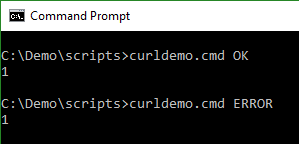
The group shows the result for both operations, sent from a script. 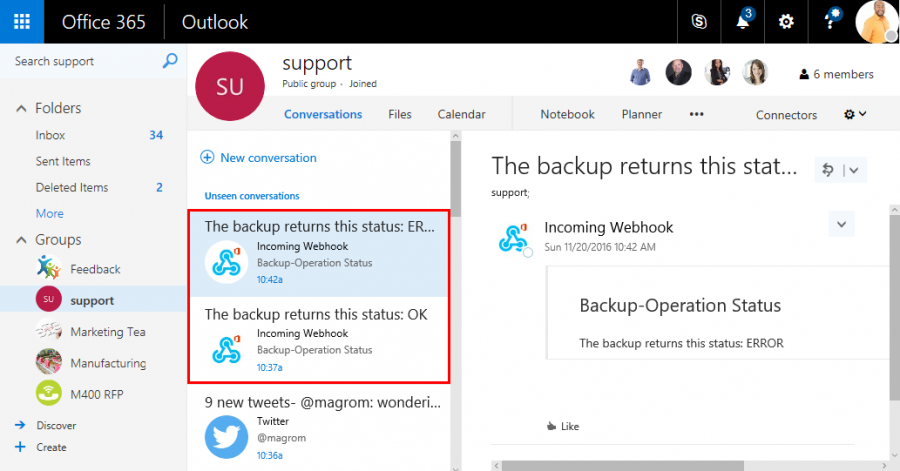
Easy to use, right?
Using PowerShell
The same concept works with built-in PowerShell. This is done with the Invoke-RestMethod commandlet.
Tip: In PowerShell, the whole message string must be braided with @”, to use the multiline text with quotes included.
Use this script here to send a message to the group.
 $url = 'https://outlook.office365.com/webhook/...'
$body = @"
{
 "text": "This info was sent from PowerShell",
   "title": "PowerShell!"
}
"@
Invoke-RestMethod -Uri $url -Method Post -Body $body -ContentType "application/json"
When executing the PowerShell script we’ll get the usual “1” as a result, if everything worked okay. 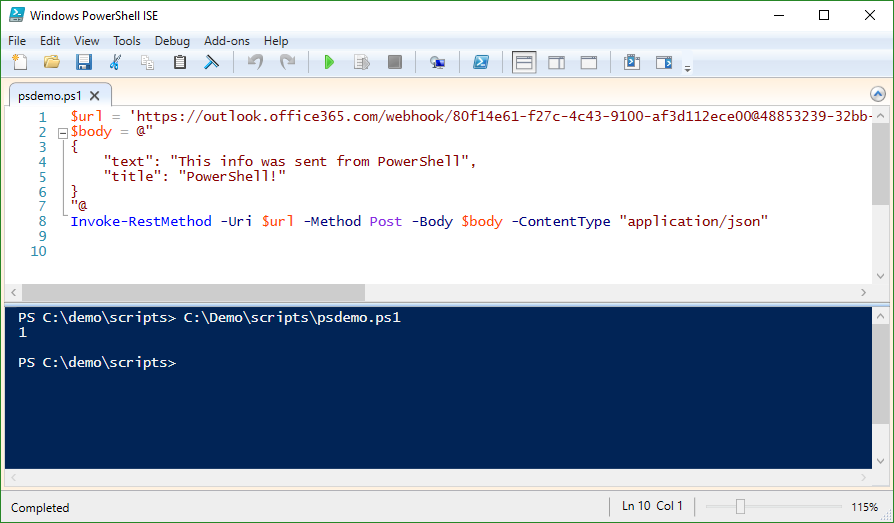
Checking the result shows the message sent, as before. 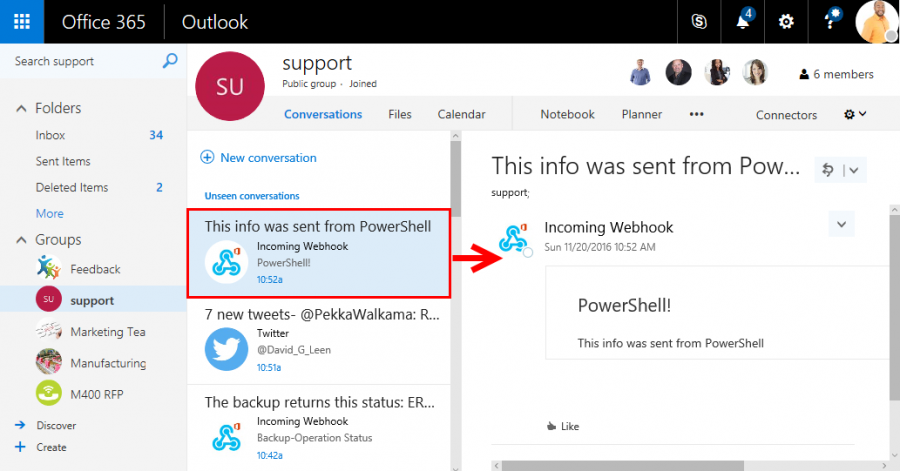
Summary
This article shows how the Incoming Webhook Connector works, and how to send data from outside into an Office 365 group. This can be done from scripts with tools, or even with PowerShell and other custom code. In part three, we’ll pretend to be an ISV and concentrate on the integration of Office 365 Connectors into our own application. This can be a web form or a single Line of Business app.
Check back next week for the article!
 Toni Pohl is a Windows Development MVP and a Principal at atwork.at living in Vienna, Austria. He has worked in the IT industry for 20 years in various roles, including as a consultant, blogger, author, as well as a conference presenter. Toni is an expert in the development of online technologies, Office 365 and Azure. Find more about Toni at https://about.me/toni.pohl.
Follow him on Twitter @atwork