Unleash the power of SQL Server 2016 and Azure SQL database temporal tables
Editor’s note: The following post was written by Data Platform MVP Johan Åhlén as part of our Technical Tuesday series with support from his technical editor, Data Platform MVP Peter Larsson.
Maybe you have heard about temporal tables in SQL Server 2016 and Azure SQL database, but I bet you haven’t seen the full power of them yet. This article explains how to make practical use of temporal tables, and delves into things like how to make UNDO accidental changes, or do a Change Data Capture (CDC) in a new way.
Temporal tables (not to be confused with temporary tables) were introduced in SQL Server 2016, and have also been made available in Azure SQL Databases. Basically, this feature adds automatic history tracking and supports new T-SQL query syntax for historical querying. Note that the full name of this feature is “System-versioned temporal tables”, but for brevity we will just call them temporal tables.
Temporal tables consist of two tables: a “current” table and a “history” table. The history table is managed and created automatically, but you could supply your own table if you want to customize it. The “history” table starts empty and grows when rows are changed or deleted in the “current” table.
There is a new icon - with a clock - in Management Studio to indicate temporal tables. Additionally, Management Studio displays the history table if you expand a temporal table. 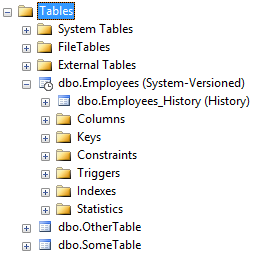
For a more thorough introduction to temporal tables, I recommend reading my article on SQL Server Central. It describes how to manage your temporal tables (including history retention for on-premise SQL Server and Azure SQL Databases) as well as the new T-SQL extensions to query temporal tables.
We’ll be diving into some practical scenarios for temporal tables, but first let’s start with a scenario background.
Scenario background
Let’s imagine we are running an HR system that features a table of employees, their salaries and their managers. 
As we don’t have access to the source code for the HR application, we can’t do any changes to it or the SQL statement it executes. However, we are able to make changes to the database.
The CREATE-statement for the Employees table looks like this:
 CREATE TABLE [dbo].[Employees](
   [EmployeeId] [int] NOT NULL PRIMARY KEY CLUSTERED,
  [Name] [nvarchar](50) NOT NULL,
 [JobTitle] [nvarchar](50) NOT NULL,
 [Salary] [int] NOT NULL,
    [ManagerEmployeeId] [int] NULL
) ;
Auditing with temporal tables
As Robert doesn’t trust Petyr or Varys, he orders Jaime to audit the HR system for unauthorized changes. Jaime converts the table into a temporal table:
 ALTER TABLE [dbo].[Employees] ADD
 [SysStartTime] datetime2(0) GENERATED ALWAYS AS ROW START HIDDEN NOT NULL CONSTRAINT DF_Employees_SysStartTime DEFAULT '2016-01-01 00:00:00',
   [SysEndTime] datetime2(0) GENERATED ALWAYS AS ROW END HIDDEN NOT NULL CONSTRAINT DF_Employees_SysEndTime DEFAULT '9999-12-31 23:59:59',
 PERIOD FOR SYSTEM_TIME ([SysStartTime], [SysEndTime]);


ALTER TABLE [dbo].[Employees]
 SET (SYSTEM_VERSIONING = ON (HISTORY_TABLE = [dbo].[Employees_History]));
This adds two new columns, SysStartTime and SysEndTime, which are initially loaded with the values 2016-01-01 00:00:00 and 9999-12-31 23:59:59 - but they were automatically updated by SQL Server as rows were changed. The two new columns are also hidden so they won’t be shown to the application if it doesn’t explicitly specify their names. The schema and name of the history table is specified, dbo.Employees_History, which means it will reuse the table if it exists or create a new if it doesn’t exist.
There is one case when you can’t convert tables to temporal tables. That’s when the application uses truncate statements on the table. Temporal tables don’t support truncate.
Jaime later notices that Petyr’s salary seems to have changed. As far as Jaime remembers, it should be 5000, but now it says 10000 in the HR system. Jaime looks at the history for the last year (using the FOR SYSTEM_TIME BETWEEN clause):
 SELECT *, SysStartTime, SysEndTime
FROM dbo.Employees
FOR SYSTEM_TIME BETWEEN '2016-01-01' AND '2016-12-31';
This query shows all changes to the Employees table during the year 2016. 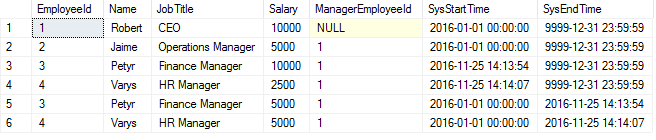
As can be seen in the table, something happened around 2016-11-25 14:13 with Petyr’s and Varys’ salaries. Let’s improve the query a bit:
 WITH cte AS
(
  SELECT
     [EmployeeId]
        ,[Name]
     ,[JobTitle]
     ,[Salary]
       ,[OldSalary] = LAG(Salary) OVER(PARTITION BY EmployeeId ORDER BY SysStartTime ASC)
      ,[ManagerEmployeeId]
        ,[SysStartTime]
     ,[SysEndTime]
       ,[OldSysEndTime] = LAG(SysEndTime) OVER(PARTITION BY EmployeeId ORDER BY SysStartTime ASC)
  FROM dbo.Employees
  FOR SYSTEM_TIME BETWEEN '2016-01-01' and '2016-12-31'
)
SELECT
    [EmployeeId]
    ,[Name]
 ,[JobTitle]
 ,[OldSalary]
    ,[NewSalary] = Salary
   ,[ManagerEmployeeId]
    ,[SysStartTime]
FROM cte
WHERE OldSysEndTime IS NOT NULL AND OldSysEndTime = SysStartTime;
The query now shows all salary changes during 2016. 
The OldSalary is found by using the LAG / OVER clause (which gives the value of the previous row in the table). Also there is a WHERE-clause at the end, which gives us only the updates. This WHERE-clause could be changed depending on the auditing scenario.
After seeing these salary changes, Jaime is very suspicious with Petyr. Is there any way to include more auditing information, such as which user did the changes? Extra columns can be added that track further information by using default-constraints. For example:
 ALTER TABLE [dbo].[Employees] ADD
 [SysCurrentUser] NVARCHAR(128) NOT NULL CONSTRAINT Employee_SysCurrentUser DEFAULT CURRENT_USER,
    [SysSystemUser] NVARCHAR(128) NOT NULL CONSTRAINT Employee_SysSystemUser DEFAULT SYSTEM_USER;
Unfortunately, the new columns cannot be hidden to the application. Only the time columns can currently be hidden. This means that adding extra auditing columns could break the application, if it uses SELECT * or inserts data without column names. Note that these columns would not record who deletes rows, since nothing would be written.
Auditing Summary
- You can start auditing a table by converting it to a temporal table. Just be careful that your application doesn’t use truncate statements, since they aren’t supported.
- You can monitor changes by using interval queries, for example SELECT … FOR SYSTEM_TIME BETWEEN … AND … You can use the LAG / OVER clause to do comparisons against previous rows.
- You could add extra auditing columns, which you populate through default-constraints, but you can’t make them invisible to the application.
Change Data Capture with temporal tables
Robert decides that he needs an intelligent advantage against his competitors. He therefore decides they should build a data warehouse. Jaime is given the task to supply the data warehouse with a Change Data Capture (information about all inserts, updates and deletes) from the HR system. The Change Data Capture should include everything that happened during the last day.
There is a built-in Change Data Capture functionality within SQL Server, but Jaime has heard that using Temporal Tables instead has several advantages that would please Robert:
- It works on Azure SQL Databases (in the cloud).
- It works also on In-Memory tables (which the standard Change Data Capture doesn’t support).
- The history table can be a stretch table (stored in the cloud) .
- It’s more efficient.
Jaime started by creating some test data:
 INSERT INTO dbo.Employees([EmployeeId], [Name], [JobTitle], [Salary], [ManagerEmployeeId]) VALUES
(1, 'Robert', 'CEO', 10000, NULL),
(2, 'Jaime', 'Operations Manager', 5000, NULL),
(3, 'Petyr', 'Finance Manager', 5000, NULL),
(4, 'Varys', 'HR Manager', 5000, NULL);

WAITFOR DELAY '00:00:10';

UPDATE dbo.Employees SET
    Salary = 6000
WHERE [Name] = 'Jaime';

UPDATE dbo.Employees SET
    [Salary] = 2500,
    [JobTitle] = 'Finance assistant'
WHERE [Name] = 'Petyr';

INSERT INTO dbo.Employees([EmployeeId], [Name], [JobTitle], [Salary], [ManagerEmployeeId]) VALUES
(5, 'Tyrion', 'Finance manager', 5000, NULL);

WAITFOR DELAY '00:00:10';

DELETE FROM dbo.Employees
WHERE [Name] = 'Petyr';
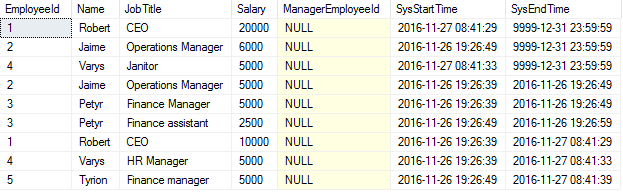
Jaime checks the results by running the following query:
 SELECT *, SysStartTime, SysEndTime
FROM dbo.Employees
FOR SYSTEM_TIME ALL;
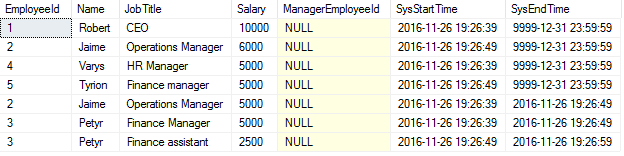
Now, how can this table be converted to a list of inserts, updates and deletes?
Getting all changes
Let’s visualize some records on a time line: 
In this visualization, we can draw some conclusions:
- A row that has no previous row or has a gap in front of it must be an insert.
- A row that has a previous row just in front of it must be an update.
- A row that ends without any new row starting directly after it must be a delete.
Note: this method requires that the time resolution of the temporary table is high enough to get the exact order of changes to a row. If multiple history rows have exactly the same starting time, we can’t order them.
Our method of finding insert, updates and deletes should therefore be to sort the record in time and check for gaps. Let’s add the time columns for the previous / next record by using the LAG / LEAD / OVER clause:
  SELECT
  [EmployeeId], [Name], [JobTitle], [Salary], [ManagerEmployeeId], [SysStartTime], [SysEndTime]
   ,PrevSysEndTime = LAG(SysEndTime) OVER (PARTITION BY EmployeeId ORDER BY SysStartTime ASC)
  ,NextSysStartTime = LEAD(SysStartTime) OVER (PARTITION BY EmployeeId ORDER BY SysStartTime ASC)
FROM dbo.Employees
FOR SYSTEM_TIME ALL

If PrevSysEndTime (or NextSysStartTime) is NULL, that means this was the first (or last) record and that it therefore must represent an insert (or a delete). If there is a value, we’ll have to compare it to the current record to see if there is any gap in time. Let’s extend the query with two flags: Inserted and Deleted.
 WITH Step1 AS
(
    SELECT
     [EmployeeId], [Name], [JobTitle], [Salary], [ManagerEmployeeId], [SysStartTime], [SysEndTime]
       ,PrevSysEndTime = LAG(SysEndTime) OVER (PARTITION BY EmployeeId ORDER BY SysStartTime ASC)
      ,NextSysStartTime = LEAD(SysStartTime) OVER (PARTITION BY EmployeeId ORDER BY SysStartTime ASC)
 FROM dbo.Employees
  FOR SYSTEM_TIME ALL
), Step2 AS
(
 SELECT
      [EmployeeId], [Name], [JobTitle], [Salary], [ManagerEmployeeId], [SysStartTime], [SysEndTime]
       ,Inserted = IIF(PrevSysEndTime IS NULL OR PrevSysEndTime  SysStartTime, 1, 0)
       ,Deleted = IIF(NextSysStartTime IS NULL OR NextSysStartTime  SysEndTime, 1, 0)
  FROM Step1
)
SELECT *
FROM Step2;
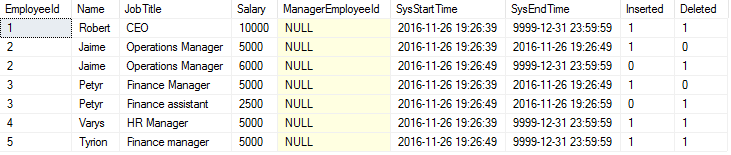
Note that the Deleted flag contains some false hits. This is because it believes there is a delete at 9999-12-31. That will automatically be filtered out if we limit our results to a specific time interval. Let’s look at a single day:
 DECLARE @StartTime DATETIME2(0) = '2016-11-26 00:00:00';
DECLARE @EndTime DATETIME2(0) = '2016-11-27 00:00:00';
We can now get the inserts, updates and deletes between @StartTime and @EndTime through the following query:
  DECLARE @StartTime DATETIME2(0) = '2016-11-26 00:00:00';
DECLARE @EndTime DATETIME2(0) = '2016-11-27 00:00:00';


WITH Step1 AS
(
 SELECT
     [EmployeeId], [Name], [JobTitle], [Salary], [ManagerEmployeeId], [SysStartTime], [SysEndTime]
       ,PrevSysEndTime = LAG(SysEndTime) OVER (PARTITION BY EmployeeId ORDER BY SysStartTime ASC)
      ,NextSysStartTime = LEAD(SysStartTime) OVER (PARTITION BY EmployeeId ORDER BY SysStartTime ASC)
 FROM dbo.Employees
  FOR SYSTEM_TIME ALL
), Step2 AS
(
 SELECT
      [EmployeeId], [Name], [JobTitle], [Salary], [ManagerEmployeeId], [SysStartTime], [SysEndTime]
       ,Inserted = IIF(PrevSysEndTime IS NULL OR PrevSysEndTime  SysStartTime, 1, 0)
       ,Deleted = IIF(NextSysStartTime IS NULL OR NextSysStartTime  SysEndTime, 1, 0)
  FROM Step1
)
SELECT
  [Action] = CASE WHEN Inserted = 1 THEN 'I' ELSE 'U' END
 ,[EmployeeId]
   ,[Name]
 ,[JobTitle]
 ,[Salary]
   ,[ManagerEmployeeId]
    ,[TimeStamp] = SysStartTime
FROM Step2
WHERE SysStartTime > @StartTime AND SysStartTime  @StartTime AND SysEndTime <= @EndTime

ORDER BY [Timestamp];
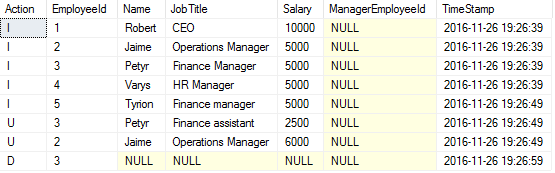
Compare this list of actions with the statements Jaime used for creating the test data and you will see that it matches. At 19:26:49, Jaime changed his own salary and also made Petyr into “Finance assistant” with salary of 2500. At 19:26:59, Petyr (with employee id 3) was deleted.
Getting the net changes
Now, getting all changes to a table and replaying them can be pretty inefficient. It can sometimes be more desirable to get the net changes. In the visualization below, we have several changes to a table, but the net change is a single INSERT. 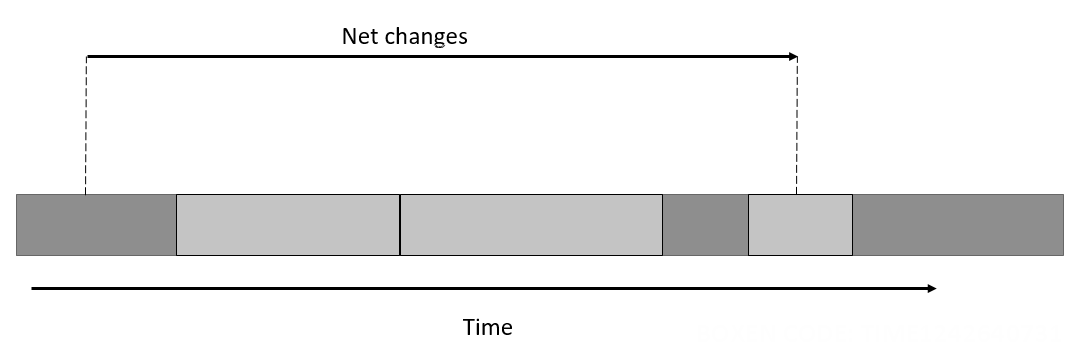
Finding the net changes can be done by comparing two points in time. To make it even more efficient, we can start by doing an interval query to check which employees to include. Then, the next step would be to do the actual comparison.
This is the complete net change script. Note that this code is for readability. It is not optimized for efficiency or speed.
 DECLARE @StartTime DATETIME2(0) = '2016-11-26 00:00:00';
DECLARE @EndTime DATETIME2(0) = '2016-11-27 00:00:00';


-- Step 1: Find employees that may have any changes between @StartTime and @EndTime
WITH Step1 AS
(
   SELECT DISTINCT EmployeeId
  FROM dbo.Employees
  FOR SYSTEM_TIME ALL
 WHERE SysEndTime > @StartTime AND SysStartTime  @StartTime AND SysEndTime  @StartTime AND CurrSysStartTime <= @EndTime

UNION ALL

SELECT
    [Action] = 'U'
  ,EmployeeId
 ,[Name] = CurrName
  ,JobTitle = CurrJobTitle
    ,Salary = CurrSalary
    ,ManagerEmployeeId = CurrManagerEmployeeId
  ,[TimeStamp] = CurrSysStartTime
FROM Step2
WHERE OldSysEndTime IS NOT NULL AND CurrSysStartTime IS NOT NULL AND OldSysEndTime  CurrSysEndTime
AND CurrSysStartTime > @StartTime AND CurrSysStartTime  @StartTime AND OldSysEndTime <= @EndTime

ORDER BY EmployeeId;
Change Data Capture summary
- Change Data Capture with temporal tables has it’s advantages, when compared with the “standard” Change Data Capture: it works with Azure SQL Databases and n-Memory tables, and can use stretch databases for the history tables.
- Inserts, updates and deleted are detected by looking for gaps in the time between records. This can be done with an over clause and then comparing SysStartTime and SysEndTime between the records.
- In many cases, we will be looking for the net changes. We then use a query that compares two points in time. To make it even more efficient, we first filter out the records that potentially could have changed.
Undoing data changes with temporal tables
While Jaime is away, Robert himself takes over the responsibility for the databases. Eager to show off his skills, Robert runs some SQL statements. However, after Robert’s SQL statements, there seems to be big problems with the HR System. This is very embarrassing for Robert, so when Jaime returns Robert asks for help restoring the Employees table to exactly the way it looked before Jaime’s trip.
This is how the Employees table looked after Robert’s SQL statements: 
This is the Employees table with full history (with Robert’s changes done around 08:40 on 2016-11-27):
  SELECT *, SysStartTime, SysEndTime
FROM dbo.Employees
FOR SYSTEM_TIME ALL;
Restoring a table to the way it looked earlier is useful, and not only for Robert and Jaime. So how can it be done?
Perhaps the most natural option is to use a point-in-time query to get a snapshot of how the table looked earlier. With a temporal table we can very easily get a snapshot of the way it looked in the past by using a point-in-time query (FOR SYSTEM_TIME AS OF …). Then, use a MERGE-statement to update the table to make it look like the snapshot.
  DECLARE @RollbackTime DATETIME2(0) = '2016-11-27 00:00:00';

-- Create a snapshot
SELECT
    [EmployeeId]
    ,[Name]
 ,[JobTitle]
 ,[Salary]
   ,[ManagerEmployeeId]
    INTO #snapshot
FROM dbo.Employees
FOR SYSTEM_TIME AS OF @RollbackTime;

-- Undo all changes
MERGE INTO dbo.Employees AS dst
USING #snapshot AS src
ON dst.EmployeeId = src.EmployeeId
WHEN NOT MATCHED BY TARGET THEN
   INSERT ([EmployeeId], [Name], [JobTitle], [Salary], [ManagerEmployeeId])
    VALUES ([EmployeeId], [Name], [JobTitle], [Salary], [ManagerEmployeeId])
WHEN NOT MATCHED BY SOURCE THEN
 DELETE
WHEN MATCHED AND EXISTS
       (SELECT src.[EmployeeId], src.[Name], src.[JobTitle], src.[Salary], src.[ManagerEmployeeId] EXCEPT SELECT dst.[EmployeeId], dst.[Name], dst.[JobTitle], dst.[Salary], dst.[ManagerEmployeeId])
  THEN
    UPDATE SET
      dst.[Name] = src.[Name]
     ,dst.[JobTitle] = src.[JobTitle]
        ,dst.[Salary] = src.[Salary]
        ,dst.[ManagerEmployeeId] = src.[ManagerEmployeeId];

DROP TABLE #snapshot;

-- Compare results
SELECT * FROM dbo.Employees FOR SYSTEM_TIME AS OF @RollbackTime ORDER BY [EmployeeId]
SELECT * FROM dbo.Employees ORDER BY [EmployeeId]
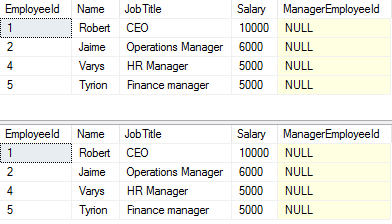
Phew, Robert’s honor is saved!
However, this method is potentially very inefficient. If the table is very large, the snapshot will also be very large. There might only be a small percentage of rows that are actually changed. Can we avoid storing the rows that have no changes?
We can improve this method by first looking for potentially changed employees. That can be found by running an interval query to find changes since the @RollbackTime and store the EmployeeIds. Let’s call this list #PotentialChanges.
Then we need only to store snapshot rows that reference EmployeeIds that exist in the #PotentialChanges table. In other words, we exclude all rows that we know for sure don’t have any changes.
Finally, in our MERGE-statement, we delete a row only if it exists in the #PotentialChanges table. Otherwise we can safely skip it since there was no change to it.
The resulting SQL script of this, more efficient, solution is:
  DECLARE @RollbackTime DATETIME2(0) = '2016-11-27 00:00:00';

-- Generate a list of employees that might have changes
SELECT DISTINCT EmployeeId
INTO #PotentialChanges
FROM dbo.Employees
FOR SYSTEM_TIME ALL
WHERE SysStartTime > @RollbackTime
OR (SysEndTime > @RollbackTime AND SysEndTime < '9999-12-31 23:59:59');

-- Create a snapshot
SELECT
  e.[EmployeeId]
  ,e.[Name]
   ,e.[JobTitle]
   ,e.[Salary]
 ,e.[ManagerEmployeeId]
  INTO #Snapshot
FROM dbo.Employees
FOR SYSTEM_TIME AS OF @RollbackTime AS e
INNER JOIN #PotentialChanges AS p ON e.EmployeeId = p.EmployeeId;

-- Undo all changes
MERGE INTO dbo.Employees AS dst
USING #Snapshot AS src
ON dst.EmployeeId = src.EmployeeId
WHEN NOT MATCHED BY TARGET THEN
  INSERT ([EmployeeId], [Name], [JobTitle], [Salary], [ManagerEmployeeId])
    VALUES ([EmployeeId], [Name], [JobTitle], [Salary], [ManagerEmployeeId])
WHEN NOT MATCHED BY SOURCE AND EXISTS (SELECT * FROM #PotentialChanges AS p WHERE p.EmployeeId = dst.EmployeeId) THEN
   DELETE
WHEN MATCHED AND EXISTS  -- The purpose of this EXISTS clause is to compare src and
                         -- dst in a NULL-safe way.
       (SELECT src.[EmployeeId], src.[Name], src.[JobTitle], src.[Salary], src.[ManagerEmployeeId] EXCEPT SELECT dst.[EmployeeId], dst.[Name], dst.[JobTitle], dst.[Salary], dst.[ManagerEmployeeId])
  THEN
    UPDATE SET
      dst.[Name] = src.[Name]
     ,dst.[JobTitle] = src.[JobTitle]
        ,dst.[Salary] = src.[Salary]
        ,dst.[ManagerEmployeeId] = src.[ManagerEmployeeId];

DROP TABLE #Snapshot;
DROP TABLE #PotentialChanges;
Undoing data changes summary
- With temporal tables, you can restore table contents to the way it looked earlier. However, you cannot undo schema changes (such as dropping columns entirely).
- Typically, you would start by creating a snapshot of how the table looked earlier by using a point-in-time query (SELECT … FOR SYSTEM_TIME AS OF …). However, this snapshot table can be huge if you are undoing changes on a huge table.
- You can use an interval query to create a more efficient undo solution, that only includes rows in the snapshot table if they were changed.
Conclusion
This article highlights some of the usage areas for SQL Server 2016 and Azure SQL Database temporal tables:
- Auditing
- Change Data Capture
- Undoing data changes
Temporal tables are particularly useful, because in most cases it is a relatively easy task to covert ordinary tables to temporal tables, without needing to do any application changes. This makes it possible even for legacy systems to benefit from the new functionalities the tables offer.
References
- My article on SQL Server central
- My introductory video on Channel 9
- Temporal table online documentation
 Johan Åhlén is an internationally recognized consultant and Data Platform MVP. He is passionate about innovation and new technologies, and shares this passion through articles, presentations and videos. Johan founded and co-managed PASS SQLRally Nordic, the largest SQLRally conference in the world. He also founded SolidQ in Sweden. Johan built up the Swedish SQL Server Group and served as the president of the user group between 2009-2016. He has been recognized by TechWorld/Computer Sweden as one of the top developers in Sweden.
Follow him on Twitter @johanahlen