Using OpenID Connect
Editor’s note: The following post was written by Visual Studio and Development Technologies MVP Shaun Luttin as part of our Technical Tuesday series with support from his technical editor Visual Studio and Development Technologies MVP Kevin Chalet.
We're going to develop a secure single page application (SPA). Cookies are not convenient for SPAs, because they require antiforgery; so we're going to use tokens flowed via the Authorization header. Since OAuth2/OpenID Connect is the most popular way to do 'token authentication', we'll use it in our demo.
What is OpenID Connect?
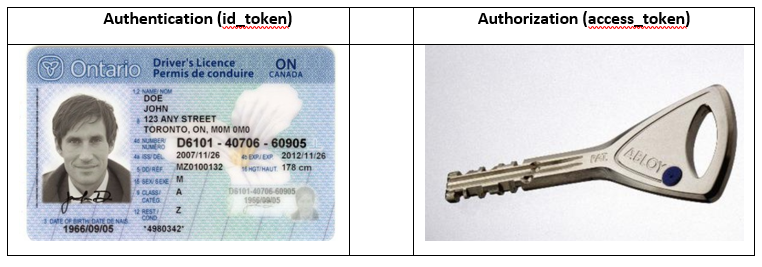
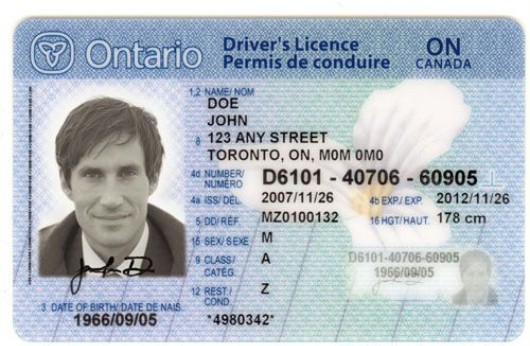
OpenID Connect uses id_tokens and access_tokens for distributed application security. An id_token is for authentication; it is analogous to a driver’s license, a passport, or another form of ID. An access_token is for authorization; it is analogous to car key, a bank card, or a building access card. We use an id_token to prove who we are; we use an access_token to gain access to our stuff (or someone else’s stuff).
Why not just use Cookies for authentication and authorization?
The major reason we avoid cookies for APIs is to avoid forgery attacks. The fact that the browser automatically sends cookies can lead to forgery attacks, and XSRF countermeasures are unnatural for APIs.
Cookies are good for browser-based applications that use a single domain. The server adds a cookie to the response, the web browser automatically stores that cookie, and the web browser automatically sends the cookie with every request to the cookie’s single domain.
When an application does not use a web browser but instead uses a native client, cookies are not appropriate, because they are a web browser technology. When our resources live at multiple domains, cookies are not appropriate, because they are a domain specific technology. Chiefly, though, we need to prevent cross-site request forgery attacks. That is why we have tokens.
Some History: OAuth, OpenID, and OpenID Connect
Both OAuth and OpenID are Internet standards. OAuth is about authorization. OpenID is about authentication. OpenID Connect offers both: it specifies a client-server protocol to requests, generate and consume access_tokens (for authorization) and id_tokens (for authentication).
- 2006 - OpenID 1.0. An app can ask an authority for proof that a user owns an identity (a URL).
- 2007 - OpenID 2.0. Adds flexibility and another identity format to OpenID 1.0.
- 2007 - OpenID Attribute Exchange. An app can fetch and store end user profile information.
- 2010 - OAuth 1.0. An user can grant an app limited access to resources on a third-party server.
- 2012 - OAuth 2.0. Just like OAuth 1.0 but with a new protocol.
- 2014 - OpenID Connect. Combines the above features into a single protocol that can :
- verify the end user’s identity
- fetch the end user’s profile info, and
- gain limited access to the end user’s stuff
Live OpenID Connect Demo
The live demo demonstrates OpenID Connect in a single page application. OpenID Connect allows users to sign in with a single identity across web sites and native applications.
- Live Demo: https://zamboni-app.azurewebsites.net
- Source: https://github.com/openiddict/openiddict-samples/tree/master/samples/ImplicitFlow
The demo uses:
- OpenID Connect, an interoperable authentication protocol
- Aurelia, a Single Page Application framework;
- oidc-client-js, a JavaScript library that handles OpenID Connect in the web browser,
- OpenIddict, an ASP.NET Core library that handles OpenID Connect on the server, and
- NET Core Security, middleware for security and authorization of web apps.
- NET Core Identity for local authorization.
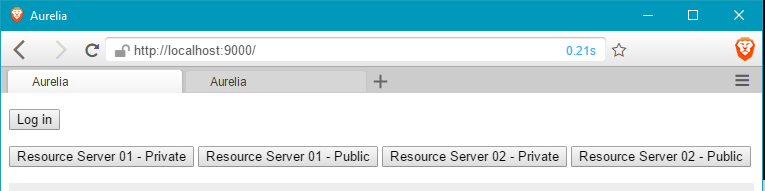
All five are open-source and available on GitHub. Here is a screenshot of the LIVE demo.

Things to Try in the OpenID Connect Live Demo
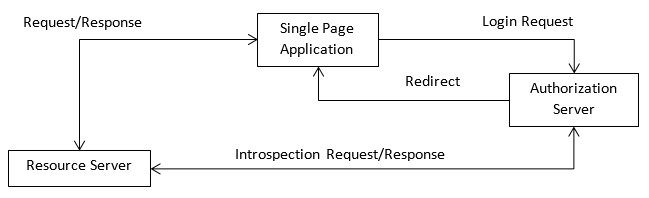
Click the Log in button. This discovers and requests the Authorization Server’s authorization endpoint. At the Authorization Server, you (the end-user) can register, or if you have previously registered, you can log in. The Authorization Server authenticates you and then redirects back to the Single Page Application (SPA). The SPA parses the authorization server’s response, stores the tokens in local storage, and displays the response payload on the screen.
Click the Resource Server 01 – Private button. This makes an authenticated request to Resource Server 01. The request includes the available access_token in the request’s Authorization header. On receiving the request, the Resource Server uses Introspection to ask the Authorization Server if the access_token is valid. If the Authorization Server responds that the access_token is valid, the resource server responds to the SPA with its requested protected resource. If the access_token is invalid or absent, the Resource Server responds with a 401 Forbidden response.
Click the Logout button. This requests the Authorization Server’s end session endpoint. The Authorization Server logs out the end-user at its end, and then redirects the end-user back to the SPA, which logs out the end-user at its end.
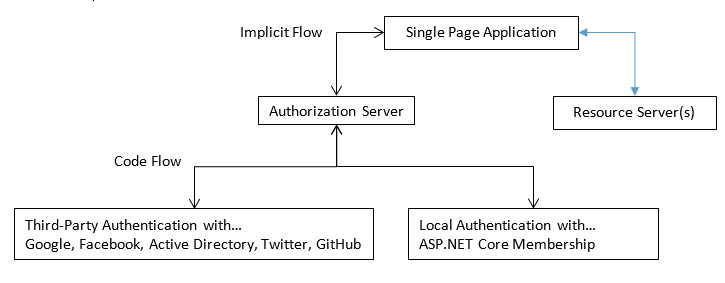
Diagram of the OpenID Connect Demo
This demo has the Single Page Application, Authorization Server, and Resource Server(s) each running at different domains and on different servers. All of them, though, could also run in a single domain.
Running the OpenID Connect Demo Locally
It’s worth running the sample locally and viewing it with Fiddler. Here is how.
PowerShell
-
git clone https://github.com/openiddict/openiddict-samples.git -
cd .\openiddict-samples\samples\ImplicitFlow -
.\RunDemo.ps1
When you want to stop the demo, run Kill-Demo from the same PowerShell prompt that started it.
Starting the demo opens four command prompts: one Single Page Application, two Resource Servers, and one Authorization Server.
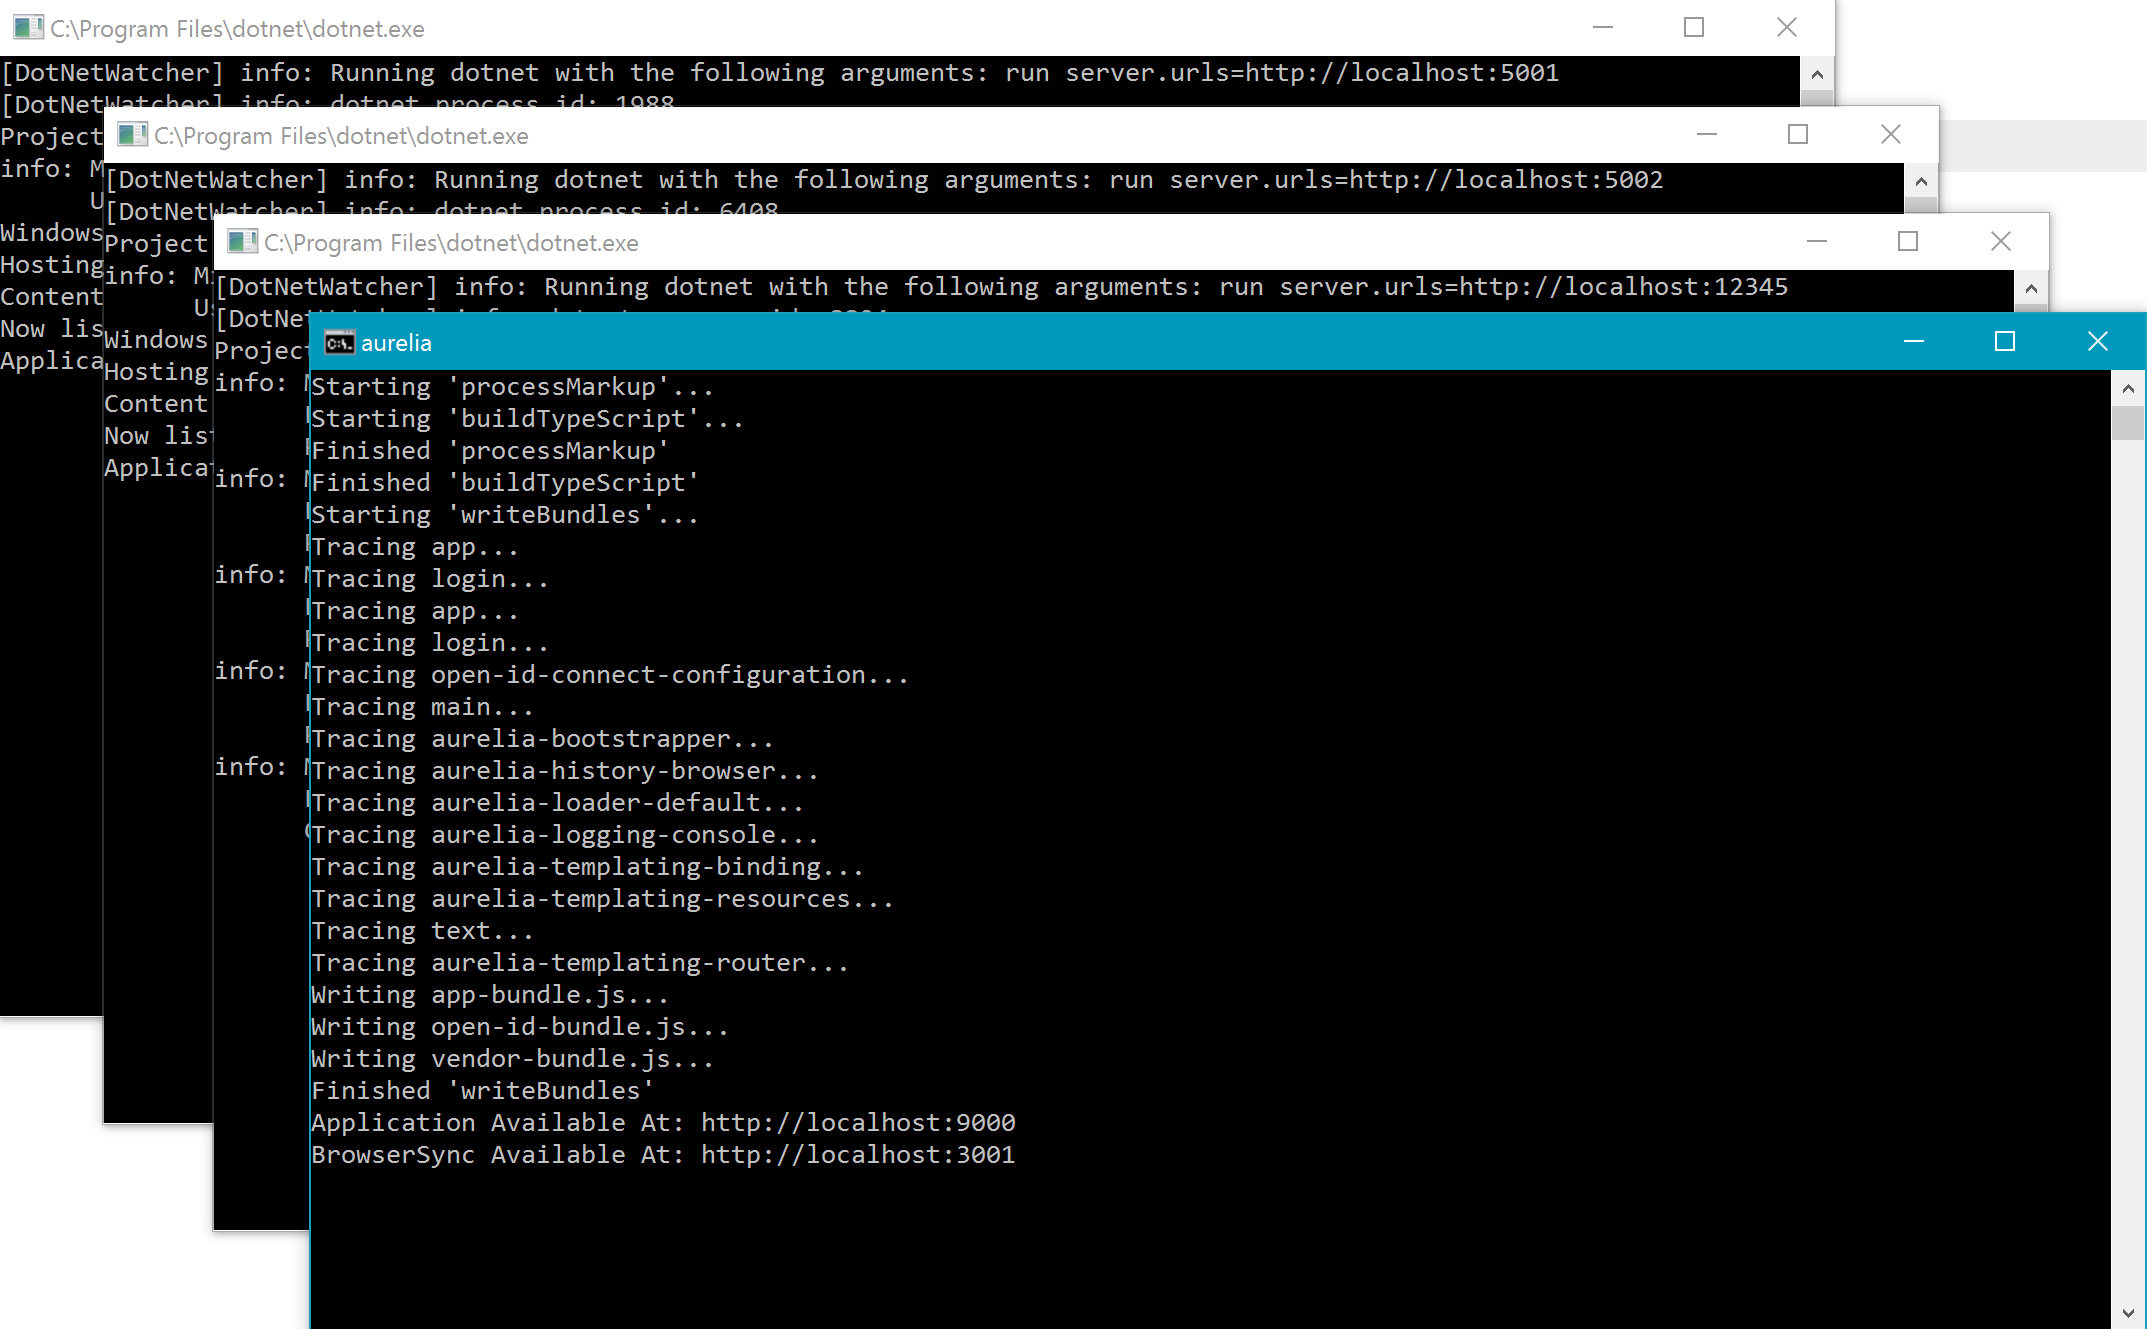
With the demo running, navigate to https://localhost:9000 to view the same SPA that you saw at https://zamboni-app.azurewebsites.net.
Looking at the Local OpenID Connect Demo with Fiddler
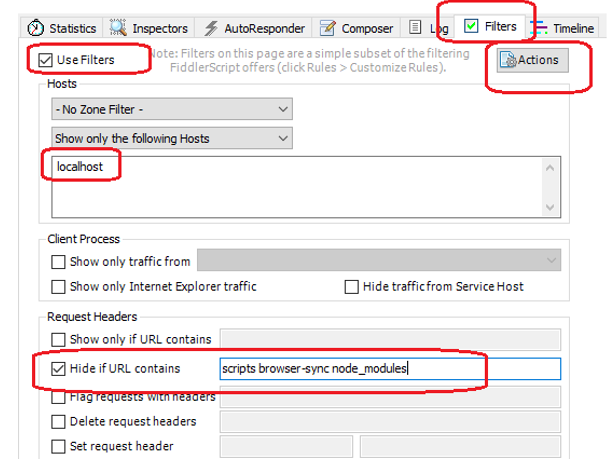
Configure Fiddler to show only the HTTP requests that we want to see and ignore the noise.
- Open Fiddler and click on Filters.
- Then check Use Filters.
- Under Show only the following Hosts add localhost.
- Check Hide if URL contains, and add scripts browser-sync node_modules
- Click Actions > Run Filterset Now.
With Fiddler and the local demo running, go to https://localhost:9000 and take the following steps:
- Click Log in. The web browser will navigate to the local Authorization Server.
- Click Register as a new user? The web browser will navigate to the registration page.
- Complete registration and click Register. The web browser will navigate back to the SPA.
After taking those steps, this is the result in Fiddler. Fiddler has numbered the HTTP requests that it has captured (your numbers may be different).
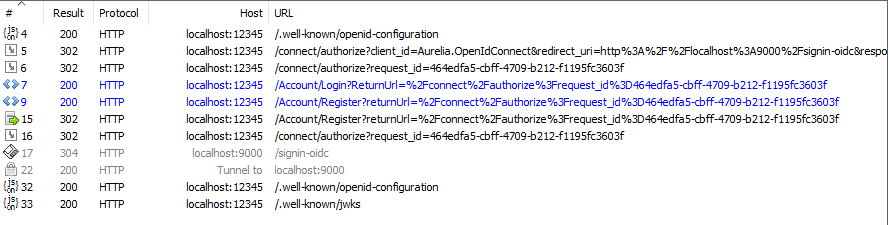
Here is an analysis for those steps.
Capture #4
- We clicked log in.
- The SPA used OpenID Connect Discovery to learn how to interact with the Authorization Server.
- The Authorization Server’s discovery response included its endpoints and capabilities.
Captures #5 to #7
- After having completed discovery, the SPA requested the authorization endpoint.
- That request initiated the OpenID Connect Implicit flow and included these URL parameters:
- client_id,
- redirect_uri,
- response_type,
- scope,
- state, and
- nonce.
- The Authorization Server processed the request, associated the request details with a request_id, and redirected to its login page, flowing the request_id for later use.
Capture #9
- We clicked Register as a new user.
- Since the Authentication Server is now using ASP.NET Core Identity to authenticate and/or register new users, this is a simple MVC navigation from the login page to the registration page.
- The OpenID Connect related parts of this step involve flowing the request_id for later use.
Capture #15 to #17
- We have filled out the registration details and clicked Register.
- The Authorization Server processed the request, redirected to its authorization endpoint, which in turn redirected to the SPA. The OpenID Connect Implicit Flow is now complete.
Two Fiddler Challenges for You
- Use Fiddler to inspect an authorized request to Resource Server 01.
- Use Fiddler to inspect logging out the Single Page Application.
You’re Talking about JWTs
JSON Web Tokens (JWTs – pronounced jawt) are a part of OpenID Connect. An id_token uses the JWT format, and an access_token sometimes uses the JWT format. The JWT format takes a JavaScript object and transforms it into a signed and/or encrypted hash. The dots separate the header, payload, and signature.
JavaScript Object (JSON) with a header, payload, and signature. 8
 { alg: "HS256", typ: "JWT" }.

{ foo: "bar" }.

[signature]
JWT with a header, payload, and signature.
eyJhbGciOiJIUzI1NiIsInR5cCI6IkpXVCJ9.eyJmb28iOiJiYXIifQ.dtxWM6MIcgoeMgH87tGvsNDY6cHWL6MGW4LeYvnm1JA
Exercise: Generate a JWT here https://jwt.io and then decode it at https://jwt.calebb.net.
The JWT specification defines rules for transforming between a JWT and JSON. The JWT specification arose for the compact encoding of claims. While the motivation for the JWT format is claims communication, the JWT is not intrinsically associated with authorization/authentication. Rather, it is a way of hashing, signing and/or encrypting JSON.
JWT claims are properties with values. While a JWT can contain any claim that we want it to have, there are a handful of non-mandatory registered claims. Here are three of the most important claims.
- iss (Issuer). Who issued the JWT?
- sub (Subject). Who is the topic of the JWT?
- exp (Expiration Time). When does the JWT expire?
For instance, a driver’s license could have the iss as Ontario, the sub as JOHN DOE, and the exp as 2012/11/26. In the context of an OpenID Connect id_token, the iss is the Authorization Server, the sub is the end-user (e.g. an email address), and the exp is the duration that the id_token is valid.
Choosing the OpenID Connect Implicit Flow for Single Page Applications
An OpenID Connect flow is a series of steps that allow a client application to obtain token(s) from a server on behalf of an end-user. OpenID Connect flows are synonymous with OAuth grant types; that is, a flow specifies how an end-user grants permissions to a client application. The different flows are appropriate for different application types. Here are the three most important flows to consider.
Types of Client Applications
For the sake of this document, we are going to define three types of client applications. A confidential client is capable of keeping secrets and a public client is NOT capable of keeping secrets. Either of those can be a highly trusted client; one that we trust not to abuse end-user’s secrets.
Confidentiality and publicity exist on a continuum. For instance, a traditional MVC web app that runs on server provides high confidentiality by storing its secrets on the server. A native app that runs on a user’s device provides moderate confidentiality; its secrets are stored on the user’s device and are generally hard to extract. A single page app provides low confidentiality (i.e. is a public client) because its secrets are stored in the web browser and are generally easy to access.
Whereas confidentiality is about the ability to maintain secrets, trust is about the willingness of a client application not to share or steal secrets. We can ascribe high trust only to client applications that we control.
Resource Owner Password Credential Grant/Flow
The Resource Owner Password Credential (ROPC) flow is appropriate for highly trusted clients that are either public or private. This flow requires high trust, because the client application will see the end-user’s username/password. We can ascribe high trust only to client applications that we control. It is reasonable for our authorization server to allow the ROPC flow for our own client applications, but the server should never allow this flow for third-party client applications. Further, when allowing this flow for a highly trusted application, the server should always enforce client authentication to the extent possible. This prevents our end-user’s credentials from flowing through an untrustworthy client app.
In summary, with the ROPC flow the client application:
- communicates with the authorization server directly
- authenticates with the authorization server via
- its client secret (if it is a confidential client)
- its redirect_uri (if it is a public client)
- receives an access_token after presenting the end-user’s username/password
- does see the end-user’s username/password
The main risk of this flow is exposure of the username/password.
https://tools.ietf.org/html/rfc6749#section-4.3 https://tools.ietf.org/html/rfc6749#section-10.7
Implicit Grant/Flow
The Implicit flow is appropriate for public clients that run in a web browser. A single page application (SPA) is an example. An SPA is not eligible for the benefits of the authorization code flow, because the SPA cannot keep its client secret or its access_token private. And since some SPAs are not trusted, those SPAs are not appropriate for the ROPC flow.
In summary, with the implicit flow, the client application:
- communicates with the authorization server via the web browser
- authenticates with the authorization server via its redirect_uri
- receives an access_token after presenting the end-user
- does not see the end-user’s username/password
The main risks of this flow are client application impersonation and/or exposure of the access_token.
https://tools.ietf.org/html/rfc6749#section-4.2
Authorization Code Grant/Flow
The Authorization Code flow is appropriate for confidential clients that can make use of a web browser. Native apps and MVC web apps are examples of confidential clients that can provide moderate to high secrecy. This makes them eligible for the two main benefits of the authoriation code flow: authenticating the client via its client secret and keeping the precious access_token hidden from the web browser.
In summary, with the authorization flow, the client application
- communciates with the authorization server
- via the web browser to receive an authorization code
- via backchannels to receive the access_token
- authenticates with the authorization server via its client secret
- receives an authorization code after presenting the end-user
- recieves an access_token after presenting the authorization code
- does not see the end-user’s username/password
https://tools.ietf.org/html/rfc6749#section-4.1
The Appropriate Flow for a Single Page Application (SPA)
If you control both the authorization server and the SPA, then the ROPC flow is perfectly reasonable, though it is more secure to use the Implicit flow, to reduce the chance of exposing the end-user’s username/password.
The Role of ASP.NET Core Authentication in our OpenID Connect Demo
Together, ASP.NET Core Security and ASP.NET Core Identity provide middleware and classes for local and third-party authentication. Our demo’s Authorization Server uses both of these.
ASP.NET Core Security middleware supports third-party authentication using the code grant/flow.
- OpenIdConnectAuthentication - Configurable for any third-party.
- OAuthAuthentication – Configurable for any third-party and pre-configured for:
- GoogleAuthentication
- FacebookAuthentication
- MicrosoftAccountAuthentication
- TwitterAuthentication
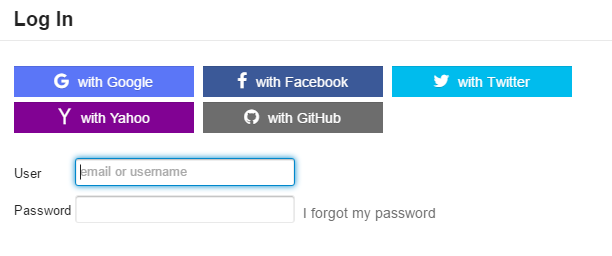
ASP.NET Core Identity provides traditional, local authentication, in which our application accepts a username/password. Many websites offer the end-user a choice between third-party and local authentication, like this:
Additionallly, ASP.NET Core Security includes CookieAuthentication and JwtBearerAuthentication middleware, for storing authentication state in the web browser. That is, after the server authenticates an end-user, the server responds to the client with either a security cookie or a JWT. The client stores either the cookie or the token for use with future authenticated requests. The CookieAuthentication middleware generates and validates cookies whereas the JwtBearerAuthentication validates cookies that have been generated elsewhere.
Our demo application’s authorization server leverages both ASP.NET Core Security and ASP.NET Core Identity. The following diagram can be quite confusing; as a result, it is worth studying.
In the diagram, our SPA initiates the Implicit Flow by redirecting to the Authorization Server. At this point, the Authorization Server needs to authenticate the end user. The Authorization Server can either authenticate locally or via a third-party (such as Twitter). Usually the end-user is given several choices, but our demo only displays local authentication (for now). If the end-user chooses to log in with Twitter, the Authorization Server initiates the Code Flow with Twitter (leveraging the ASP.NET Security middleware).
The Role of Community Contributions for OpenID Connect
ASP.NET Core Security and ASP.NET Core Identity do not handle the implicit flow part of the above diagram. That is what the following two alternatives provide.
- Identity Server 3
- OpenIddict (and the lower level AspNet.Security.OpenIdConnect.Server)
Our demo uses OpenIddict. OpenIddict manages the interaction between the Single Page Application, the Authorization Server, and the Resource Server(s).
Brief Intro to OpenID Connect Anatomy/Terminology
OpenID Connect expands on and adapts much of the terminally from its OAuth and OpenID heritage. A relying party (client, client application) is any application that relies on the Authorization server for authentication and authorization. In our demo, the Single Page Application (SPA) is the relying party and the Resource Server(s) that use introspection are also relying parties. Some relying parties have a redirect URL, which is the URL to which the authorization server redirects after having authenticated the end-user. The user agent is what acts on behalf of the end-user and is often the environment of the relying party. In our case this is the web browser; it is both the agent of the end-user and the environment for our Single Page Application. The resource owner is synonymous, in our case, with the end-user; that is, the end-user is the person who owns resources on the resource server. The Resource Server, of course, is the server that contains the end-users protected resources (i.e. the user’s stuff).
Bringing the OpenID Connect Implicit Flow together in a Chart
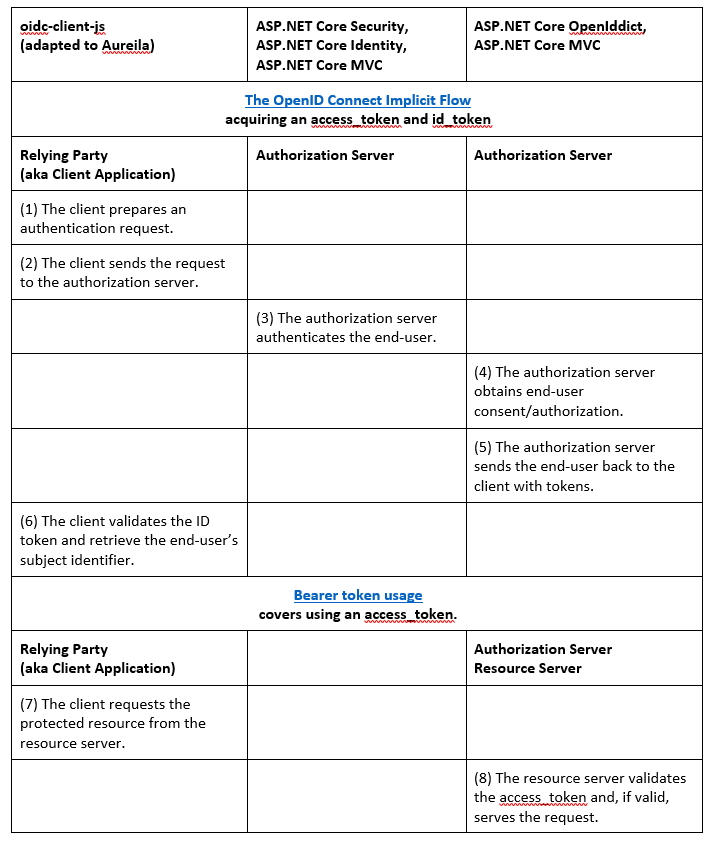
(4) Obtain end-user consent/authorization. In our sample, we elected to ignore this step, because a single organization controls the single page application, authorization server, and resource servers.
(8) Validate the access_token and, if valid, serve the request. access_token validation is at the discretion of the resource server and the agreement it has with the authorization server. If it is a signed, encrypted JWT, then validate it appropriately. If it is some other proprietary format, then validate it appropriately, et cetera. In our sample, the access_token uses SAML instead of JWT. We are using introspection to validate it. Introspection means that the resource server makes an HTTP call to the authorization server, and the authorization server response indicates whether the access_token is valid or not. For this to work, the Resource Server registers itself with the Authorization Server and has a secret to authenticate itself. That is all we need to start making use of the AuthorizeAttribute on our controller’s actions.
Frequently asked questions
Could we still use cookies, and store the access_token and id_token in the cookie?
Don't store bearer tokens in cookies: Implementations MUST NOT store bearer tokens within cookies that can be sent in the clear (which is the default transmission mode for cookies). Implementations that do store bearer tokens in cookies MUST take precautions against cross-site request forgery. (Bearer Token Usuage, n.d.)
Can one server and domain host the authorization server, single page application, and resource server?
Yes.
Does it matter how the Authorization Server authenticates the end user?
It does not matter. The Authorization Server can use retina scan, username/password, third-party (Google, Facebook, Twitter…), or some other form of authentication.
Is a JWT strictly for authorization/authentication; can we use it as a compact store for arbitrary data?
Use it to store whatever you want.

About the author
After receiving a Bachelor of Human Kinetics with honors from the University of British Columbia in 2008, Shaun sampled careers in health care, leisure administration, and academic research. The latter included co-publishing a paper on Motor Learning with Dr. Nicola Hodges.
He wrote his first line of code in 2009, and then enrolled in an intensive Software Systems Developer program at the BC Institute of Technology. Since receiving a Certificate of Technology with distinction in 2010, he has provided software development and technical support services to small, medium, and enterprise-scale businesses. He is a Microsoft Certified Professional Developer.
In 2011 he and his wife Kathryn moved from Vancouver to Salt Spring Island. In his spare time Shaun volunteers, practices sleight-of-hand, and is a prolific reader.