Extending Azure Logic Apps Using Azure Functions
Editor’s note: The following post was written by Microsoft Azure MVP Kent Weare as part of our Technical Tuesday series with support from his technical editor, Microsoft Azure MVP Steef-Jan Wiggers .
In this blog post we are going to discuss two emerging Azure services--Azure Logic Apps and Azure Functions— and how, when used together, they can provide customers with a unique value in the form of extensibility.
Azure Logic Apps is an Integration Platform as a Service (iPaaS) which recently achieved a General Availability milestone. The service allows developers and citizen integrators to build integration interfaces using workflow and the ability to connect to a wide variety of SaaS applications quickly.
Azure Functions is a relatively new service which is still in Public Preview. Functions allow developers to build methods (AKA functions) which are to be executed in the cloud without deploying other hosts, such as a web application. It is also considered to be “serverless” in the sense that it is event driven, scalable and does not require fixed infrastructure to be pre-provisioned in order for it to be used. It is also metered differently than most cloud-based services as costs are determined based upon code execution time and the number of executions instead of a service being online for ‘x’ hours.
Please note: you can find all code snippets referenced in this article here: https://snipplr.com/view/151590/extending-azure-logic-apps-using-azure-functions/
Azure Logic Apps + Azure Functions = Better Together
When building integration interfaces, a developer will often have to deal with a requirement that may not be addressed through out-of-the-box tooling. The result is, the developer needs to write some custom code to address this problem. In BizTalk Server, this can be achieved by writing .NET helper methods that belong to a .NET DLL assembly. In Logic Apps, we don’t have the ability to call a .NET DLL assembly directly. Enter Azure Functions. Azure Functions allow us to write methods where we can execute our custom code, but offers a friction-less deployment model.
Sample Scenario
Let’s now work through a scenario that highlights how these two services can work together. In this scenario, we have business users who need to see the forecasted energy production output for the next 6 days. However, each day they will need to see what the data is. We are going to build a Logic App that uses recurrence. We will use this as our batch scheduler to ensure this Logic App fires each day. We will then use Azure Functions to determine what are the right dates we want to provide our SQL Stored procedure so we are returning the right dataset each day. Lastly, we will publish this SQL result set to an OneDrive for Business folder.
NOTE: The Azure Function logic will not be very complex on purpose. The goal of this blog post is to demonstrate how these two services function together and as a result, we are not focusing on trying to solve a very difficult logic problem inside of Azure Functions.
Creating Azure Function
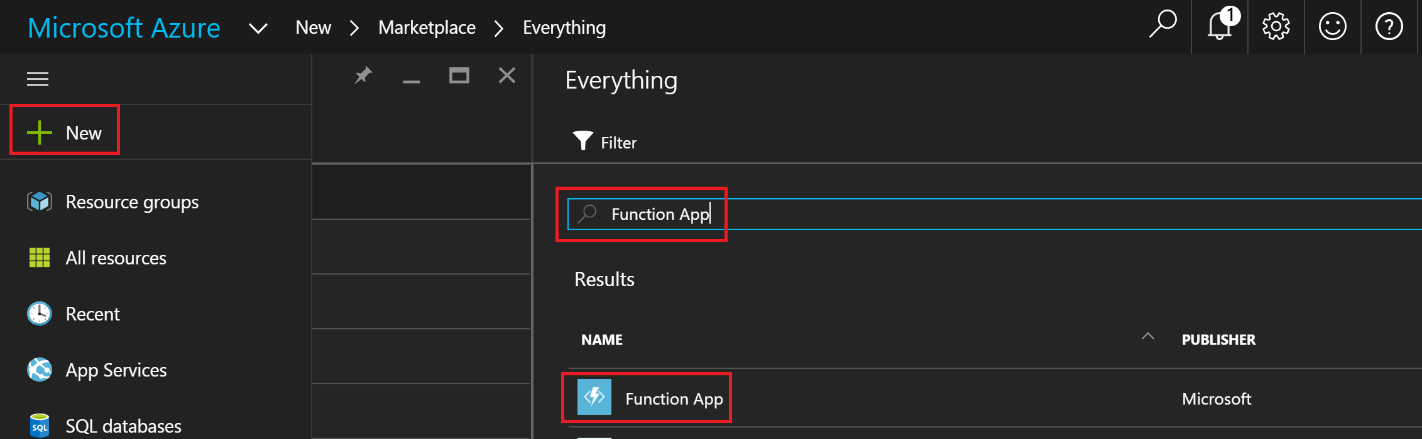
- From Azure Portal, click on New, then search for Function App and then click Function App.
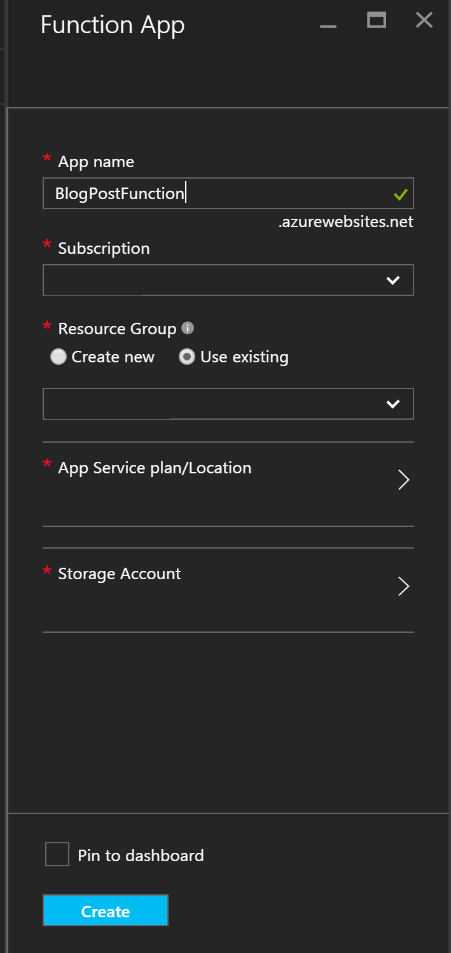
- Provide an App name, Subscription, Resource Group, App Service Plan and Storage account.
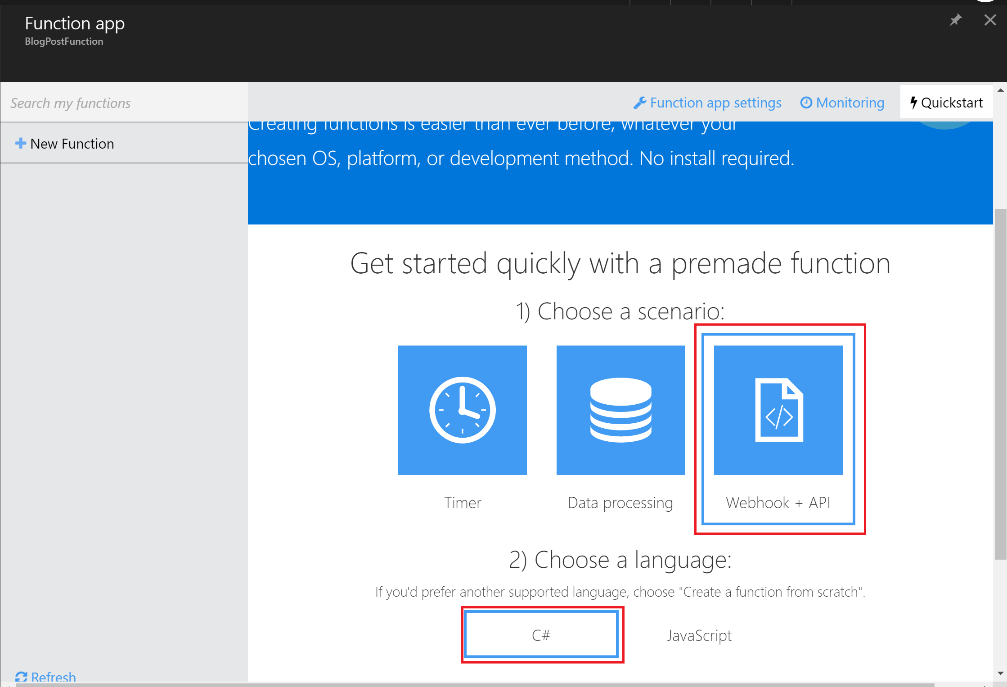
- There is some optionality when creating an Azure Function. Some functions can be dependant upon time, data processing or events such as a Webhook. Azure Functions can also be written in either C# or JavaScript. For the purpose of this blog post we will select Webhook + API and C# and then click on Create this function This will create a sample Azure Function that will demonstrate some of the capabilities of Azure Functions. Once we are familiar with the concepts, we will create our own function.
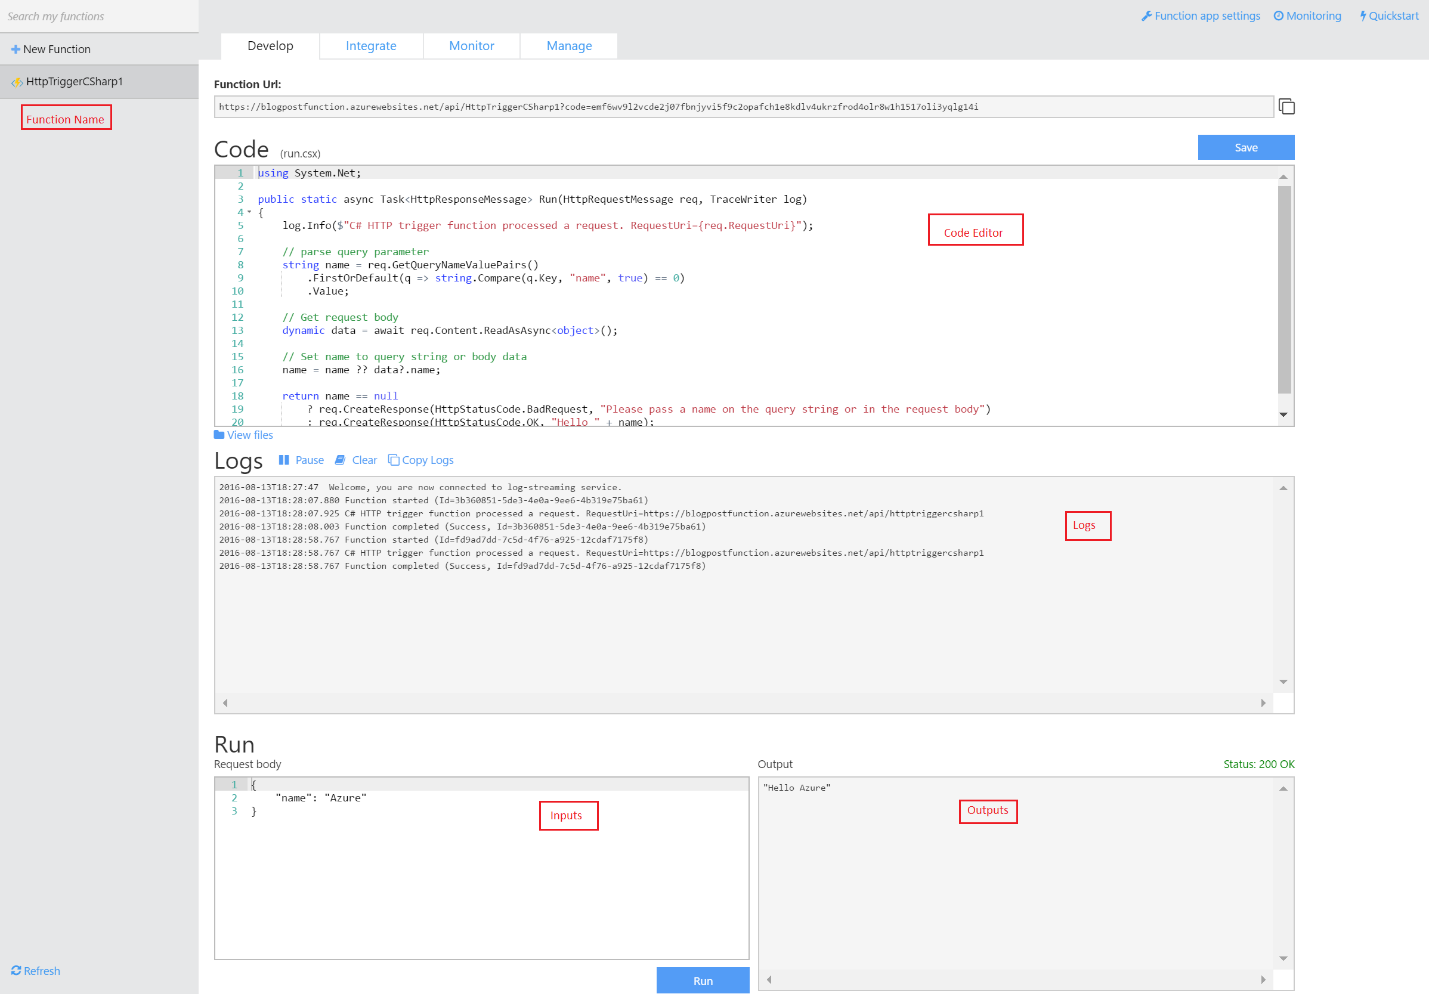
- Microsoft provides a template that allows developers to get started. In the upper left corner, we have the name of the Function. In the center, we have our Code Below the Code window, we have our Logs where any errors will be reported. In the bottom, we have a Run window where we can provide any parameters or inputs. When we click on the Run button, we can see the output of the function in the Output window.
- After evaluating the template function that was provided, we want to create a new function by clicking on New Function Select the Generic Webhook – C# , then provide a Name, followed by Create.
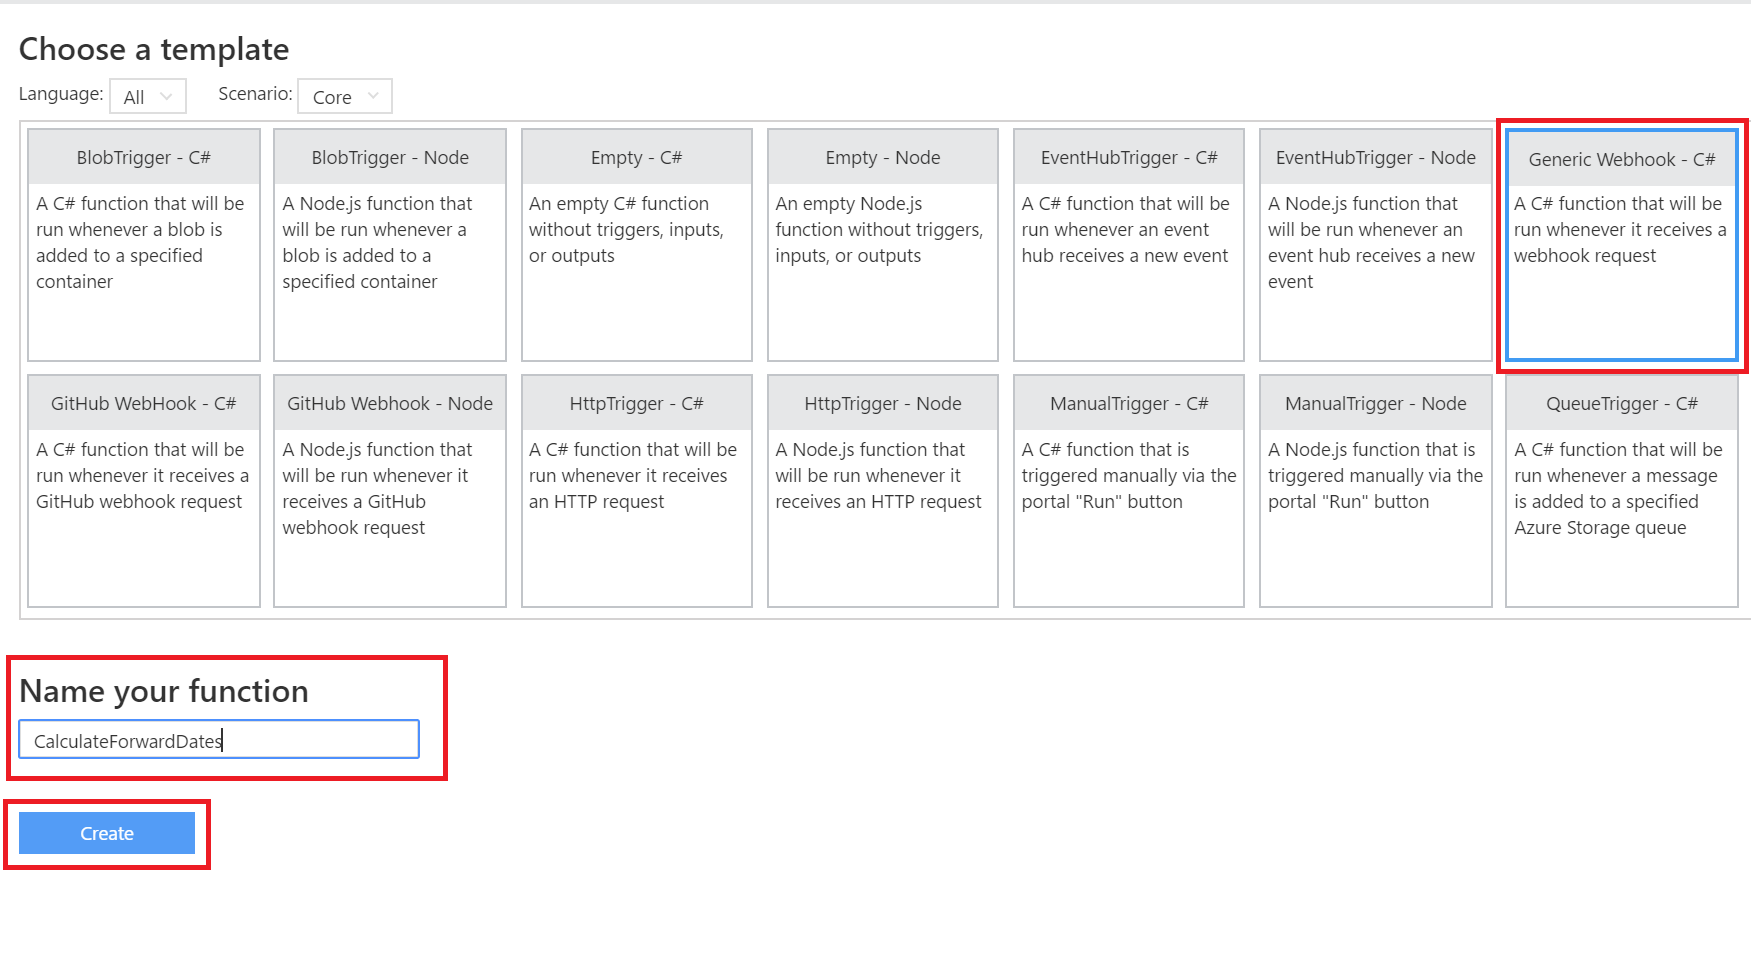
- In the code window, we are going to provide the following code:
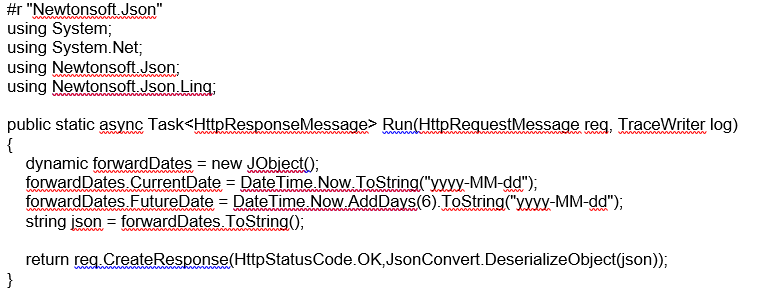
Within this code we are going to capture what the current date is and the future date which is 6 days from now. We can then construct a Json message that will include both of these dates. Also note, that we can include additional assemblies by including the using statement.
- When we go to test this method, our output will be:

- With our Azure Function complete and tested, we can now focus on creating our Logic App.
Creating Logic App
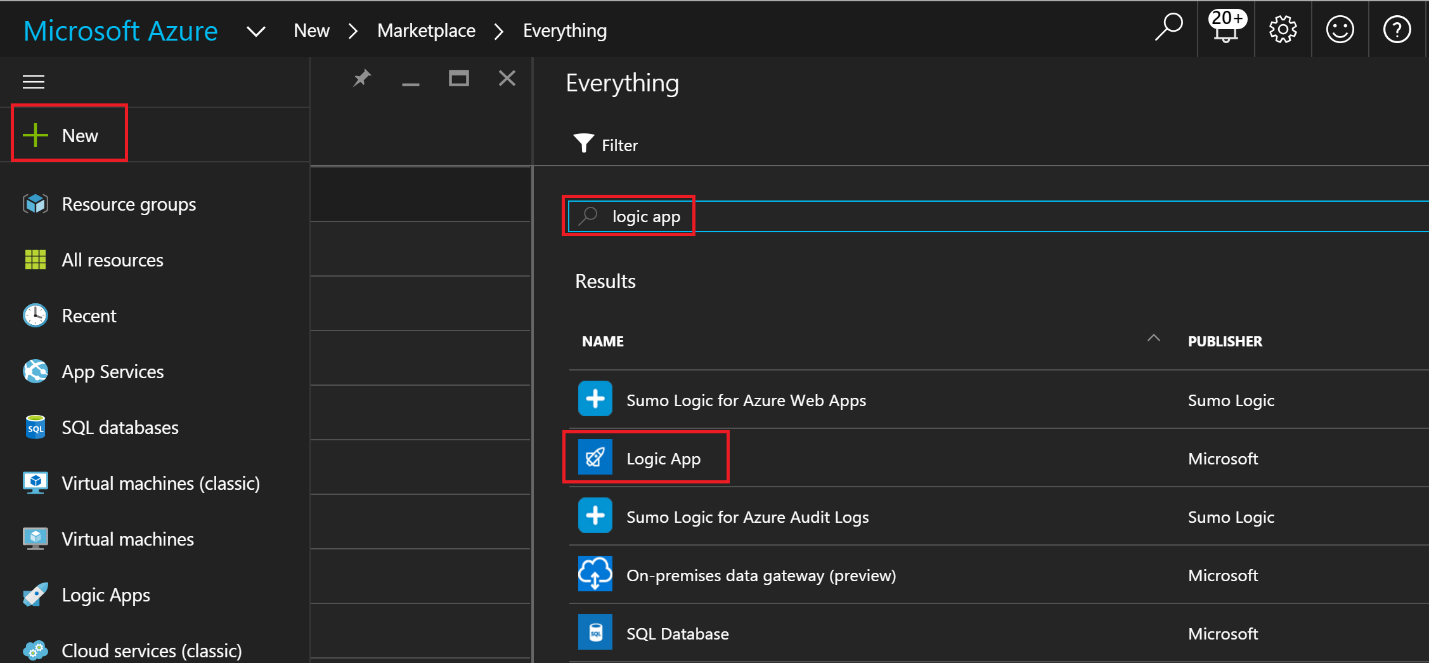
- From the new Azure Portal click New, then search for logic app and then click Logic App.
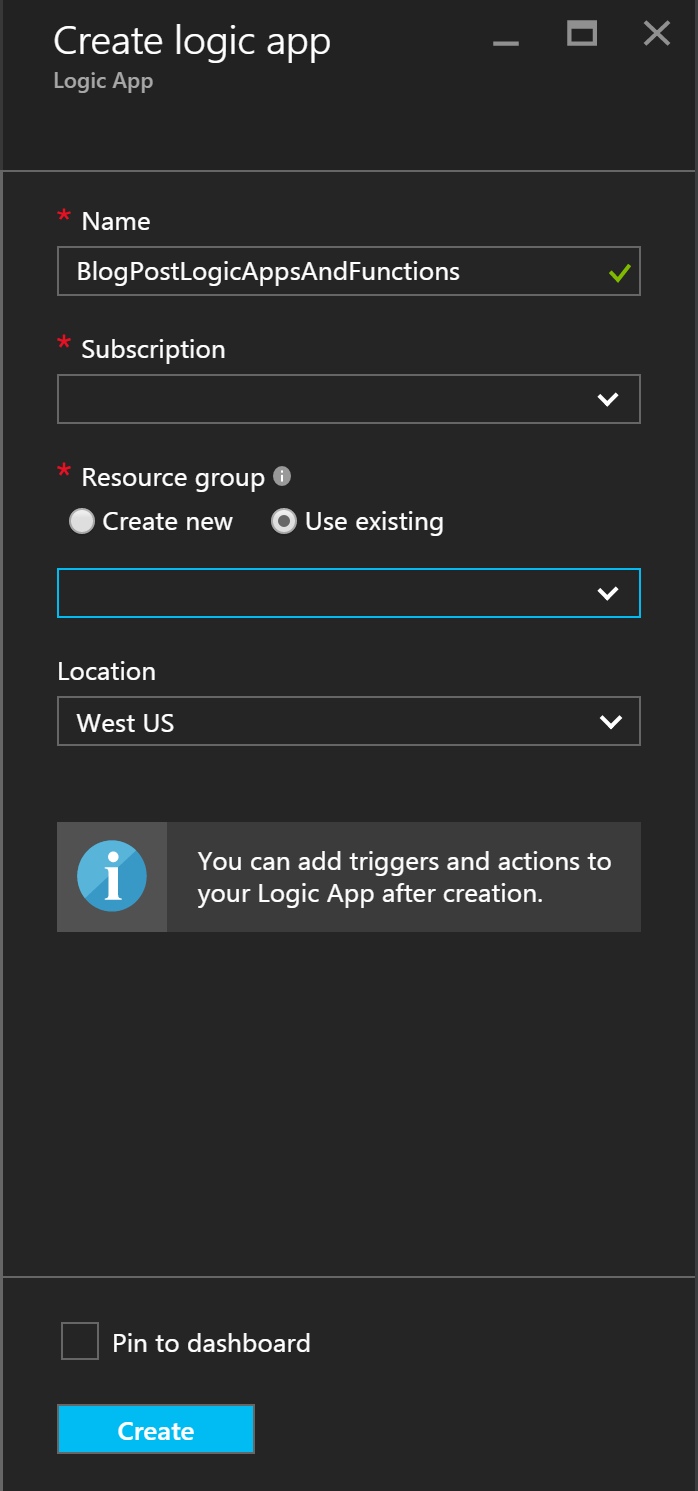
- Provide a Name, Subscription, Resource Group and Location for your Logic App and then click Create.
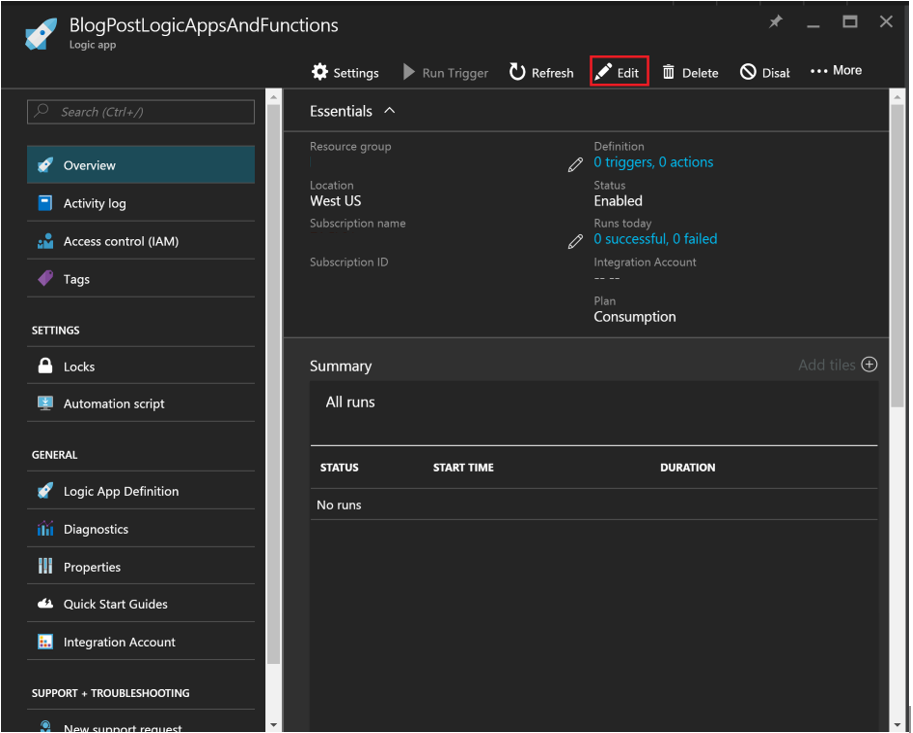
- Locate your Logic App and then click the Edit This will bring up the Logic Apps editing canvas.
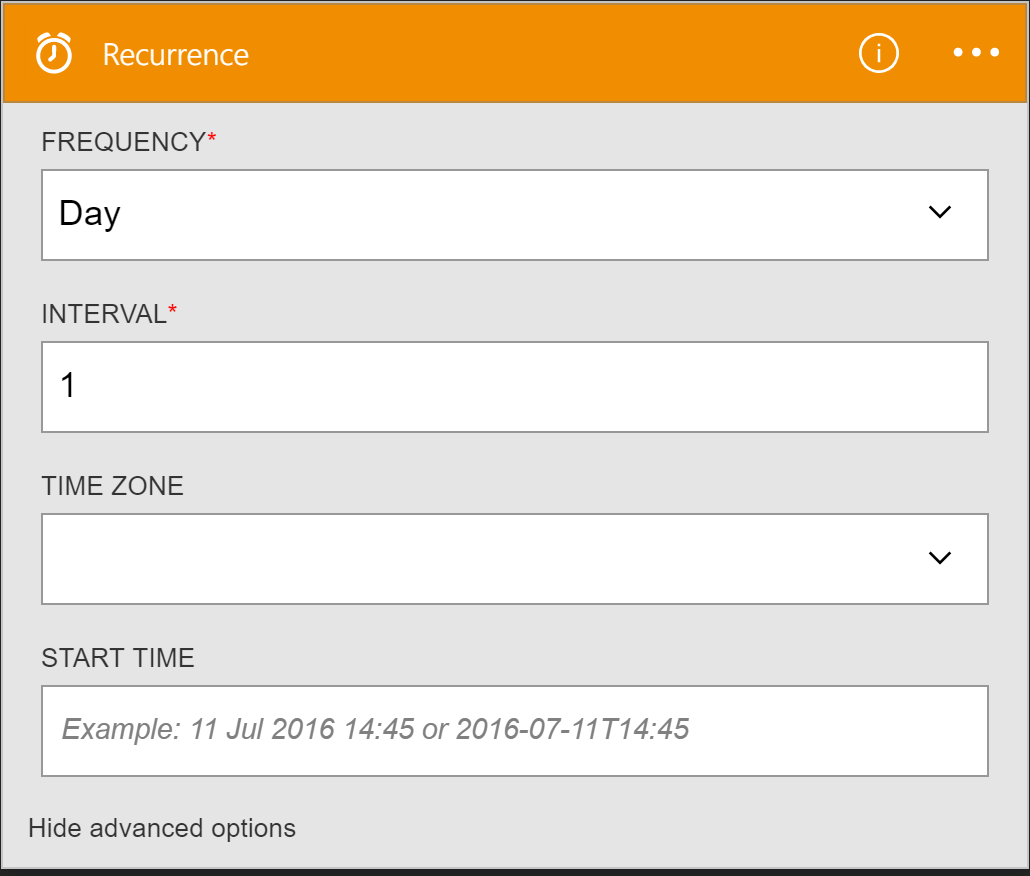
- Since this a batch schedule, we will add a Recurrence trigger which can be found in the Show Microsoft managed APIs drop down. Set the Frequency to be Day, Interval to be
- Next, we need to add our Azure Function. Below the Recurrence shape we can click on Add Step and then Add an Action. We need to click on the drop down list arrow beside Show Microsoft managed APIs. Once we have done so, we will see some additional options show up. In this case, we want to select Show Azure Functions in same region.

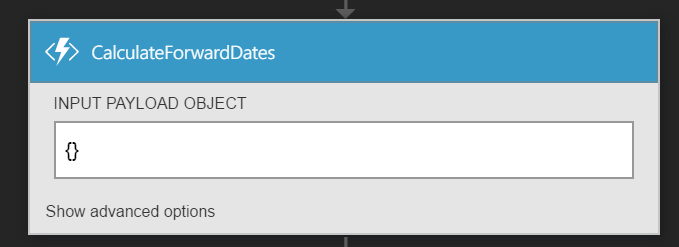
- We now want to select the Azure Function that we created in the previous section which in my case was called BlogPostFunction and then CalculateForwardDates as function we want to call .
- Even though our Azure Function is not expecting any parameters, we need to provide an ‘empty’ message from Logic Apps. In order to do this, we will simply provide {}
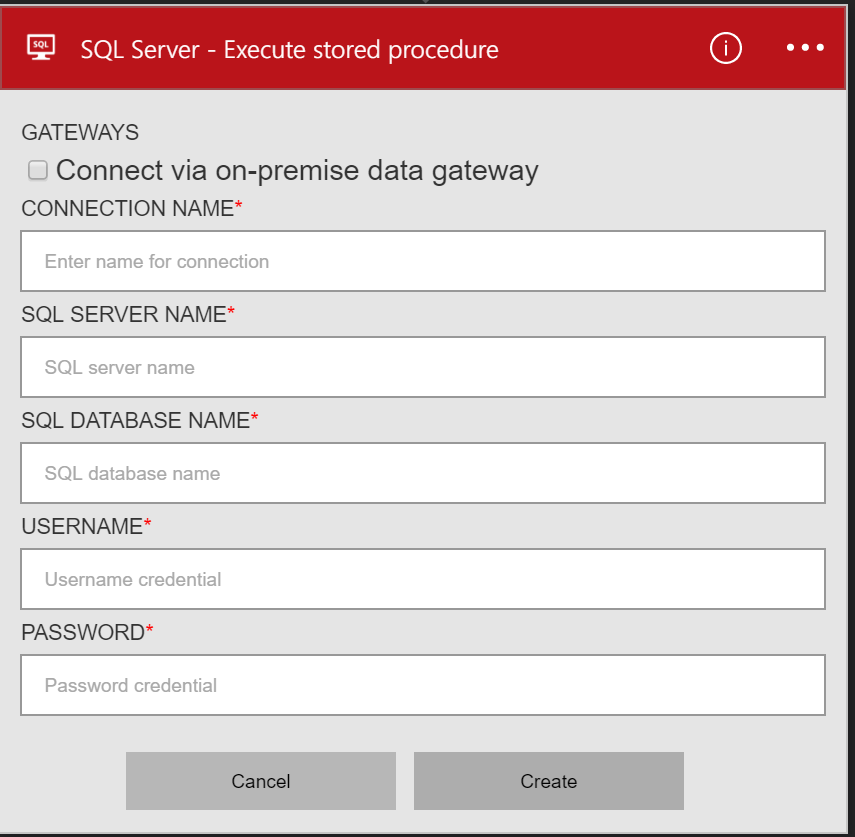
- Next, we are going to use the response payload from our Azure Function to populate an Azure SQL stored procedure call. Once again we will Add New Step, Add an action and then from the Show Microsoft managed APIs dropdown we will select SQL Server – execute stored procedure.
- If this is the first time using Logic Apps to connect to this particular Azure SQL instance, then we need to create a new connection.
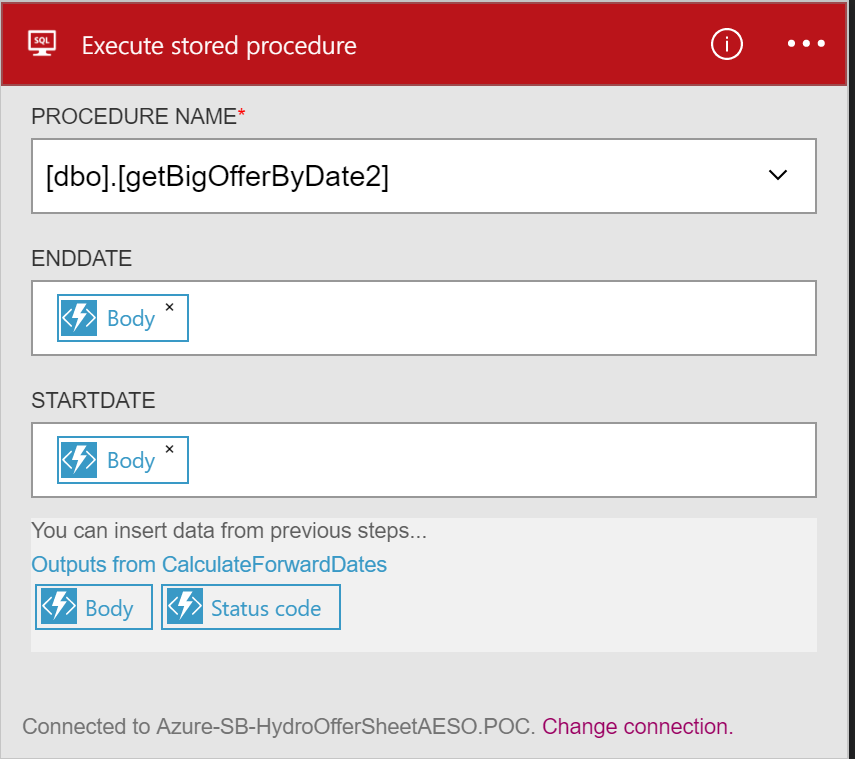
- We now need to choose a Procedure Name and provide two parameters ENDDATE andIn this scenario, we would like to use the values that were provided in our response message from Azure Functions. As we previously discussed, our expected message shape being returned from Azure Functions is
{"CurrentDate":"2016-08-13T06:00:000","FutureDate":"2016-08-19T06:00:000"}
The problem is the SQL Connector is not fully understanding the shape of the message being returned. It only understands that a “Body” will be returned. For now, we will select Body as the inputs to the SQL Stored Procedure as this will help us in our next step where we will fix this. Click Save to persist our changes.
- Submitting “Body” into our SQL Stored Procedure parameters will only generate runtime errors. We can fix this to use our specific CurrentDate and FutureDate values that are being returned from the Azure Function. But, in order to do this, we need to enter Code View in the Azure Portal. Once we have entered Code View we need to find the following snippet of code:
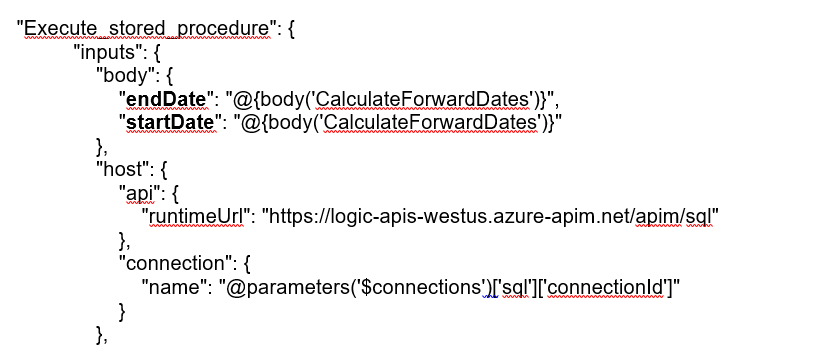
Notice that our endDate and startDate properties contain our “Body” that we previously discussed. We now need to add in the names of our CurrentDate and FutureDate properties so that we can retrieve those specific values from our Azure Function message. In order to do this, modify these two lines to be: 17

- Click the Save
- Enter the Designer mode and expand our Execute stored procedure Notice that we now see FutureDate as our ENDDATE and CurrentDate as our STARTDATE. Now we know that the proper values are being parsed from our Azure Function and being sent to SQL Server.
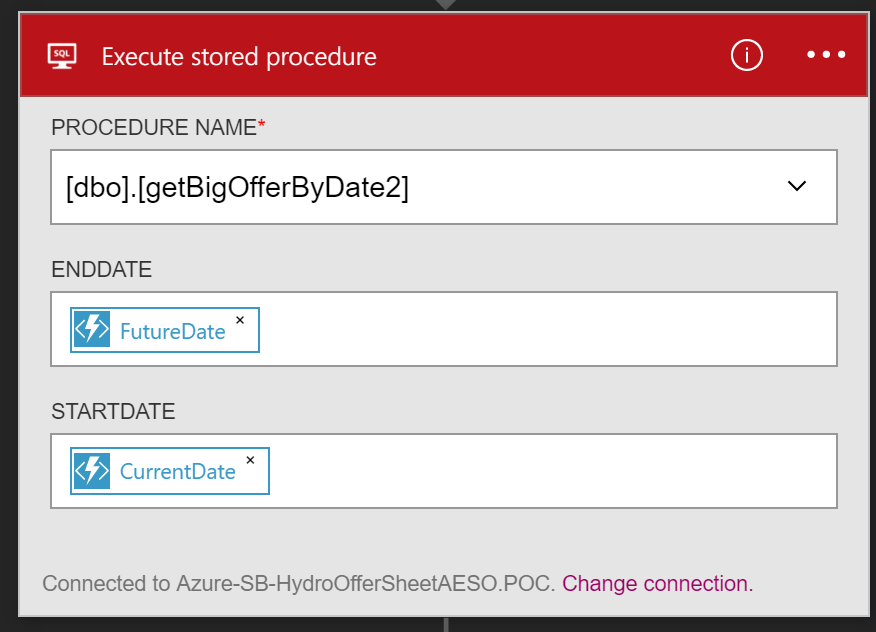
Why do I have to do this? The reason is that Logic Apps is not aware of the message shape that is being returned from Azure Functions. Usually, Logic Apps will have Swagger metadata that it can use to interrogate a message’s characteristics, but in the case of our Azure Function, there is no Swagger metadata.
- We are now ready to publish our results to a Microsoft OneDrive folder. We can do so by clicking on Add Step and then Add an Action. Next, we need to click on the drop down list arrow beside Show Microsoft managed APIs. We can then search for OneDrive and then select OneDrive for Business – Create File.
- Sign in with your Credentials
- With Credentials being authenticated and a connection established, we will now configure our Connector like the following.
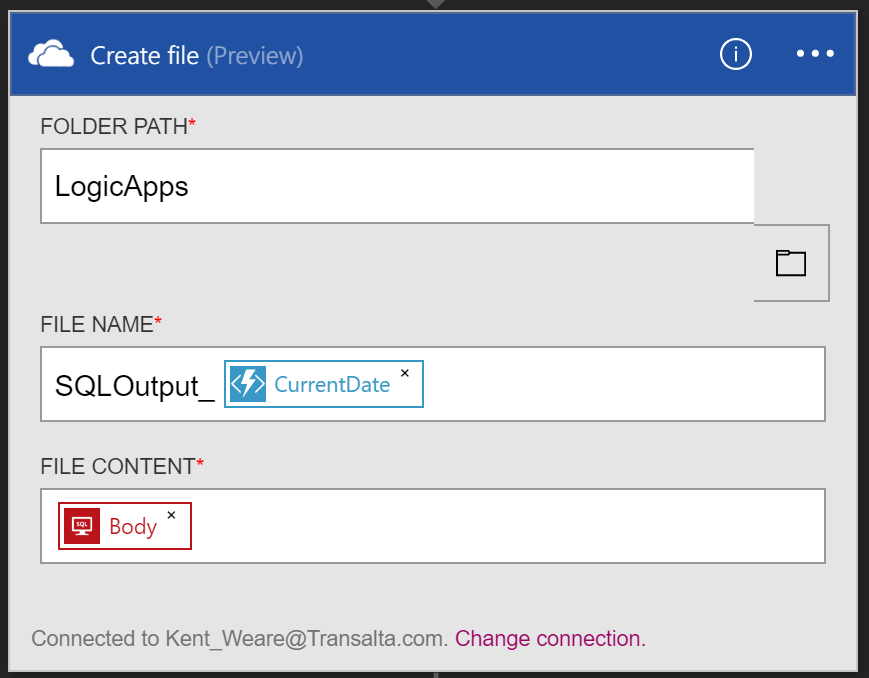
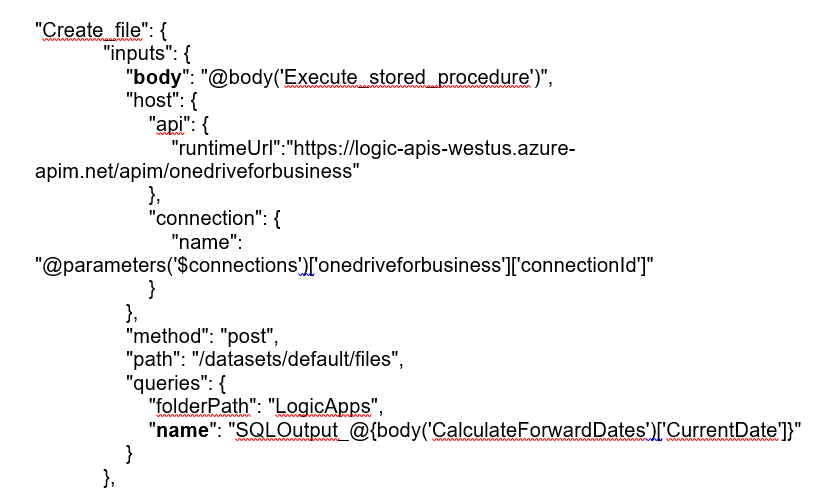
- Much like our step in our SQL Connector, using the metadata that has been exposed is not enough. We do need to go back into code view so that we can use the CurrentDate as part of the FILE NAME. We also want to use the entire message Body that was returned from our SQL Connector. To do this, enter Code view and then make the following changes to the body and name properties:
- With our Logic App configured, we can now Save and exit from the design surface and then click on the Run Trigger
- In order to validate that everything functioned as expected, we can verify the Run Details by clicking on the instance we just kicked off. We can then click on each shape to validate that our inputs and outputs meet our expectations. We also can see the duration of each step and any related metadata.
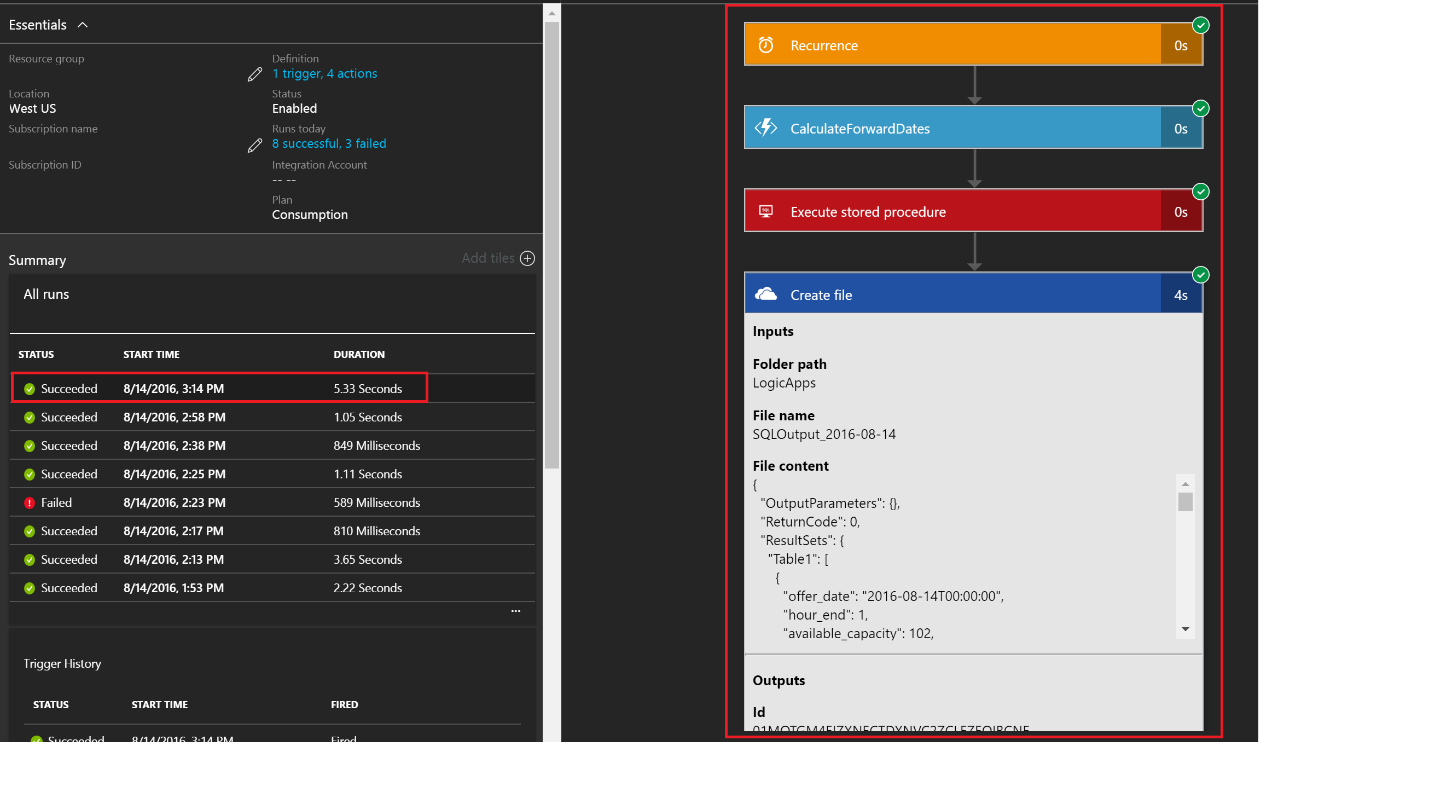
20. Our end result is we see a new file in our LogicApps folder within our OneDrive for Business

Conclusion
In this blog post we walked through creating a very simple Azure Function and a Logic App that used the outputs of the Azure Function. While our Azure Function was very simple in nature, on purpose, it does highlight Azure Function’s ability to be an extensibility point for Logic Apps. In our scenario, we included some custom logic to determine what dates should be passed to a stored procedure, but the opportunities to use Azure Functions and Azure Logic Apps are endless. We can also use Azure Functions to perform calculations, provide message enrichment or use it to clean-up unwanted serialization or formatting of data.
From a Logic Apps perspective, it is very easy to plug Azure Functions into existing workflows. While we did not cover it, developers can also create Azure Functions “inline” from the Logic Apps editor. This allows developers to create simple Azure Functions without accessing the broader Azure Function portal experience. This may be useful when a developer may not require access to the logs or testing facilities provided by the Azure Functions editor.
Lastly we took a quick look at the visual run details that Logic Apps is providing which allows developers to trace and debug their code to ensure everything is working properly. Azure Logic Apps provides this as an out-of-the-box experience, which means that developers do not need to write their own logging or tracing tools.

About the author
Kent is a senior enterprise architect at TransAlta, a multi-national power generation and energy trading company. His expertise includes BizTalk, logic apps, API management and service bus technologies. In addition to his enterprise architect responsibilities, he also writes for InfoQ.com on matters relating to cloud computing. Kent holds a master’s degree in Information Management from Arizona State University and a computer science degree from the University of Regina.